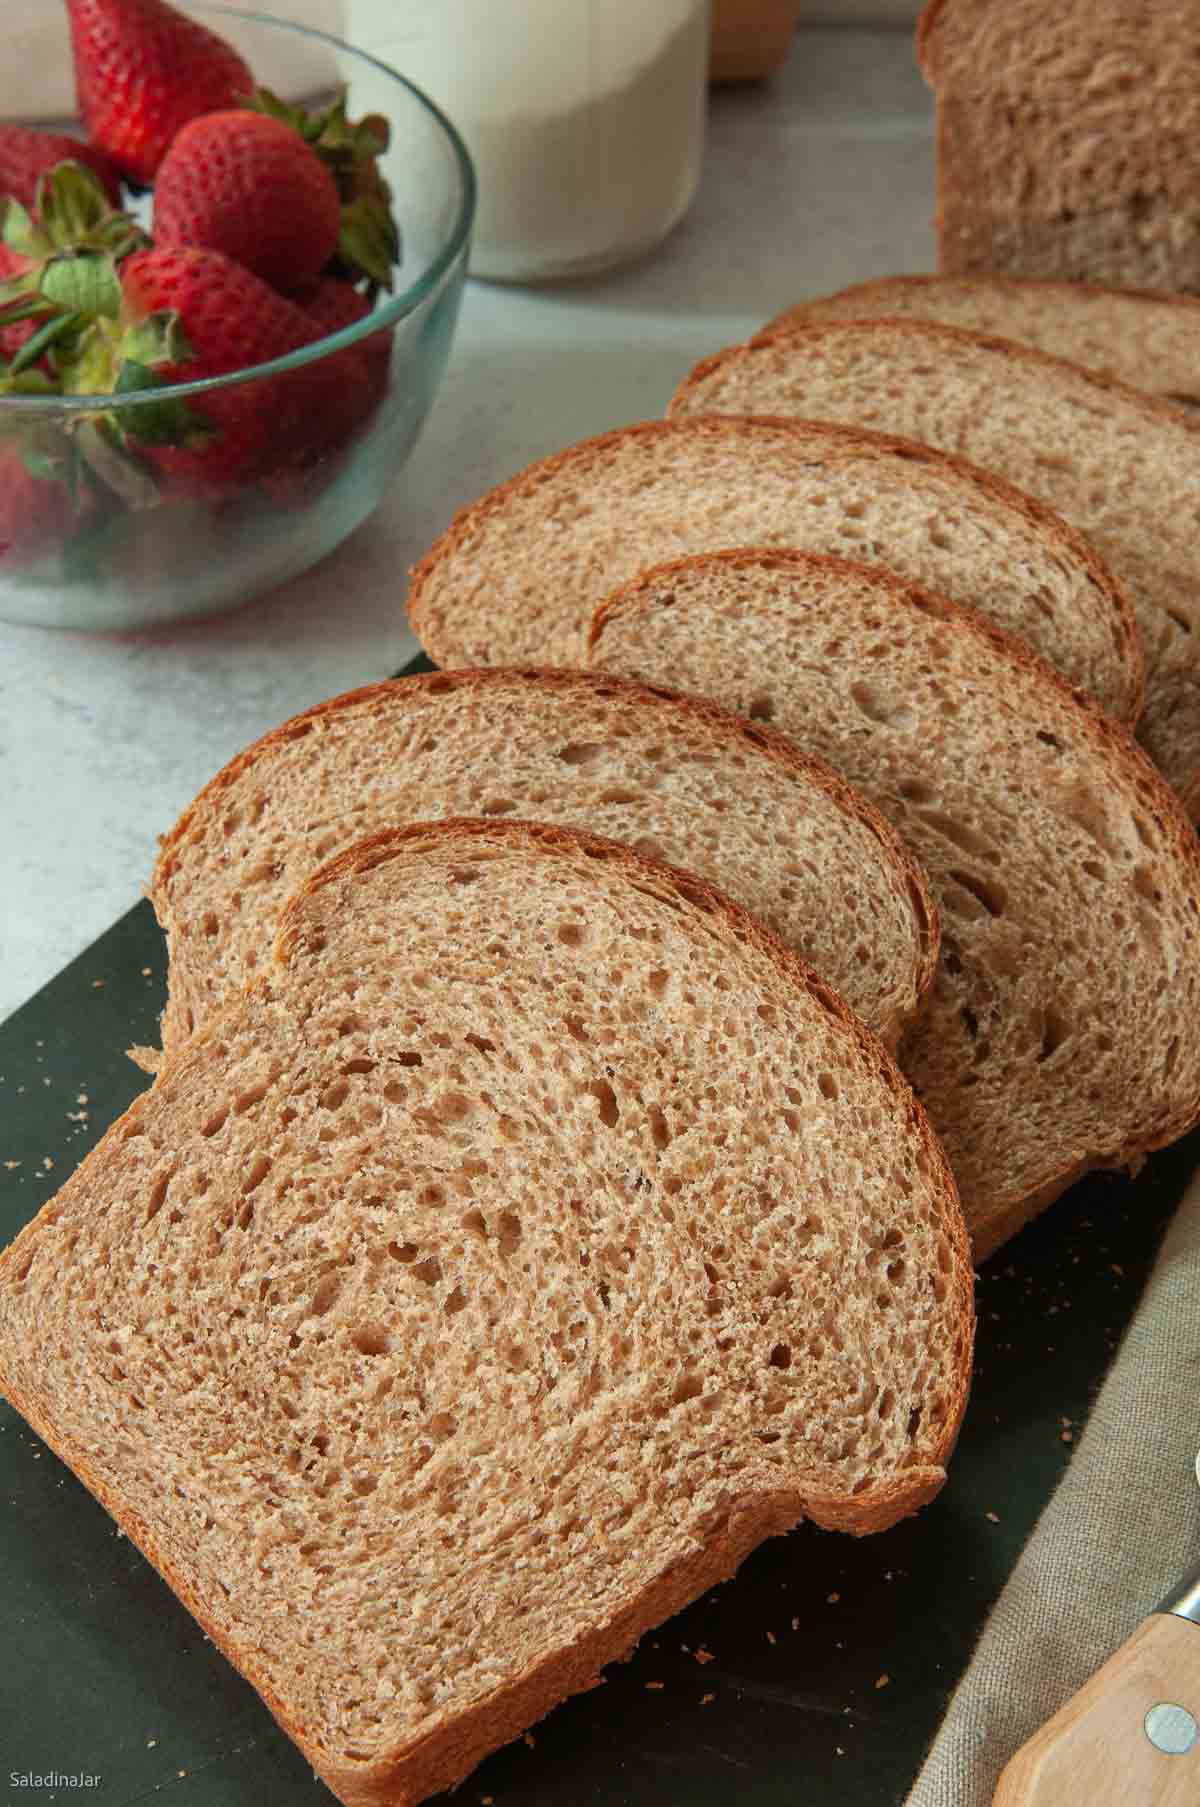
Outstanding Bread Machine Whole Wheat Bread with No White Flour
Sneak Preview: This 100% Bread Machine Whole Wheat Bread recipe contains no white flour. This recipe could be the solution if you want to incorporate more whole grains into your diet. As usual, there is an unexpected secret ingredient you don’t want to miss.
As an Amazon Associate, I earn from qualifying purchases.
Have you ever tried making bread machine wheat bread by substituting whole wheat flour for all the white flour in your favorite basic white bread recipe? How did it go? Most people report producing something like a brick or a doorstop.
I made my first 100% whole wheat loaf a few weeks ago. It wasn’t much better. It came out of the oven flat on top, not beautifully rounded as I had hoped. That was my first lesson–whole wheat flour without a supporting act of white flour is more fragile.
After many rounds of testing, I’m glad to publish a recipe I think you’ll be proud to share.
Four Reasons Why This Recipe Is Worth a Try
- The recipe has an unexpected ingredient–peanut butter. You can leave it out, but I think it adds a special something.
- I’ll show you how to use the DOUGH cycle of your bread machine to make this recipe. Ensure the moisture level is correct as the dough kneads to avoid surprises in the final bake.
- Honey is the natural sweetener in the recipe, but you can reduce it or leave it out. You can also reduce the salt, but please don’t leave it out.
- If you don’t have a bread machine, use a stand mixer or make it by hand. See the details in the recipe notes.
Happy Bakers Speak Up
I tried some recipes for “whole wheat bread using a bread machine” but wasn’t getting very far. Researching more, I came across your website, particularly the page Outstanding Bread Machine Whole Wheat Bread with No White Flour. I followed your instructions to a T (except for using a packet of yeast, 1 ounce more than the recipe). OH-MY-WORD!!! You nailed it! Perfect the very first time.–Marty
Quick Facts About Whole Wheat Flour
Whole wheat flour contains all three parts of the wheat berry:
- the bran
- the germ
- the endosperm
- All-purpose flour and bread flour are both ground endosperm (the inner white portion). Bread flour is made with hard wheat while AP flour is made with hard and soft wheat. Whole wheat flour contains all three parts of the wheat berry.
- The natural oils in the germ are what cause your wheat flour to go rancid quickly. Store it in the refrigerator or freezer.
- Hard wheat contains more protein and more gluten. Bread flour has the most protein and will rise higher than all-purpose flour or whole wheat flour.
- Although some people have trouble digesting the gluten in whole wheat flour, it has many health benefits, too.
“That means it contains more nutrients, fiber, and natural oils.”
The Bread Machine Magic Book of Helpful HInts by Linda Rehberg & Lois Conway
What Is Different About Baking with WholeWheat Flour as Compared to Baking White Bread?
Whole wheat flour contains less gluten than bread flour.
Think of wheat bread as a bundle of tiny balloons. The balloon skin is developed gluten. Each balloon holds carbon dioxide belched out by hungry yeasty bodies. If the balloons pop, the air escapes.
Since there is less gluten in whole wheat flour, the skin of the “balloons” isn’t as strong as white flour’s. If these fragile balloons are allowed to get too big, they will pop. When they pop, the bread falls, and another brick is born.
Note: I hope it doesn’t happen, but don’t throw it out if you end up with a dense loaf or brick. Instead, make this Bread Crumb Pudding. Nobody will know about your mistake after you turn it into crumbs with a ton of flavor.
Ingredients and Substitutions
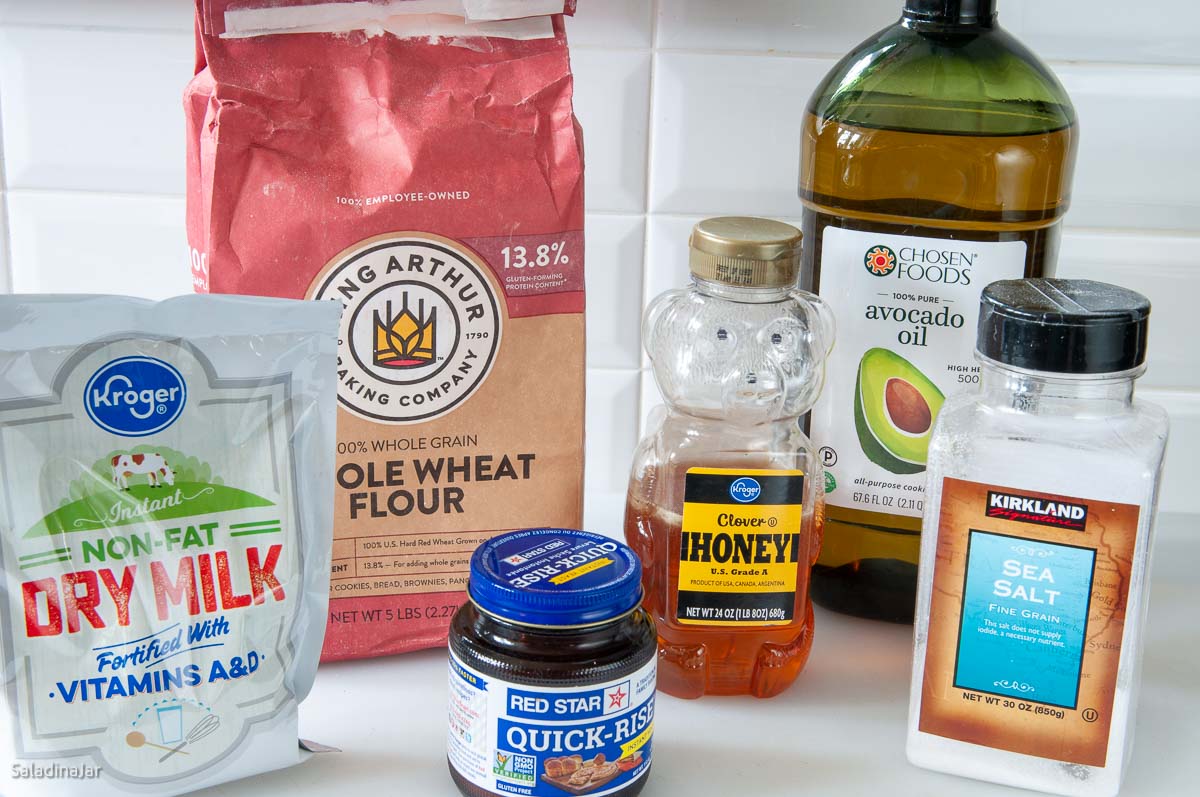
- Water: Tap water is good enough unless you have very hard water or high chlorine levels.
- Salt: I tested the recipe with sea salt. Table salt works fine, too. If you want to use Kosher salt, add ¼ teaspoon more.
- Oil: Avocado, coconut, canola, or vegetable oil are my choices, in that order.
- Honey: Substitute brown sugar if you like, but reduce the amount of liquid. Start by holding out a couple of tablespoons of water. If the dough seems dry after being kneaded for a while, add the water back a tablespoon until the dough sticks to the sides of the bread machine pan, then pulls away cleanly.
- Sunflower seed butter or creamy peanut butter: (Optional) This is the secret ingredient. While staring at my pantry one day, I wondered what some peanut butter would do for my whole wheat loaf.
- It turns out that it makes a wonderful-tasting and slightly softer loaf. I tried both peanut butter and sunflower seed butter. Even though the sunflower seed butter is more expensive, I like the milder flavor. It’s virtually undetectable.
- If you are using peanut butter, I think you can smell it if you think about it. My husband couldn’t smell or taste it, but he still loved the bread.
- If you don’t want to use either of these ingredients, leave them out and add a tablespoon of avocado or vegetable oil to take its place.
- Nonfat dry milk or powdered milk: I have only tried nonfat dry milk because it’s available in my area. I assume powdered whole milk would work, too.
- Whole wheat flour: Many readers ask me about my favorite brand of flour. The answer is whatever you can get your hands on during hard times. I’ve tried this recipe with King Arthur flour, Target’s and Kroger’s store brands. They all make good bread. White whole wheat flour is another option.
- Vital wheat gluten: (Not pictured above) This is another optional ingredient. I did most of my testing without it because many people don’t have it on hand. However, it does add gluten to the bread and helps the dough rise more. My husband prefers lighter and softer bread, so I always include it now. Use it or not. You’re the boss.
- Yeast: If you make this recipe with a bread machine, use instant yeast (aka bread machine yeast). Active dry yeast will work if that’s all you have. See the notes at the end of the recipe.
A Note About the Way I Use a Bread Machine
In case this is your first time using one of my bread machine recipes, note that I only use the DOUGH cycle of my bread machine. When the DOUGH cycle completes, I pull the dough out of the pan, shape it on the counter, let it rise one final time, and then bake the loaf in my conventional oven. This is the easiest way to produce a fabulous loaf that will inspire you to share the fruits of your labor with family and friends.
If you don’t have a conventional oven available, you can try making this homemade bread from beginning to end with the whole wheat cycle of your bread machine. However, the recipe has not been tested for this method. Because of variables like humidity, room temperature, different brands of ingredients, and other factors, your chances of ending up with a beautiful loaf are much lower than when using the DOUGH cycle and baking in your conventional oven.
How To Make a 100% Whole Wheat Bread Machine Recipe
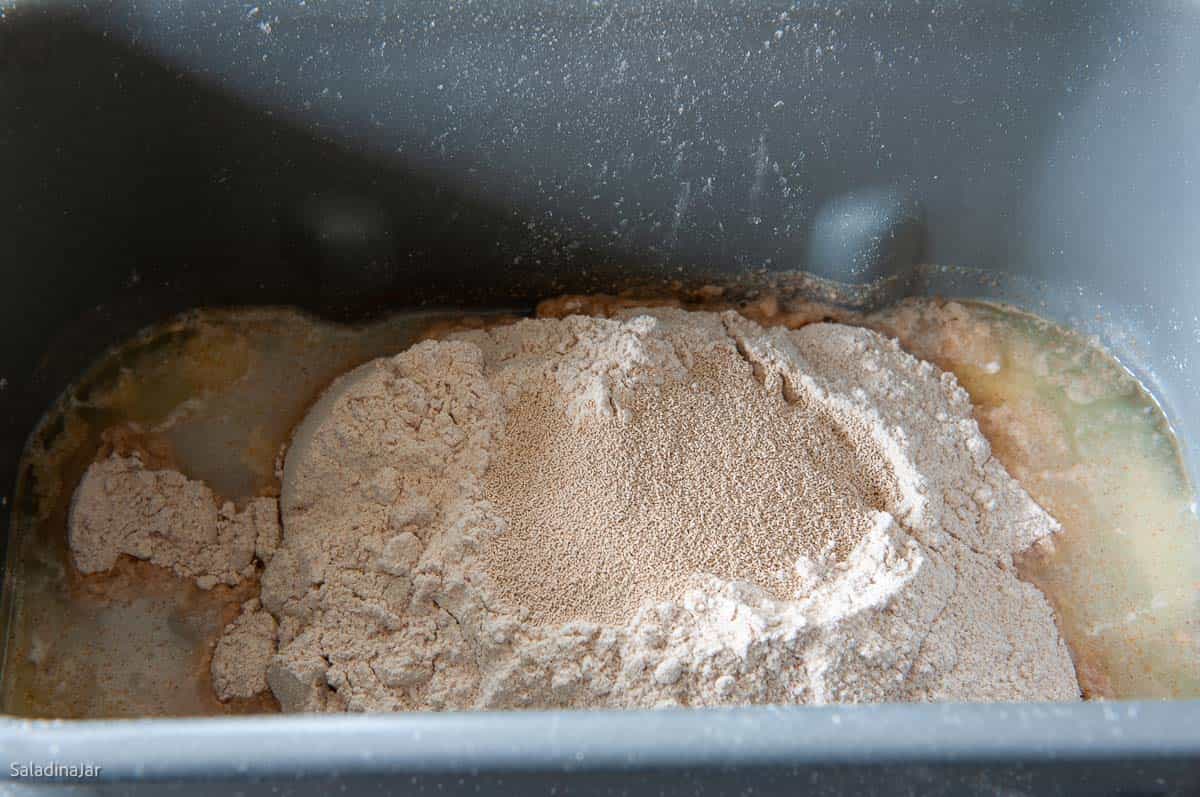
After one minute, STOP the machine. Use a small plastic spatula to ensure all the ingredients are mixed, and no dry flour is seen. Let this flour mixture sit for 30 minutes inside the bread maker before restarting the DOUGH cycle.
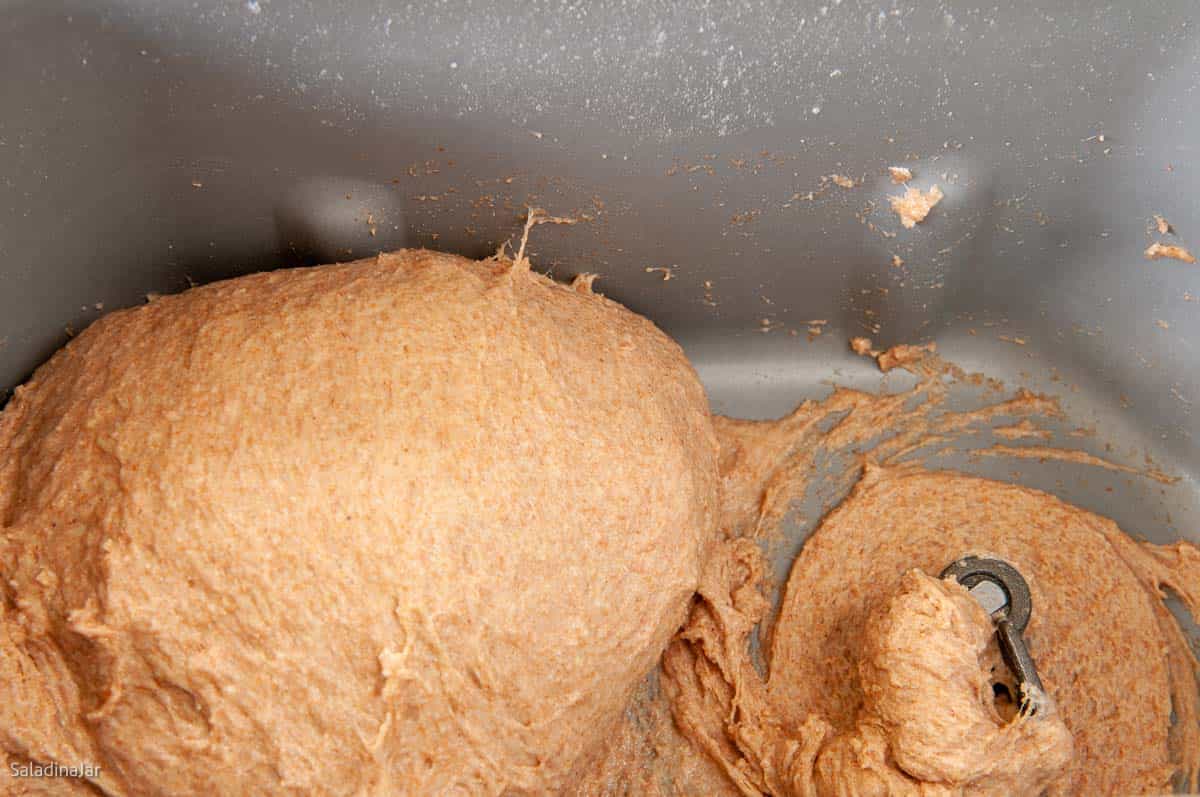
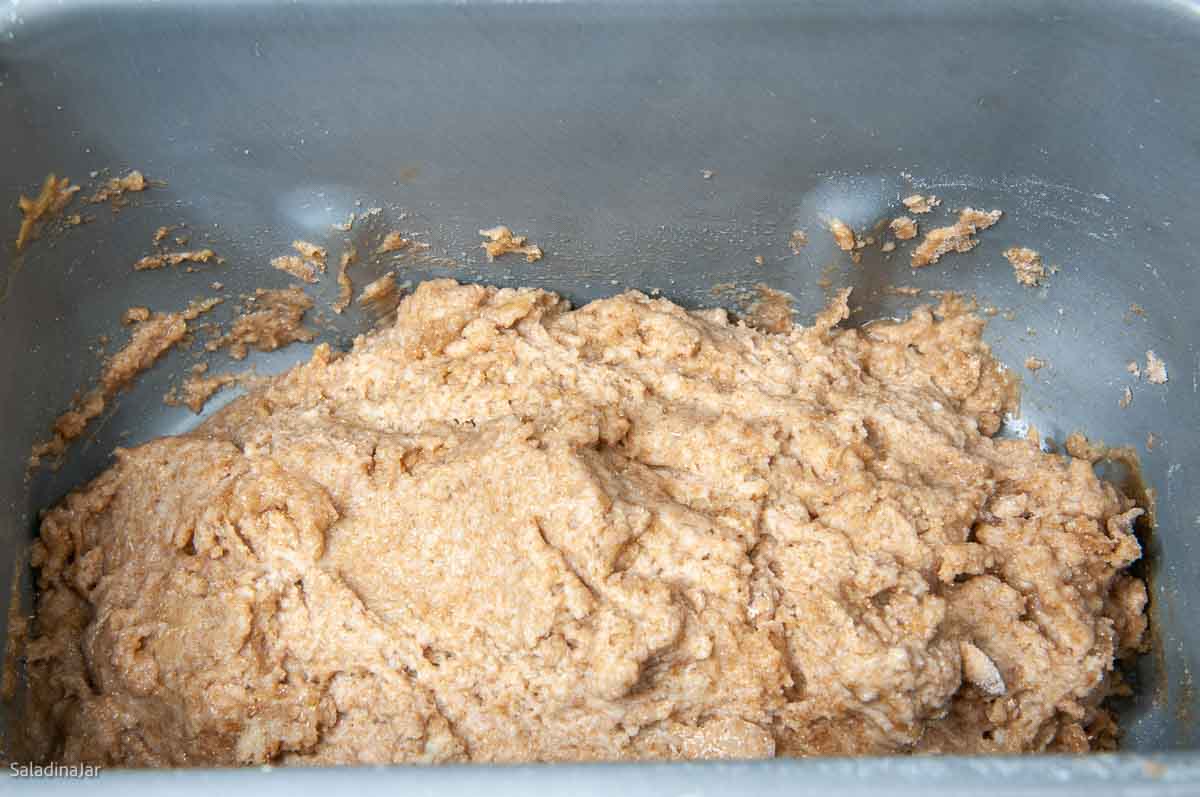
Although the dough may look too wet, don’t add flour yet. Give the machine more time to develop the gluten.
About 8 minutes before the kneading phase ends, you can see the dough is a perfect consistency–sticks to the side and pulls away cleanly. I did not need to add water or flour.

Don’t use flour because it can lead to tunnels in the finished loaf. If your hands stick to the dough, spray them with water, too. A bench scraper sprayed with water is helpful.
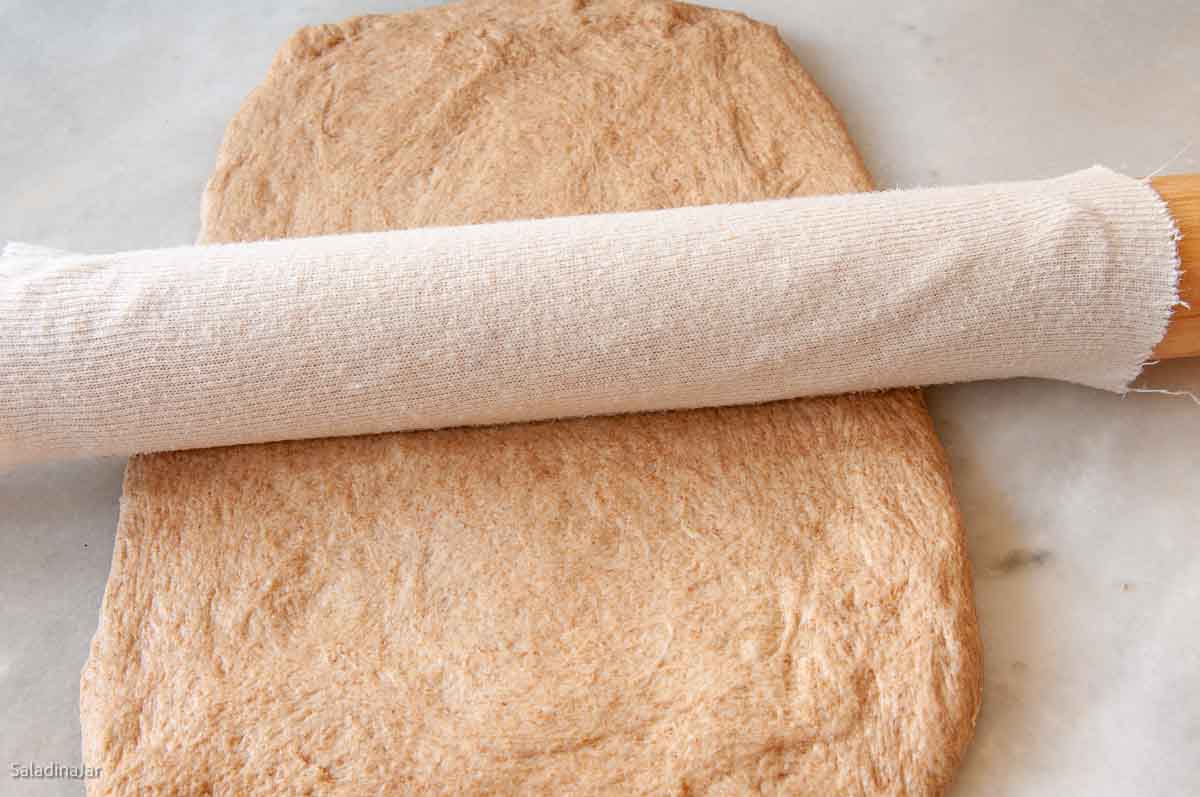
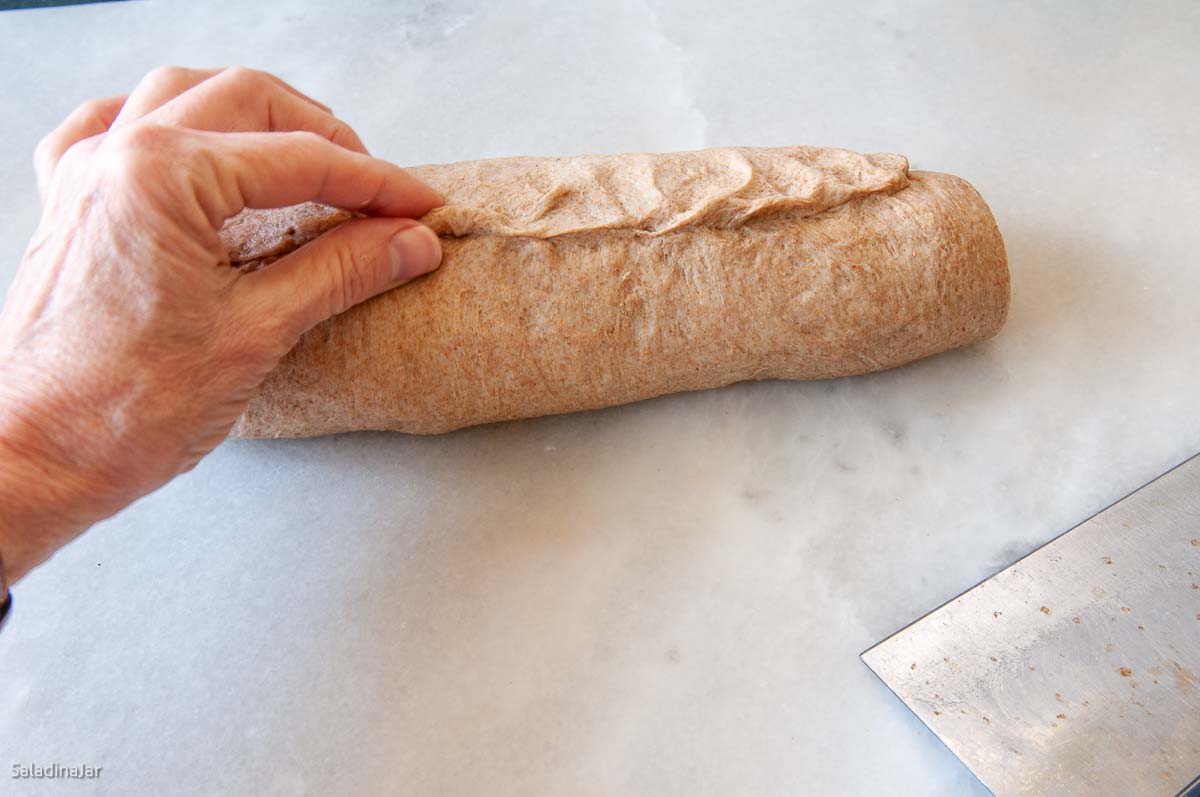
I like to use a rolling pin to be sure I compress the bubbles around the edges.
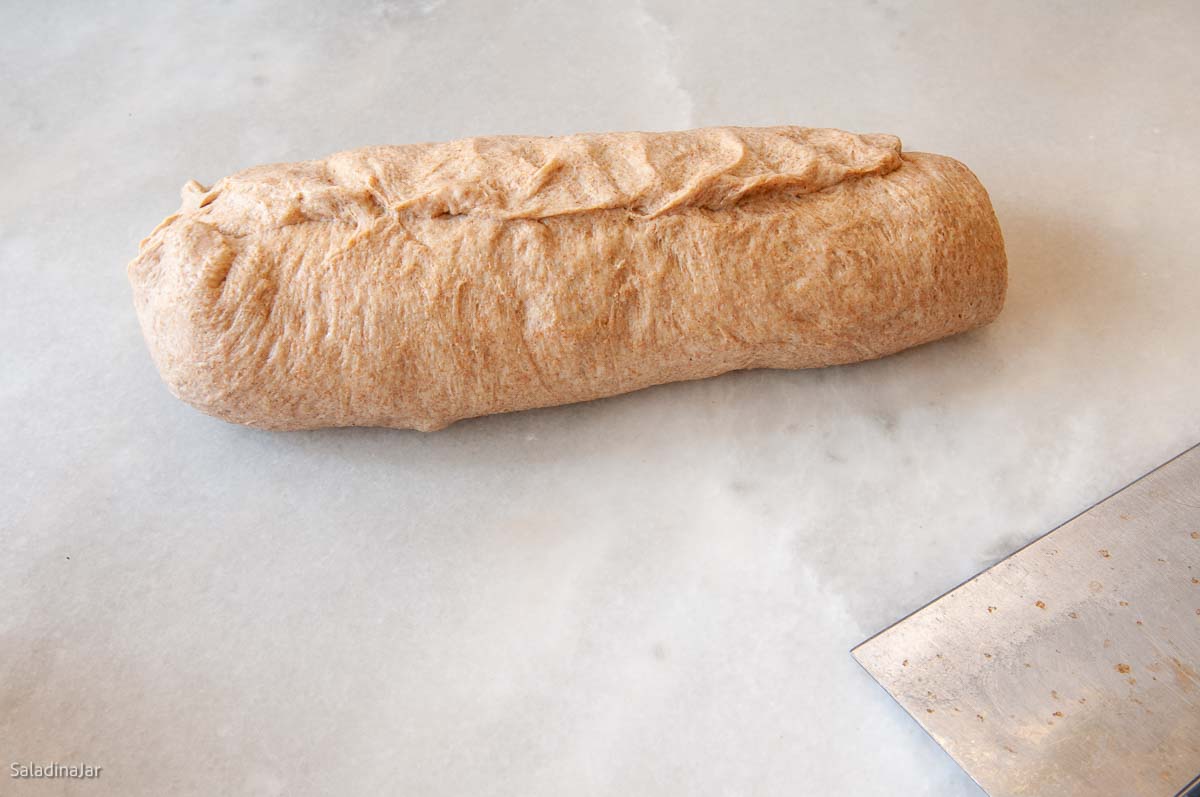
Roll up the dough, starting with the short end closest to you. Avoid stretching or trapping any air between the layers as you roll.
If you want inspiration and exclusive tips, add your email and press the button. (Don't worry. I won't sell your email.)
This dough tends to stick to all but my favorite USA pans (paid link).

Bake at 350˚F (180˚C) for 35 minutes or until the internal temperature reaches 190˚F (88˚C). Check with a quick-read digital thermometer (paid link).
FAQs About This Whole Wheat Recipe
I know of no commercial substitute. You can always leave it out. Your loaf will still be tasty, just not as high. Please note that if you leave it out of my recipe, you should substitute the same amount of whole wheat flour in its place. Read the recipe carefully.
Your loaf was probably over-proofed. In other words, it rose too much during the final rise. When the loaf hit the oven’s heat, it ran out of energy and collapsed. 100% whole wheat is vulnerable to falling because it doesn’t have as much gluten to build a strong scaffold.
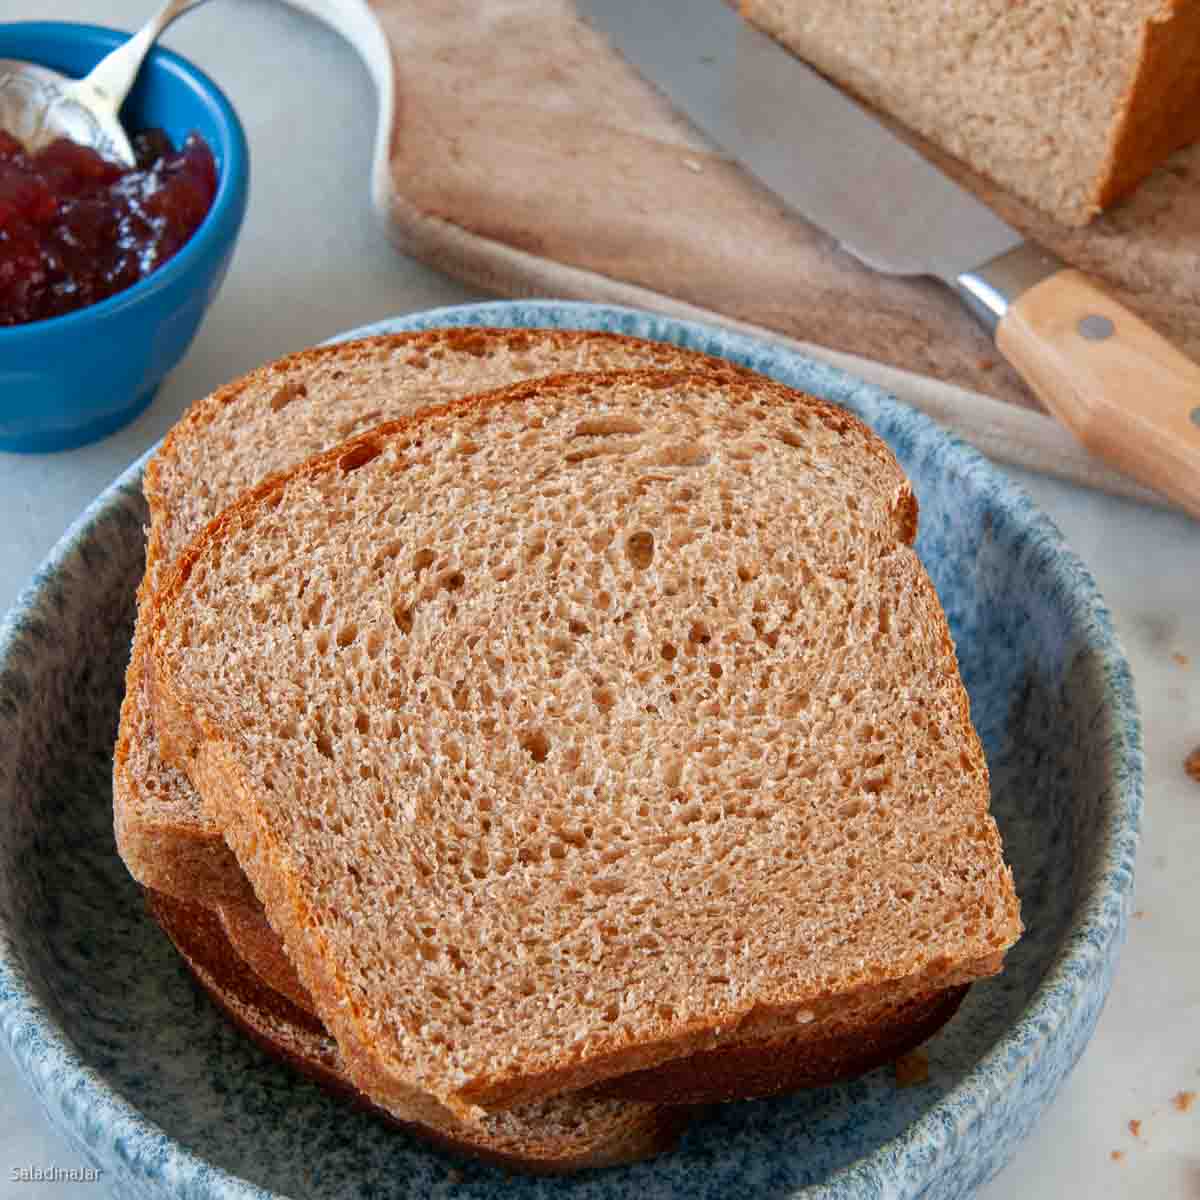
Rolling out the dough will give your bread a structure and uniform crumb pattern. Not only will your loaf be prettier, but the crumb will hold together better since it has been organized. Have you ever tried to eat a sandwich made with crumbly bread?
Less fat will leave you with a dry loaf. You could cut back on the honey if you like. (I tried it and missed it.) Regarding the salt, you can experiment with cutting back a bit, but don’t cut it out. The yeast needs it.
Double-wrap and freeze whatever you can’t eat in 2-3 days. Since this recipe has no preservatives, it will only stay fresh on the counter for a short time, especially if your kitchen is warm. It’s best not to store bread in the refrigerator because humidity encourages mold.
Too much flour or oil on your work surface and hands when shaping the dough can cause tunnels. When perfecting my bread machine sourdough recipe, I learned to spray my hands and work surface with water (but not too much) to prevent sticking. Works great with whole wheat dough, too. A bench scraper is helpful for sticky dough.
Other causes include not pushing all the bubbles out of the dough after the first rise and not letting the dough rise long enough before you bake the bread. (Be careful about the rising tip. Over-proofing will cause your dough to collapse in the oven because whole wheat flour is not as strong as white bread flour.)
Whole wheat flour takes longer to absorb liquid. If you don’t give it time, you will be tempted to add too much flour when it seems impossibly sticky. Too much flour produces doorstops.
Another reason is that the bran in whole wheat flour has microscopic sharp edges that can slice through the gluten and weaken the network. Water helps to soften those edges.
The easiest solution is to use a parchment paper sling, as pictured earlier in this post. Otherwise, a non-stick pan sprayed with something like Baker’s Secret (an aerosol mixture of flour and oil) often works. I recommend the shiny and heavy USA loaf pans (paid link). (Don’t wash your non-stick pans in a dishwasher, and use a plastic knife (to avoid damage to the pan) to loosen the sides of the loaf before turning it out.

Parting thoughts: If you want to make a loaf with whole wheat flour and white flour that is light and fluffy, my Honey Whole Wheat Loaf might be more your style. Here is a recipe for Whole Wheat Dinner Rolls if that’s what you need. This recipe for Sprouted Wheat Bread Machine Recipe with Honey and Seeds is especially flavorful, and you can use your whole wheat flour as a substitute for sprouted wheat flour.
Recipe Help at Your Fingertips: For questions or suggestions, email Paula at saladinajar.com. If you need help, I’m happy to troubleshoot via email (faster than leaving a comment). Attach pictures and as many details as possible for the best advice.
100% Bread Machine Whole Wheat Bread Recipe
Rate this recipe
(5 stars if you loved it)
Video
Ingredients
- 1¼ cups (284 g) water
- 1¼ teaspoon salt
- 2 tablespoons (23 g) avocado, canola, or coconut oil add one more tablespoon if not using peanut butter or sunflower seed butter
- 1 tablespoon creamy peanut butter or sunflower seed butter (optional)
- 3 tablespoons (63 g) honey
- 3 tablespoons nonfat dry milk
- 2 tablespoons vital wheat gluten (optional)
- 2⅞ cups (345 g) whole wheat flour (if not using vital wheat gluten, add two additional tablespoons of whole wheat flour for 360 gr total)
- 2 teaspoons instant yeast
Instructions
Mixing the dough:
- Add all ingredients: 1¼ cups (284 g) water, 1¼ teaspoon salt, 2 tablespoons (23 g) avocado, canola, or coconut oil, 1 tablespoon creamy peanut butter or sunflower seed butter, 3 tablespoons (63 g) honey , 3 tablespoons nonfat dry milk, 2 tablespoons vital wheat gluten, 2⅞ cups (345 g) whole wheat flour, and 2 teaspoons instant yeast to the bread machine pan in the order listed.
- Select the DOUGH cycle, then START. Let the machine run for about 1 minute, then press the DOUGH button again to stop the action. All the ingredients should be wet. Use a small spatula to clean flour from the sides of the pan and mix it into the dough so no ingredients are dry.
- (All bread machines are different. With a Zojirushi, set the timer for 2:00. Then press START. The DOUGH cycle will automatically start in 30 minutes. With other machines, you may have to unplug the machine or restart the DOUGH cycle. If all else fails, let the dough sit in the machine and come back to manually restart it on the DOUGH cycle after 30 minutes.) The purpose of this rest is to let the whole wheat flour soak in the water to kickstart the gluten development and soften the flour.
- After the DOUGH cycle starts, check the dough at least twice by lifting the lid to take a peek. Do this at the beginning to see if the paddles are correctly engaged and the dough is starting to clump or form a ball.Recheck the consistency of the dough again 15-17 minutes into the DOUGH cycle.If your dough is too wet, add flour one tablespoon at a time. The dough should stick to the side, then pull away cleanly. See the pictures above. Adding flour too hastily will result in dry bread.Conversely, if the dough is too dry (it should be tacky to the touch), add one tablespoon of liquid at a time until the dough looks just right. Find out more about this surprising secret to success with a bread machine here.
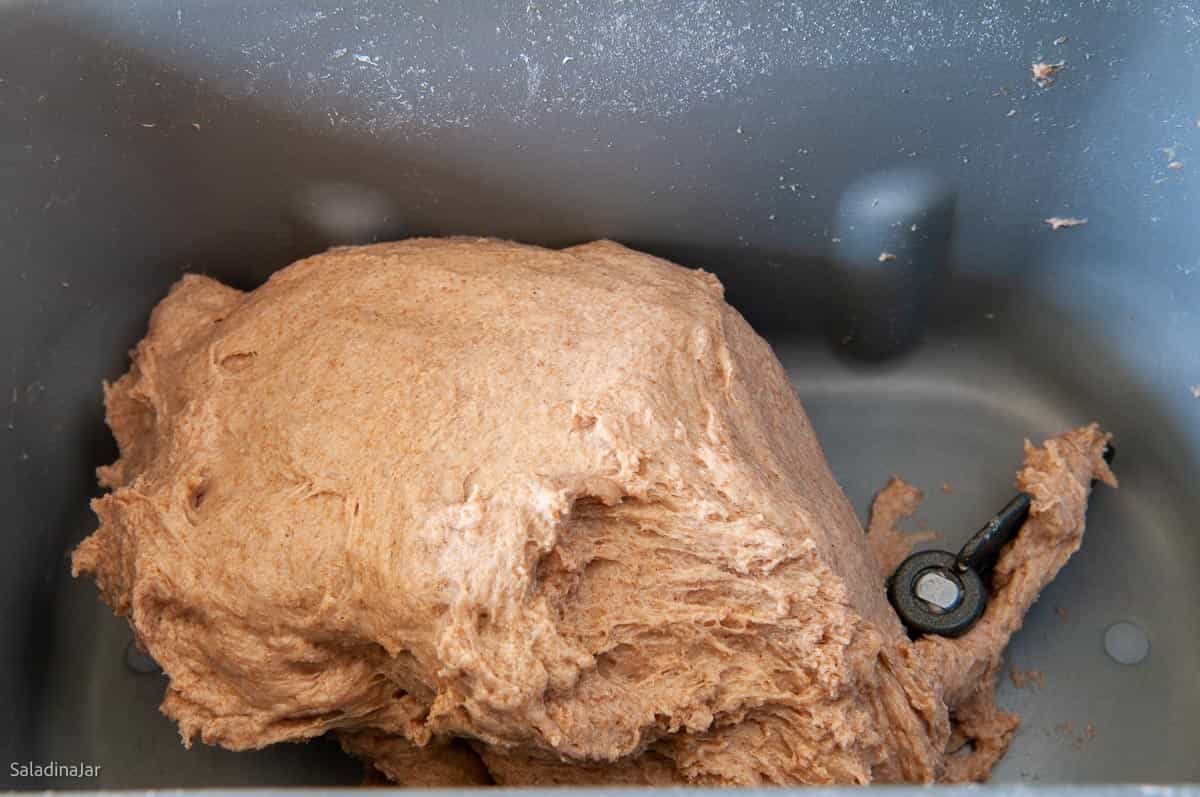
- When the rest period and the DOUGH cycle are finished, the dough should be doubled in size. If not, leave the dough in the bread machine until it is double the original size at the end of the kneading phase.
Shaping:
- Spray your counter or silicone mat with a small amount of water. Remove the dough onto your damp surface. Also, spray your hands with water as opposed to using flour to keep the dough from sticking. (Using flour or oil can cause tunnels inside of the finished whole wheat bread.)
- Using damp hands, press the dough into a rectangle shape. A bench knife helps to keep your hands out of the sticky dough. Use a cloth-covered rolling pin, if you have one, to roll over the top of the dough to make the rectangle a uniform thickness. Press out any large bubbles on the sides of the dough with your fingers or the rolling pin.
- Starting from the short end closest to you, begin to roll the dough to make a cylinder. Use a damp bench knife to scoot under the dough as you roll it to keep it from sticking. Avoid stretching the dough but make sure you aren’t rolling big air pockets into the cylinder as you go. Pinch the seams together horizontally across the cylinder of dough. Turn the ends toward the seam and pinch them together, also.
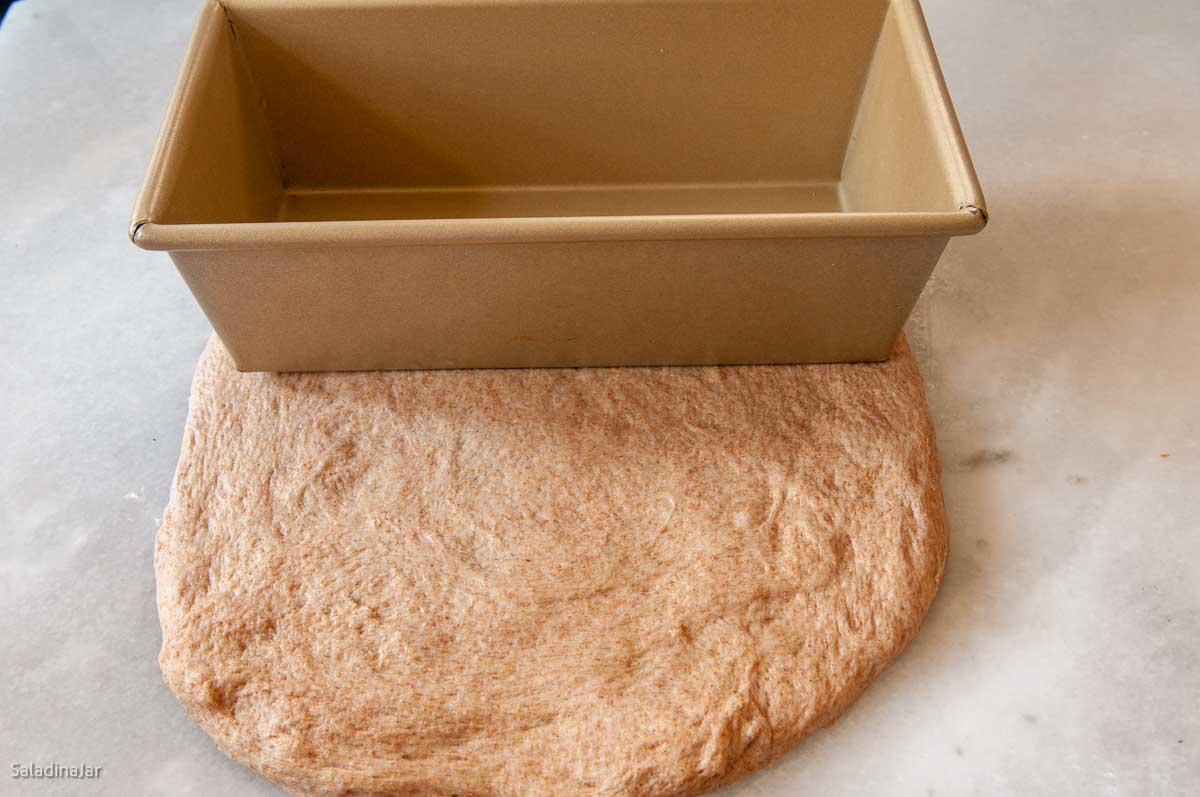
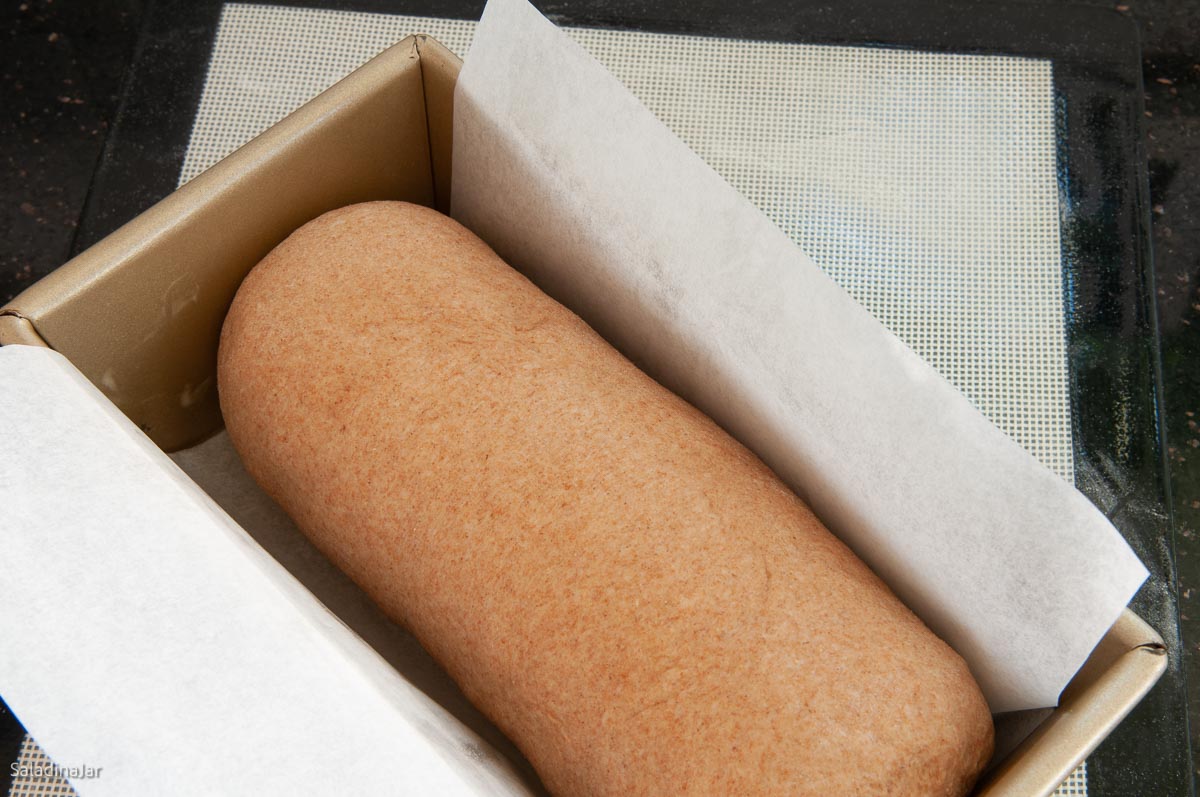
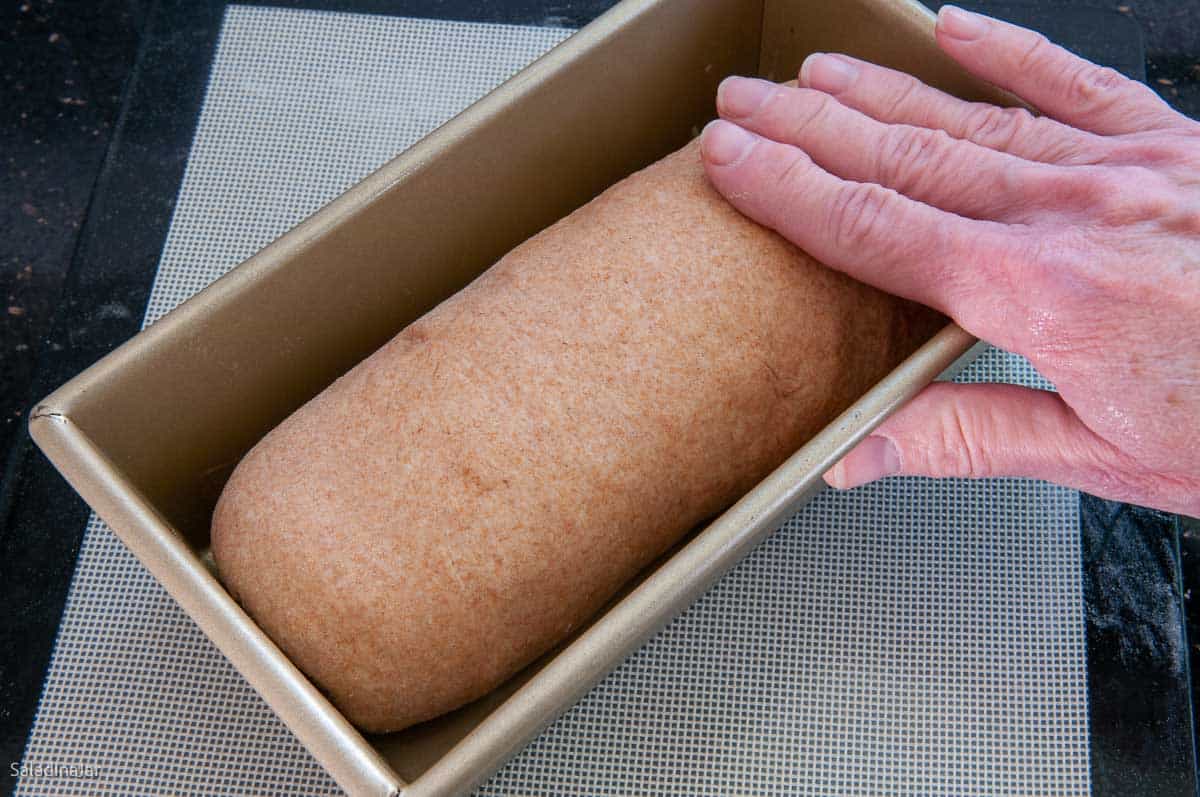
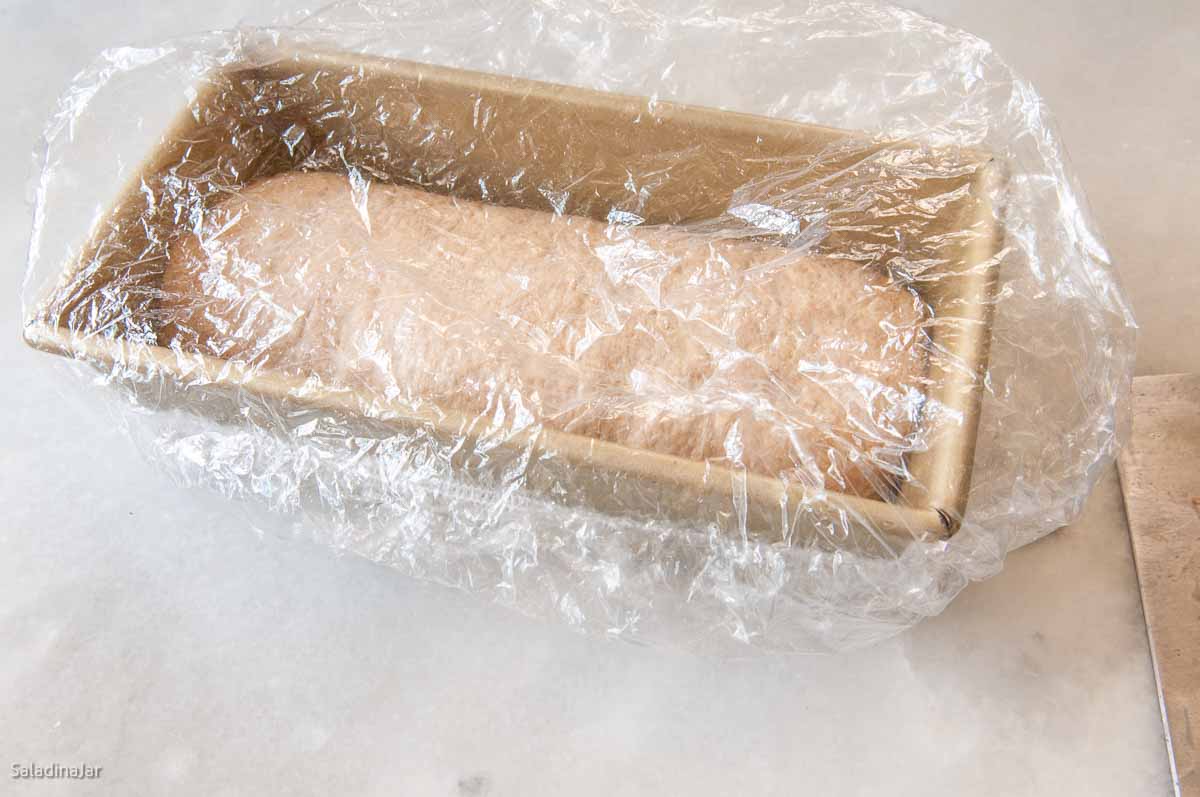
- Use a damp bench knife and damp fingers to pick up the dough cylinder and place it seam-side down into a greased or parchment paper-lined 4½ x 8½-inch loaf pan or a 9x4x4-inch Pullman pan. Try to press the dough into a uniform shape inside the pan so the ends of the loaf don’t dry out before the middle is done. Cover with a damp tea towel or a cheap shower cap and place in a warm (but not too warm) place to rise a final time.
- Preheat oven to 350˚F (180˚C).
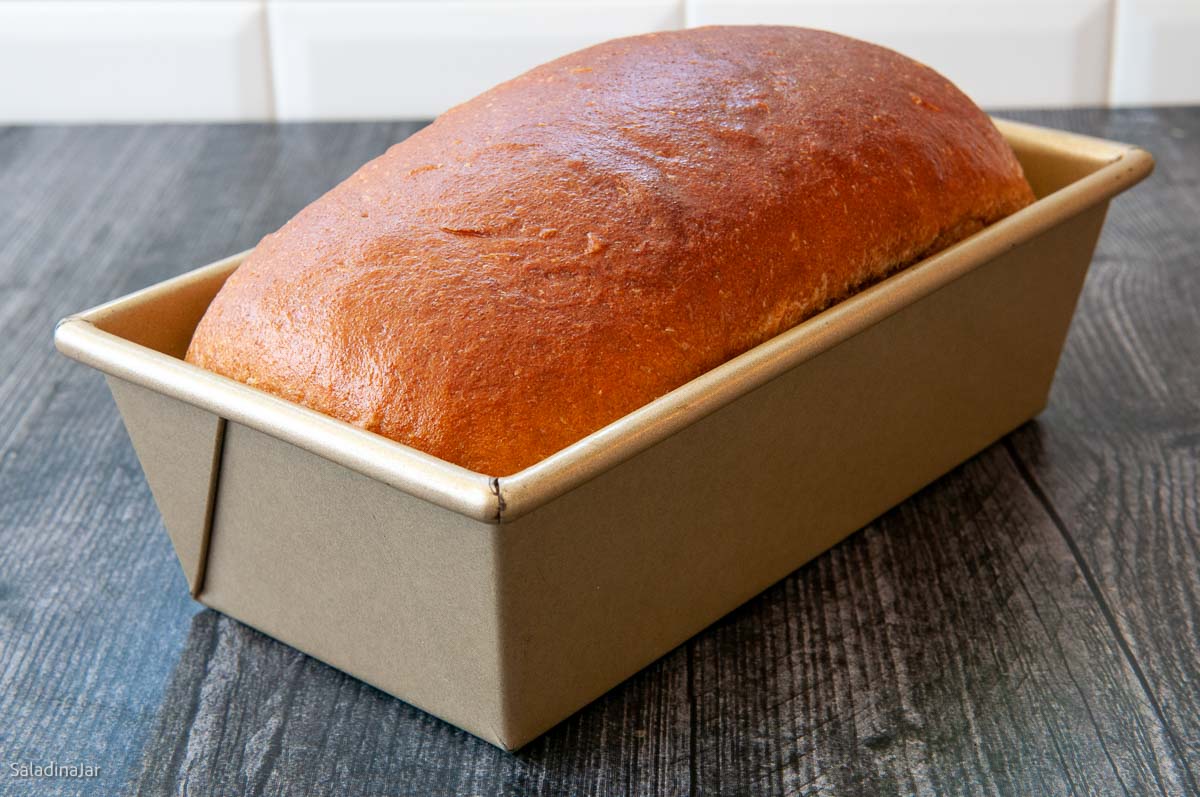
- When the loaf has risen approximately 1-inch above the top edge of the 8½ x 4½-inch pan or approaches the top of the Pullman pan, place it onto the center rack of your hot oven for 35 minutes or until the internal temperature reads 195˚ to 200˚F. (90-92˚C).
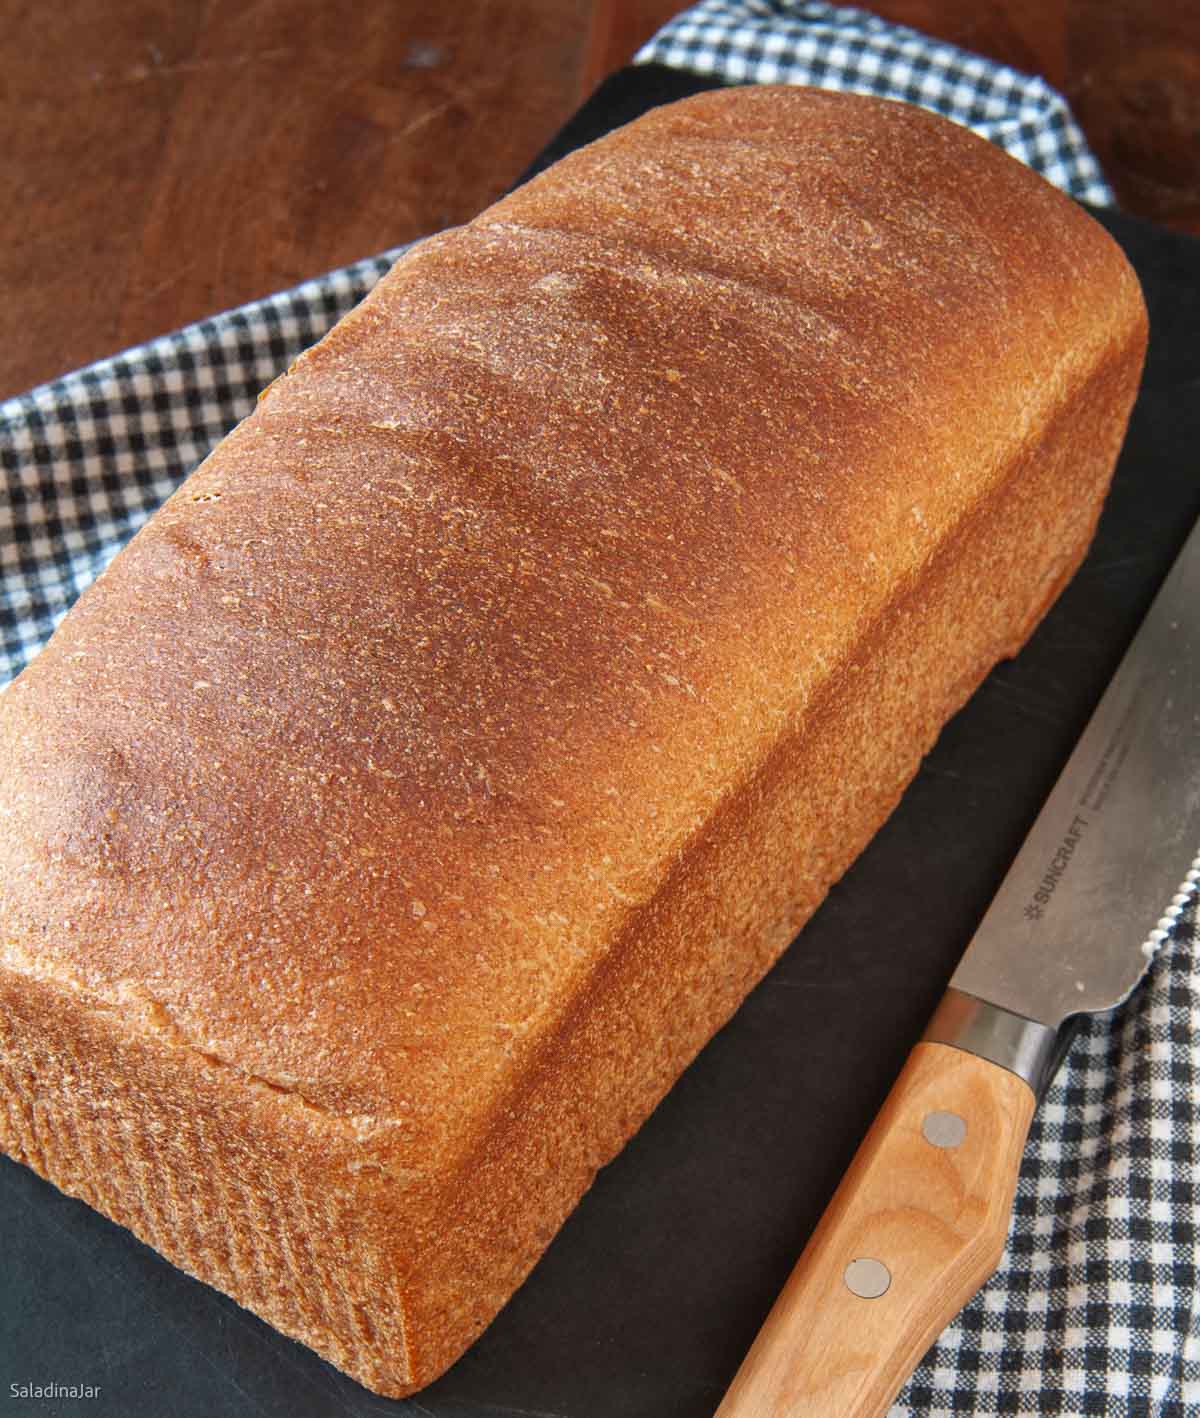
- Allow the loaf to sit in the pan for 5 minutes, then remove it to a cooling rack for at least 30 minutes before slicing. Swipe a little soft butter over the crust to lend an appetizing shine.
Notes
- To make this recipe in a heavy-duty stand mixer: Add ingredients to the bowl in the same order. Turn on LOW to mix until all ingredients are moistened. Then, using a dough hook, turn the speed to 2 or 3. Continue beating/kneading until dough becomes smooth and elastic (about 5-10 minutes). Cover and allow to rise in a warm place. Deflate dough gently and shape as indicated in the recipe.
- If making by hand: Combine all ingredients into a shaggy ball in a large bowl. Turn dough out onto a floured surface. Knead with your hands until the dough becomes smooth and elastic. Kneading will likely take 10-20 minutes, depending on your experience. Place the dough ball into a greased bowl. Cover and allow to rise until double. Deflate the dough gently and shape as indicated in the recipe.
- Please note: If you only have active dry yeast, use 1/4 teaspoon more than called for in the recipe. It no longer needs to be dissolved first, but you can if you prefer.
Equipment
Nutrition
All images and text ©️ Paula Rhodes for Salad in a Jar.com
Paula Rhodes, owner
As a retired home economist, I created Saladinajar.com to share my belief that you don’t have to be a chef to find joy in creating homemade food worth sharing. Bread machines (used in an unconventional way), homemade yogurt, and quick microwave recipes are my specialty.