Angel Food Birthday Cake Recipe with Chocolate Ganache
No decorating talent is required to make this showy angel food cake for your next birthday party. The whole flavor experience reminds me of a dipped cone from the DQ.
16
slices
Ingredients
Cake:
- 1½ cup (170 g) confectioners sugar
- 1 cup (120 g) cake flour
- 1½ cup (365 g) egg whites
- 1½ teaspoon (1½ teaspoon) cream of tartar
- ¼ teaspoon (¼ teaspoon) salt
- ¼ teaspoon (¼ teaspoon) almond extract
- 1½ teaspoon (1½ teaspoon) vanilla extract
- 1 cup (200 g) granulated sugar
- 2 tablespoons (2 tablespoons) powdered cocoa (dutch-process) - (sifted)
Chocolate Ganache:
- ⅔ cup (151 g) heavy whipping cream
- 4 oz. (113 g) semi-sweet chocolate bar
Whipped Cream Icing:
- 1-1/2 cup (340 g) heavy whipping cream (chilled) -
- ⅓ cup (76 g) confectioners sugar
- 1 teaspoon (1 teaspoon) vanilla extract
Instructions
Preheat oven to 325 °F (165˚C).
Cake:
- Whisk 1½ cup confectioners sugar and 1 cup cake flour in a medium bowl. Set aside.
- Use a stand mixer with a large mixing bowl and the wire whip attachment for the following mixture. Add 1½ cup egg whites, 1½ teaspoon cream of tartar, ¼ teaspoon salt, ¼ teaspoon almond extract, and 1½ teaspoon vanilla extract to the bowl and mix on LOW for one minute.
- Turn the mixer up to HIGH speed and add 1 cup granulated sugar in 1 tablespoon increments from the side. Allow 15 seconds between each tablespoon. (I count it off.) Mix until the egg whites are thick and billowy and the peaks stand up without falling over.
- Remove the mixer bowl containing the whipped egg whites from the mixer and do this next step by hand. Use a large rubber spatula or spoon to delicately and carefully fold the flour and sugar mixture into the whipped egg whites. Add about ½ cup of the flour mixture at a time. Use the spatula to slice perpendicular to the whites down to the bottom of the bowl and turn the spatula slightly to pull up the batter from the bottom and lay it over the top.
- Turn the bowl 1/4 turn and repeat the slice-and-fold process until the flour and egg whites are just mixed. Do this with patience and a light hand. Practice helps. If you overdo the mixing, your cake won't be as high as your hopes.
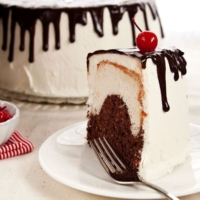
- Pour slightly more than half of the cake batter into a 10-inch ungreased tube pan with a removable bottom. Use a thin knife to gently "slice" through the batter to remove any large air bubbles. Use a spoon to draw a trough around the middle. (See the picture above.)
- Carefully fold 2 tablespoons powdered cocoa (dutch-process) into the remaining batter until completely mixed. (Do not skip the sifting, or you will have little chunks of cocoa in your batter.) Fill the trough with the chocolate batter and then smooth over the top.
- Bake for 50-55 minutes at 325 °F (165˚C). Remove from the oven and immediately turn the cake upside down to cool for two to three hours. (Don't use the legs on your pan when you turn it over. Better to use a pop bottle or funnel.) Use a firm hand and a skinny knife to loosen the cake from the edges of the pan. Turn the cake upside down onto the cake plate or cooling rack.
Chocolate Ganache:
- Heat 2/3 cup heavy whipping cream in a small glass bowl for 1 minute in a microwave oven. Add 4 oz. semi-sweet chocolate bar broken into smaller pieces to the hot cream. Allow the chocolate to sit in the cream and melt for a few minutes.
- When the chocolate is completely melted, use a small wire whisk or spatula to stir. Start by making small circles at first, then larger, and finally, mix the melted chocolate and cream until smooth.
- Set the ganache aside to cool.
Whipped Cream Icing:
- Whip 1-1/2 cup heavy whipping cream (chilled) in a medium-sized chilled bowl with a wire attachment or a portable mixer. When the cream thickens and has soft peaks, add 1/3 cup confectioners sugar and 1 teaspoon vanilla extract. Go too far, and the whipped cream will be dry-looking or turn into butter. Spread the whipped cream smoothly over the angel food cake.
Assembly:
- Pour the warm chocolate ganache into a small zippered bag. Snip one corner about 1/4 inch. If this is your first time, turn over a cereal bowl and practice running chocolate along the edge till you get the effect you want. If it's too thick to make nice "runs", add a few drops of warm cream. If too thin, let the chocolate cool a while longer.
- Slowly squirt ganache from the small hole in the corner of your zippered bag making "runs and drips" around the perimeter of the cake. Do the center of the cake the same way. Quickly squirt the remainder of the ganache over the top of the cake. Then, use a spoon, spatula, or offset flexible knife to spread the ganache evenly. You have a small window to smooth the ganache because the cold whip cream icing will harden the ganache on contact.
- Chill at least one hour before serving. Best eaten within 24 hours but still amazingly good for a couple of days.
Notes
*You don't have to use dutch-process cocoa. Regular powdered cocoa will work, but the taste and color will be slightly different.
Nutritional Information
Serving: 1 | Calories: 247kcal | Carbohydrates: 37g | Protein: 4g | Fat: 9g | Saturated Fat: 6g | Polyunsaturated Fat: 1g | Monounsaturated Fat: 3g | Trans Fat: 1g | Cholesterol: 24mg | Sodium: 82mg | Potassium: 156mg | Fiber: 1g | Sugar: 29g | Vitamin A: 259IU | Vitamin C: 1mg | Calcium: 20mg | Iron: 1mg