Making Greek Yogurt with Raw Milk: A Simple Guide
Sneak Preview: Want to make yogurt with raw milk? This step-by-step guide shows you how to make both regular and Greek yogurt from unpasteurized milk.

This post contains affiliate links. As an Amazon Associate, I earn from qualifying purchases at no extra cost to you.
No cows in the backyard? Me neither! I don’t have easy access to raw milk, but my son and daughter-in-law love yogurt made from it. Their enthusiasm got me curious—so I gave it a try!
Important Note: As a home economist, I’m not here to debate the safety of raw milk. The USDA advises against consuming unpasteurized dairy. Do your own research before making a decision.
Why Heat Raw Milk for Yogurt?
Some people skip heating raw milk to 175°F, hoping to preserve its natural bacteria. But after experimenting, I found that heating the milk results in thicker, creamier yogurt—whether the milk starts raw or pasteurized.
Heat helps unravel milk proteins, allowing yogurt cultures to work effectively. I prefer yogurt with some body, so I always heat the milk first, then cool it down before adding the starter.

How To Make Greek Yogurt with Raw Milk
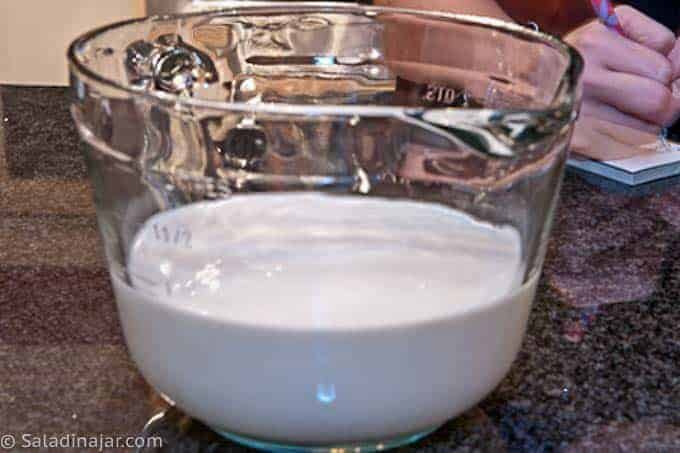
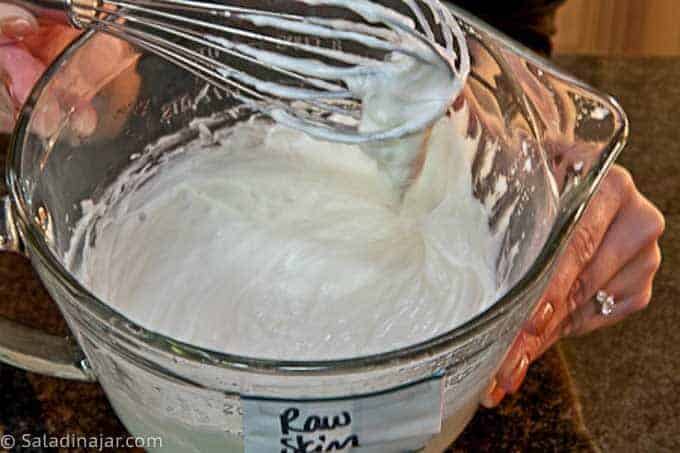
1. Heat the Milk
Pour raw milk into a microwave-safe bowl or heavy-duty pot. Heat to 175-180°F, stirring occasionally. (In my microwave, it takes about 11 minutes on HIGH.)
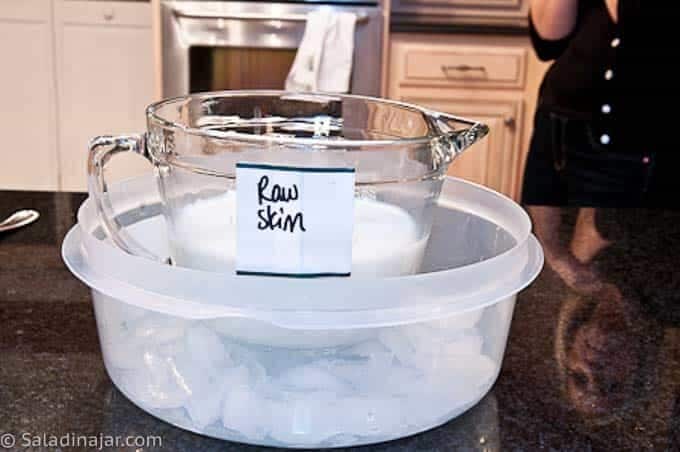
2. Cool the Milk
Let the milk cool to 100-110°F on the counter or use an ice bath to speed up the process.
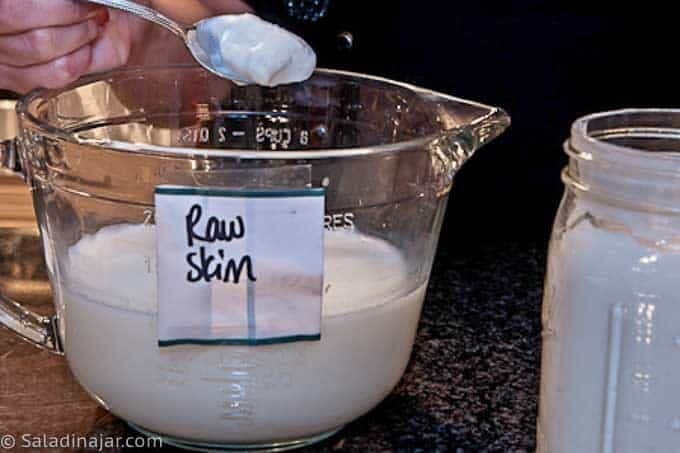
3. Add the Yogurt Starter
Whisk in 1 tablespoon of yogurt per quart of milk (use store-bought or homemade from a previous batch).
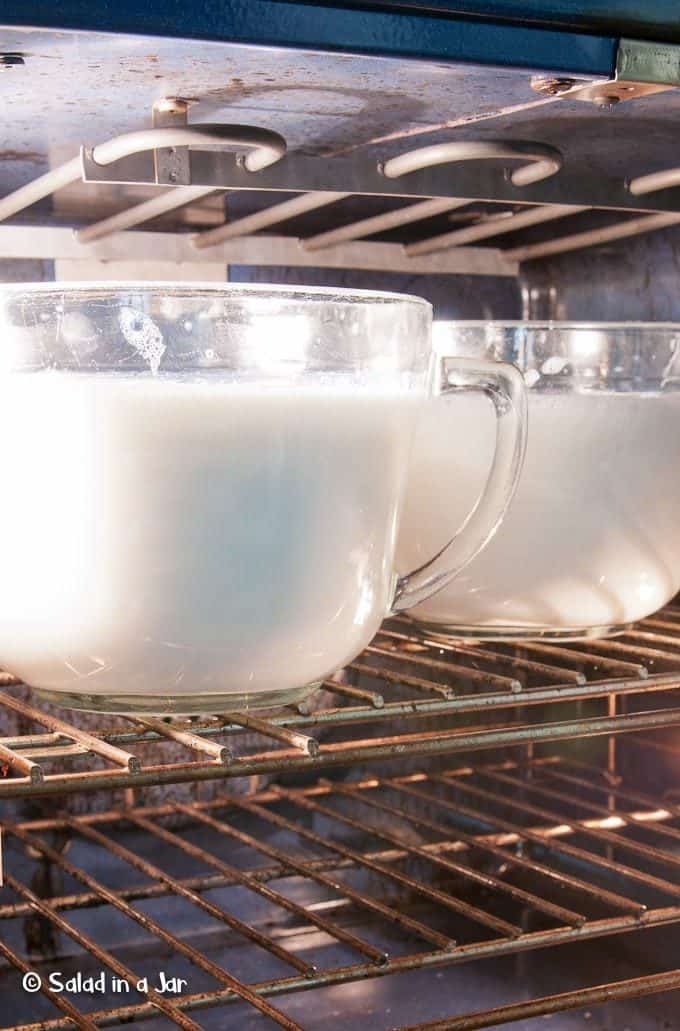
4. Incubate
Cover loosely and place in a warm spot (100-110°F) for 4-8+ hours. Avoid disturbing it! Peeking or stirring can prevent proper thickening. The longer it sits, the tangier it will be.
5. Strain for Greek Yogurt
If you prefer Greek yogurt, strain it using a cheesecloth, coffee filter, or fine-mesh strainer. Let it drain for 1-3 hours, depending on your desired thickness.
6. Whisk and Chill
Once strained, whisk the yogurt until smooth. Chill before serving for the best texture. Add flavors or sweeteners if desired.

FAQs
Can I make yogurt without heating the raw milk?
You can, but it will likely be thinner and risk unwanted bacterial growth.
Why is my yogurt runny?
Raw milk yogurt tends to be thinner. Heating the milk and straining will help.
How long does homemade raw milk yogurt last?
Store in the fridge for up to 7 days.
Need help troubleshooting? Please email me: Paula at saladinajar.com–photos welcome!
Making Greek Yogurt with Raw Milk
Video
Ingredients
- 1 quart (946 g) unpasteurized dairy milk )
- 1 tablespoon yogurt commercial or your own homemade
Instructions
- Fill a Pyrex 2-qt microwave-safe bowl or pitcher with milk. Alternatively, pour milk into a heavy-duty pot to heat on the stove.
- Heat in the microwave until bubbles begin to appear around the edge. The temperature should reach 170-180˚F after you stir it. (In my microwave, it takes about 11 minutes on HIGH). Check at 9 minutes.
- Allow your milk to cool until the temperature drops to between 100-110˚F.
- Whisk in fresh unflavored yogurt (the starter). You may use yogurt from a previous batch of your homemade yogurt.
- Cover the milk and place it in a warm environment where the temperature stays around 100-105˚F.
- Allow the inoculated milk to incubate for 4-8+ hours or until set.
- At this point, you could chill the yogurt and eat it as is. Or you can decide whether to pour off the whey or stir it back in. Straining yogurt to make it thicker will result in Greek yogurt.
From Regular Yogurt to Greek Yogurt:
- Carefully pour yogurt into a bouillon strainer or chinois. If the mesh is fine enough, you won't need to use a cheesecloth or paper towel. Or use a or a commercial size paper coffee filter inside a cheap strainer or colander.
- Let yogurt sit in the strainer until the yogurt is reduced by approximately a third. Time will vary according to the thickness of the yogurt out of the oven and your own preference regarding texture and sourness.
- Empty whey from the batter bowl and pour yogurt out of strainer back into the original bowl. Use a good whisk to beat until smooth. Thin with milk or leftover whey if yogurt is too thick.
- Now is a good time to add any flavorings or sweeteners.
- Chill.
Notes
Equipment
Nutrition
All images and text ©️ Paula Rhodes for SaladinaJar.com

All I can think is why waste raw milk, heating it makes it no longer raw?
Hi Sue,
My method may not be your preferred method. When the milk is not heated, the yogurt is considerably thinner. Even after heating, the raw milk yogurt tastes fabulous. Whatever works for you!
I am new at making yogurt. My first batch worked but I added 1/2 cup of starter per 3.5 cups of milk. This seemed like a lot of starter so I began to search just how much starter is needed and found your article Jan 15, 2023.
For my second batch, I only added 1 tbsp of starter per half gallon of milk. At eight hours, it looked like half turned into yogurt and the rest was still milk. There was no whey (yellowish watery liquid). I didn’t know that the incubation period ended once stirred and I did stir it. I decided to add more starter and try again. This time I doubled the amount of starter. I am waiting to see if this works.
My question to you is, since some of the milk did turn into yogurt, is it most likely I needed more starter or perhaps I should have just left it alone for a few more hours. In your starter experiment, time made the 1/4 tsp measurement thicken.
Any input would be appreciated.
Hi Nanette,
Eight hours should be plenty long enough to produce yogurt. (Mine only takes 3½ hours, but I like a mild-tasting yogurt.) This makes me wonder if the incubation temperature is holding steady.
Also, how old was the starter? The fresher, the better, and it’s best if your starter is no more than 7-10 days old.
Did you indeed use raw milk? Did you heat and cool according to the directions given here? All of these details can make the difference between success and a fail.
It can take a while to figure out your incubation system and timing using the milk and starter you have available. I’m confident you’ll get it soon.
this provides nutrional information, but does not establish the serving size for this information. is this based on a 4 oz or 6 oz serving?
Hi Moonpie,
I’m sorry, but I’m unable to provide that information. As I said in the notes of the recipe, “Nutritionals are only an estimate. Numbers will vary according to how much you strain your yogurt.” This may be one of the most difficult parts of making your own yogurt, especially Greek yogurt. It is impossible to tell you exactly because every batch will be different. The final amount of yogurt is affected by so many factors: 1. how long it was strained 2. Fat content of the milk 3. What temperature was used to incubate 4. How long was the yogurt incubated.
The only way to know for sure is to pay a chemist to test it for you. But even then, you would only know about that particular batch.
warren frost
Thu, Feb 1, 8:18 PM (2 days ago)
to info@nwferments.com
When I make yogurt with unpasteurized raw milk the yogurt has a bitter taste and bad odour.After sitting in frig for 1 week this odour and taste disappear.Did bad bacteria/enzymes in raw milk cause problem.I have tried using a mother batch and boiling utensils.In the past this problem only occurred occasionaly.Pasteurising the milk 180 F for 1 hour sometimes fixes the problem.I use yogurt powder in sachets for starter.
Hi Warren,
So nice to hear from you.
I’m not a food chemist, so I don’t feel qualified to answer your question. All I know is that I would never recommend eating anything that smelled bad. Always heat the milk to 180˚F when making yogurt, then let it cool back to 110˚F before adding your sachets of starter powder.
Assuming raw milk has some good bacteria not normally found in pasteurized milk…
I’d love to make some yogurt using a mixture of any and all raw milk I can find (goat, cow, sheep, camel, etc), but I wonder if the bugs would play nice together? For example would one type of colony crowd out the rest when heated to make the yogurt?
Also, Mad Cow disease is so scary, is there any way to lower the number of potentially bad germs?
Ben,
I’m not a food scientist so don’t feel qualified to answer your question. So sorry. paula
You say that you are”not comfortable letting unheated raw milk sit at 100 degrees for 12 hours” but with raw milk to does not go bad. It just gets more and more sour. Raw milk is a living thing. I know someone who left raw milk out for several weeks to see what would happen. It never went bad.
Thanks for the info! A lot of people say that it is a complete waste to use raw milk if you will be pasteurizing it, but here in California the raw milk we can get comes from 100% grass fed cows, which to me is better milk than the stuff from grain fed cows. I think that the fat in the grass fed milk is of better quality.. Opinions?
wow. thanks for the how-to! i’m a bit confused though – this seems so simple, so why are there ‘yogurt makers’? i was going to buy one on amazon, but it looks like it really isn’t needed-?
Very helpful-although I’m with Daniel if you are spending money to get milk raw-heating it over 112 doesn’t make sense. Also-using the microwave really changes the chemical structure of the foods heated. From what I’ve researched it really makes the food unrecognizeable to the body.
Hi Sara,
Welcome. If you have read much of my blog, you probably already realize we don’t agree on the whole microwave issue. My research shows much different results than you found. But that’s OK. It depends on who you believe. Hopefully, we can agree to disagree on this point.
Regarding the whole heating of the milk thing, it has nothing to do with the taste and everything to do with food chemistry. Heating changes the structure of the proteins and makes a thicker yogurt. I prefer very thick yogurt which is why I will do anything to make it thicker. Honestly, I’m no expert on raw milk. It scares me because of the risks involved with disease–especially for people with compromised immunity systems. I wrote the post because my kids love it and wanted to make yogurt with it.
Thanks for writing.
comprimised immunity systems seems to be an ever increasing percentage of the population. Seems to me that the further away from nature we get the more prevalent it is. Refering to “Raw milk scares me” comment, Marie Curie once said “nothing in life is to be feared only to be understood”. The risks you speak of are unfounded and something that has been said over years and years for generations and people just accept it. Ideas like this need to be rethought and reexamined over time as technology and sanitation methods improve.
Hey just so you know pastuerised milk means to be heated to 161 degrees for 20secs. If you pay heaps of money for raw milk only to heat it up then it kinda defeats the purpose of raw milk. im still trying to find a way to thicken it without heating it.
Hi Daniel, Thanks for writing. I’m not into raw milk myself but my daughter-in-law thinks the yogurt it makes tastes better so heating it doesn’t change that for her. pr
If you are looking at the benefit of raw being only the good bacteria and losing that when you heat it, then you are right, don’t waste the raw milk money. Don’t forget all the antibiotics and hormones that is in store milk. If I can avoid those but lose the good bacteria with the heating process, it is still worth it to me. Raw milk is not only about drinking to get what store milk does not have, but also what Raw Milk does not have it in too.
So you are assuming now that raw milk doesn’t have antibiotics and hormones. Raw doesn’t mean organic. If you want to know for sure ask the farmer directly assuming the farmer isn’t going to lie. a poor farmer will try to cut costs by using more cows per area of land thus increasing diseases and thus the need for antibiotics or hormones for faster growth. Unless the farmer is poor for not doing this.
I would just like to add that all milk you purchase in the store has no antibiotics in it! All milk is tested before it is even unloaded at the processing plant. If any milk has a trace of antibiotics in it they will not use the milk and it is spread on a farm field. ANY milk you buy in a store is free of antibiotics!
Daniel, I read somewhere recently you can try experimenting with thickening by adding gelatin. Haven’t gotten that far myself but I’m willing to try!
Paula,
I am lactose intolerant. I drink lactose free milk but I can eat cheese that is aged and greek yogurt from the store. My question is, can I make yogurt @ home from lactose free milk?
Cari
Cari, Sorry, I have never tried it but it’s on my list.
Probably not. The lactobacillus acidophilus (bacteria in your starter yogurt culture) need the lactose in regular milk to turn it into yogurt. However this will not be a problem for lactose intolerant people (including myself) as the process of making milk into yogurt uses up the lactose in the milk. If you have a little gastric distress after eating your homemade yogurt try just letting it sit another day in the fridge before you eat it…the live yogurt cultures will continue to “eat” any remaining lactose in your homemade yogurt.
Hi Paula,
WOW I have been converted to the greek yougurt craze!! I have been making my own yougurt with the cooler and warm water incubation to great results using raw milk from my family farm. I stumbled across your website when researching how to make it greek. SO SO SO easy, make yougurt, incubate, then strain through cheescloth, that’s it!! I think I can put the very local Chobani out of my house for ever! Yes chobani is literally 3 miles away, they employ hundreds of people locally ( great for the depressed NY state economy), work 3 shifts, and are still having a hard time getting all the product out that the demand calls for. SO I took your advice and put some bananas on the bottom of sevring size of yougurt, added some pomegrante seeds, topped with half a teaspoon of brown sugar and a shake of cinnamon! Heaven! gee let’s see…..saved at least $10 a week, and to make it, cost me literally pennies! Thank you so much for your blog. Same day with the cream off the top of milk can made the condensed cream of mushroom soup, then added the cream to serve as the best cream of mushroom soup I ever had!, again saving more moola, no more campbells for me! Looking into the salad in a jar, hoping to get some gift cards for Christmas so I can purchase the Food Saver.
Thank you so much,
Best wishes for a Happy Thanksgiving!
Jen
So glad to hear from you Jennifer. Sounds like you will save a boatload. Paula
Hi Paula, Thanks for steering me in the right direction…This time I did not continue heating my milk in the microwave for the additional 15 minutes (as I mentioned above in my note) and happy to say my yogurt came out perfect! That really saved me some time. Looking forward to your next yogurt experiment with the non-dairy milks. Wonder if Almond and/or Coconut milk would make good yogurt? Thanks again for all your hard work!!!
I’m the founder/moderator for Punk Domestics (www.punkdomestics.com), a community site for those of use obsessed with, er, interested in DIY food. It’s sort of like Tastespotting, but specific to the niche. I’d love for you to submit this to the site. Good stuff!
My daughter in law wants a goat so she can have a source of raw milk. I wonder if making yogurt with goat milk would be different? Very interesting- I’ve been wanting to try this for a while. 🙂
Betty, I’m guessing the process would be exactly the same. I’ve also heard one can make yogurt with soy milk and oconut milk. Guess that will be my next project.
I’m in love with the picture above! And now I’m off to check out the evil brownies…
Paula, Wow! Thanks for taking all the time to document all this! Have you though of writing a book? I would buy it! You are amazing!
Informative as always. You really are becoming the yogurt making guru, which I think is kind of cool. My chiropractor would be loving the raw milk suggestion since he advocates no milk unless it is raw due to all supposed meds. the cows are on to keep them healthy to produce milk. He is a bit extreme as expected of chiropractors. Great post Paula.
Hi Paula! I have learned more great things through your website. Question: I read somewhere that after heating my milk up in the microwave (I was taught to take it up to 180 but I don’t know if it makes that much difference or not) that I should try to hold it at that temperature for another 15 minutes (in the microwave) before starting the cooling process…I assume it has something to do with the speed of stovetop vs microwave and not having enough time to loosen the proteins. Have you ever heard of doing this and do you think it is necessary?
In one of my experiments with using “nonfat dry milk” I tried skipping the 180 degrees and went for just below 120 (since it was already homogonized and dried) and then I added my starter …but it did not work… upon final inspection I saw it did not set…it was very runny and was already 10 hours old had to throw it out… so I found heating it up to approx. 180 (ish) a necessary step..I just don’t know if I need to keep it at that temp for 15 minutes.
Thanks again for all your laboratory work…I always earn so much! 🙂
Maggie, I have never heard of holding the higher temperature for another 15 minutes. Of course, anything heated in the microwave will continue to cook for several minutes but that’s expected. I see no reason to do it longer on purpose. Maybe an old wives’ tale? (There are many of those concerning the making of yogurt because so many people do it how their mother or grandmother did without the slightest idea why.)
As you already figured out, not heating nonfat dry milk to the higher temps of 175 or 180 means those proteins don’t get unraveled and your yogurt will not be very thick. Some people like runny yogurt but not me! paula
This is so interesting! I’d never thought of making my own yogurt