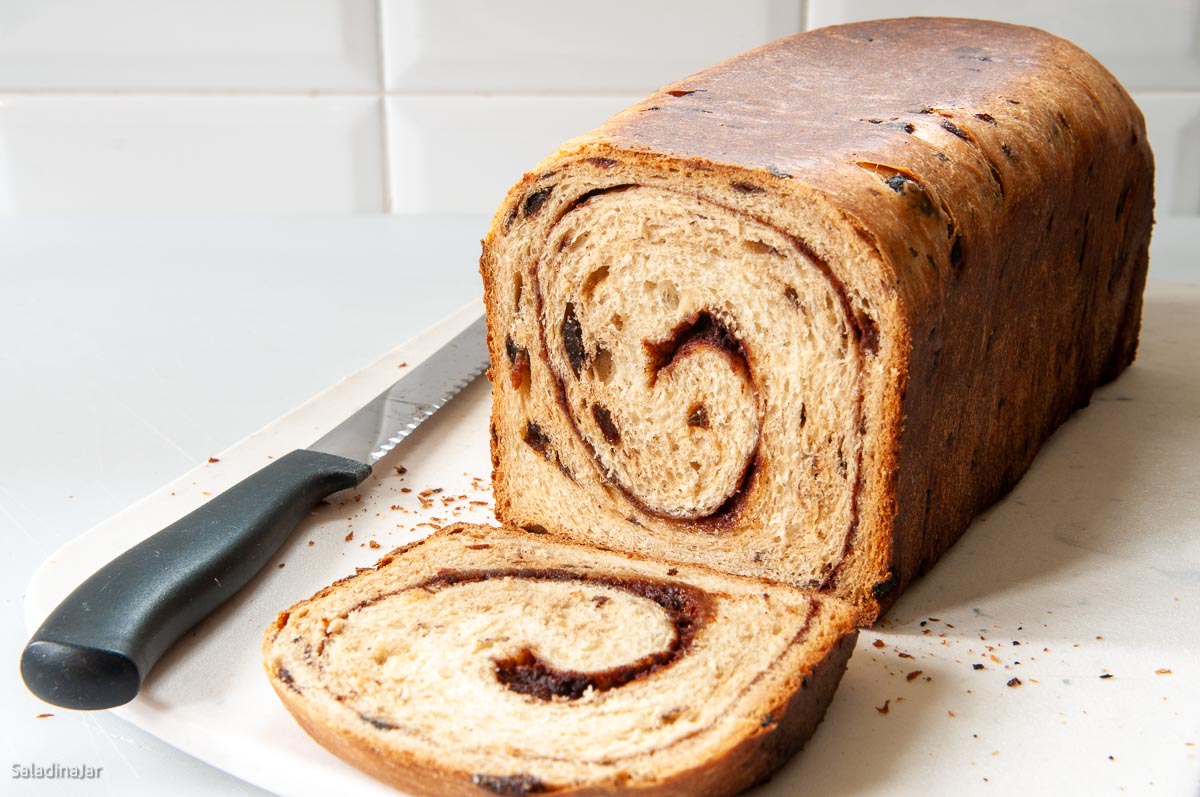
Bread Machine Cinnamon-Raisin Bread (Oven-Baked)
Sneak Peek: This bread machine cinnamon-raisin bread uses everyday pantry ingredients, with the dough mixed and kneaded in the machine, then rolled and oven-baked for a defined cinnamon swirl. It takes about 3.5 hours start to finish.
This post contains affiliate links. As an Amazon Associate, I earn from qualifying purchases at no extra cost to you.
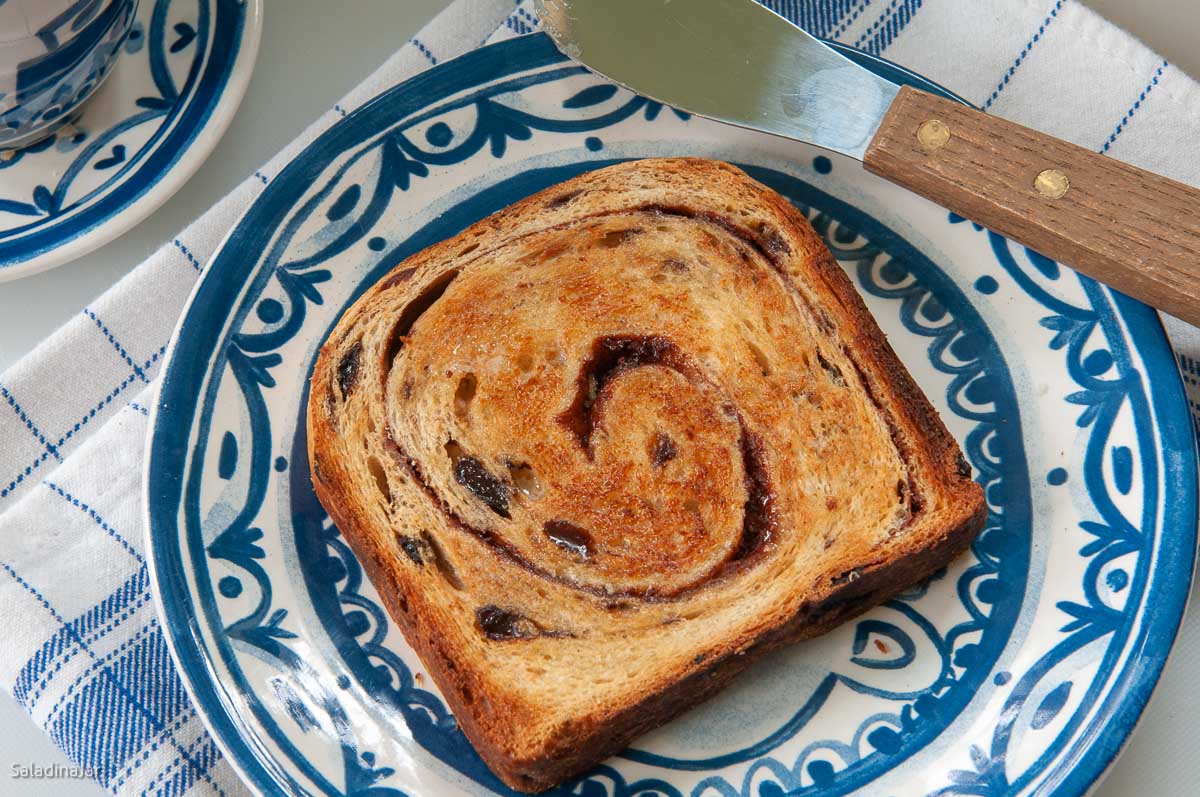
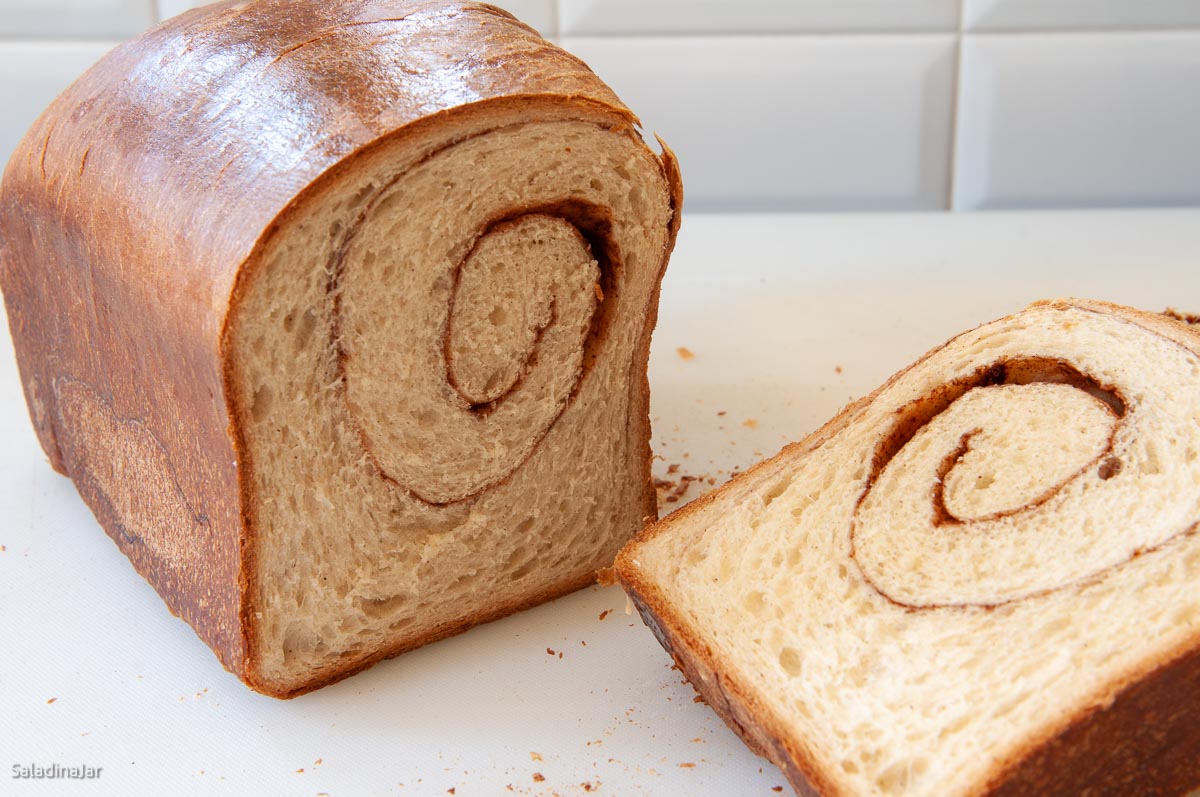
Am I the only one who loves peeling apart layers of food while eating? Go ahead—unroll this bread and savor the cinnamon-scented layers as you go! A touch of clove enhances the cinnamon,— similar to how coffee enhances chocolate.
How I Use a Bread Machine for Better Bread
I use my bread machine (this is the model I use) to mix and knead the dough using the DOUGH cycle, then shape it by hand and bake it in a conventional oven. This approach takes advantage of the machine’s consistent kneading while giving me full control over shaping, rising, and baking—especially important for rolls, pizza, and other swirled and shaped breads.
My free Bread Machine Crash Course explains this approach in more detail.
No bread machine? See the recipe notes for how to make this recipe with a stand mixer or by hand.
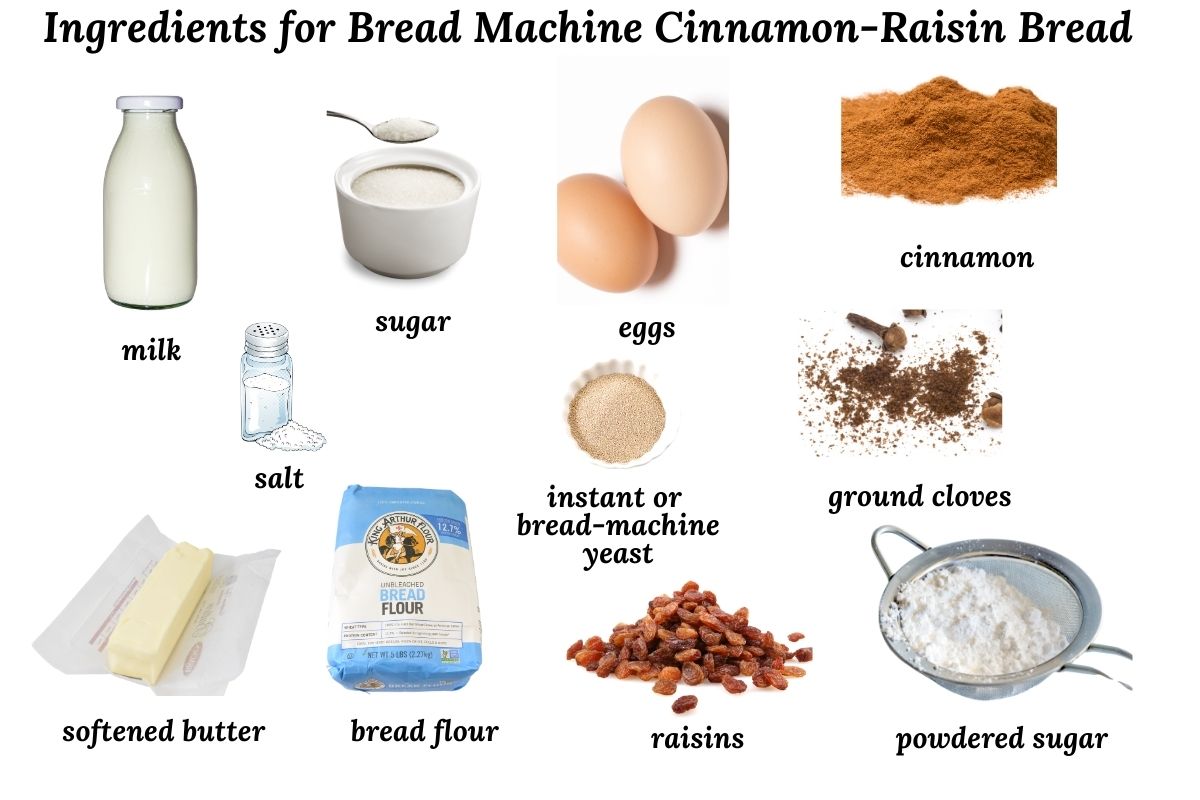
• MILK: Any type; higher fat yields richer bread. No need to preheat.
• EGGS: Use large (≈50 g). Adjust liquids if using another size.
• BUTTER: Unsalted is best; reduce added salt if using salted.
• SUGAR: White granulated sugar. Sub honey if preferred and reduce other liquid.
• SALT: Use table or sea salt; add ¼ tsp more for Kosher.
• CINNAMON & CLOVES: A pinch deepens the cinnamon flavor (optional).
• FLOUR: Bread flour preferred. Reduce liquid slightly if using all-purpose.
• YEAST: Instant or bread machine yeast. See recipe notes for active dry.
• RAISINS & NUTS: Optional. Sub dried cranberries or currants; toast nuts for extra flavor.
The Secret to a Better Filling
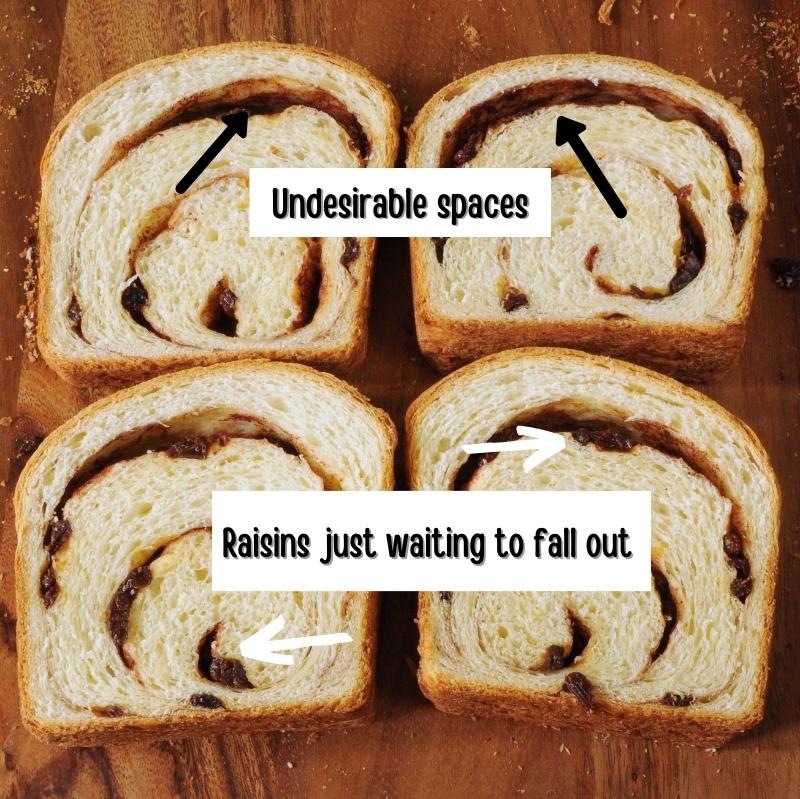
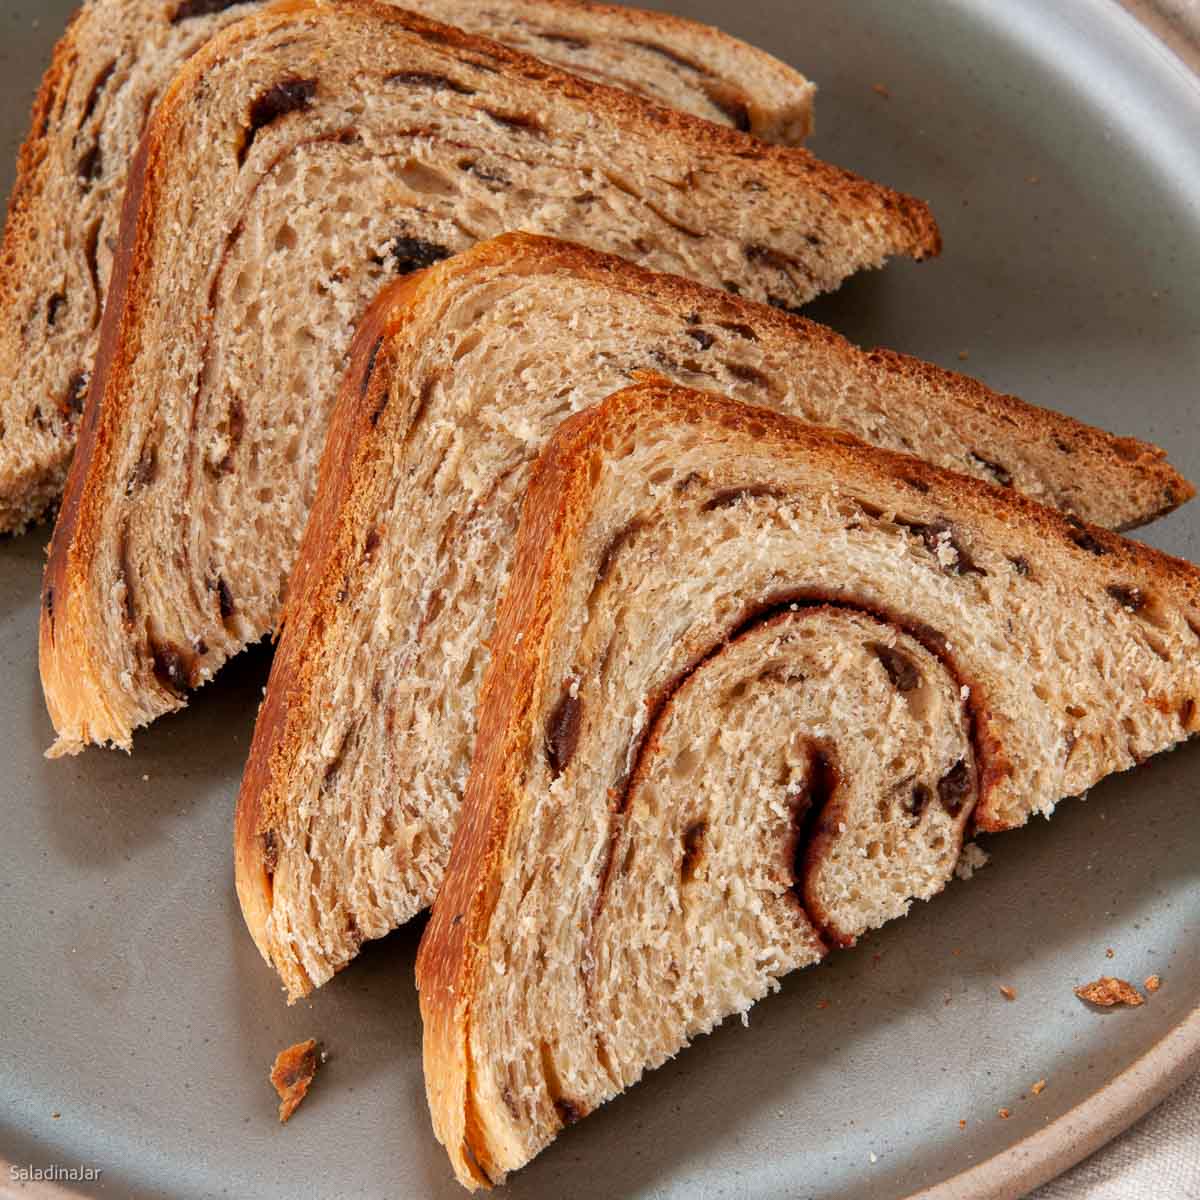
Most cinnamon bread fillings use granulated or brown sugar, which can cause the layers to separate. Inspired by Jennifer at Once Upon a Chef, I use powdered sugar. The cornstarch helps the filling cling to the dough, keeping the swirl snug and intact after baking. Add raisins at the end of the DOUGH cycle or knead them in by hand instead of sprinkling them over the filling. This keeps them from falling out easily.

Step-by-Step for making Cinnamon Bread
⬇️ Jump to the recipe below for exact amounts and detailed instructions.
Making the Dough
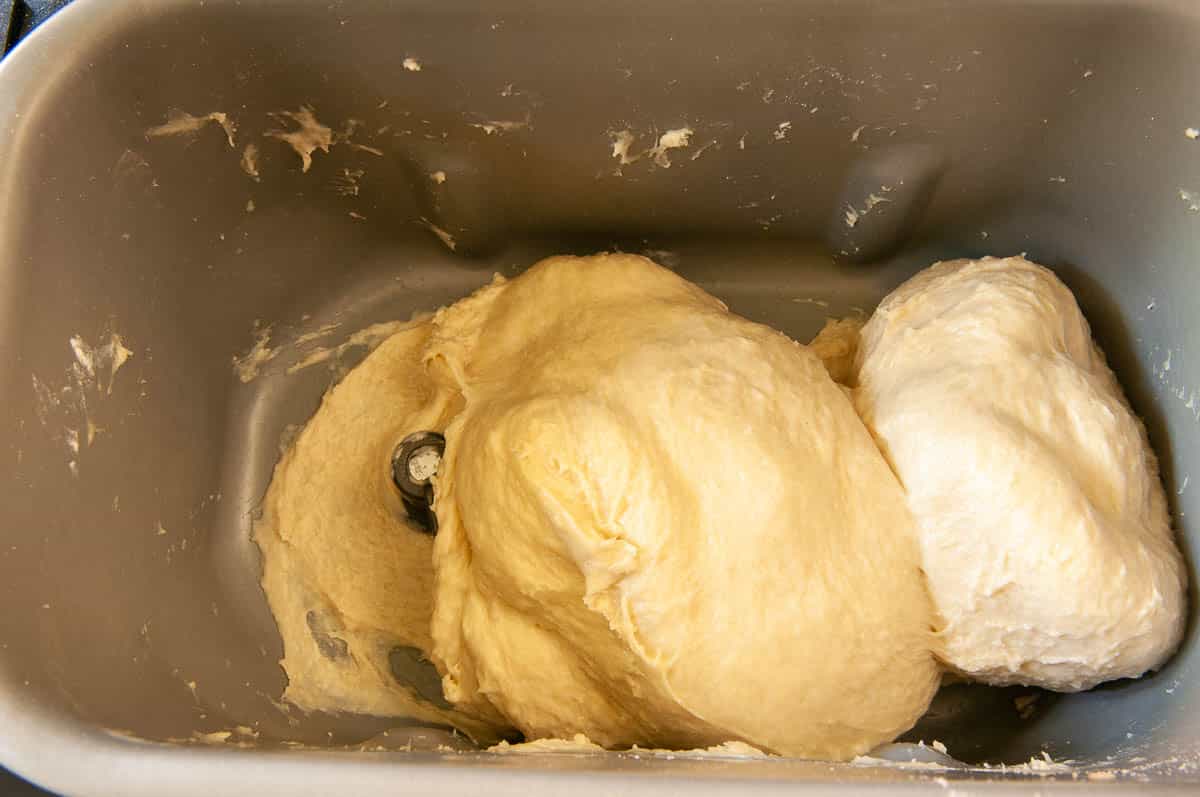
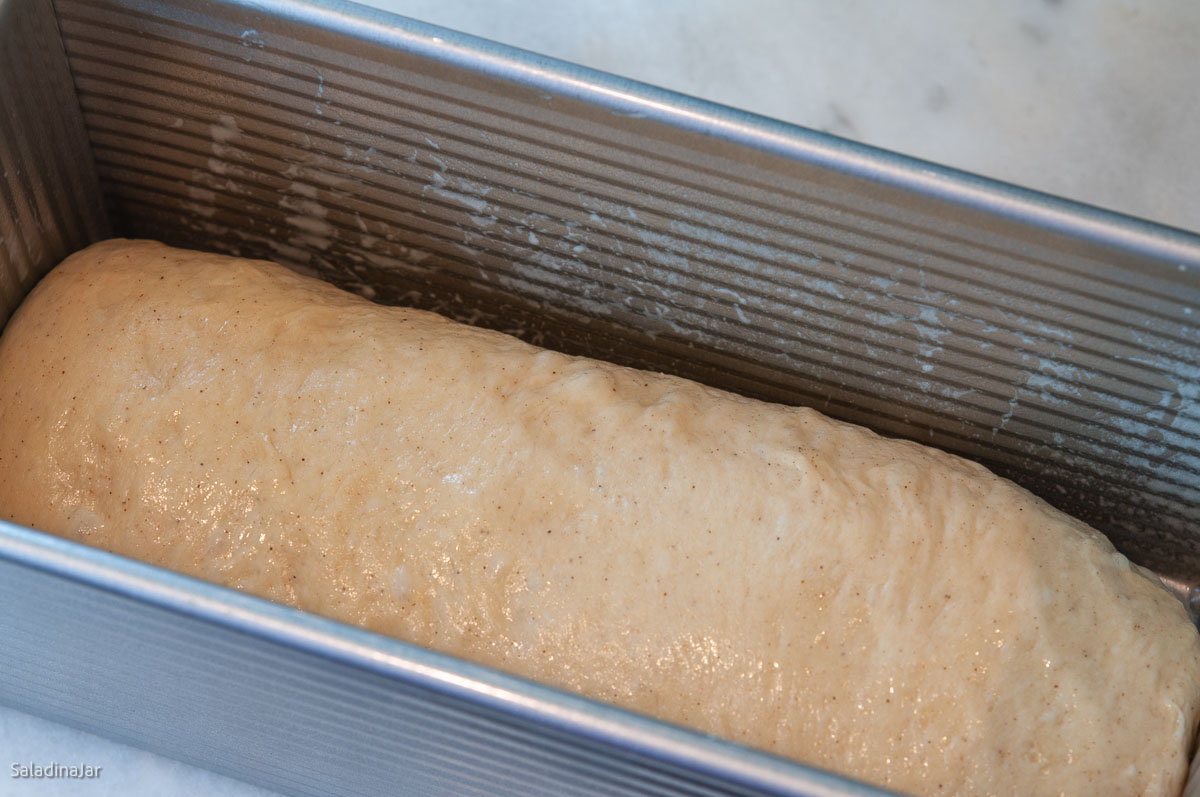
Add raisins when the machine beeps. Allow DOUGH cycle to finish. Dough should double in size.
Assembling the Swirl After the DOUGH Cycle


Troubleshooting: Why Did My Cinnamon Swirl Bread Split?
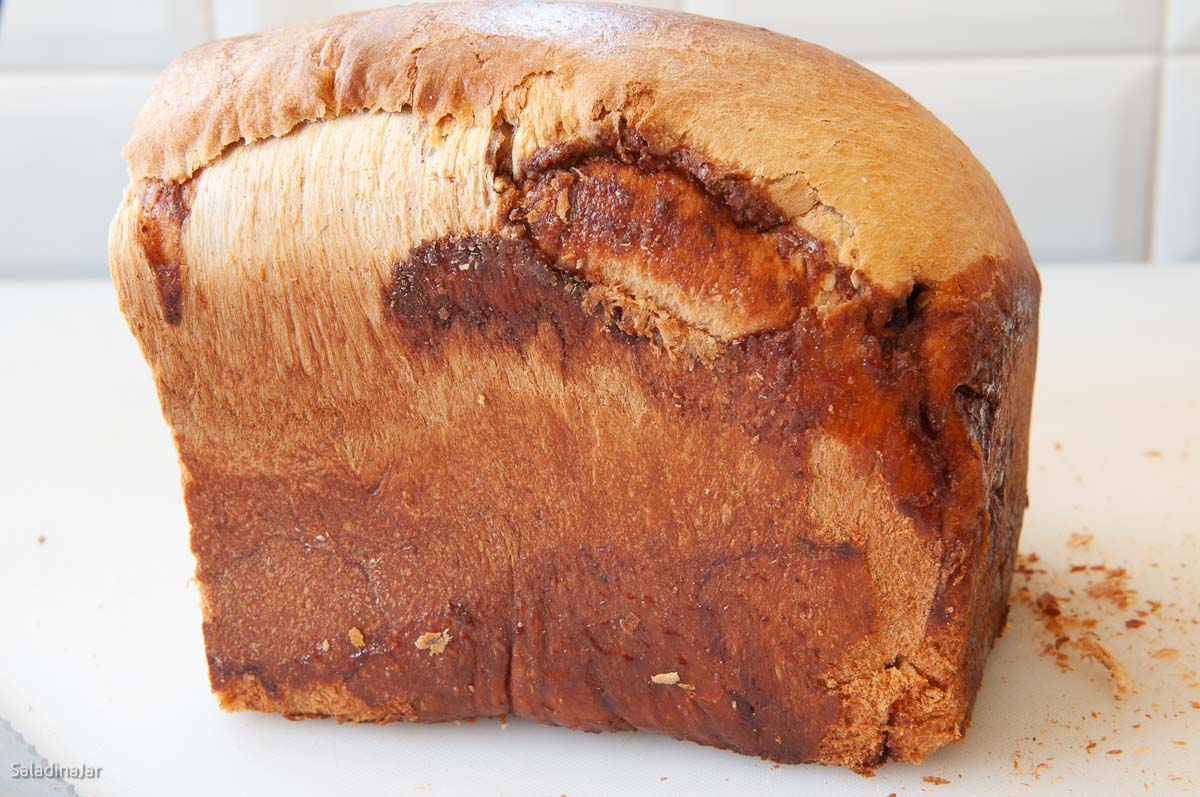
This loaf looked perfect from the top—but the side tells a different story. The seam wasn’t sealed well, and the filling spilled during baking.
Even if the top looks great, a split side usually means:
• The seam wasn’t sealed well.
• The dough didn’t rise long enough before baking.
• The pan was too small and the dough overflowed.
• The dough was rolled too tightly.
Fix it next time: Roll gently, seal tightly, let the dough rise fully, and use a silicone mat to catch leaks.
Bread Machine Cinnamon-Raisin Bread (Oven-Baked)
Video
Ingredients
Dough:
- ⅔ cup (151 g) milk
- 2 large (100 g) eggs
- 3 tablespoons (42 g) unsalted butter, chopped
- ¼ cup (50 g) granulated sugar
- 1½ teaspoons table salt
- ½ teaspoon cinnamon
- 3 cups (360 g) bread flour
- 2¼ teaspoons instant yeast
- ⅔ cup (66 g) raisins, chopped or use currants
Filling:
- ⅓ cup (38 g) powdered sugar
- 2 teaspoons cinnamon
- ⅛ teaspoon ground cloves
Glaze:
- 1 large (50 g) egg
- 1 tablespoon water
Instructions
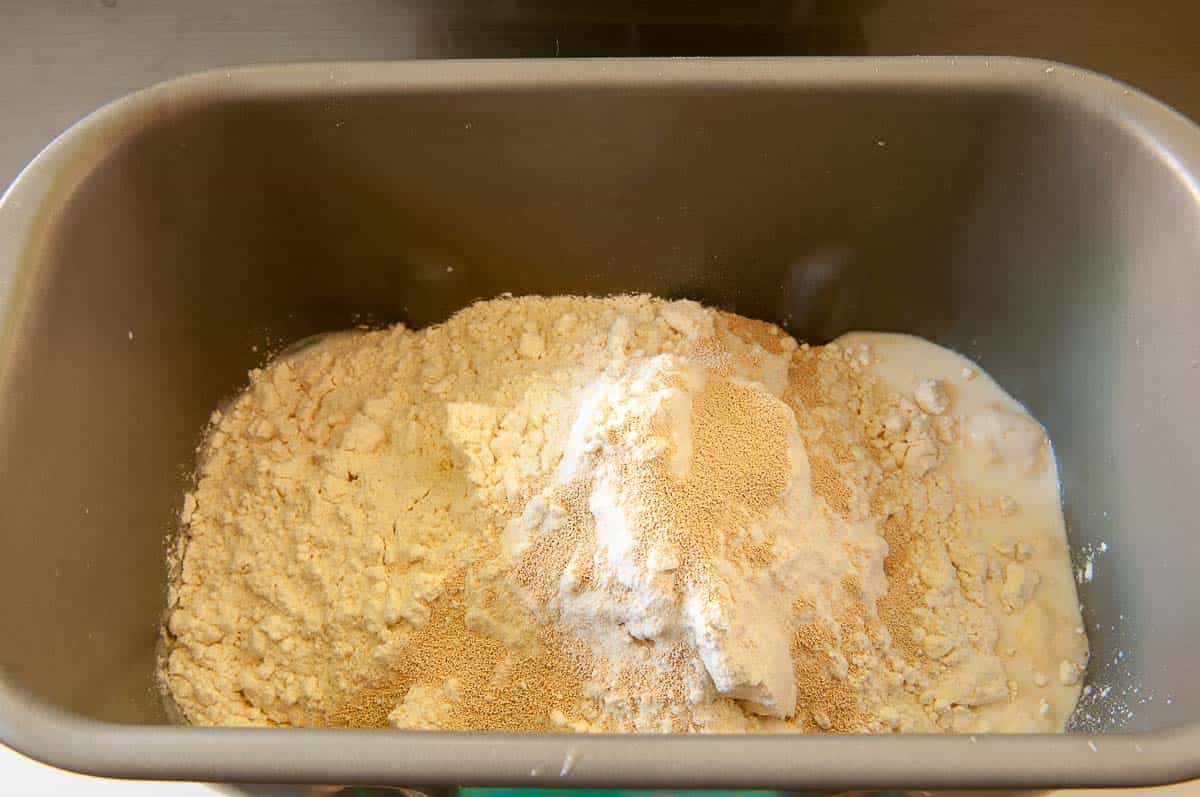
- Add ingredients to pan: Add ⅔ cup (151 g) milk, 2 large (100 g) eggs, 3 tablespoons (42 g) unsalted butter, chopped , ¼ cup (50 g) granulated sugar, 1½ teaspoons table salt, ½ teaspoon cinnamon, 3 cups (360 g) bread flour, and 2¼ teaspoons instant yeast to the bread machine pan in the order listed. Select the DOUGH cycle and press start.
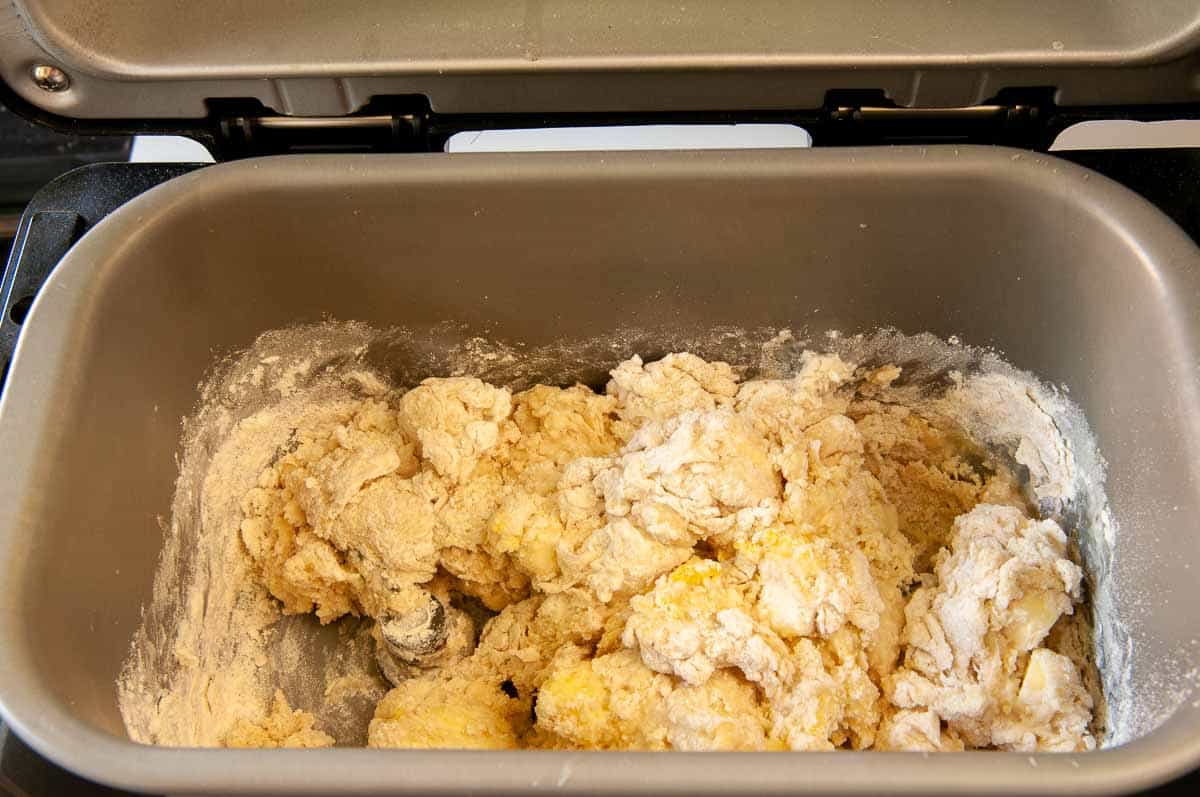
- Select the DOUGH cycle and start.First check: After the first minute, check the dough to make sure it is coming together into a raggedy ball. If not, add more water 1 tablespoon at a time. If you see pancake batter instead of dough, you forgot some flour—just add it slowly until everything pulls together.Second check: Check the dough again after about 15 minutes. The dough should stick to the sides of the pan, then pull away cleanly. If too wet, add flour 1 tablespoon at a time. If too dry and the dough doesn't stick at all, add more liquid. See more details–Surprising Secret for Making Better Bread with a Bread Machine.NOTE: Bread dough is influenced by flour, humidity, and even your kitchen temperature—so use this step to fine-tune the dough for your environment.
- Add raisins: When your machine beeps for add-ins, stir in ⅔ cup (66 g) raisins, chopped or use currants (or chopped currants). If there’s no beep, knead them in by hand after the cycle ends.
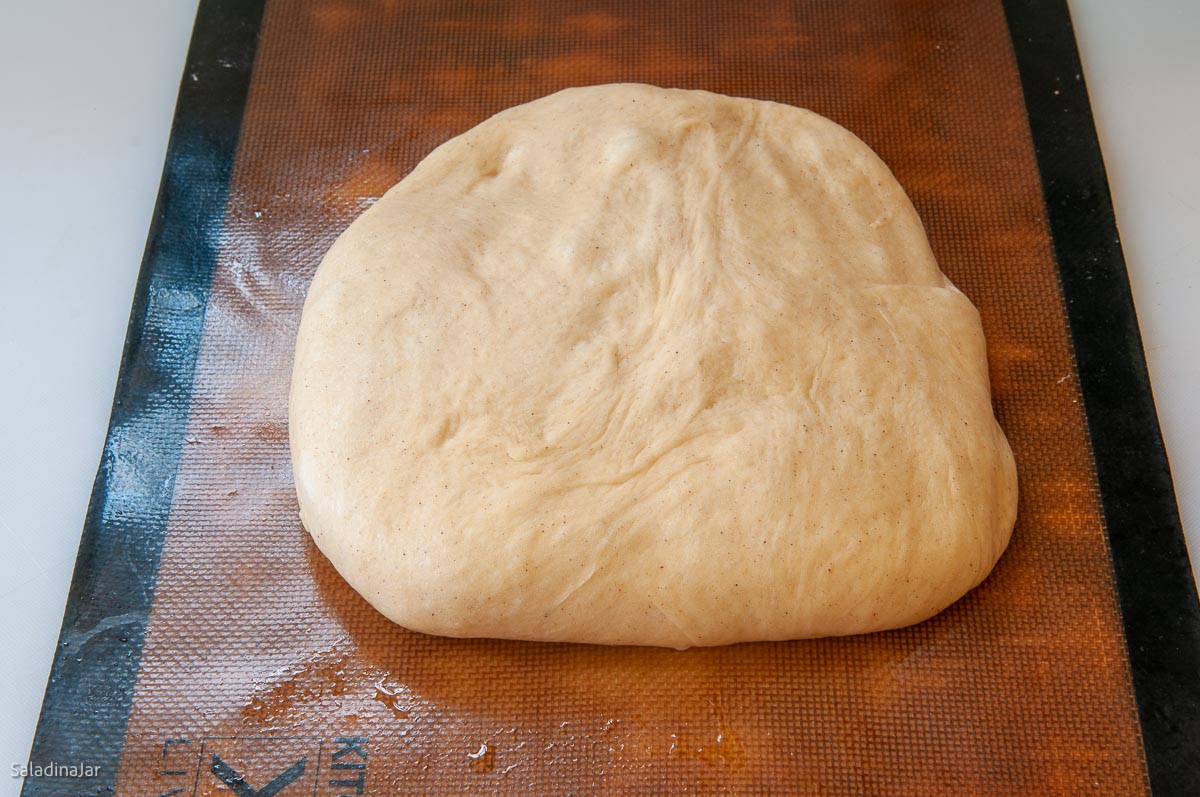
- End of DOUGH cycle: The dough should be doubled. If not, give it more rise time until it is. Restart the DOUGH cycle and knead for 5 seconds to deflate the dough. Stop the machine and turn the dough out onto a lightly floured surface, shape into a smooth ball, cover, and let rest for 10 minutes.
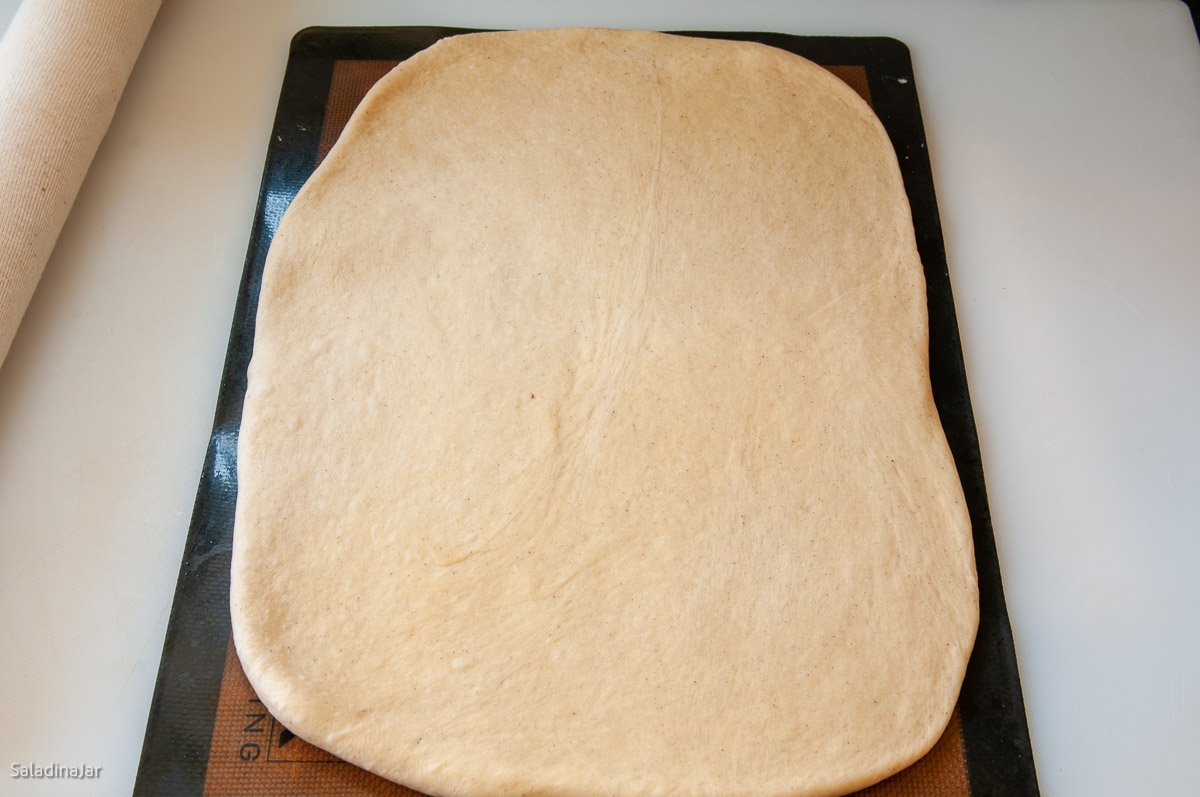
- Shaping the Loaf: Shape dough roughly into a square, then roll into a 10×14-inch rectangle. If dough is rebellious, cover, walk away and let it rest 10–15 minutes.
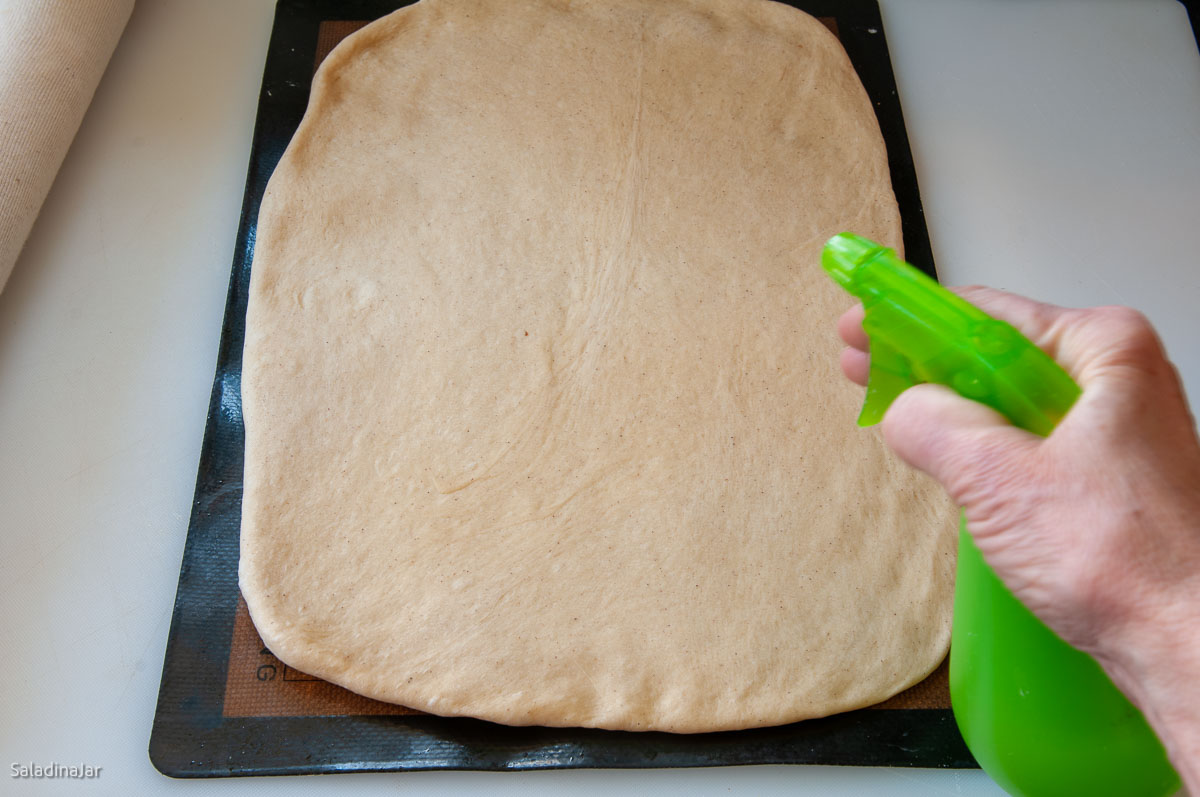
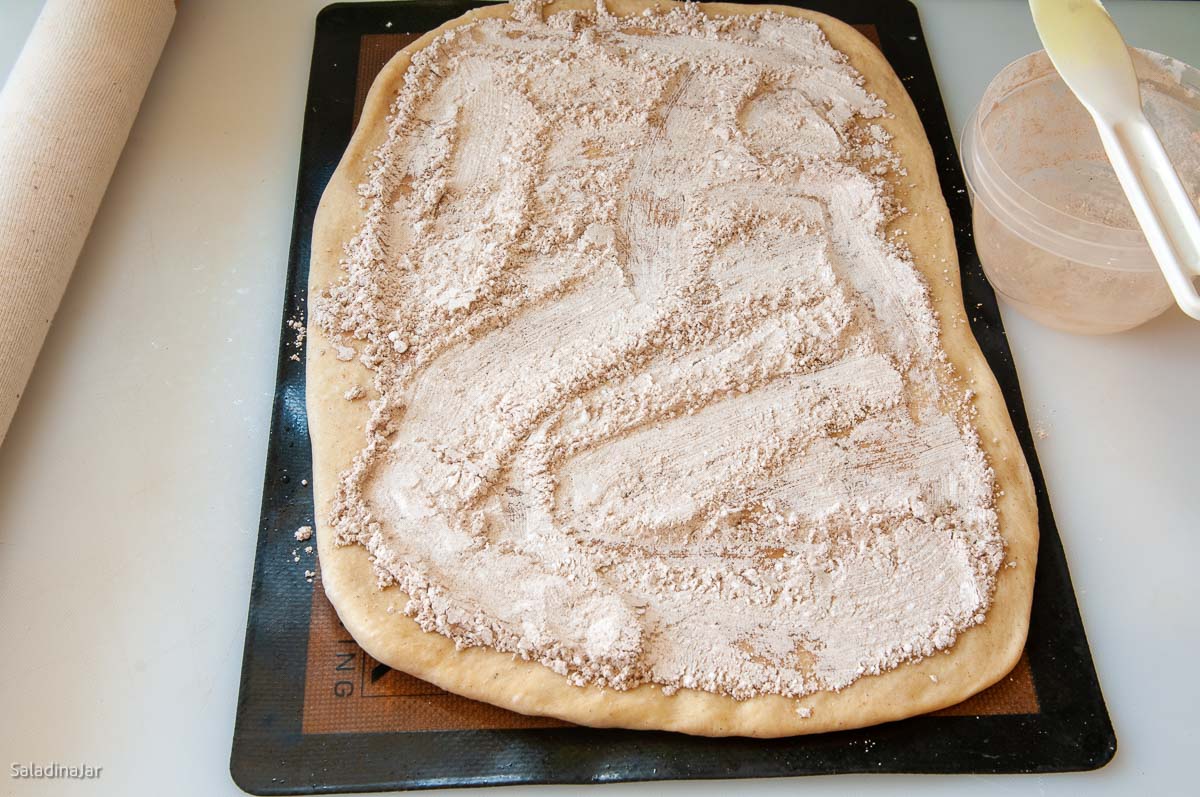
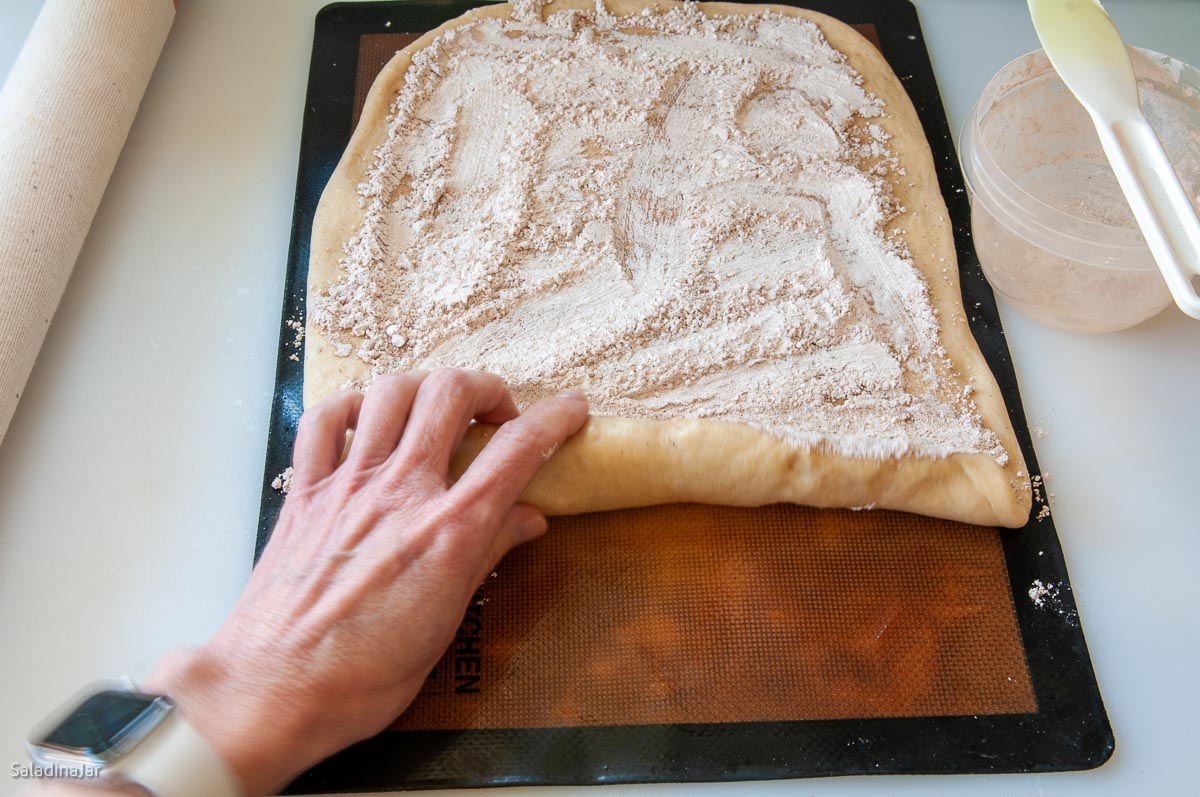
- Add filling: Lightly mist the dough with water. Mix ⅓ cup (38 g) powdered sugar, 2 teaspoons cinnamon, and ⅛ teaspoon ground cloves. Sprinkle evenly, leaving a 1-inch border.Roll from a short end. Pinch seam and ends to seal.
- Final rise: Place seam-side down in a greased 9×5-inch loaf pan or a 9x4x4 Pullman pan. Press down on the dough with open palms to evenly distribute it throughout the pan. Cover and rise until nearly doubled (45–80 minutes or more). If using the Pullman pan, let the dough rise until just under the rim so you can put the lid on without harming the dough.
- Preheat the oven to 375˚F (190˚C) about 15 minutes before baking.
- Glaze (optional): If baking in a loaf pan, brush with 1 large (50 g) egg, (beaten) with 1 tablespoon water.
- Bake: Bake for 35–45 minutes, removing the Pullman lid 10 minutes before the end if using. The internal temp should reach 190˚F when using a quick-read thermometer.
- Cool: Let sit in the pan for 15 minutes. Remove to a rack and cool at least 30 minutes before slicing.
Notes
- Unbaked dough: Freeze after the DOUGH cycle or after shaping (before final rise). Defrost in the fridge overnight.
- Baked bread: Double-wrap and freeze up to one month. Reheat gently.
- Add ingredients to the bowl in the listed order.
- Mix on LOW until moistened, then knead on speed 2 or 3 with a dough hook for 5-10 minutes until smooth and elastic.
- Cover and let rise in a warm place until doubled.
- Gently deflate and shape as directed in the recipe.
- Mix all ingredients into a shaggy dough ball in a large bowl.
- Turn onto a floured surface and knead for 10-20 minutes until smooth and elastic.
- Place in a greased bowl, cover, and let rise until doubled.
- Gently deflate and shape as directed.
Equipment
Nutrition
All images and text ©️ Paula Rhodes for Salad in a Jar.com
What Readers Ask Me About This Recipe
1. Too much flour or too little liquid—use a digital scale to weigh flour for accuracy.
2. Make sure the dough rises long enough; enriched dough can take more time, especially in a cool kitchen.
Yes. However, there are compromises to consider. The crust will be thicker and the texture denser.
Use the Basic or Sweet cycle. Remove the dough from the bread machine pan before the second rise, shape according to the recipe and layer it back into the bread machine pan (without paddles). Return the pan to the machine to finish the cycle. It might not be pretty, but it works in a pinch. This works better with an elongated bread machine pan than with an upright pan with a single paddle.
Final Thoughts
Cinnamon-raisin bread is always a treat, but shaping the swirl gives you better control over the look and texture. The powdered sugar in the filling helps hold the layers together, and checking your dough during the kneading cycle gives you the best texture.
Do you like the pinch of cloves in your cinnamon bread? Try my favorite cinnamon rolls and these Tangzhong Cinamon Rolls for a similar taste treat.
— Paula, Home Economist
Homemade Food Worth Sharing
Need help troubleshooting?
Email me: Paula at saladinajar.com — photos help!

When things go wrong… I started to make this only to discover that I had just one egg. Proceeded with the recipe anyway and just used more milk. Seems to work just fine. I followed your detailed instructions but I think I rolled up the dough too tightly because it split as it was rising. The only other change I made was, instead of using powered sugar, I used granulated sugar but added a small amount of flour to the filling and brushed the dough with milk. It worked like a charm. For the first time ever doing a rolled up bread, I had no splitting!
Just as it was about ready to go into the oven, I discovered that my oven wouldn’t turn on. Grrrr. Fortunately, I have a Breville toaster oven so used that instead but I dropped the temp down to 350 degrees.
I was concerned how it would bake but, after about 45 minutes, I was rewarded with the most delicious cinnamon bread I have ever made. Beautiful sliced with a cup of tea.
Thank you for this great recipe and your wonderful website.
Wow! Lots of changes going on here but it sounds like everything worked. I’m pretty sure this isn’t your first go-around with bread. Once you know what the dough should look like, you can get away with certain substitutions. Thanks so much for sharing.
Could you make this with sour dough? Any suggestions how to do that?
Hi Joann,
I have not experimented with this idea. Because this recipe has so many enrichments (eggs, butter, sugar, milk) the rising time would be VERY long without adding any commercial yeast to assist. I’ll play with it and see what happens. Thanks so much for writing.
Hi Paula! Love your site and recipes. So I’ve made this a few times and last night when I made it, there was a hole in the middle of most slices and quite large. I was thinking perhaps too much water? I also used a little more powdered sugar. I read that 2 teaspoons of flour can act as a stabilizer for the filling. Should I try that? Thank-you!
Hi Linda,
This is a very common problem for this type of bread. If you Google cinnamon-raisin bread, you will see many recipe photos with holes where the swirl separates. In my experience, the best way to avoid this is to use a Pullman pan. Put the lid on top for the first half of the bake, then remove it for the last part of the bake so the bread can brown. Not putting raisins into the swirl itself also helps (knead them into the dough before you roll it out). I don’t think I’ve ever tried the flour trick you mention because I don’t like the taste of flour that hasn’t been processed into the dough. Be mindful that you roll the dough securely enough that the air is pushed out as you form it into a cylinder. It’s easy to roll up the bread with an air pocket inside. I hope your bread was tasty anyway.
This recipe looked great and I was very excited to try it. I assembled all the ingredients and got to work, then I nade the mistake of trying to access the video to be sure not to miss any tricks. After several very frustrating, and unsuccessful attempts, to get the video to play (it kept reloading with ads every time I tried), I finally have up and finished (I thought) preparing the dough. While waiting for the dough to proof, I noticed 2 eggs laying on the counter.
I only have myself to blame and maybe I’ll give the recipe another try at some point, but it would be helpful if your videos were useful for more than just endless ads.
Hi Mari,
Thanks for reaching out–I completely understand your frustration! I’m sorry the video gave you trouble and disrupted your baking session. Leaving out ingredients happens to all of us. Here’s an inside tip for the next time that happens when mixing bread with a bread machine. If it hasn’t been more than 15 minutes since the dough finished mixing, add the ingredient you left out and restart the DOUGH cycle. It won’t hurt the dough to be kneaded again in the bread machine because the kneading is so gentle.
I appreciate your feedback about the ads—I’ll look into it to see if there’s a better way to balance the content and ads so it’s less distracting and frustrating. In the meantime, feel free to reach out with any questions—I’m always here to help.
Hope your next baking adventure goes smoothly!
Warm regards,
Paula
p.s. One question I have that you didn’t mention: Wasn’t your dough very dry when you checked to see if the dough was sticking to the side before pulling away? Two eggs is a lot of moisture and your bread would be dry and dense without it. You don’t have to answer, of course, but I was just curious.
I’ll admit- this loaf had been challenging for me to master. Flavor is fantastic, texture was superb- but much of the loaf “split” at the filling swirl. I used the Pullman pan with the lid and misted the dough before I spread filling. At 15 minutes before done time, I took out the loaf to remove the lid…and found the lid stuck fast to the pan. No amount of prying, pulling, or coaxing worked until the lid and pan were cooled to room temperature. The resulting struggle may have split the filling swirl. Next time I will slide the lid on the Pullman pan backwards so it doesn’t seal into place and can be removed. Sent photo to your website for any enlightenment – still a 5 star recipe and cheaper than the $4.00/1 lb loaf gummy textured commercial raisin bread.
Glad you loved the bread Laurie. I would try letting the dough rise a little bit less during the final rise and see if it works better.
a polar blast came through New York this past weekend. when I woke up I thought that a loaf of cinnamon raisin bread would be just the ticket on this cold blustery day. did not need any additional or less of any of the ingredients. it came out delicious. the only thing I would change next time for my oven is to take it out 5 minutes sooner. I also forgot to add the extra quarter teaspoon of yeast because I use active dry yeast. lesson learned for next time. but it came out delicious!
Hi Karen,
Thank you for sharing your experience. A loaf of cinnamon raisin bread is always a good idea.
Taking it out 5 minutes sooner next time sounds good. Hopefully, you have a quick-read thermometer, so you don’t have to guess when your bread is done.
Stay cozy!
Made this cinnamon bread yesterday and it turned out amazing and was a huge hit with all my family. Thank you for your delicious and easy recipes! I will definitely be making this a lot.
Oh Yeah! So happy it turned out good and that the family liked it. I bet you were popular yesterday.
Making this now! Can’t wait for it to be done and will let everyone know how it turned out! Love all your recipes and turn to them all when looking for things not in my meal rotations! Thank you!
Hi Wendy,
How did your bread turn out? Hope it was fabulous! Thank you for writing.
Delicious bread! Make sure to mist the dough with water before adding the filling! It helps a lot
Hi Nick,
I’m so glad you liked the cinnamon raisin bread. And thank you for the 5-star rating. You’re right. Spraying the dough with water is so helpful in keeping the layers together.
Delicious! No need to search for another recipes or technique. This is it!
Thank you for coming back to say so. Enjoy!
I have a KBS machine, it has a 23 minute Raw dough function and 133 minute Leaven dough function. If I want to proof and bake in my air fryer oven, which function should I be using to prep and knead the dough.
Hi Happy,
Use the “Leaven” function.
I have made the raisin bread recipe twice now. Both times I used buttermilk instead of whole milk and I used half bread flour and half whole wheat white flour. The second time I rolled the loaf and then cut it in 3rds as I was using smaller pans. I pinched the cut side on both end pieces for my small pullman pans and the piece from the middle I sliced like you would cinnamon rolls. I placed them in my small greased glass baking dish and baked at 340 degrees for about 20-22 minutes. I kept checking the temperature with my instant thermometer. I put a little icing on them while they were warm – vanilla, powdered sugar, melted butter, and buttermilk(it’s the only milk I had on hand). They turned out perfect!
Hi Beverly,
The last sentence says it all! Glad you enjoyed the cinnamon bread.
Wonderful texture and taste. My machine doesn’t have an “mix in” buzzer so I mixed raisins in when shaping. Didn’t get the raisin distribution I wanted so next time I have to do better manually kneading them in. Checking temp is absolutely the way to go. I would have underbaked if not for that. Thanks for another great bread recipe!
Hi Gretchen,
Great to hear from you. Thrilled that you enjoyed the cinnamon-raisin recipe.
With a little practice, you’ll quickly master the raisin distribution process. Another option is to determine the length of the kneading phase on your machine. Then, set your own timer to remind you to add the raisins 3-5 minutes before the kneading ends.
Thank you for writing.
I would love to make this but try to avoid bread that doesn’t have some whole wheat (at least half). Have you tried this using 1/2 bread and 1/2 white whole wheat?
Hi Shirley,
I have not tried this bread with whole wheat. If I did, I would only start with one cup of whole wheat instead of the same amount of bread flour. If that works, I would increase it slowly. Substituting whole grains changes the recipe’s character. Check the moisture content as the dough kneads to ensure it’s not too dry. Whole grains can be quite thirsty. Whole grains also don’t have as much available gluten so they don’t rise in the same way. If you have white whole wheat flour, I would definitely recommend using it in this recipe.
Let us know how it goes.
I received a bread machine for Christmas so I’ve only had it 2 weeks. This was my first attempt at a sweet bread. And I am so proud of how this cinnamon swirl bread turned out. I followed the directions exactly, but did not have a Pullman pan so I baked it in a glass loaf pan. I baked it at 375 for exactly 35 minutes and it turned out beautifully. I was afraid maybe I had baked it too long because it was very brown, but it tastes amazing. The flavor is out of this world and the swirl is perfect. I wish I could leave pictures of how perfect the bread is. Thank you so much for this recipe and the detailed instructions.
Hi Amy,
It’s so fun to hear from you. Isn’t it satisfying to make a loaf you are proud to share?
Sounds like you did a great job. I might mention that whenever you bake bread in a glass dish, it helps to reduce the temperature by 25˚F. Glass bakes hotter than aluminum or steel.
I would love to see a picture—if you still have any bread left. ? You can email me: Paula at saladinajar.com
Listen. I barely followed the steps. I skipped over the whole layer thing and just threw everything into my bread maker. I used brown sugar instead of granulated and replaced regular milk with oat milk. I also threw the powdered sugar right into the machine. I can’t even tell you how incredibly it came out. It formed into some kind of magical sourdough-like perfection that I didn’t think could ever happen in a breadmaker. I mean the layers, the crust, the way it rose, the….everything. Absolute perfection. I’m speechless. Best thing to ever come out of my bread machine.
Hi Jess,
Wow, sounds like you really went rogue—and it turned out to your satisfaction. Congratulations!
Thanks so much for writing.
I made this exactly as the recipe says and the flavor and interior texture are both fantastic… but the outer crust is quite thick and hard. Any ideas why this happened? I used a regular loaf pan. Oh! And I had to knead in the raisins because I somehow missed the super loud and annoying beeping my machine does when it’s time to add stuff.
Hi Bridgett,
There could be several reasons why your crust was thick and hard. The first suspect is your pan. Is it dark or black? Cheaper pans (often thin) tend to dry out the crust. I can’t recommend USA pans enough. They are shiny stainless steel with a non-stick coating that doesn’t quit. Those pans will revolutionize your baking. (They do not pay me to say this—they’ve never heard of me, I’m sure.)
Have you calibrated your oven lately? Is it possible that the bread was overbaked? Did you use a quick-read digital thermometer to check the interior temperature? After all these years, I use a good digital thermometer almost every time I make bread. It is so easy to be fooled.
Following the recipe “exactly” is no guarantee when making bread. There are many other factors you can’t write into a recipe: temperature and humidity, flour freshness and quality, the amount of tension incorporated when shaping, the baker’s experience with handling the dough, and the baker’s ability to read the dough to determine when it has risen enough—these are just a few things off the top of my head.
Kneading in the raisins probably didn’t hurt anything. We’ve all missed the beep at some time or another. That’s not a problem.
I hope this helps and that something rings a bell for you.
I made this bread as directed in my bread machine and it was the best! Thank you, Paula, for this recipe.
You’re welcome, Roberta. Thank you for the 5-star rating!!!
Hi Paula, Just wondering. Can I just add the cinnamon and raisins(when the fruit/nut add beeps)and touch of cloves to the bread dough all at once when kneading rather than placing it in separately. Sometimes, I am in a rush and just don’t have the time but want to make the bread. Lazy way out I guess you could call it.
Hi Lynda,
Of course, you can. It just won’t look or act like traditional cinnamon-raisin bread. When would you add the powdered sugar? To me, if I’m going to the trouble to make this bread, I would see it through. But the beauty of making your own bread is that you get to do it the way you want.
Can you use regular unbleached flour if i don’t have bread flour
Hi Cheryl,
Yes, you can use regular unbleached flour, but the results will be a little different. The bread will not rise quite as high and will be softer. Bread flour results in a slightly chewier texture that is good for toast and sandwiches. Be sure to check the dough as it kneads in case it needs more flour or water since unbleached flour will absorb moisture differently.
Step 1 stops at “It should be”. I don’t know if the ad is somehow blocking the rest of the sentence, but I can’t read the rest of the sentence. :S
Hi Kat,
I apologize if there was an ad blocking part of the recipe. That is not supposed to happen. I looked at it myself and there was no problem. If that ever happens again, just refresh your screen and that should take care of the problem.
My whole family loved this recipe! Very easy and something I will make again and again. Wondering if you have tried apples instead of raisins for an apple cinnamon bread?
I’m so happy your bread turned out well. I haven’t tried using apples as I have another recipe for cinnamon apple bread. https://saladinajar.com/recipes/whole-wheat-apple-pie-yeast-bread/
why oh why would I have a bread machine to make the dough and then bake in the OVEN?!? Makes no sense at all. Went ahead and followed directions. It was good but not goid enough to heat up the oven in the summer when I can use my other revipes to compkwtely bake bread in my bread machine.
Hi Kerri,
So nice to hear from you.
I am very picky about my bread for three reasons:
1. I often give it away—ugly bread is not good enough.
2. I often sell my bread. It must be as good or better than a bakery.
3. Any bread I eat must be worth the calories.
If you only want bread for breakfast toast or to fill you up, bread baked in a bread machine may be enough. We all have different needs and circumstances. Suit yourself.
Using a bread machine saves me a lot of time with the mixing and kneading process while hand shaping and baking at hotter temperatures than a bread machine can accomplish gives me the best loaf. Thanks for writing.
This made the most beautiful loaf of cinnamon swirl bread! I loved the flavor punch from the cloves, and the egg wash made it look like it came from a bakery! Yum!! Always appreciate all of your detailed tips. I, too, never bake in my bread machine anymore. I don’t have a Pullman pan yet, but this made a gorgeous loaf in a regular pan. I left out the raisins (my husband isn’t a fan) and instead of spraying the dough with water before sprinkling the cinnamon-sugar mixture, I brushed it lightly with some of the egg wash (learned this tip from a Smitten Kitchen whole grain cinnamon swirl bread recipe that I also love—but making yours in my bread machine was more convenient!). Thanks for another great recipe!
Hi Caroline,
That’s a great tip about egg wash. I’ve done that with a chocolate babka before and it worked just like you said. You will enjoy the Pullman if you get one. It’s especially nice that you can bake several sizes of bread in it. Thanks for taking the time to write.
This is the most successful and best bread I have ever baked – bread machine or not! Thanks for a great recipe. I might have to make this once a week for my family!
Hi Cassie,
Thanks for the 5-star rating. I bet you are very popular with your family if you make this every week.
can i use a 13x4x4 pullman for this recipe?
I haven’t tried it, Ted. It definitely wouldn’t bake up as high.
Hello, I plan to make this recipe but am curious about the range in volume for the milk. All other ingredients are precisely noted but milk is a range. Is this a case where I should start with the 1/2 cup but if dough is too dry add more? I don’t want to ruin it out of the gate. Thanks!
Hi Dee,
Yes, you are right. Start with the ½ cup at the beginning. Look at the dough after the mixing starts. It should start to clump right away. After 10-12 minutes of kneading, the dough should stick to the side, then pull away cleanly. If the dough doesn’t stick at all and isn’t tacky, add a tablespoon of milk. Let the mixture continue to mix. If this doesn’t fix the dough, repeat the process. Actually, you should do this with every recipe you make in a bread machine. Read more about it here. I hope the recipe turns out good for you.
I just made this bread using the bread machine to ferment and the oven to rise and bake. It was awesome although I did have a small separation. Just noticed that I missed the step to “mist” the dough, maybe that was the problem. Unfortunately for me, the next day I was diagnosed with diverticulitis and can’t eat it. I am in awe of how good it smells as my husbands toasts it up for himself! No problem, “they’ll” make more, LoL. I am looking up the Pullman pan now on amazon. Anyway, thanks for a truly yummy recipe.
Hi Amy,
I’m so sorry about the diverticulitis. Bummer!! The spritzing helps with the separation, but the Pullman pan is the real secret to very little separation. No guarantees with bread, but I think you’ll enjoy the Pullman pan.
Thank you for this recipe. We love this bread and it never lasts long unless I can sneak half the loaf into the freezer. Fresh slice or toasted, buttered or plain all I can say is yum. I like a fresh slice that I can pull apart, my partner slathers it with butter. Have you ever made a bread & butter pudding with this bread? I may try this. I’ve ordered a Pullman Pan & can’t wait to try it.
Hi Denise,
I’m so glad your bread turned out well. I’ve never tried making bread pudding with this bread because I already know I would be tempted to eat the whole pan. Yes, I’m sure it would be fabulous. I think you will enjoy the Pullman pan. It transforms the texture of so many recipes by controlling the rise. Thanks for writing.
Thank you for this amazing loaf recipe and the detailed instructions. We just love this loaf fresh and toasted. There is one problem we are having with your recipes, they don’t last because we cannot stop eating them because they are so yummmy.
Hi Denise,
So glad you love it and thank you for the 5-star rating!!!
I wish I could show you the photograph of my Cinnamon Swirl loaf! I don’t have a Pullman pan, and it still came out PERFECTLY…no “undesirable spaces”! The neighbor who received it was thrilled. This is my third Paula Rhodes recipe…everyone one has been a HUGE SUCCESS! (Note: if you haven’t made her Hawiian Bread, you missed an AWESOME recipes…the rolls are to die for!)
Hi Becky,
Isn’t it satisfying when you make a bread that turns out perfect? Thanks for sharing your win (and also for the recommendation on the Hawaiian bread).
Not bad for a first attempt, but I still got the “undesirable space” from the swirl at the top of my loaf. Consistency is great, flavor fabulous, not too dense, all of the rise checks were on target (slow filling of finger indentation) and I used 10X sugar in the filling. I’m ordering the Pullman pan specified with the lid instead of the unlidded pan (9 x 5 I think) also suggested. Anything else I can try?
Hi Laurie,
The lid for the Pullman pan will fix that space at the top of your loaf. Can you believe the price for that pan? Crazy! But worth it just for this bread. Those spaces drive me crazy. However, if you look at cinnamon-raisin loaves online, almost everybody has them.
I would love to see a picture after you get the lidded Pullman pan. I bet your loaf will be beautiful. You will soon be famous for your cinnamon loaf. High-Five!!!!
thank you
You’re welcome Sheri. And thank you for the 5-star rating. Have a great week.
I made this just now and I had to say thank you so much. Wow, this recipe tastes absolutely fantastic. Definitely among the best cinnamon raisin bread I’ve ever eaten.
I didn’t have whole milk, so I mixed one part heavy whipping cream with two parts 2% milk and I’m very impressed by how fluffy and flavorful it turned out.
I can’t get enough of this– gonna go eat some right now. Keep up the excellent work!
David,
I’m so happy to hear that you liked it. I agree with you. This bread is hard to resist. I can imagine that using the cream only made it better!!
Made this and it had a very small disappointing rise to it. I read everything (there is quite alot) but when I had the ingrediants to make it I jumped straight to recipe so missed the bit right at the end about using dry active yeast.
The needed info is there but I think it would really help in the recipe section if there was a little asterisk saying to check notes or something.
The other bits about sultana/currant substitution etc is personal choice but I think the note about the yeast is very important and something about it in the recipe would help enormously.
Hi Lorraine,
I’m sorry your rolls didn’t rise so much. There could be many reasons your bread didn’t rise besides the yeast. Active dry yeast normally works fine, but it may take a little longer. I would love to help you troubleshoot. If you are interested, send me more details about your process. Did you use the DOUGH cycle and your own oven, or did you mix and bake it in the bread machine? How warm is your kitchen these days? That can make a huge difference. Did you use the two-finger test to see if your dough had risen enough? You might want to take a quick look at my post about dense bread for more help. Hope to hear from you again.
I use a stand mixer then shape and bake my breads in an oven as well. I want to try this recipe for a friend with currants. If I put the currants in at the beginning with all the other ingrediants would that be ok or should I add them closer to the end? Already tried your 2 tsp starter yoghurt and it was a total sucess, hopefully this will be too! From Melbourne Australia.
Hi Kris,
Congratulations on your yoghurt success. It’s so satisfying to make your own yoghurt–don’t you think?
About the currants: You can certainly add the currants in the beginning, however, if the mixer is strong enough to knead your bread, it will likely pulverize the currants. Your bread will turn brown. If that’s what you like, go ahead. I like to taste and see the currants individually, so I add them closer to the end–like the last 5 minutes. If you forget, you can always incorporate them by hand when shaping the dough. I bet you will like that recipe. So tasty!
@Paula, I think I will add by hand when shaping the dough. After my expensive well known stand mixer died less than 6mnths after I brought it I did some research and eventually got an Ankarsrum Assistent Mixer, it is very powerful, great for kneading all my bread, including the stiffer doughs and never overheats. Wil definitely add after by hand, thanks.
I have a 13×4 pullman pan. Would making 1 1/2 (except for the yeast)of the recipe be enough for this size pan?
Hi Donna,
I do not have a Pullman pan this size, so I can’t speak from experience. From what I’ve read, a 2 lb. loaf is about right for this size. So 1 and one-half times this recipe seems about right. The original recipe is probably close to a 1½ lb. loaf. It’s worth a try. I would love for you to come back and leave a comment about how it went. Your experience would be helpful for my readers.
Has anyone rolled the cinnamon/sugar in the dough then put it back in the machine to rise and bake? Did it turn out ok??
Hi Donna,
Glad you asked. The answer (and picture) is already in the post. I tried it. It worked out fine. Didn’t look as good in my opinion. But it was delicious. I described two ways to do it. Hope that helps.
Never stated when to add raisins
@Debbie, under the FAQ
“When and how should I add the raisins?
Chop the raisins coarsely or use currants (nature’s mini raisins). Add them when your machine beeps that it’s time for add-ins.”
Hi Debbie,
Thanks for letting me know. I’m so sorry if it inconvenienced you. I have added it to the recipe itself.
I just made this bread, although with a few tweaks, and it was delicious. I use the bread for nut butter sandwiches, so wanted a solid piece of bread, rather than with a swirl. I skipped the filling, but added 2 tsps of cinnamon to the dough, which worked marvelously. Of course I had to have a piece of toast first to check it out. ?
Ummmm. I can smell that toast if I imagine hard enough. Yum. Thanks for your kind words. Glad the recipe turned out good for you.
The only issue I had with this bread was I ate 4 slices right off the bat! And my family followed suit, we won’t have a problem storing it, cause it’s almost gone!
I omitted the cloves-not a fan-but followed the recipe exactly otherwise. It wasn’t too sweet, a perfect cinnamon raisin loaf! Thank you Paula for another amazing recipe! Oh and I used the Pullman pan for the first time with this recipe, loaf slid right out!
This bread is amazing. I’ve made it several times now and my grandchildren love it.
I am new to my bread maker. Made this and did the corrections adding the milk. This came out PERFECT, like store bought! I recommend this recipe!
In your instructions you sometimes state “any milk”. I avoid dairy milk and usually use oat milk for most things. You don’t say if you’ve tried anything but dairy milk in your recipes so my question is if you think it would create similar results? Do you know if anyone has tested the recipe with non dairy milk?
Jackie, I have not tested it…yet. But it’s a good idea. I think it would work just fine. The flavor might be slightly different, but I assume that’s OK with you. Depending on how much fat is in your substitute, you might want to add a little more butter to make up for it. It will help the bread to keep from drying out quite as fast.
Love all the awesome recipes you are sending!
Hi Ann,
Nice to “see” you. Glad you are enjoying the recipes.
Next “dough” loaf I’m going to try, Paula. Don’t have a Pullman pan but I know it will be super in just a regular. Thank you!
You’re right. It will be good in a regular loaf pan. That’s what I used for years.
Thanks for setting me straight, my cinnamon raisin swirl came out perfect even though I rushed the rise a bit, it took a little longer to get the internal temp. Picture perfect ??
Congratulations! Isn’t it exciting to see the perfect swirl? So glad to hear this. Thank you for writing back.