Yogurt Strainer Bag: A Reusable Way to Strain Greek Yogurt
Sneak Preview: If you’re tired of disposable coffee filters or messy cheesecloth, a yogurt strainer bag is a reusable alternative for straining Greek yogurt—especially helpful when working with large batches of yogurt.
This post contains affiliate links. As an Amazon Associate, I earn from qualifying purchases at no extra cost to you.
If you’ve struggled with cheesecloth, fine-mesh strainers, or coffee filters when making Greek yogurt, you’re not alone. While I don’t personally consider this my favorite method, a yogurt bag is a great option for those who prefer a reusable solution.
What Is a Yogurt Strainer Bag?
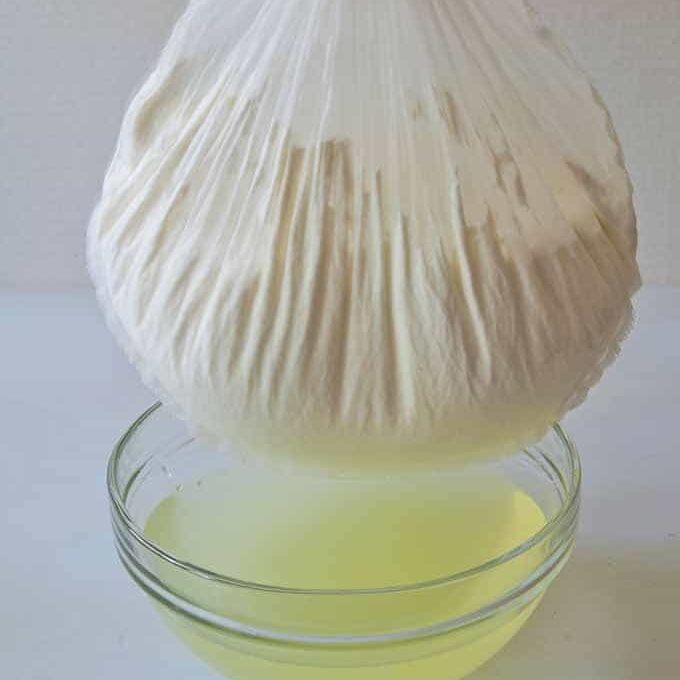
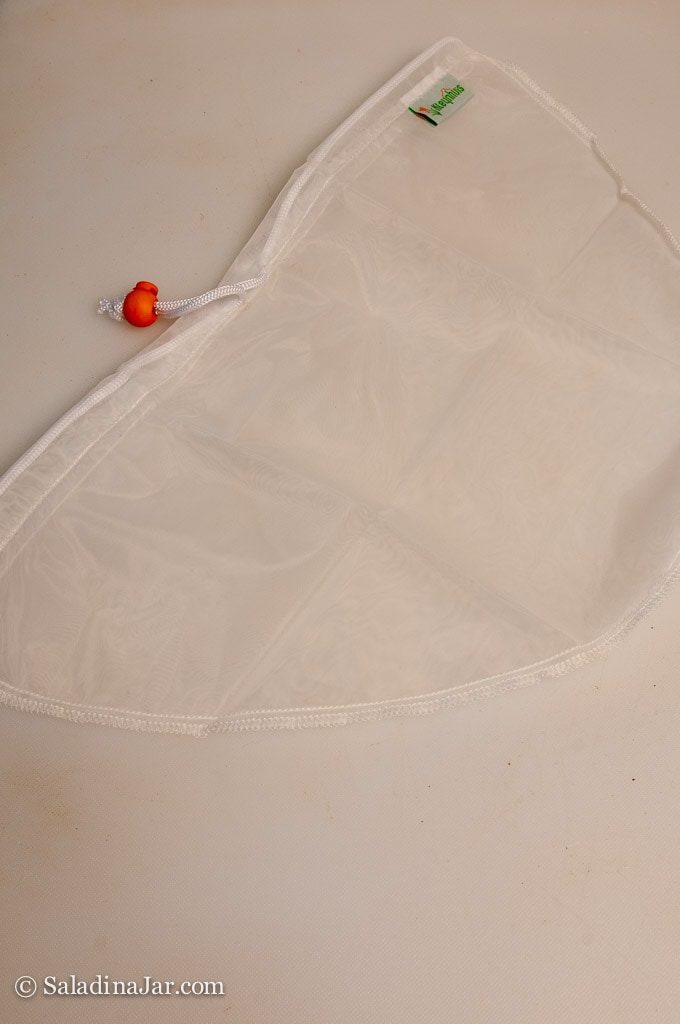
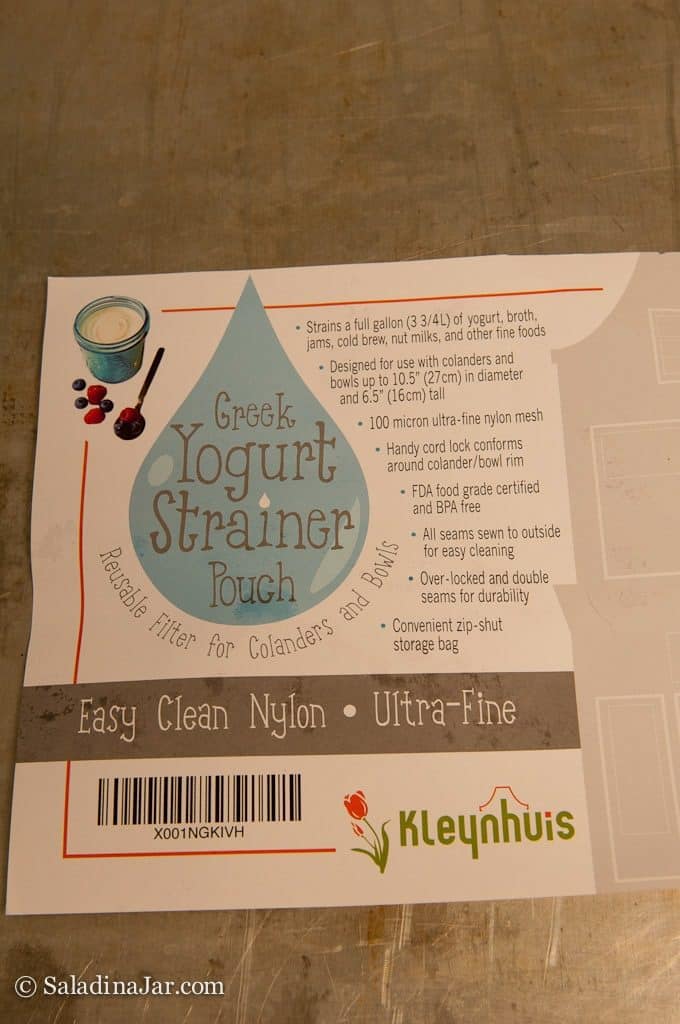
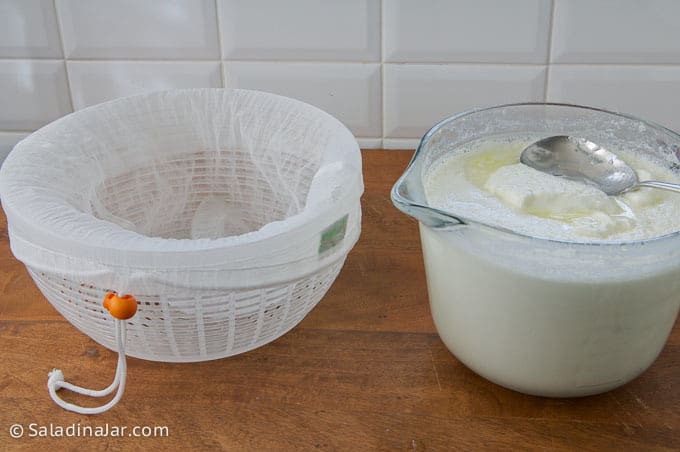
A yogurt strainer bag is a reusable fine-mesh pouch designed for draining whey from yogurt. Instead of lining a colander with coffee filters or dealing with cheesecloth, you pour the yogurt into the bag and hang it to drain.
Some bags hold as much as a gallon at once, which makes them especially convenient if you strain yogurt in large batches. For smaller amounts, I usually reach for a coffee filter and colander instead.

How To Strain Yogurt with a Yogurt Bag?
- Fill the Bag – Pour your yogurt into the bag and cinch the top with the drawstring. If using a full gallon, let it drain for 15-20 minutes before cinching.
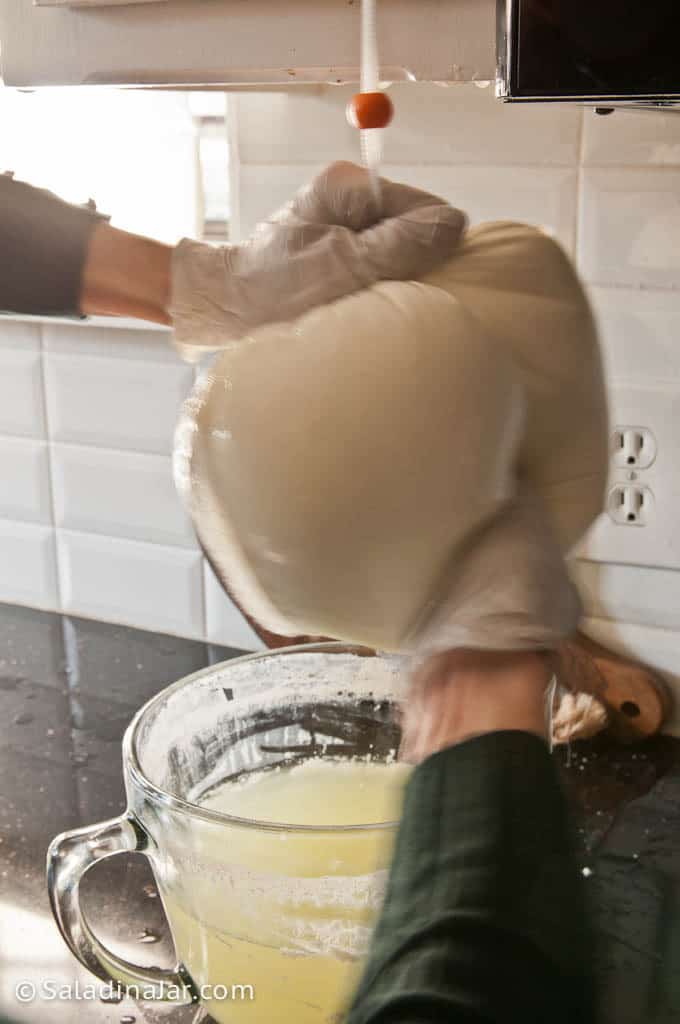
- Hang It Up – Attach the bag to a cabinet handle so it hangs above a bowl or sink, allowing whey to drip out freely.
- Speed It Up – In a rush? Gently squeeze the bag to encourage faster whey drainage.
- Empty & Enjoy – Once it reaches your desired thickness, turn the bag inside out to scoop out your thick, creamy Greek yogurt!
Why Some People Prefer a Yogurt Bag
- Holds up to a gallon at once
- Easy to rinse clean
- Reusable instead of disposable filters
- Stores flat when not in use
Other Ways To Strain Yogurt (Besides a Yogurt Bag)
If you don’t have a yogurt bag, a paper coffee filter set inside a colander or strainer is one of the easiest alternatives. The filter catches small yogurt solids, so the strainer underneath doesn’t need to be especially fine—almost any colander will work as long as the filter fits reasonably well.
A very fine mesh strainer can also work without a liner, but only the finer (and usually more expensive) models are tight enough to hold yogurt properly. I explain what to look for in a fine-mesh strainer here.
If you already own a salad spinner, the large removable colander inside many models works especially well for straining yogurt when paired with a large (gallon-size) coffee filter.
Yogurt can be strained on the counter for several hours because its natural acidity protects it during draining. Refrigerate only if you plan to strain overnight.
FAQs: What You Need to Know
Q: Does this work better than cheesecloth?
A: Many people find yogurt bags easier to clean and reuse than cheesecloth. Cheesecloth works, but it can be messy and harder to rinse thoroughly after straining yogurt.
Q: How long does it take to strain yogurt?
A: Without squeezing, expect about 2–4 hours for thick Greek yogurt. If you gently squeeze the bag, it can be ready in 20–30 minutes depending on how much yogurt you’re draining.
Q: Do I have to hang a yogurt strainer bag to use it?
A: Usually yes. Most yogurt bags work best when suspended over a bowl or sink so whey can drain freely. If hanging space is limited, a coffee filter set inside a colander is often easier.
Q: Can I strain a full gallon of yogurt in one bag?
A: Some yogurt strainer bags are large enough for a full gallon, but check the size before buying. Smaller bags work better for quart-sized batches.
Final Thoughts
If you strain yogurt often—or work with large batches—a yogurt strainer bag can be a convenient reusable alternative to coffee filters or cheesecloth. It’s not the method I use most often, but many readers appreciate how quickly it handles a full batch.
See my complete yogurt-making FAQ here if you have more questions.

Is it possible you mixed up microns and mesh size? Because 200 mesh size is indeed the most common size recommended (by the manufacturers) for yogurt, but that should yield around 100 micron holes, like the product you’re writing about. (200 mesh means 200 threads per inch.)
Hi David,
Yes, it’s possible. (I will remove that comparison.) What I know for sure is that the manufacturer of the yogurt bag pictured here is 100 micron. At least that is what the label shows as pictured in my post. Thanks for writing.
Hi I am frome mexico wher I can buy the mesh bag
Hi Albert,
Amazon doesn’t deliver in Mexico? To be honest, I have no idea. But here’s another idea for straining yogurt. https://saladinajar.com/yogurt/a-cheap-way-to-strain-yogurt-without-using-cheesecloth/
Hi Paula,
I was wondering how you make coffee concentrate. Our fav yogurt flavour is coffee & I have been wondering how to go about flavouring it
Thanks!
Coffee concentrate works fine. However, it will thin your yogurt. If you strain your yogurt a lot, then you can thin it back down with the coffee concentrate. I use Pioneer Woman’s iced coffee recipe. Another way to do it is to use instant espresso. It won’t make your yogurt thinner. Just stir until it dissolves. Great for making coffee ice cream, too.
I have a question…would I be able to also use this as a nut milk bag/juice strainer ? Just curious to see if I can get more bang for my buck since I also need a new nut milk bag. ?
Yes. You could even use it to make iced coffee. If you make very much Greek yogurt, it’s worth every dime.
This is great! I just started making yogurt since my husband eats a parfait for breakfast every morning, and greek yogurt gets expensive! I bought one of these a few weeks ago (https://smile.amazon.com/gp/product/B00KLT6X9W/ref=ppx_yo_dt_b_asin_title_o02_s00?ie=UTF8&psc=1) It works great and holds a gallon, but it does have corners and it won’t fit around my bowls like it looks that one does. Oh well. If I ever lose or damage mine, I’ll replace it with this one.
I love the way you do experiments to see how different variables affect the end result. Have you done one with instant powdered nonfat milk? I add two cups to one gallon skim milk.
Hi Robin,
When I first started making yogurt, I played around with powdered milk. However, the texture seemed to turn the yogurt a little bit chalky for my tastes, so I quit. If you like it, keep doing it. Seems like it would provide extra calcium and protein.
I bought this and am trying for the first time with regular yogurt I bought at the store. However instead of whey draining out, the yogurt is draining out! What have I done wrong???
Hi Susan,
The yogurt is draining out? Is it drinkable yogurt? Hmmm. I can’t imagine that you are doing anything wrong. Wetting the bag might help. The only time I have trouble is when the yogurt did not set up right. But I’m assuming that if you bought it at the store, it should be perfect. Sorry, I’m stumped based on the information you’ve given me.
Hi there,
So I found out that the yogurt I was using had emulsifiers to prevent separation! Who knew??? So I am making my first batch of home made yogurt now.
Susan,
I’m so glad you wrote back. Hadn’t thought of that but it makes sense.
I have two of the strainers, and I absolutely love them. “whey” easier to clean than my Europe wire mesh.
Paula H
Hi Paula, I couldn’t agree more.
Sorry but your visual is misleading. Your whey catcher on the right is curved on the bottom, having less volume, and showing a possibly wrong conclusion by boosting the level of the whey in that bowl. So much more helpful/honest if the volume markers were visible on each bowl.
Hi Laurie,
I went back and looked at the pictures again. Think I see what you are saying. I removed that picture and edited the post to more accurately reflect how using the pouch will allow you to speed up the process with manual manipulation, if you want to. Also, the more yogurt you put in the pouch (up to a gallon), the faster it will drain.
Well Paula, you totally convinced me! I had been humming and hawing about making yogurt for months now, ONLY because I did not want to deal with the draining of it afterwards. After reading all your yogurt posts and amendments to draining preferences, I was convinced that this Kleynhuis strainer was made especially for me. I made my first batch of yogurt within an hour of receiving mine in the mail.
For anyone wondering if Paula has exaggerated the awesomeness of the Kleynhuis strainer pouch in any way, I can tell you that she has not! This thing works perfectly. Like Paula mentioned, it fits a large quantity of yogurt, has a fine weave so that only the whey – not the yogurt – gets strained out, easily releases the yogurt afterwards and is incredibly easy to wash afterwards.
Best of all for me, it takes up NO space in my tiny kitchen and I’m not stuck with a big clunky strainer that can’t be used for anything else.
Thank you Paula for your very thorough review of the Kleynhuis strainer pouch.
Hi I have a question. Do I put the yogurt in the frig first and let it get cold then drain? Or do I drain first then put in frig? Thanks
Hi Margaret,
I drain first. Finished yogurt can sit out on the counter for hours because it is so acid. You can chill it first if you want, but draining off the whey will take a lot longer. And besides, who has room in their fridge for the whole strainer set up unless you are making a very small amount.
Is the “sitting out” portion of your comment also true for coconut milk yogurt?
Hi Ml, I can’t speak with any authority about coconut milk yogurt since I’ve never made it successfully. I can only guess—and you would probably be better at that than me. So sorry.
This is exactly the kind of thing I’ve been looking for. I have a small kitchen and have been putting off making yogurt because I wasn’t sure how to strain it without investing in a big clunky strainer that would take up valuable space. Thank you for the very detailed review. I’m in Canada and don’t see a way to get it here (Amazon won’t ship it here), but have contacted the owner directly and hope that we can figure out a way to get one to me.
Have you tried the cotton version of it? I’d like to stay away from petroleum products as much as possible and would prefer cotton over nylon, but I bet the nylon is much easier to clean.
Hi Kate,
No, I haven’t tried the cotton version for the reason you mention. Takes too long to dry. The nylon dries in less than 30 minutes where I live. Predict that you will love it. So worth the money!
The bag sounds great, but my daughter gave me a strainer with my new yogurt maker. As I thew out the whey the whey I ran to the computer for ideas. so happy to find them. I am lactose intolerant so use lactose free milk. It works!! I have yogurt again!
Wow, I may have to try this! Thanks for sharing!
Oh yes, Gina. I think you will like it. However, we all have different priorities in the kitchen, so you just have to try it.
How does this compare to using a yogurt strainer? My strainer is a cone shaped colander type yogurt strainer.
Thanks!
Hi Debbie,
Glad you asked. What I like about a yogurt pouch is the way I can use gravity and manual pressure to speed up the process. With a colander, there is no way to press down or exert pressure on the yogurt to cause the whey to drain faster. I just have to wait. And because I like my yogurt REALLY thick, it can take 4-6 hours, even all night with a colander. Also, a colander must then be washed. Since I need three colanders every time I make yogurt, they fill my dishwasher along with the 3 2-qt pyrex pitchers I use to incubate the yogurt. With a pouch, I can divide 1-1/2 gallon yogurt between two pouches, hang so they sit on nothing (I use a cabinet handle), drain for a couple hours, squeeze a couple times and “VOILA!,” I have Icelandic yogurt. It takes less than 30 seconds to rinse the bags under the faucet. They dry super fast because they are thin but strong nylon. If you strain much yogurt, they are totally worth 14$.
ps. If you already spent a lot of money on a nice fine-mesh colander, try it to strain bone broth and getting the seeds out of thick fruit puree.
THANK YOU SO MUCH FOR THE GREAT INFO! YES, I BOUGHT MY STRAINER YEARS AGO WHEN I FIRST FOUND YOUR RECIPE AND INSTRUCTIONS ON HOW TO MAKE YOGURT. LOVE IT! YOUR INFO WAS SUPER HELPFUL TO ME. GOD BLESS!
As always, I’m always pleased to find salamander in my inbox! Thanks for sharing this new product with us.
I’ve got a question tho. Under one of the pics of stained yogurt you mentioned something about “before it’s been whipped or amended”.
Whaaatt? Did i miss something? Do you whip finished yogurt? I know mine always looks lumpy after staining but I always just thought that was going to b e one of the drawbacks of homemade. Please tell me how,(details? please? we all know I’m anal and need specific instructions of not videos. lol)
If all this is in a post I missed somewhere please direct me there.
Thank you so much Paula, for being there for all of us. You know we love you!
Merry Christmas!
Tere
PS. Tere here again. I hope you know I meant “something from Salad-in-a-jar…not salamander…in my inbox.” How awful that would be! lol. It’s that pesky spell correct thing?!?
Salamanders? Laughing is a great way to start the day!
Yes, I whip or blend my yogurt. In my original “How to Make Yogurt” video, I did it with a whisk. However, now I use an immersion blender. It’s so easy and does a much better job without the fuss and trouble of using a blender and cleaning it. I like my yogurt thick (that’s why I make Icelandic yogurt) and smooth as ice cream. I also add coffee concentrate or sometimes, blackberry fruit puree, among other things (we go through phases.) Again the immersion blender is the easiest and fastest way to incorporate the additions into the thick yogurt. At first, it will appear thinner. But when chilled, it firms up. We eat it for dessert every single night.
Sorry for this long answer. But you now have given me an idea for a blog post. Thanks, Tere, for writing and asking.
This is ingenious! Good for her, and thanks for telling me about it. I generally don’t make this much yogurt at one time, but if I do, I will definitely purchase this.
To answer your question, I have resorted to cabbage, kale, and brussel sprout salads, maybe with some radicchio thrown in.
I really miss my romaine, but it’s not worth getting sick over. I truly do not like iceburg, and butter and leaf don’t have that crunch! So, I guess we will have to get over it, Paula. I’m thinking of trying to grow some indoors under a grow light , crazy, right?
That last sentence gave me a good laugh. Let me know how that works out.
Yes, it’s the crunch I miss, too. But too much cabbage and brussels sprouts have their own disadvantages. Saw online today that the FDA has lifted the ban for a good part of the nation. Hope it won’t be long before romaine hits the stores again.
By the way, even if you only make a small amount of yogurt, this would work great. So easy to clean and takes up no room to store.