How To Make a Hearty Rye Bread Recipe (Bread Machine)
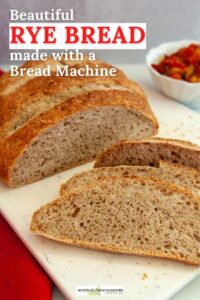
Sneak Peek: A dense, flavorful rye bread made with a bread machine sponge and finished in the oven. This method produces better texture and deeper flavor—but it does require planning ahead.

This post contains affiliate links. As an Amazon Associate, I earn from qualifying purchases at no extra cost to you.
Rye bread plays by different rules than wheat bread. The dough is stickier, the rise is more subtle, and the structure depends as much on handling as it does on ingredients. That’s often where bakers get frustrated—especially when using a bread machine.
This recipe is designed to work with rye’s personality, not fight it. Your bread machine handles the mixing and kneading, while an overnight sponge builds flavor and strength. Shaping and baking the loaf in the oven gives you better control and a sturdier, more sliceable result.
The process takes a little planning, but the payoff is a dependable rye loaf with good flavor and structure—well-suited for sandwiches, toast, or hearty breakfasts.
Understanding Rye Flour (Key Takeaways)
Rye flour behaves very differently from wheat flour, and those differences affect how the dough feels, rises, and bakes.
- Lower gluten content makes rye dough naturally sticky.
- Rye dough spreads outward more than it rises upward.
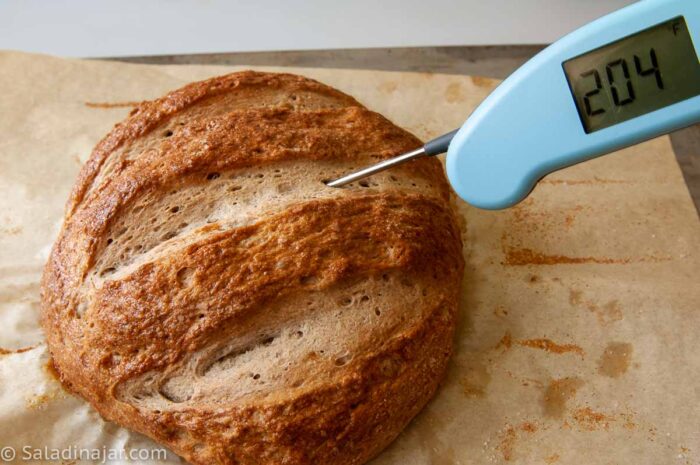
- Internal temperature matters: rye bread is fully baked at 200–207°F.
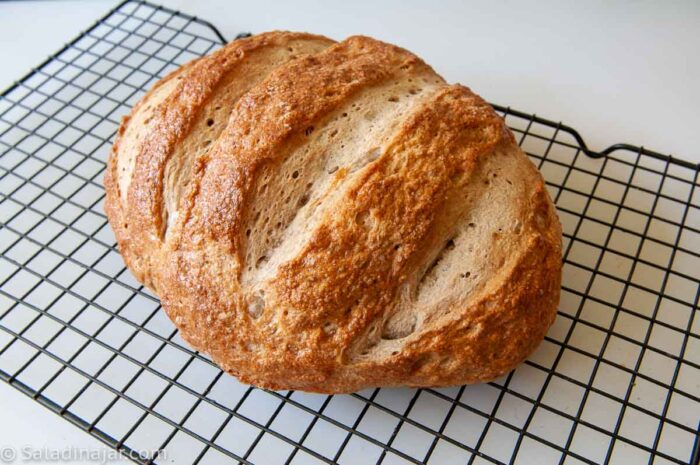
- Cooling time is essential: allow at least 1 hour, ideally 3, before slicing.
- Careful kneading helps: controlled mixing prevents over-flouring and structural issues.
“Because of the sap-like gum that appears naturally in rye, and because of its water-binding capacity, rye doughs will always feel moist and sticky when you test them with your finger. This makes it easy to add too much flour during kneading, so be careful not to add more than a tablespoon or two more than the measurement given in the recipe.
The Bread Lover’s Bread Machine Cookbook—Beth Hensberger
three Solutions to common problems with rye bread
1. Avoiding Holes and Tunnels: Use a bread machine to mix and knead the dough. Press all air bubbles out before shaping the dough. TIP: If you don’t have a preheat phase on your bread machine, try restarting the DOUGH cycle and running for 1 minute to compress the holes before shaping.
Use the bread machine to mix and knead the dough thoroughly. Before shaping, press out all visible air bubbles and let the dough rest for 10–15 minutes.
Tip: If your machine doesn’t include a preheat phase, restart the DOUGH cycle for 5-10 seconds to help compress excess air.

2. Preventing a Flat Loaf: Let dough rise in a steep-sided bowl to encourage upward growth.
3. Reduce Cracking on Top: Proof dough with the smooth side down, then flip before baking. Lightly greasing the bowl helps release the dough without tearing.
Ingredients & Substitutions
• MILK: Whole milk gives the best flavor. Low-fat or half milk/half water also works. The milk does not need to be warmed.
• HONEY: Adds flavor and a hint of sweetness. Halve it if you prefer less sugar.
• SALT: Table or sea salt is fine. If using Kosher salt, add an extra ¼ teaspoon.
• BUTTER: Unsalted is best. If using salted butter, reduce added salt slightly. Don’t melt butter—chop it finely instead.
• WHITE WHOLE WHEAT FLOUR: Mild and wholesome. Red whole wheat also works, though slightly denser.
• ALL-PURPOSE FLOUR: Balances the wheat for a softer texture. You can sub bread flour for extra chew.
• INSTANT YEAST: Use bread machine or instant yeast. No proofing needed. Active dry yeast works if you follow the package instructions.
• CORNMEAL: For coating. Semolina flour also works and gives a crunchier crust.
Essential Equipment (Recommended but not required)
Note: You can see all of these things and more in my Amazon store. As an Amazon Associate, I earn from qualifying purchases.
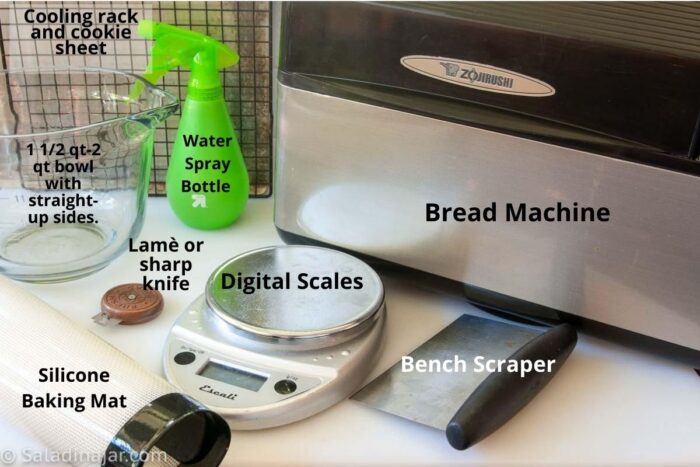
BREAD MACHINE: Use the DOUGH cycle. Avoid doubling the recipe (dough is dense/sticky).
DIGITAL SCALE: Essential for accuracy, especially with flour. Avoid scooping.
PROOFING BOWL: 2-quart bowl or casserole dish with steep sides. Try a 2-quart plastic batter bowl like this one from OXO.
A LAMÉ OR SHARP KNIFE: Slash loaf tops with a lame, razor, or sharp knife.
How To Make and Shape Rye Bread
⬇️ Jump to the recipe below for exact amounts and detailed instructions.


Want a Lighter Texture?

- Reduce rye flour and increase wheat flour.
- For example, if the recipe calls for 2 cups of bread flour and 1 cup of rye, decrease the rye flour to 1/2 cup and increase the bread flour by 1/2 cup.
- Use light rye instead of dark rye (which contains bran).
- Add vital wheat gluten (2 tbsp per 3 cups flour).
How to Make a Hearty Rye Bread Recipe (Bread Machine)
Video
Ingredients
Sponge
- ⅔ cup (151 g) water, cool
- ½ cup (53 g) rye flour
- ¼ cup (30 g) all-purpose unbleached flour
- 1 ¼ teaspoons instant or bread machine yeast
Dough
- ½ cup + 1 tablespoon (128 g) water
- 2 teaspoons molasses (not blackstrap)
- ½ cup (53 g) rye flour
- 2 cups (240 g) all-purpose unbleached flour
- 2 teaspoons caraway seeds, optional
- 1 ½ teaspoon table or sea salt
- 2 teaspoons olive oil
Glaze (optional)
- 1 large (50 g) egg
Instructions
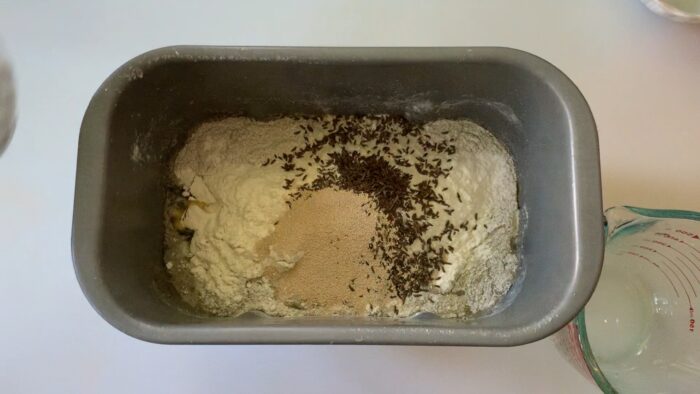
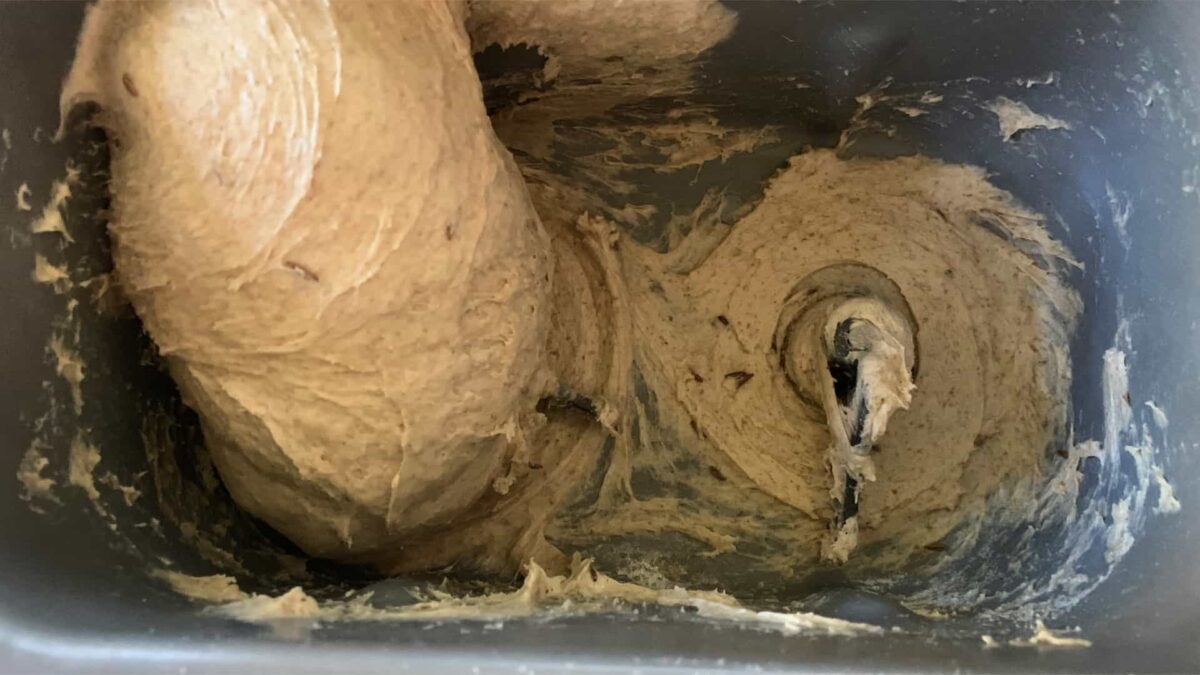
- Mixing the sponge: Add 2/3 cup (151 g) water, cool, 1/2 cup (53 g) rye flour, 1/4 cup (30 g) all-purpose unbleached flour, and 1 1/4 teaspoons instant or bread machine yeast to the bread machine pan in the order given.
- Choose the DOUGH cycle. Let the sponge mix for about 5 minutes. Use a small spatula to clean the flour out of the corners. Unplug the machine and let sit overnight or for at least 10-12 hours.
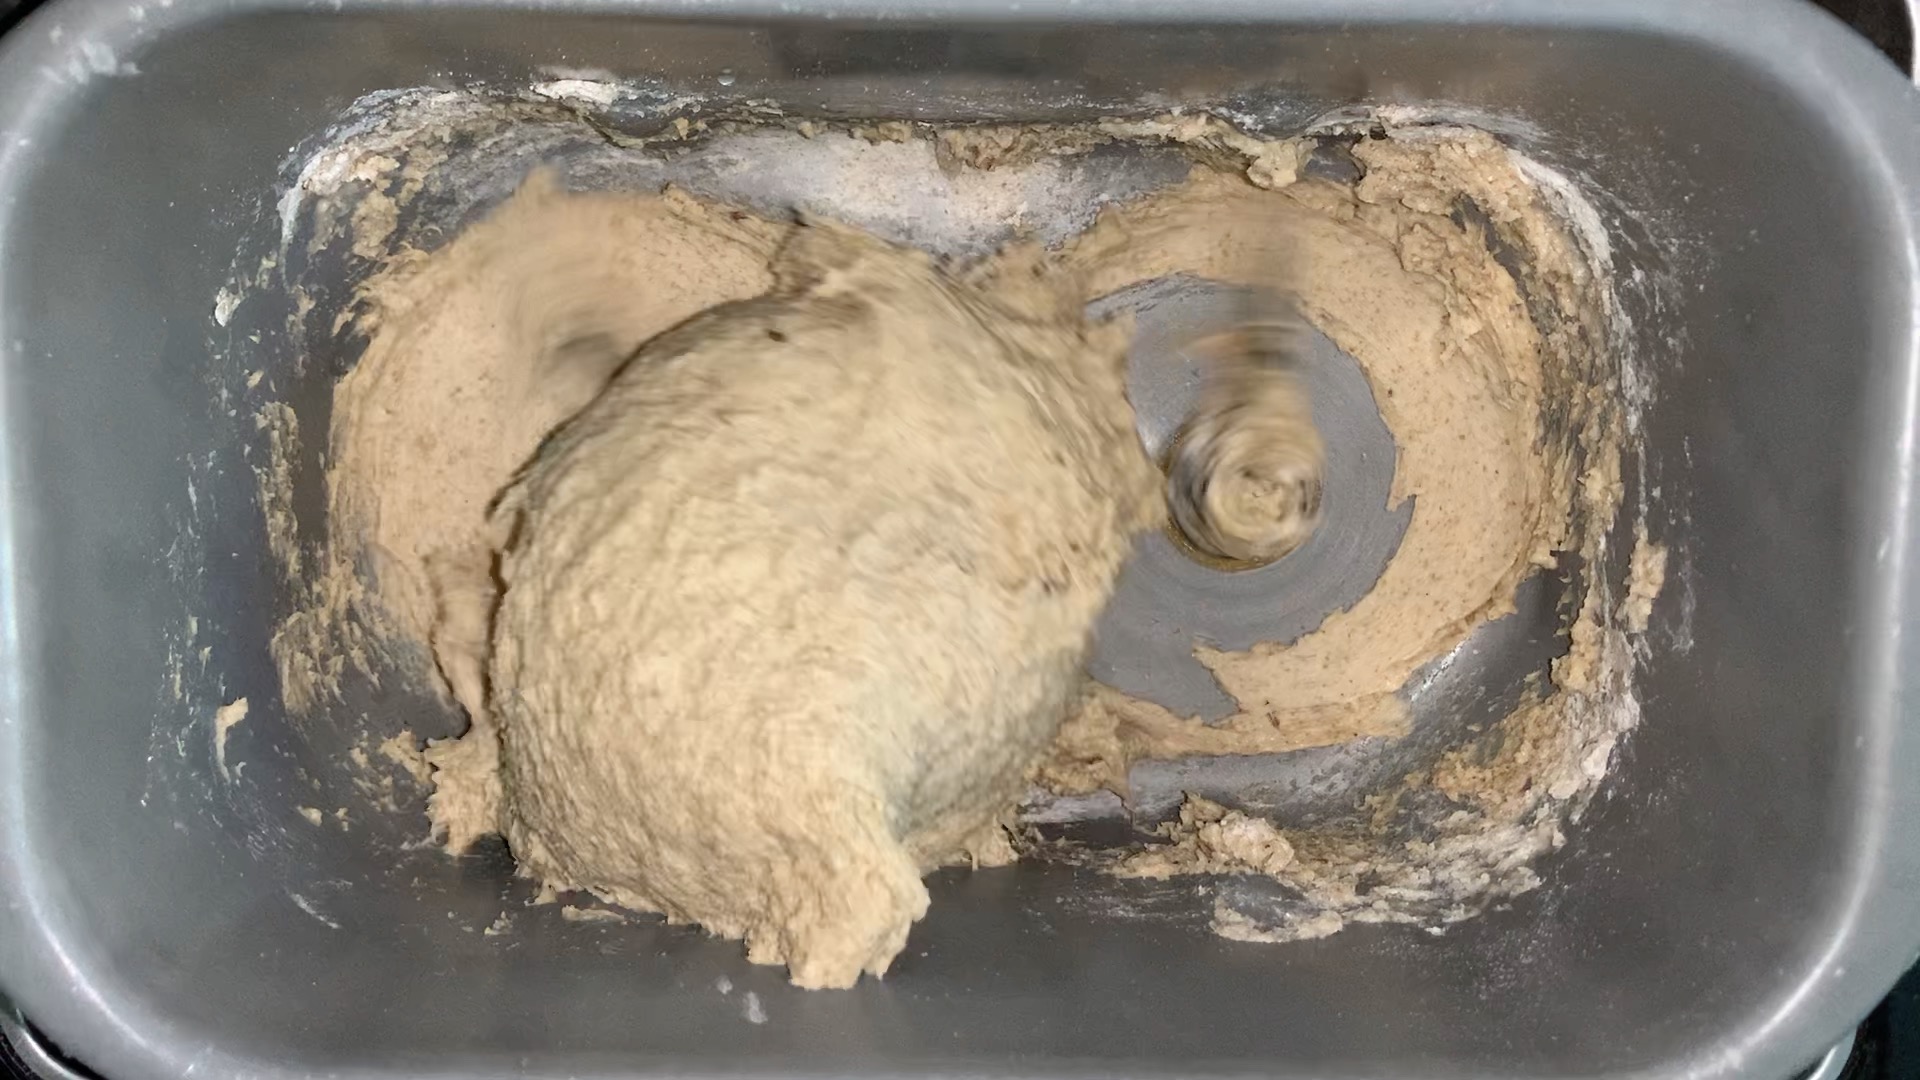
- Mixing the dough: Add 1/2 cup + 1 tablespoon (128 g) water, 2 teaspoons molasses (not blackstrap),1/2 cup (53 g) rye flour, 2 cups (240 g) all-purpose unbleached flour, 2 teaspoons caraway seeds, optional, and 1 1/2 teaspoon (1 ½ teaspoon) table or sea salt, (everything but the olive oil) to the sponge you already mixed the day before. Select the DOUGH cycle. After about 5 minutes, add the olive oil.
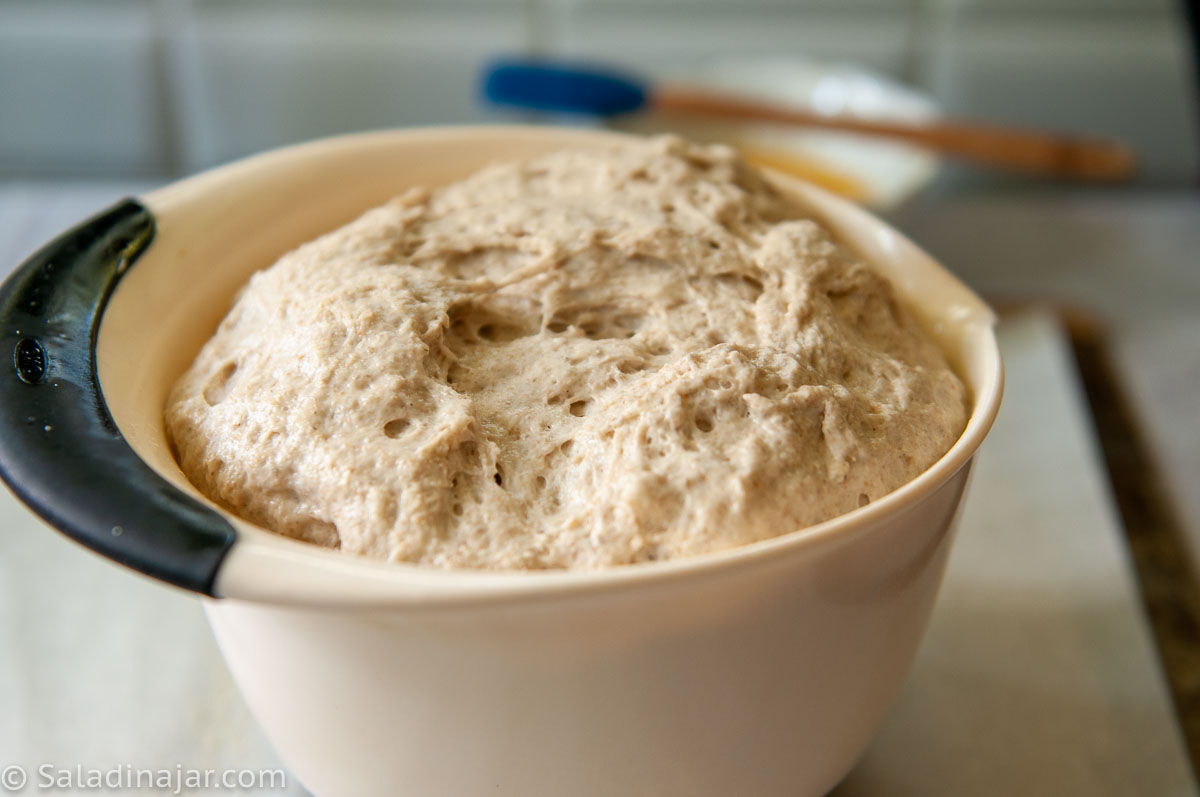
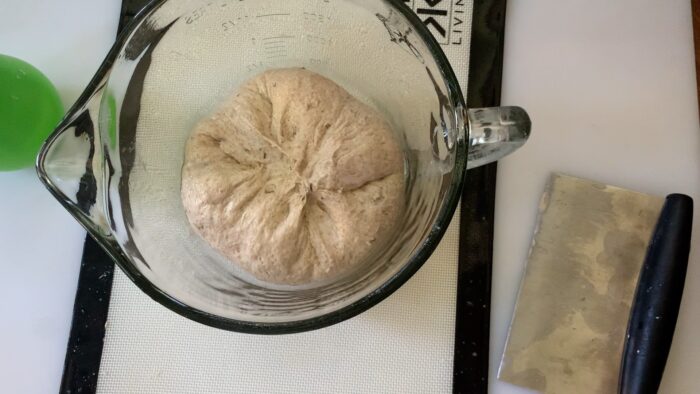
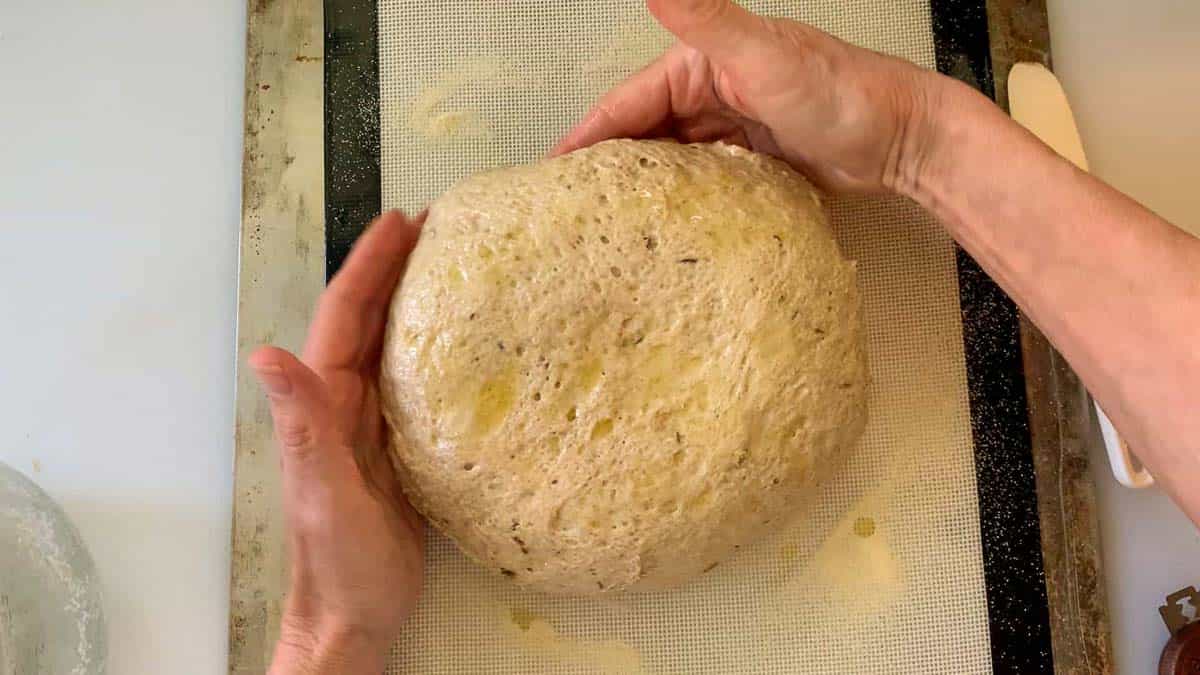
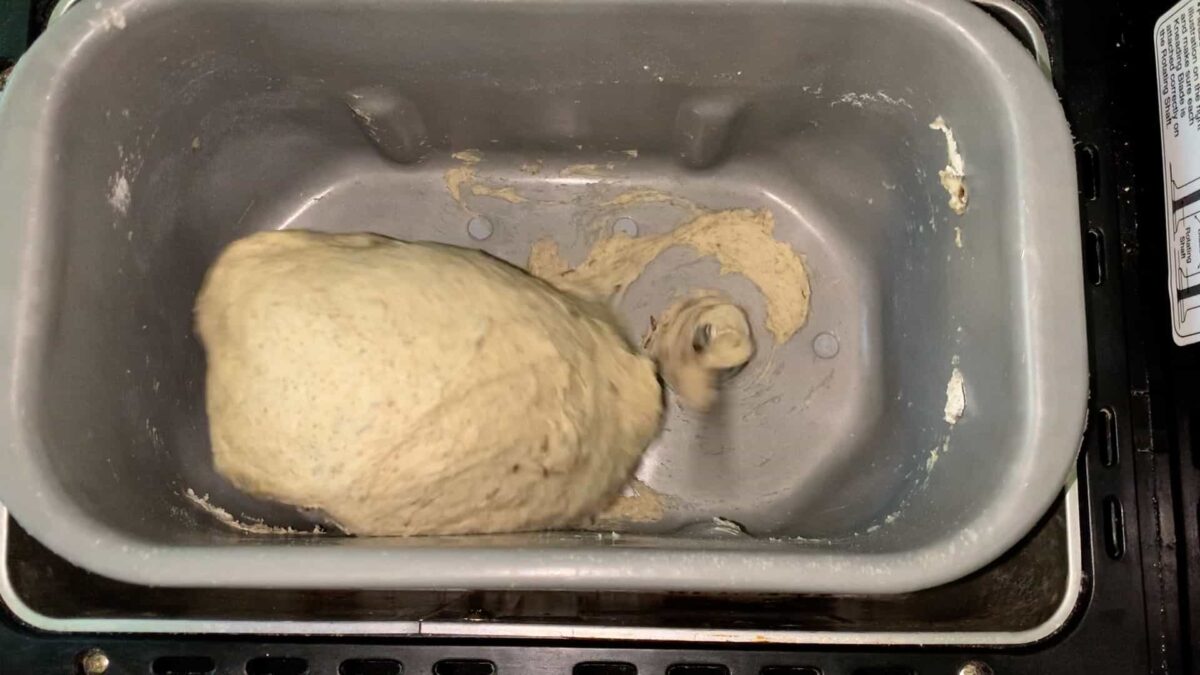
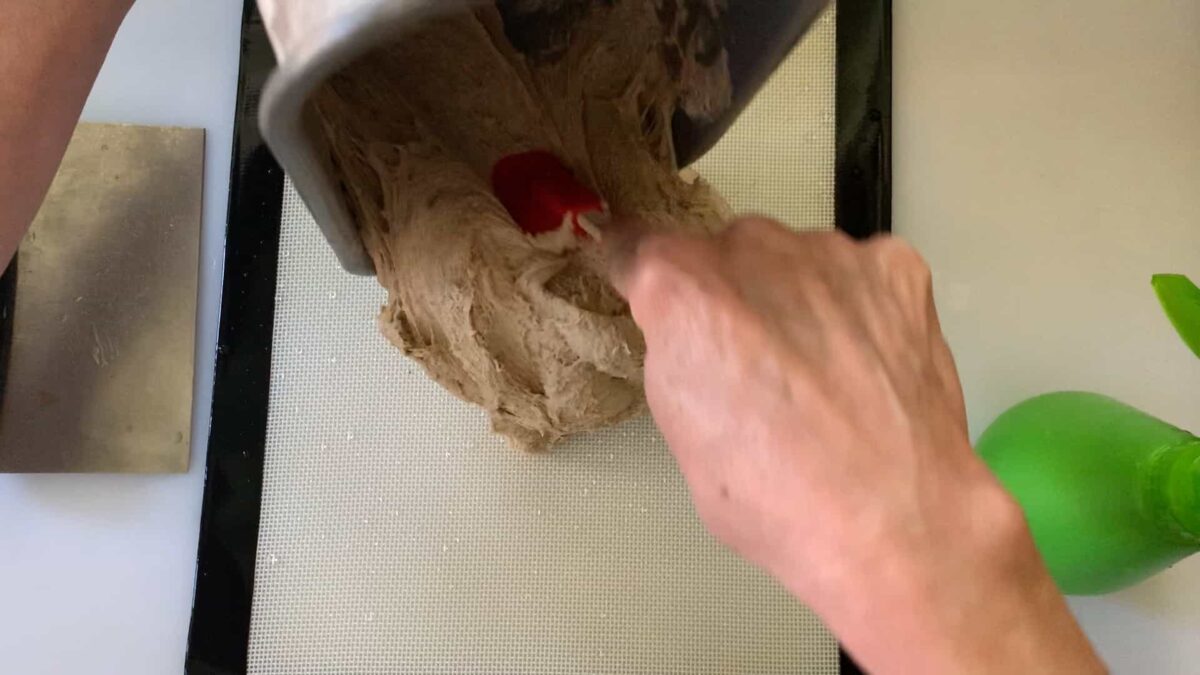
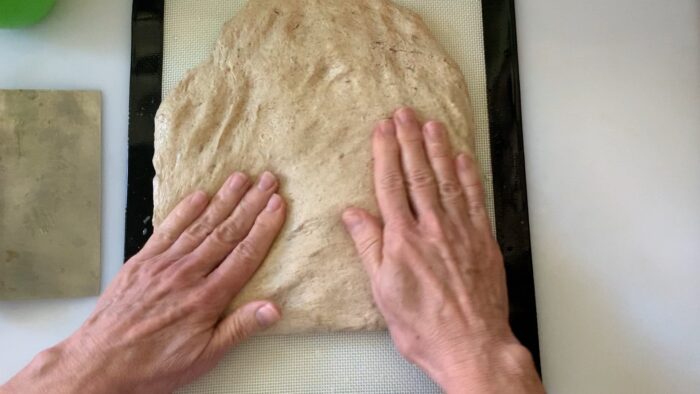
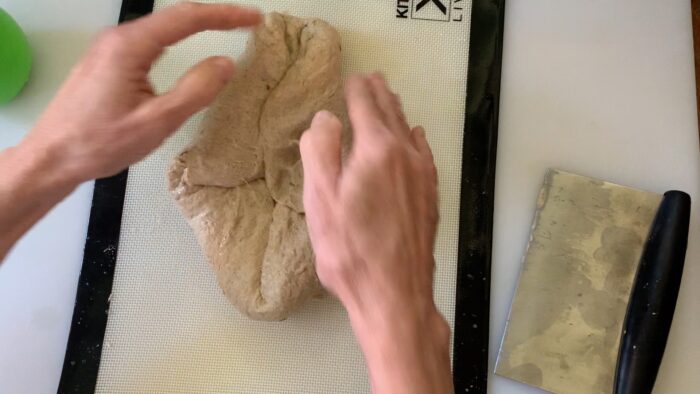
- Shaping: When the DOUGH cycle completes, pull the rye bread dough out of the machine onto a surface you have sprayed with water. (I like to use a silicone baking sheet so I can also bake on it, then throw it into the dishwasher.)Wet your hands and manipulate the dough to form a rough ball. Allow to rest for 5-10 minutes.Press the dough into a large circle approximately 9-10 inches in diameter being careful to push out all the air bubbles.Fold the edges to the middle and press to secure. Keep folding the dough toward the middle to make a tight ball.Use 2 teaspoons of olive oil to completely coat the inside of a round container (1 1/2 to 2-quart) with high, steep sides. (The post provides more details.)Place the ball of dough smooth side down into the oiled container.
- Final rise: Cover loaf with a tea towel or a cheap plastic shower cap. Allow to rise until double the original size.
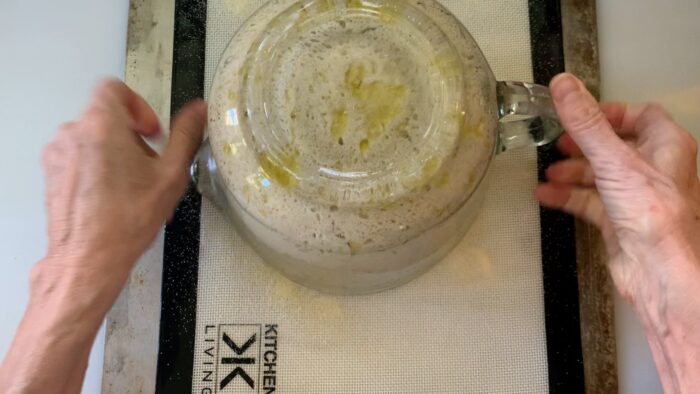
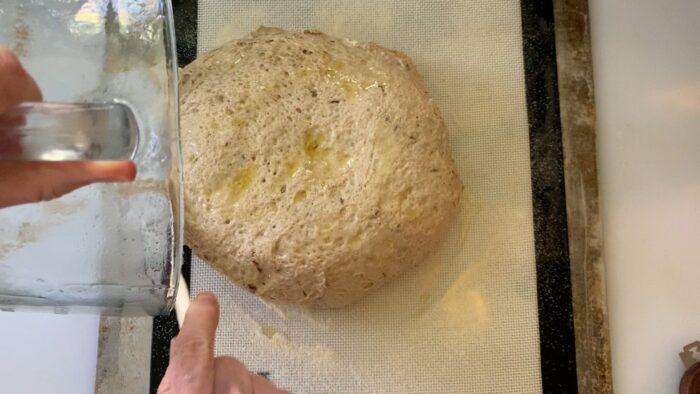
- Preparing to bake: Preheat your conventional oven to 425˚F(220˚C).Prepare a cookie sheet by covering it with a silicone mat, a piece of parchment paper, or sprinkle it with semolina or finely-milled cornmeal.Remove cover and use a thin spatula to carefully loosen dough from the edges of the bowl.Carefully turn the bowl upside down and let bread gently fall onto a cookie sheet. The smooth side of the ball should now be showing.
- (Optional glaze) Whisk 1 large (50 g) egg in a small bowl. Use it to glaze the loaf. Sprinkle with Kosher salt. Work quickly so your loaf won't have a chance to spread.
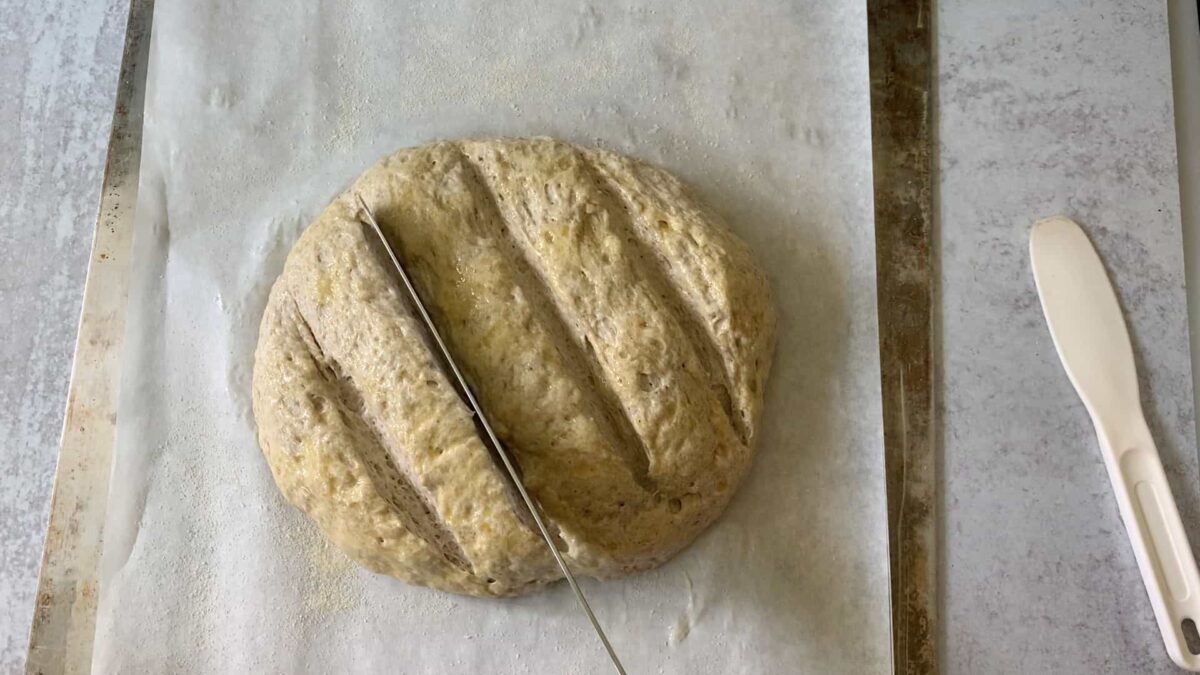
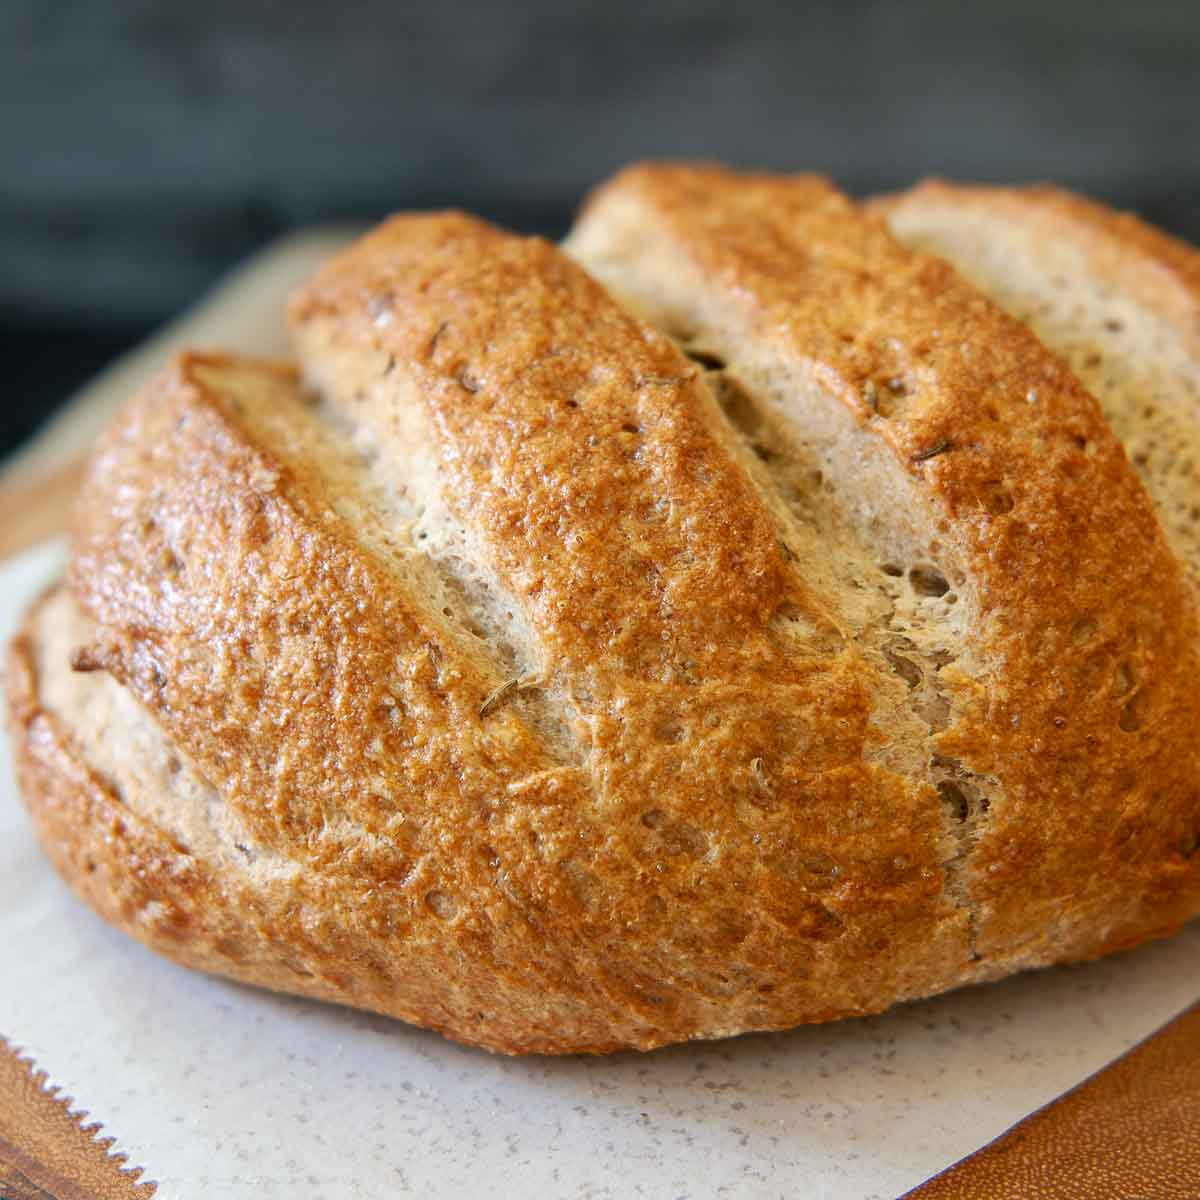
- Bake: Make three to five slashes across the top with a clean single-edge razor blade or a very sharp knife. They should be at least 1/2-inch deep. Repeat the same slashes if necessary to make the slits deep enough.Without delay, place bread into a hot oven before the dough has a chance to spread out. Bake for 30-40 minutes or until a quick-read thermometer reads 200˚F (93˚C) and the rye loaf is nicely browned.
- Cooling: Move the loaf to a cooling rack to cool for a minimum of 1 hour. Slicing into the loaf sooner can result in a gummy texture.
Notes
- Add ingredients to the bowl in the listed order.
- Mix on LOW until moistened, then knead on speed 2 or 3 with a dough hook for 5-10 minutes until smooth and elastic.
- Cover and let rise in a warm place until doubled.
- Gently deflate and shape as directed in the recipe.
- Mix all ingredients into a shaggy dough ball in a large bowl.
- Turn onto a floured surface and knead for 10-20 minutes until smooth and elastic.
- Place in a greased bowl, cover, and let rise until doubled.
- Gently deflate and shape as directed.
Equipment
Nutrition
All images and text ©️ Paula Rhodes for Salad in a Jar.com
Final Thoughts
Rye bread doesn’t behave like white or whole-wheat bread, and that’s exactly why it’s worth understanding on its own terms. Once you know what to expect—stickier dough, a gentler rise, and the importance of structure—the process becomes much more predictable.
If you’re new to rye, take your time with the sponge and pay attention to the dough as it kneads. This is the kind of recipe that builds confidence with experience, and each loaf will teach you something useful for the next one.
— Paula
Home Economist
Food Worth Sharing
p.s. If you’re a beginner, this might be a challenge, but it’s worth the effort! Looking for something simpler? Try my Crusty French Bread or Cracked Wheat Berry Bread.

Hi Paula! I love this bread, and have left comments to that effect. I would really like to try a sourdough version, and at least one person commented the same interest. I have a rye starter, and a plan for adapting the sponge for sourdough:
100g. room temp. water
100g. rye sourdough starter
35 g. all purpose flour
Here, I was aiming to get close to the total weight measurement of your sponge. I haven’t had a chance to try it yet, but before I start in with actual ingredients, I was was hoping to get your feedback about this sourdough sponge plan before I plunge in with actual ingredients. I was wondering if I should decrease the quantity of starter, increase the water and add some rye flour. What do you think?>
Hi Jane,
You are a bit ahead of me. Although I love to add a teaspoon or two of rye flour to my sourdough recipe, I have not made a rye starter. If I were going to try, I think I would skip the sponge and add the sponge ingredients to the rest of the recipe all at once. (In other words, no sponge).Then, add your rye sourdough starter. You will have to add more flour, but I would do that gradually as it’s mixing and kneading. Watch the dough as it kneads and add the flour as needed to get dough that looks like you are used to with the regular recipe. I would not add more rye flour, because it tends to be very sticky. Are you going to use any yeast or depend on the starter for leavening? Your decision will affect the taste, texture and timing. It might be easier to find a sourdough rye bread recipe that’s already been tried and tested. Sorry, I can’t be more helpful, but please do report back if you try it.
It doesn’t use much yeast. Is this correct? No extra yeast after adding to the biga?
Hi Kimberley,
Yes, that is correct. Instant or bread machine yeast is more powerful than active dry yeast. However, many people are unaware of this and continue to use the same amount they were accustomed to with older recipes. Also, the longer your dough takes to rise, the more flavorful it will be. So I tend to be stingy with the yeast. And one other thing, rye causes bread to rise a bit faster because yeast loves to ferment in rye. Having said all that, you could add another 3/4-1 teaspoon of yeast when you add the flour without any harm. If you are adventurous, give it a try. (One more thing: this rye bread is meant to be somewhat dense and sturdy to make a good sandwich as opposed to a light and fluffy loaf.)
Can you use an active starter instead of a Biga? What would be the exchange rate? My starter is made with light rye flour.
.
Hi Cookie,
I have not experimented with this idea, but I’m sure it would work. Not everybody has starter around the house, including me, back when I first developed this recipe. I have no idea what the exchange rate is. That would take some trial and error. If you try it, check the dough as it nears the end of the kneading phase to see if you need to add flour or water to make the dough perfect. Baking with rye flour can be a bit tricky, but I have confidence you can do it.
I’m making this in the next few days, and know I’ll have better results than my last try, with a non Salad in a Jar recipe. This one looks very much what I was looking for to begin with as far as a rye bread.
The only thing I plan to add is King Arthur’s Deli Rye Flavor. I’ve had it for about a month, and am looking forward to have a good Deli Rye Flavor loaf, with caraway seeds, of course. I just got in a new batch of VWG, which I used in breads with rye or wheat flour before.
I’ll let you know how it goes!
I can’t wait to hear about it, Cookie.
I’m living in a place where good deli like rye bread is hard to find. Troubling for a Polish person raised on good rye bread from Toronto! I recently found your recipe and along with my research of using whey (or yogurt) in recipes to make a ‘faux’ sourdough, I made your rye bread, however, not using a bread machine (I don’t own one). And, I am so happy to report that it worked!!!!! I baked the loaf in a tin pot with the lid. Kept the shape round. I used 100g of whey (strained from yogurt) combined with water. Might try a little less next time. And I’ll use your suggestion of adding gluten flour or Fleischmann’s booster next time. And yes, the rye flour is sticky and just doesn’t want to knead nicely! Nevertheless, I now have a sourdough-like rye bread that I can make, thanks to you!!!!!!!
Thank you so much for sharing your experience! It makes me so happy to hear that this recipe helped you create a sourdough-like rye bread that reminds you of home. Using whey from yogurt is a great hack.
Baking it in a tin pot with a lid sounds perfect for keeping that round shape, and I’m glad it worked so well. Rye dough can definitely be a bit tricky to handle, but it’s always worth the effort when the result is a flavorful, hearty loaf.
I can’t wait to hear how it turns out with gluten flour or Fleischmann’s booster next time. Thank you for letting me be part of your bread-baking journey—Polish rye bread from Toronto has some tough competition now! ?
Hello, Paula. I tried to comment to your reply to my earlier comment, but I can’t seem to get that to work, so here’s a new post.
I have tried this again, and baked the loaf in a pullman pan. I tried my best to score it after the egg wash, but in the pan, scoring was difficult. I think it diminished the loft of my bread, and the surface was not as attratctive or rustic as an artisan loaf. (delicious bread, nonetheless).
If you make a rye bread in a loaf pan, do you score it, or just eggwash and bake without scoring?
I’d like to know if I should leave it unscored in a pan. Also, is the cooking time in a pan really 350? Just checking.
Hi Jane,
I wouldn’t bother to score a loaf in a Pullman pan. It’s too narrow, as you already figured out.
I turn down the temp to 350 because I don’t want a crispy crust when using a Pullman pan. It’s for sandwiches. But if you want a crispy crust, turn the temperature up higher. I would try 400˚F. All ovens are different, personal preferences vary, and the purpose of the bread does, too. Play around with the temperature to see what you like.
I had high hopes for this bread, and the final product totally exceeded all that I expected. I couldn’t believe that I made this, and eagerly began sharing slices of it with people! The molasses lends a rich flavor without pronounced sweetness, the crumb is close but light, the crust is show-stopping when scored and then given the egg wash. And the taste is divine! Hearty, moist, with an evident yet not overwhelming rye flavour. It smells great when it is cooking.
After many repetitions of baking hard, flat, sourdough rye disks (the dogs love them as toys, but they are the only ones!), this is the loaf that I’ll be going back to when I want some rye. Thank you for a terrific recipe.
Hi Jane,
What a nice review. Made my day! Rye can be tricky, so I’m glad this recipe worked out for you.
I was reluctant to try a rye bread because they seemed so complicated but this recipe is so easy and delicious! I have made multiple times now and it turns out great, I cook it in a cast iron Dutch oven.
Hi Janet,
Thank you returning to leave a comment and 5-star rating. Rye can be tricky so congratulations on mastering that skill. I bet baking it in a Dutch oven made a beautiful crust.
Another winning recipe, thank you! Loaf turned out perfectly. thank you for including great step by step instructions to follow. Loaf is almost gone and searching for the next recipe to try.
Hi Lynne,
Thank you, thank you. I hope this comment will encourage others who haven’t tried this recipe yet.
Hello Paula! Thanks so much for this wonderful recipe and ALL of your hard work. I would like to try baking the rye bread in a loaf pan. Should I let the dough rise in my 2-QUART MEASURING PITCHER as per the recipe or should I let it rise in my loaf pan?
Thank you for your kind words, Randy. Let the dough rise in the loaf pan. Good question.
I’ve tried almost every one of your 66 recipes, I think, and with double-bladed bread machine I got at an auction, they’re turning out even better. The rye, though, is something that tugs at my heart. My late parents were Displaced Persons from Latvia- and they traveled many miles to get rye flour and other strong milled grains near Toronto in the 1950s and 60s. This past June, three of my nieces- daughters of all my late siblings, asked if I would go to Latvia with them – their old Auntie at 78 still speaks the language and they trusted me to introduce them to the countryside and its values. There, in a peasant culture, bread is not just a foodstuff- it’s the work of hands in cultivating the grain, trusting the various leavenings and enjoying it with a strong sense of family tradition. We even found stalks of rye woven into our midsummer crowns! At our first lunch in Riga, I had potato pancakes but my niece had just a basket of the homemade bread with Latvian butter. (At the Central Market, you buy butter according to its %fat content – bliss!) And our favourite granola? – with rye bread crumbles and cranberries.
YOUR rye bread recipe is the best I’ve found. That overnight “biga”, the use of all-purpose flour instead of our wonderful Canadian bread flour, and the molasses- just right. However, for my household, adding 2 Tbsp. of buttermilk powder to the machine tipped the taste to perfection.
Thank you for the respect you have given to homemade bread again- and for the brilliance of your directions.
P.S> – an what do Latvians eat with beer as their snacks? – not chips or peanuts. They slice stale rye into “fingers, fry it quickly on both sides, then rub it with raw garlic and sprinkle with salt. I tried spritzing with oil and air-frying instead – not too bad!
Hi Daina,
What an interesting letter. You trip to Latvia sounds like the trip of a lifetime. I can only imagine how much your three nieces enjoyed it. The food sounds incredible. I also like the sound of Latvian snacks. That’s a great use of stale bread–an idea that all of us breadmakers need tucked up our sleeve.
Thank you for your kind words about my website and especially the rye bread. I can’t wait to try the buttermilk powder. Sounds like the perfect flavoring considering what else is going on in that recipe.
First time trying this rye bread, followed the recipe but left out the caraway seed as I don’t like them, turned out phenomenal. I did take the bread course first so I understood better what to expect and check. Absolutely will be adding this to my regular bread making. Love it. Thank you Paula
HiJacqueline,
I’m so excited that this recipe worked for you. I’m with you on the caraway seeds. Using them only affects the taste–nothing else. Thanks so much for the 5-star rating and taking the time to come back and leave a comment.
my bread dough is on the second rise as i type this. everything was spot-on with is recipe… EXCEPT, that dough needed way more flour!! it was too sticky to get it off the silicon mat even with wet hands and a wet spatula. and forget about making it into a tight ball. whew! it was a mess! i ended up trying to knead in about .5 C all-purpose flour just so I could manipulate the dough. any suggestions?
Hi Marcus,
Yep, rye flour can be challenging! You could try chilling the dough after the DOUGH cycle completes. This would enable you to shape the dough more easily. The dough will need a bit more time for the final rise so it can warm up.
Hi Paula! I’ve made this rye bread several times…I think I finally have it down! 🙂 I add 1TBS flour at the 5 minute mark and the dough is perfect when it comes out of the bread machine pan; still sticky but not so much that I can’t work with it. Also, I accidentally put 2 TBS olive oil in instead of 2tsp the first time I made it. The bread turned out so soft, I’ve made that change every time now. I took it to church with some soften butter….they loved it! thank you!
Marcus, Your tip about the olive oil is quite interesting. I’m going to try it myself the next time I make this recipe. Thank you for sharing what works for you with everybody.
Finally made a great rye bread thanks to you. My sponge wasn’t bubbly like in the photo. Substituted Brown sugar and honey for molasses, and baked in 9×3 bread pan. thanks to ‘Salad in a Jar’ for the great recipe. It’s a keeper.
I like your substitutions. Thumbs up for making a loaf you enjoy!
I really appreciate how you included all the conversions on the recipe! It makes putting everything together so much easier.
Thank you, Anna. What an encouraging comment!
Paula – love this bread! Could I use this recipe to make a loaf?
Would really love square slices.
Thank you,
Stephanie
Stephanie,
Yes. I would love to see a picture if you try it (paula at saladinajar.com).
I’m trying this recipe now but am wondering if there is a way to use the bread machine for the entire process, rather than finishing the recipe in the oven.
Thank you for the recipe
Hi Satsuma,
This recipe has not been tested for baking the bread in a bread machine. Results may be unpredictable. Of course, you’re welcome to try it. Who knows? You might get lucky and produce a decent loaf, especially if you’re not too picky about the crust, the texture, and the appearance.
Hi Ms Rhodes.
I’m a beginner bread baker from Asia.
Regarding to one of the ingredient “caraway seeds” for the rye bread, if thereS any substitute or similar substance we can use to replace it (such as poppy seeds, sesame seeds, …)? Please kindly advise because caraway seeds is not common in the north Asian pantry or grocery stores.
Hi Martha,
You might try dill or anise seeds. Are those available?
I finished making a second batch of the Hearty Rye Bread with great results. Your meticulous instructions and a couple suggestions by your follows helped make the process and baking a pleasure. I used more whole wheat flour (freshly ground) for a hearty loaf. The sponge rested for 16 hours to insure assertiveness of taste. Your suggestion on two teaspoons of caraway makes a difference this time, any less tends to fade. As for the molasses, only had the unsulphered blackstrap on hand without any reservations. I leaned toward the “hearty” all the way. One point though on the kneading–before the final rest, the texture may have improved with more folding over and pressing. Yet slicing so easy with few crumbs. I do need a new bread knife to fully do justice to your recipe. Thank you Paula.
Hi Connie,
Freshly ground whole wheat sounds terrific. I guess you only do the amount you need for one recipe? Or do you make a lot when you do it? Interesting observation about the kneading. Thank you so much for your detailed comment. I’m sure it will be helpful to others who try this recipe.
About the knife, I have a new favorite you might check out. (Nevermind that I already have five serrated bread knives.) Check out this one: https://store.177milkstreet.com/products/suncraft-seseragi-bread-knife. I really like it.
My bread machine had been sitting idle for at least 10 years before I got the urge to make rye bread for the first time ever and found your incredible recipe designed for us occasional bakers who need encouragement. The stay-in-place lifestyle did have an impact too the last 2 years. Before beginning, I had all the ingredients surprisingly! Although I preferred to get whole wheat flour (freshly ground at our local health store in Altadena). The results were great, could have been a bit more moist (otherwise 5 star). Husband loved it too. Now I have freshly ground whole wheat and am beginning my second batch & will add carraway seeds. Thus, the results will be different. I’ll let you know. Thank you for ensuring success with your baking experience.
Hi Connie,
I’m sorry your bread was a little dry. Did you check the dough as it mixed to make sure it wasn’t too dry or too wet? Did you use water instead of flour when handling the dough? Many people tend to use too much flour when shaping the dough because rye flour can be sticky by nature. The other thing that can cause dryness is overbaking. Did you use a quick-read thermometer so you could tell precisely when the bread was baked through? I hope this is helpful if you make this recipe again. Caraway seeds will be delicious added to this bread. Let me know how your next batch turns out.
I just made this bread for the second time, OUTSTANDING. The crust is so crunchy, the inside is as soft as a babys ass. I just love it. I recieved a breadmaker for christmas and i’ve been tearing it up, but this by far the best. If you havn’t made a pumpernickle yet please statrt soon.Sorry ain’t checked yet lazy ass.
Great to hear from you, Mark. High five on the rye bread. I haven’t made pumpernickle yet. I need to work that into my schedule.
Hi Paula,
Just cut into this loaf of Rye bread! YUM! Thank you, Paula! This reminds me of the Bohemian Rye we used to get (can’t anymore). It’s gonna be good for the corned beef panini tonight.
Thank you!
I wish I was eating dinner at your house, Cherie. Those paninis sound delicious! Thanks for your affirming words.
Paula,
Thank you so much for a great recipe, and the help you offered to make this the best rye bread I’ve ever eaten. I made it in a bread pan, and it came out perfectly sized for sandwiches. I added 1/4 cup rye flour and reduced the white flour by the same amount. I also added 2 tsps of gluten to ensure a full rise. I did have to bake it for over 40 minutes to get the proper temperature, but the biggest problem was waiting 3 hours to taste it. ?
High Five!!!! I’m so glad it turned out good for you.
This turned out to be the best rye bread I’ve ever had. The texture is firm, and the rye taste outstanding! I switched a 1/4 cup of rye flour to make it more rye tasting, which worked out perfectly.
The video shows adding all the ingredients to the bread machine and then running the dough cycle. The recipe calls for a sponge, let sit overnight, and then run the cycle with all the ingredients. Is there much difference in taste and consistency if you do it either way. Letting a sponge sit overnight isn’t a problem, and I would guess the preferred method for taste, but curious of the results using each method.
Hi Al,
Yes, you are right on all counts. I inadvertently left that part out of the video. What was I thinking? I’ll blame it on Covid and the cabin fever that was going on back then.
Your bread will be better if you make the sponge the night before. However, you may not care about having the “best” so it’s OK to skip it. I always make the sponge because it is hardly any trouble–just have to think of doing it. I plan to redo the video.
Paula, Do you substitute 2 tablespoons of vital wheat gluten for 2 tablespoons of flour in this recipe?
I recently made your whole wheat bread and love it.
Thank you.
No, not in this recipe. The recipe was developed without Vital Wheat Gluten–but you can add it it you want a lighter bread. It’s also optional in the whole wheat bread, so you have to make adjustments if you use it. Does that make sense? Hope this answers your question. Glad you liked the whole wheat bread.
Hi Paula,
Pat Wood says she adds 2 T gluten and your response is that it is necessary for this recipe. But I don’t see it listed anywhere in the recipe? Do you add gluten to this? If so, when?
/
Hi Cindy,
No, vital wheat gluten is not in the recipe. Rather I talked about it in the post as an option. It is definitely NOT necessary for this recipe. Here’s what I wrote about lifted directly from this post. “Add vital wheat gluten for additional rising power. Start with two tablespoons to three cups of flour. You may have to add some water—start with one tablespoon at a time.” If you take a quick read of this post, I think you’ll get the bigger picture. Hope this helps.
The pictures and video are great for a novice. However, the pictures match the recipe, but the video shows the bread being baked in a pan. I would prefer to use a pan, as I want this for sandwiches. Is the time and temperature for baking the same as on a cookie sheet?
Hi Al,
To bake in a pan, use a non-stick 8½ x 4½ inch loaf pan. Bake for 30 minutes at 350˚F. I will add this to the notes in the recipe. Thanks for asking.
Do you put the sponge in the fridge overnight or at room temperature?
Hi Don,
I leave it on the counter overnight. If you find you don’t have time to make bread the next day, then you can refrigerate the sponge for 3-4 days.
Hope this helps.
I have been looking for hearty, crusty, flavorful bread recipes. This one definitely fit the bill. I’m not experienced at breadmaking but just followed all the directions and my loaf turned out great! I live in a dry state so I had to add a little extra water. I left out the caraway seeds because I’m used to European rye bread that doesn’t have them. I’m very happy with the results!
Thank you so much for this recipe – it is exactly what I was looking for. Have made 3 times and turns out perfect every time. I too do not like that airy dough that is full of preservatives that you buy at the store. This is just great!
I made this bread today and it was delicious. Thank you for walking me through the process, that was a great help.
It is the second of your recipes I tried (first being the oatmeal sunflower bread, which also turned out very well). I used honey as I didn’t have molasses, and I used ordinary light rye flour, and anisseed in stead of caraway. My bread was a slightly flatter bread than yours, but it was crusty and delicious, and the change of the ingredients probably had nothing to do with the flatter result.
Thanks for the great recipes and all your work trying out the best methods. I can’t wait to make more delicious bread!
So glad to hear this Lisca. Your substitutions sound just right. Rye bread wants to flatten out and will do so at the first opportunity. That’s why I let mine rise in a bowl with straight-up sides. When I dump it out, I hurry like crazy to slash it, glaze it, and put it in the oven before it can flatten out too much.
Thanks so much for writing.
We loved this recipe, in fact, all your bread machine recipes I have tried,
have turned out great! Thanks for the great recipes.
Yay! I’m so excited that it turned out good for you and you liked it. Rye bread is a new adventure for me but after many batches of not-so-great rye bread, I was jazzed about this one.
I am not a fan of airy, white sandwich breads that are typical of bread machine recipes and had put my bread maker aside in favor of no knead recipes for more rustic breads. The bread from this recipe falls in between but it is hearty enough to upgrade it from sandwich bread.
Next time I will probably change the flour ratio to use more rye, but it worked quite well as is. I did my second rise in a well floured banneton and had no issues with sticking. I then baked the loaf on parchment paper in a preheated Dutch oven for the allotted time and temperature, removing the lid for the last 5 minutes. Very happy with the results!
Hi Carol,
I so glad you let me know that this recipe worked for you. I, too have ventured into “no-knead recipe land.” It’s a good bread. But the bread machine has its own merits.
I think your plan to increase the ratio of rye to flour is a good one if you want an even heartier bread. The current recipe is just about the limit for my family. That’s the cool thing about making it yourself, right? Customize all you want.
Paula I finished my rye bread this morning. Started it yesterday and it is awesome. It turned out really well for my first try. Thanks for a great recipe.
Hi Cathy,
I’m SO GLAD to hear this. This is a more advanced recipe, so I say, “Congratulations!”