The Secret to Better Bread in a Bread Machine: Check the Dough
Sneak Peek: The best bread machine tip I can offer? Open the lid and check the dough. This simple habit helps you fix problems early—too dry, too wet, or just off—so you get better bread every time.
This post contains affiliate links. As an Amazon Associate, I earn from qualifying purchases at no extra cost to you.
Most bread machine problems don’t come from bad recipes or faulty machines—they come from walking away too soon. A bread machine can mix and knead beautifully, but it can’t tell when the dough is too dry, too wet, or missing an ingredient. That’s where you come in.
The single most important habit you can develop is simple: open the lid and check the dough while it’s kneading. This quick step lets you catch small problems early and fix them before they ruin an otherwise good loaf.
“Your bread machine has no brain–it needs you to step in and save the loaf!”
When to Check the Dough
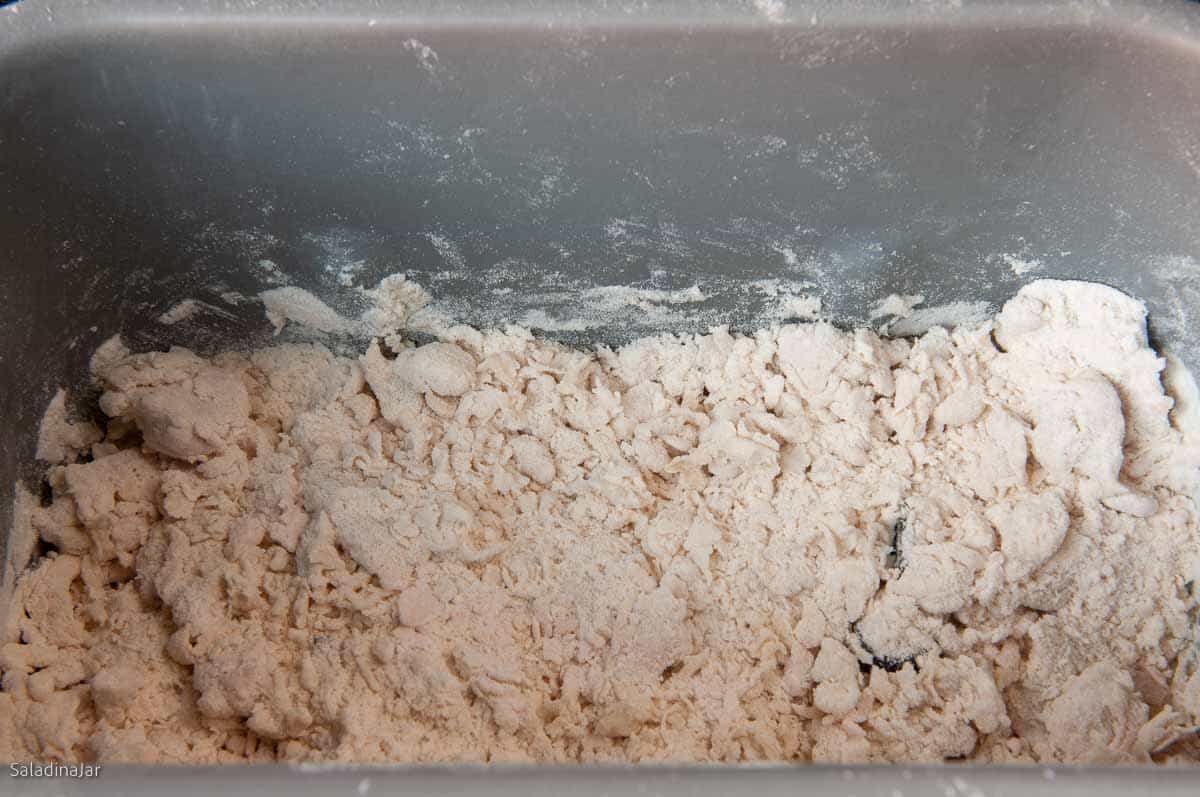
➊ First Check (1–2 minutes in):
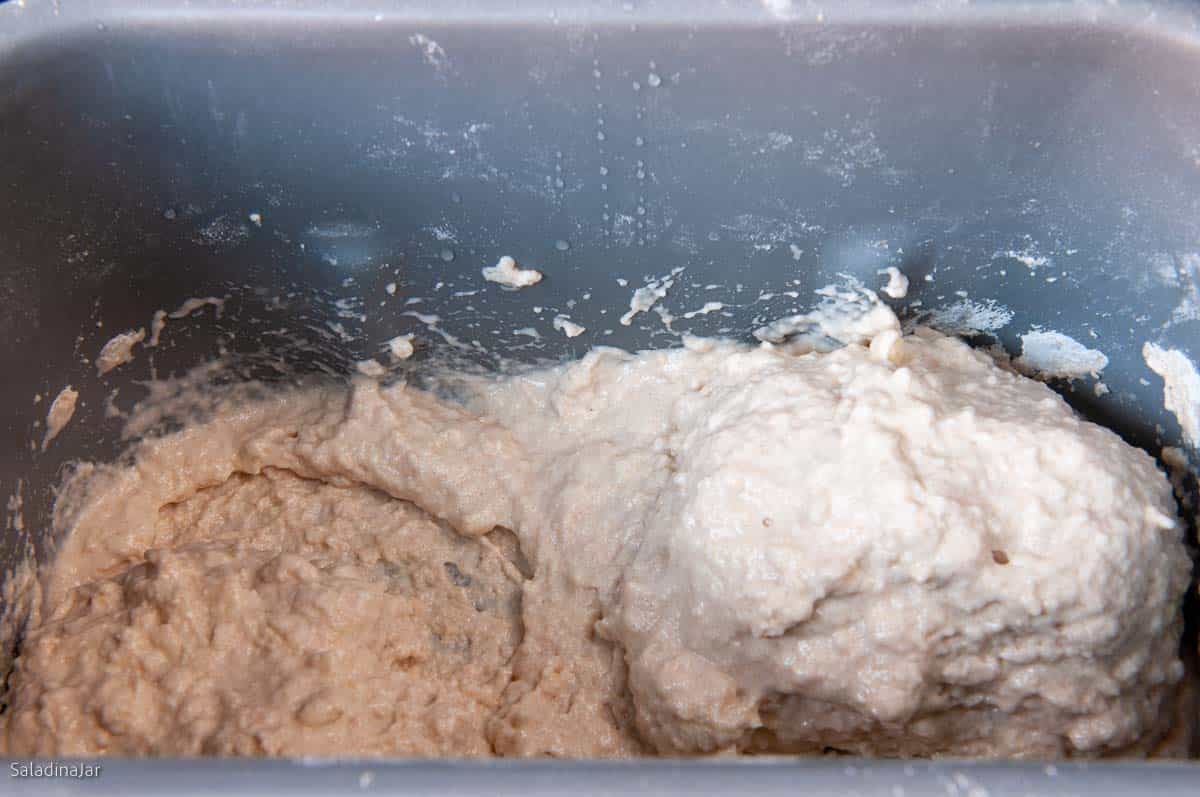
Lift the lid to make sure the paddles are turning, and the pan is seated properly. The dough should begin clumping into rough, messy lumps—not dry crumbs or thick batter.
Tip: Keep a spatula handy to scrape unmixed flour from the corners if needed.
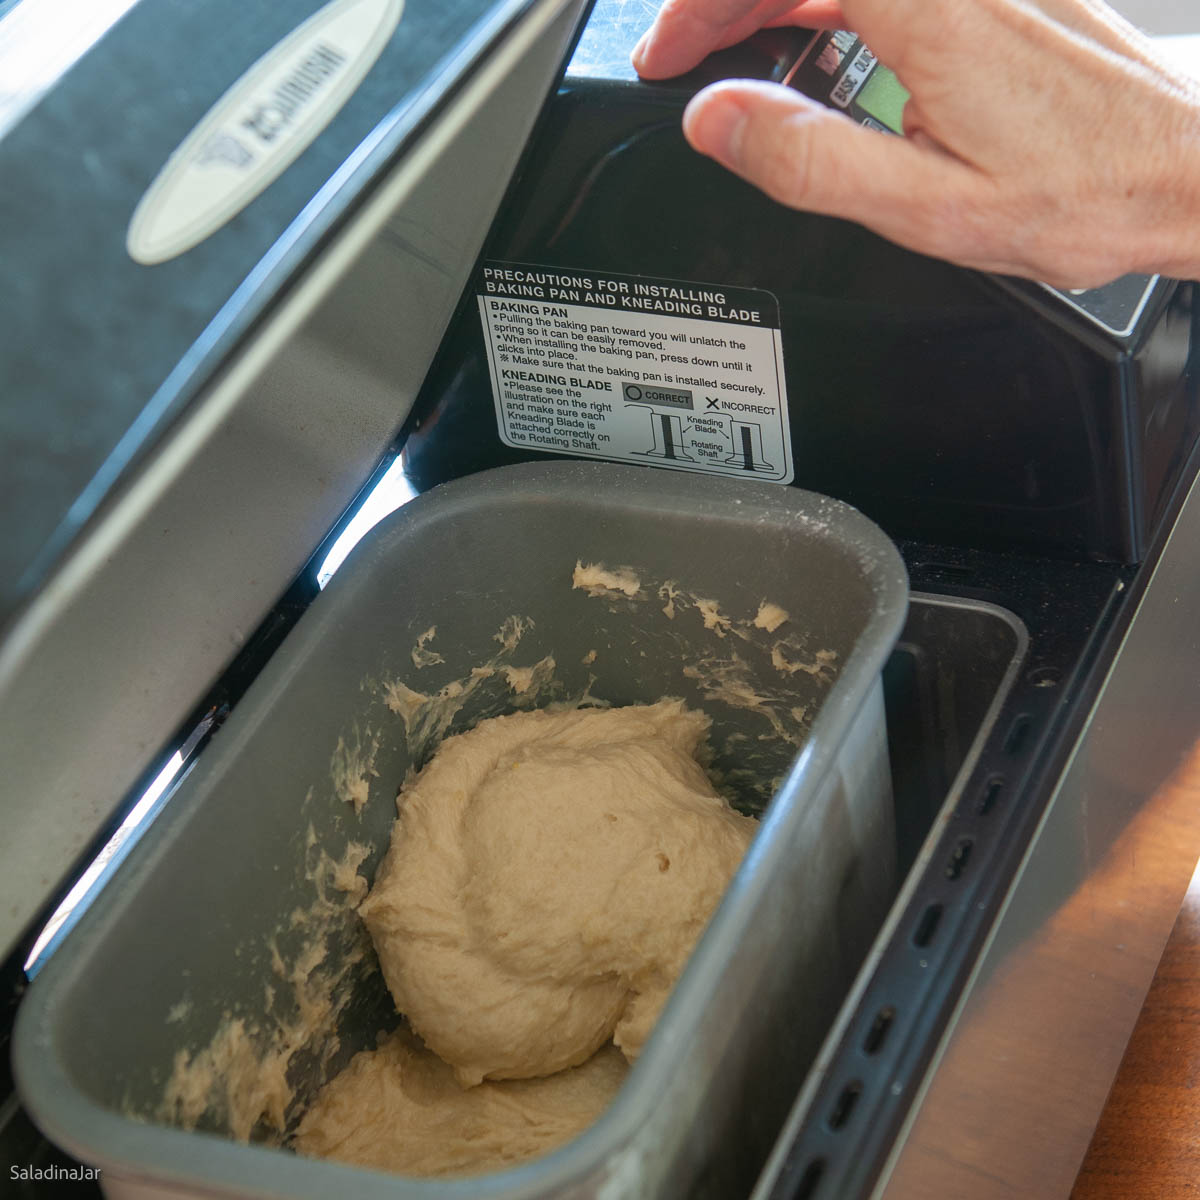
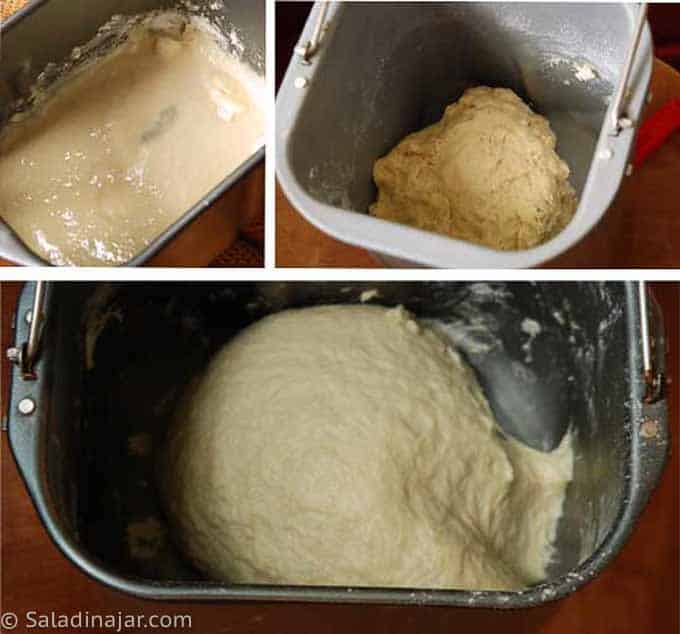
➋ Second Check (15–18 minutes in):
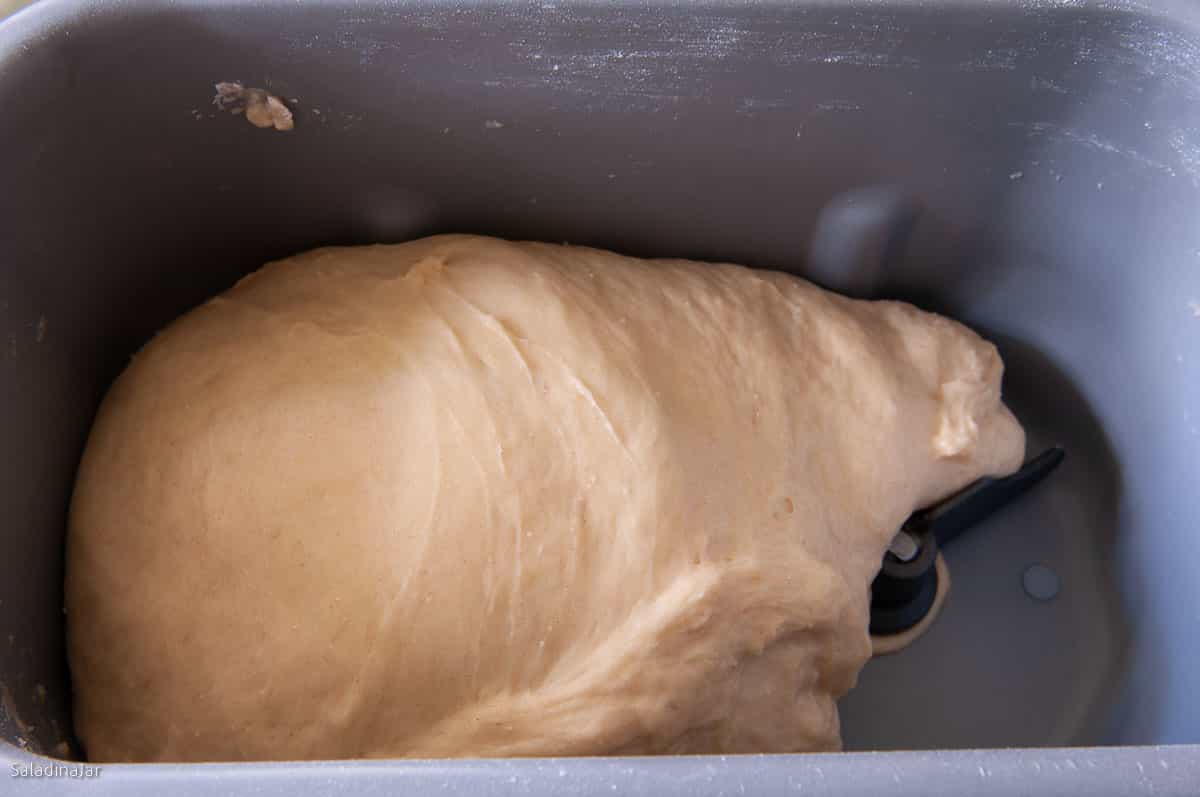
At this stage, the dough should stick briefly to the sides of the pan, then pull away cleanly. If it’s sticking excessively or barely touching the sides at all, it’s time to adjust.
Just as bad is the opposite problem–too wet.
How to Fix Dough Consistency
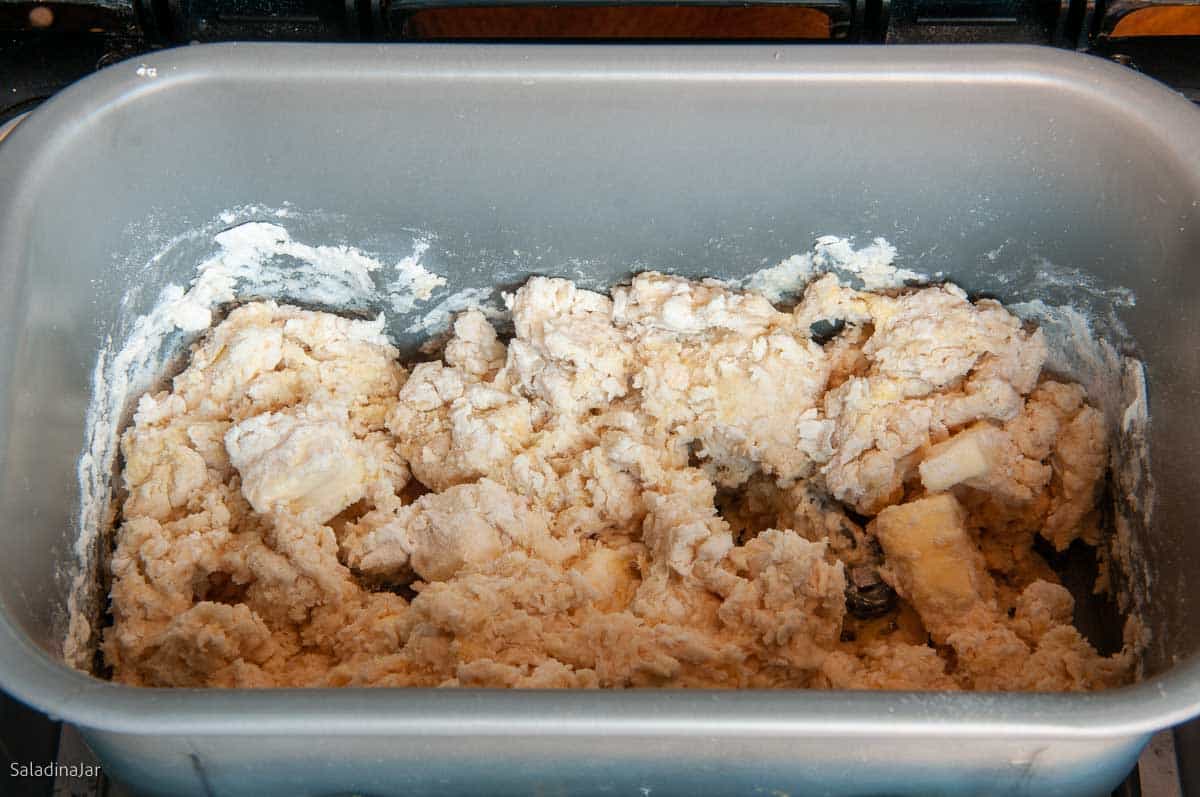
Too Dry?
If the dough looks like raw oatmeal or rough crumbles—or if it’s slapping loudly—add water (or other liquid from your recipe) 1 tablespoon at a time. Let it knead for a minute before checking again.
Too Wet?
If the dough sloshes like cake batter or clings excessively to the sides, add flour 1 tablespoon at a time, waiting between additions to avoid overcorrecting.
📌 Tip: Some doughs are intended to be wetter, such as brioche or ciabatta. If you’re still learning, start with simpler loaves (like this French Bread) until you’re comfortable recognizing dough texture.
⚠️ Avoid the seesaw effect: Go slow with adjustments. Making changes too quickly can throw off the dough in the other direction.
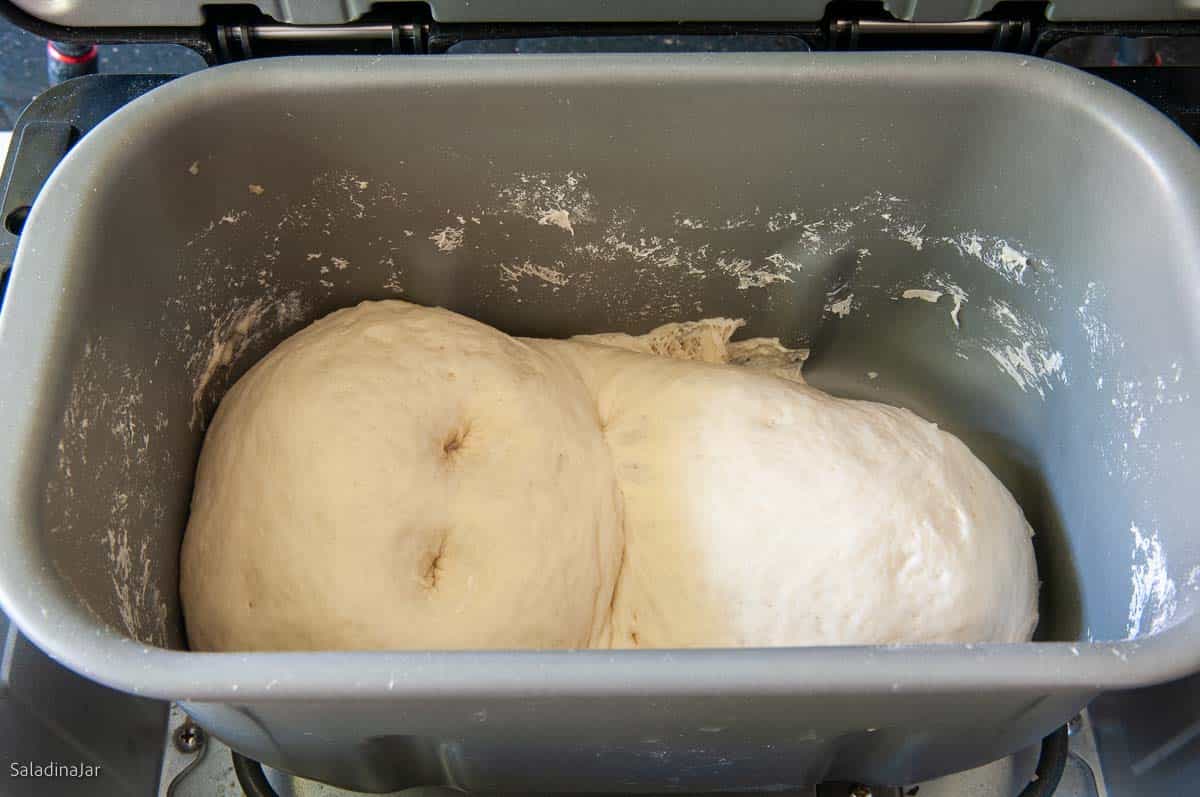
Third Check (End of the Dough Cycle)
If you’re using the DOUGH cycle only, check the dough at the end to make sure it has risen properly.
Use the two-finger test:
Gently press two floury fingers into the dough.
- Needs more time? The indentation bounces back quickly.
- Ready to shape? The indentation fills in slowly.
- Over-proofed? The dough has collapsed or feels overly airy. Gently press out the air, reshape, and let it rise again while you watch it closely.
📌 Tip: The dough should roughly double in size by the end of the cycle.
What Readers Ask About This Method
Yes—during kneading, it’s encouraged!
Yes, it’s just not quite as easy. Try to watch it through the window to see if the dough sticks to the side and pulls away. Eventually, you will gain a second sense about what you need to add, if anything, even if you can’t clearly watch the machine in action.
You can open it at any time during the DOUGH cycle. If you happen to be baking your bread in the machine, don’t open it during the BAKE cycle since it will lose a lot of heat and may cause the bread to collapse.
Remove the dough and finish kneading/rising by hand. Then bake in your conventional oven.
Final Thoughts
Bread machines are great tools, but they can’t think for you. By opening the lid during kneading and checking the dough, you can fix common issues—like incorrect moisture, a missing ingredient, or unmixed flour—before they ruin your loaf. Once this habit becomes routine, you’ll consistently get better texture, better rise, and more reliable results from every recipe.
— Paula, Home Economist
Homemade Food Worth Sharing
Need help troubleshooting?
Email me: Paula at saladinajar.com — photos help!
Other Posts You Might Find Interesting…
- 5 Surprising Reasons I Don’t Bake Bread in My Bread Machine (But I Use It All the Time)
- How to Convert a Yeast Bread Recipe for Use in a Bread Machine
- 6 Bread Machine Secrets You Need To Know

Thank you so sharing these tips. I’ve become so frustrated when using my bread machine because the bread is so dense when finished. A bucket list item for me is to master making rosemary bread in my bread machine even if I must pull it out after the dough is finished and let it rise in a bread pan on my stove. Any suggestions for letting rise in a metal or glass loaf pan would be greatly appreciated!
Hi Shelly,
I’m so glad you found my website. Here are a couple of posts that should answer your questions. Bread Machine Dough to Oven-Baked Bread: Step-by-Step Guide. Rosemary Cranberry Pecan Bread (Bread Machine Dough + Oven-Baked)
nice article, thank you
Hope it was helpful!!
The paddle turns and the dough just makes a whole and watches it. I have tried more water and less water. The bread comes out lumpy and with a huge whole in the bottom. Any thoughts?
Hi Jane,
It sounds like your dough might be a bit too dry, which can lead to lumpy bread. When you check the dough in the last 5 minutes of the kneading phase, it should lightly stick to the sides and then pull away cleanly. This ensures it gets kneaded properly and fully.
As for the hole in the bottom, the best way to avoid it is by using the DOUGH cycle to mix and knead the dough. Afterward, shape it by hand, let it rise again, and bake it in a regular pan in your oven.
If you’re using one of my recipes, let me know—I’d be happy to help you troubleshoot further and figure out what’s going wrong.
I’m making my grandmothers saffron bread but in a bread machine
I placed in order. Butter slices
Warmed steeped saffron water 7 oz. King Arthur red label flour sugar cinnamon then 1/2 pack of plain dry yeast
At 2 nd kneading beep I add a handful of raisins
It has not risen much 4” deep and the top is not rounded at now the 45 min mark
Saffron is very expensive so I’m disappointed that it hasn’t risen much
What can I try next. I’ll try again after I hear from you
Hi Susan,
Yes, saffron is very expensive, I know. Let’s see what you can do.
First of all, move the bread to a warmer location. You can move the whole machine or just pull the pan out of the machine and move it. I’m guessing it is somewhat chilly in your kitchen and the yeasty bodies aren’t moving very fast. Happens all the time during the winter. If you have a quick-read thermometer, check the temperature of the dough. It should be at least 75-78˚F. I put my dough into my microwave (don’t run it of course) and leave the door cracked so the light will stay on to warm the interior. Or use your oven, or put the pan on top of your fridge or even the dryer (after you heat it for a few minutes, then turn it off).
The slower your bread rises the better it will taste so don’t rush it too much. I don’t know the amounts of sugar in your bread, but sugar, eggs, and milk can slow down the rising a little bit.
Note: Active dry yeast can take longer to rise. If you plan to make a lot of bread with your bread machine, consider buying some instant or bread machine yeast.
Let me know if this helps.
Paula
p.s. Did you check the dates on your yeast? Just a thought.
Hi .. just wanted to add my 2 cents worth. I have always used all purpose , whole wheat , spelt and rye in my recipes and the loaves always come out on the heavier side .. also because I refuse to add more than a tsp of yeast. Today, after experimenting with my bread machine to develop a wheat- lentil bread recipe , I discovered that adding 1/4 c cooked lentils to my recipe completely changed the final product to one of softness and nutrition loaded .. game changing for me and hope some of you will try it. I used 1/4 c in 1/2 c water to cook , cool and add to 2 cups of flour , 1 c all purpr, and 1 c whole wheat which next time I will swap out for spelt as a trial ..
Experimenting with bread recipes is so much fun! Thanks for sharing.
Hello, I have to say that I stopped baking bread once I lost your recipe and I am so happy to have refound this buttermilk loaf. Thanks.
Hi Kay,
Wow! I’m so glad you found this recipe again. I hope you make many more good bread-baking memories.
Where do I find your hints about leftover ingredients? I read this review: I love your recipe hints that deal with leftover ingredients. I’m tired of dumping out 3 1/2 cups of buttermilk, love the idea that I can freeze it for the next time. I just did that threw my buttermilk out! Or are the hints included with the recipes?
Hi Terry,
Great to hear from you.
The hints are included in the recipes. I hate to throw away leftovers, but I don’t like eating the same thing three days in a row. So I’m all about either storing or recycling leftovers. I do have several “leftover recipes” you can see here. Other than that, you’ll find “Kitchen Tips” scattered throughout most of my recipes.
I made a Detroit style pizza this past weekend. I used my bread machine for the dough and bread flour. It was a very wet dough, and I did add a couple extra tablespoons of flour. How do you know when to just let it go? I did after that, and it did rise nicely. It was a very soft dough that couldn’t be handled much.
I am learning a lot !
Hi Terry,
This is a great question and one every baker must deal with because of all the variables with different flours, recipes, changing weather conditions, etc. The best I can tell you is to go for the following: Watch the dough knead. It should stick to the sides, then pull away cleanly. This is for the average recipe and the average baker but there are plenty of exceptions where the dough will be quite sticky. (Hopefully, the recipe will warn you.) More experienced bakers can handle softer doughs so they don’t have to add as much flour. Beginners often add too much flour–but it helps them shape the dough without losing their mind. How you interpret the dough depends on your experience and how well you can handle dough. Just keep making dough and before you know it, you’ll develop a sixth sense that tells you when it’s j-u-s-t right, especially if you keep making the same recipe.
Hi Paula,
Is it alright to add flax, sesame, sunflower or pumpkin seeds to any breadmaker recipe, even if they aren’t called for in the recipe?
Doris Boyle
Hi Doris,
Thank you for writing. The answer is yes, but remember that seeds add weight so start slowly. I wouldn’t add more than ½ cup total seeds, nuts, or dried fruit to any recipe to start with. If that works, then inch upward slowly. Too many add-ins can cause dense bread. How much depends on the texture and character of the particular bread recipe you are using.
What causes a fully cooked loaf to dip in the middle?
Hi Lynn,
Oh man, don’t you hate that? There can be more than one reason. In the end, it’s because the bread was overproofed before it was baked. There are several reasons for overproofing and knowing exactly why it happened is a little harder. Did you bake the bread in the bread machine? If so, perhaps the dough contained too much liquid. If you used the DOUGH cycle, as I advocate, maybe the bread just rose too much during the final rise. You can read more about overproofed bread here.Overproofed Dough: How To Avoid a Sunken Loaf in a Bread Machine
Thank you so much for this information. I’ve had this machine for 15+yrs now and finally experimenting with different breads! I made one loaf last week and it couldn’t have gone any better then yesterday’s flopped miserably but today this info saved me already. How can you tell what cycle is in the moment? I set for basic white then hit start. Is the beeping when it’s changing cycles? My machine book is close to useless. Thank you again!
Hello,
Uh oh! I think I know the genre of bread machines you have. I agree the manual is useless, at least for people whose first language is English.
At any rate, if you can’t get the information out of your manual, you may need to sit with a stopwatch (use your phone?) and time the cycles as they progress. Every bread machine manufacturer uses different timing.
The beeping (5 beeps in my machine) normally indicates that there are only a few minutes left in the kneading phase (5 minutes in my machine), so it’s a good time to add nuts, raisins, cheese, or any ingredient that you want to add to the dough but don’t want to be mashed beyond recognition.
Figuring this out is KEY to making decent bread. Glad you asked.
hi Paula, Thanks for the comprehensive instruction. My sourdough ball looks like and does pretty much what yours does in the video, sticks to the sides and pulls away. Looks great until the second 25 minute knead when during last few minutes the ball kind of melts down. I add a little flour but not too much as there is only 5 minutes or so left in second knead. Not exactly sure if the ball started to turn mushy earlier in second knead or not. Do you know what might cause this?
Hi Norm,
Good to hear from you. I’m a bit confused about what you call the “second 25-minute knead.” My machine only has one kneading phase. Does yours have two? (What brand is it?) Maybe I’m not quite understanding what you mean.
Which recipe are you using? Are you using one of my recipes? If so, which one. If you will write to my email address: paula at saladinajar.com, we can go back and forth easier.
Paula,
I find that if I use my scales, I don’t have to adjust anything in the recipes and I haven’t had to since I’ve been using them. I prefer to go by the grams, it makes it a lot easier to measure the correct amounts. I love all your recipes and you are my “Go To” website. Thank You SO much for taking your time and putting your knowledge out for us all to learn from, find answers, and get great recipes.
You are a gem!
Hi Samantha,
I want to frame your comment. Thank you so much for taking the time to write. Digital scales are a life-changer! Who knew?
I have the Zojirushi bread maker and my bread always came out very heavy and dense.
I tried your white bread recipe along with your tips for using the bread maker and this last loaf was amazing!!
My only question is that it’s still a tad dry. Not bad, not crumbly, just a little dry. I store the bread in gallon ziploc bags so I’m wondering if that’s part of it.
Also, my dough didn’t look dry necessarily but it also didn’t look a little wet like yours in the correct photo does. I’m thinking adding a TB of water might help the dryness?
I also subbed coconut milk powder because I didn’t have regular milk powder so maybe that had an effect too?
Thanks for all the great advice!
Hi Andrea,
I suspect that adding a tablespoon of water would fix the problem. The weather can affect the moisture in the flour, so what works one time may be different from what works the next time. That’s why it’s important to check the dough as it kneads. I have never tried substituting coconut milk powder for dairy milk powder. The two have quite different compositions so that may have contributed to the “dryness,” but I have not investigated that idea so I can’t say for sure.
I doubt if storing bread in plastic bags caused the dryness unless you are talking about 2-3 days after baking the bread. There are no preservatives in the recipe so it will stale quickly, especially in warm weather. I suggest you freeze what you don’t eat after a couple of days. Don’t store your bread in the refrigerator because of the high humidity.
I am so glad to have found this website. It has been very helpful.
Thank you,
Linda Avers
Thank you, Linda. That is my goal. Good bread makes better friends and happy families, until it’s all gone. ?
Why would I have to consistently double the water to make the dough look and behave normally?
Hi Joshua,
Something is not right. Is your bread turning out good? Where did you get the recipe? Are you measuring or weighing the ingredients? Are you making any substitutions, like whole wheat for white flour? With a good recipe and accurate measuring, you shouldn’t have to add more than a tablespoon or two at the most. Is this a simple recipe or something with lots of fruits or vegetables added? That can make a difference because they can be slow to release their moisture.
my house is super cold will draping a towel over it help the dough to rise better?
Pat,
It will help, but it might not be enough. Watch the dough. If it isn’t rising and you plan to bake the bread in your conventional oven, you might need to take the pan out of the machine, cover it and place it in a microwave with a cup of hot water. (Don’t turn the oven on with the dough in there.)
If you are planning to bake the bread in the machine, the only choice you have is to add another blanket or move the machine if unplugging and replugging doesn’t mess up the cycle.
There was no note about storing the bread….plastic ziploc bag, stand on end…
Hi Cheryl,
I usually store bread in a plastic bag. But most homemade bread recipes don’t keep longer than 2-3 days. What I don’t eat after a couple of days goes into the freezer. I do stand my sourdough loaves on end the first day I make them. Once you put it into a bag, the crust softens.
If you live in hot and humid conditions, do not be afraid to keep your bread flour in the fridge, I bought a cheap second hand one just for that and also the water should be really cold – we have a dispenser as we do not like to drink the tap water and so use spring water and in the hot summer months I use the water from the chill section of the dispenser. As a result when outside it is heading for and racing beyond 100F we still have good bread. I do not have bread tins so it has to be made throughout in the bread machine. I would love bread pans but they would be impossible to find here so we make do. By the way, I learned very early on to keep taking a peek at what is going on in my machine to ensure the dough is as it should be before the machine starts to agitate it continuously.
Sounds like you have made do the best you can. Sometimes, that’s what life gives us. You have given good advice about the water during hot weather.
Hi, how do you add more time?
Hi Clifford,
The answer depends on what brand of bread machine you have and what phase or cycle you want to add time to. If your machine has custom cycles available, you can probably construct a cycle to your own liking. I can give a better answer if I know why you want to add time.
Hi Paula,
Thanks for all the great tips and recipes. I am relatively new to using a bread machine and have had great success with your recipes, however, I’ve been having trouble since our air conditioning unit has been running in the last month or so. The dough rises wonderfully in the bread machine but isn’t rising as well in the pans or sometimes, will rise (not as well as it had before) and then fall a bit. Any suggestions? Thanks in advance 🙂
Hi Cheryl,
If the dough rises, then falls, that means the dough rose too long and exhausted itself.
Is it possible that the dough is rising too much inside the bread machine? This often happens to me in the summertime. I usually have to stop the DOUGH cycle and pull it out. This may be tricking you and making you think it should rise just as much in the pan when that is actually too much. If you continue to have trouble, try sending me a few phone pictures to my email: Paula at saladinajar.com. Maybe I can help you better that way.
Do you know about the two-finger test? If you push two floury fingers into the dough, the dough should fill in the holes part way. If they don’t fill in at all, the dough has over-proofed. If the dough bounces back and you can barely see where your fingers were, let the dough rise longer. You can read more about this here.
If the dough is indeed over-proofing, one solution is to reduce the yeast a bit so the dough won’t rise quite so fast when the ambient temperature is warm.
Awesome! I have an old model bread machine that never made a good bread and that I was thinking of throwing away. Looking at your tips, I was able to use it today for kneading and got myself a perfect loaf of bread. Can’t thank you enough.
This is my favorite kind of email, Sanjay. Thanks for writing.
Lately, all my loaves have fallen. The bread taste & texture are great. We live in S. Texas—hot & humid this time of year. How do I fix this, while still making my loaves in the machine?
Hi Robert,
I feel your pain since I live in Texas, also. Over-proofing is likely the cause of the problem.
I wrote this article to help people like you. Have a look.
In a nutshell, reduce the yeast. How much depends on the recipe and the brand of your machine. You may have to experiment. I would start out with half the given amount.
Actually, bread making (aka baking) IS a science. That’s why weighing ingredients precisely is so important. Bread is not a Jackson Pollock. It’s a math problem to be proofed.
One thing I do is remove the dough about an hour before the cooking process is due to start.
I punch down and shape the dough to get the surface tension then I remove the paddle from the machine and put the dough back in to finish. This makes a nicer loaf without the big hole in the bottom from the padle
If I think about I also score the dough about 10 miniutes before cooking starts
Hi Ian,
Thanks for writing and including the details about another way to use your bread machine. This method is especially good for people who don’t have a conventional oven.
Do I have to warm the water or milk to make bread
Hi Charlotte,
See this post I wrote about the temperature of liquids when using a bread machine. You will still see references to heating the liquid in some of my older recipes but I have quit doing it now with no ill effects. Thanks for writing.
Would you have any advice for someone like me who just moved to a high altitude???? 5500 ft elevation. I am really struggling with my old recipes.
Hi Colleen,
I’ve never lived at a high altitude, but I’ve heard it can be quite a challenge as you reported. I know yeast acts differently for sure. I’m going to give you another website that talks a lot about high altitude. This girl deals mostly with sourdough, but she talks a lot about high altitude baking so maybe it will give you some ideas. https://leavenly.com/how-to-make-high-altitude-sourdough-bread/
Hope this helps get you started down the path to better baking at high altitudes.
I picked up a used Oster Express today and I thank you for the tips! New to your site. I look forward to learning more. I wanted a bread machine to avoid the use of my oven, as it’s too expensive to run the oven. Also, my old hands need the break. Cheers!
Hi,
Welcome! I’m so glad you’re here. Unfortunately, I’m not sure if my website will be very helpful for you. I almost never use my bread machine to bake the bread. I only use the DOUGH cycle to mix and knead the dough. I’m sure your “old hands” would like that part. However, I am never satisfied with the crust I get with bread actually baked in a bread machine among other things. The bread machine is the best kneading machine in town, so I love it for that. After the DOUGH cycle finishes, I pull the dough out and shape it by hand. The shaped dough gets a final rise before baking in my conventional oven. None of my bread recipes are designed to be baked in the breaa machine.
Regardless, if you run into any difficulties, don’t hesitate to write back, and I’ll try to help.
I used my new bread machine for the first time today to make brown bread. The crust was hard & kinda touff, what did I do wrong?
Hi Kathie,
You may have done nothing wrong. I assume you baked your bread in the machine, right? Have a look at this post for a different way to use a bread machine that will result in a much better crust. I hope to hear from you again that you are making fabulous bread with your machine. Sign up for the free course I offer for complete details.
Hi, big, BIG thanks to you and your posts! You saved me from regretting having bought a machine while online shopping one late, late night. Truth be told, I was about to hide-and-forget my one month old bread machine when I found your website. Now I’ve tried all your suggestions and my bread is finally amazing!
Hi Peri,
Welcome to my unofficial bread machine club. Sounds like we are of like mind. So glad you were able to make bread with a bread machine that you can enjoy eating and be proud to share with others.
I am not seeing any videos. Are they included in this article?
Thanks so much for the great tips
Much appreciated
I use my machine for making dough. I use dough cycle. When done it’s perfect but never seems to do a second rise before baking. Any ideas?
Hi Darlene,
It sounds like your dough may be too wet. Do you open the lid and check to make sure the dough sticks to the side and then pulls away cleanly?
Has this recipe you are using ever worked for you? If not, you might want to try a new recipe. This recipe for French bread is very popular on my website.
You don’t give many details, but if you can tell me what you do with the dough AFTER the DOUGH cycle completes, maybe I can be more helpful.
My bread sticks to the bottom and sides of my machine, I can even get it out of the machine at all! Help, what do I do?
Thank you,
Connie
Hi Connie,
I can hear the frustration in your words. Are you removing your bread from the machine as soon as the machine finishes? Let the bread cool on a rack, not in the machine.
Another possibility? Use the DOUGH cycle on your machine, remove the dough, shape it by hand, let it rise again, then bake it in your oven. Your sticking problems will be non-existent if you use a good heavy pan. Your bread will be MUCH nicer with a thin crust that is more evenly browned than you can get when baking in a bread machine.
@Paula, my second rise doesn’t rise. I shape like a loaf of Italian bread but just flattens and spreads
Best tip about only making and proving, my bread now goes in the oven after following your tips. Best bread we have made.
Isn’t it fun to make really good bread???
I find the paddle gets so stuck in the baked loaf it is difficult to get out , and more often than not, then leaves a gaping hole in the bottom of the loaf. It is particularly bad when I make a sweeter cinnamon raisin loaf. Will I upset the process if I remove the dough ball carefully during a rest phase and reposition and maybe not have the paddle embedded so deeply? Or any tips to fix this issue?
Hi Laurie,
Lots of people do what you suggested. Do it right before the last rise. While you are at it, reshape the dough before you put it back in your bread machine. Another option is to do what I do. Only use the DOUGH cycle. Pull the dough out of the pan after that cycle finishes, shape it, let it rise once more, and bake it in your conventional oven. You’ll get a far superior crust and more beautiful bread when you do that. Some people don’t care since they only use their bread machine bread for toast. Just wanted you to have some choices.
@Paula, yes I do now only make and prove in my machine. Bake in conventional oven after second prove. You are right best bread ever, lovely crust and superior loaf done this way
I recommend thinning the dough consistency by adding liquid one TEASPOON at a time. A tablespoon can be too much and excessively thin the dough if it’s close to being right.
For thickening, yes, one TABLESPOON of flour has about an equal opposite effect.
This is because a teaspoon is 1/3 of a tablespoon which is close to the normal volume ratio of liquid to flour in bread dough.
Thank you for this very helpful and enjoyable series on bread machines. It’s great.
You make a good point. I don’t actually use a tablespoon–I just eyeball it and I bet you do, too. Experience is invaluable.
I just bought the smaller Cuisinart machine. Can I take the dough out after it kneads to rise in an oiled covered bowl covered with plastic? Thank you
Yes, Linda. You can. And I highly recommend it. I do it in ALL of my bread machine recipes because the bread is so much better when you shape it yourself and bake it in the oven. Congratulations on your new machine. Hope to hear from you again soon about the great bread you are making with it
Sorry about the errors in my last message, hope you git the just of my Q
how do I know ow when the mixi g and proofing period has ended and baking period starts. is it standard like qH for baking at the end of time the display says?
Hi Judy,
All of my bread machine recipes are written to use the DOUGH cycle. DOUGH cycles automatically end before the final proofing period. If you remove your bread right before baking, it will need to be shaped and rise again. That means even more time than you had probably planned for.
To specifically answer your question, look in your owner’s manual. (Usually online if you can’t find it.) They will tell you how long each period lasts. The other way is to watch your machine and listen to the noises. You can always lift the lid and check what’s going on. The only time you really don’t want to open the lid is when the machine is preheating and actually baking. That can cause your bread to fall. Hope this helps.
My raisins for my raisin bread end up at the bottom of my loaf and not kneaded into loaf. I am adding them at the beep. Why aren’t they getting mixed in?
Hi Carol-lee,
I have another friend with your name. I love it
About your bread: I’m wondering if your loaf was too dry. Did your dough stick to the side before pulling away or did it just bounce around in the pan. Does your pan seem to do a good job of kneading? Perhaps you could just knead them in by hand as you are shaping your bread before baking it in your oven.
Hello Paula, I came about to your website and this article in particular due to my failed result to making a 100% whole wheat bread loaf yesterday on my Oster machine. I am a newby and had success making just regular bread but this last one, the whole wheat one came out flat and dense. I followed recipe to the tee but sifted the flour. Did not use instant yeast (recipe calls for instant yeast). Also my son open the machine thinking bread was ready (even though timer said it had one hour left! Lol) and he says he went to grab the bread and it went down inmediatos so he close again and left. So I blamed him for my bad bread haha. Do you think is this the case? Or me sifting the flour or not using instant yeast?
Hi Janneth,
A nice 100% whole wheat bread is an advanced bread making skill, so don’t feel too bad. Everything you mentioned probably played a part in the density problem. Opening the machine just as the bread is starting to bake is disastrous. I hope you’ll consider signing up for my free bread machine crash course (just 6 days of free emails). I think you’ll find it helpful.
@Paula,
Thank you so much for your answer! I would love to sign up and will soon after the holidays ?
I was given a KBS bread machine. 3 lofts were perfect, but #4 I set it up and it will not start. My hand hit the face, it beeped. I read it would need to be re- set I NEED HELP….THANK YOU…Sarah
Hi Sarah,
I hope you figured out how to reset your machine. Usually, there is one key you must hold down until you hear it beep that your machine has been reset. Unfortunately, I have no personal experience with that machine.
I forgot to say I live in Calgary Alberta my bread always turns out perfectly but I cannot make the dough for dinner buns
When I use the dough recipe in my Hamilton beach bread maker it cooks the dough so it cannot be split and made into dinner buns what am I doing wrong
Hi Janet,
Does your bread maker have a DOUGH cycle? If so, that’s what you should use for dinner rolls. If not, you could try setting a timer and just taking the dough out of your machine after it has risen the first time. Shape the dough by hand and bake the rolls in your conventional oven. I hope this works for you.
Thank you for this article. It’s rare to find someone else admit to using a machine !
if you have a moment, you may be able to suggest where I’m going wrong…
I have made fairly successful sour-ish dough bread for a couple of years in London (sea level) using a modified recipe from Joshua Burton at Stella Culinary. This recipe uses a lot of starter and is made in a day. I use a bread maker as you do for the mix and rise. I take it out after its 31/2 hour programme and put it in a rice floured basket covered with oiled cling flim for 30 minutes or so before baking in a cast iron casserole for 30 minutes covered at 240C and then 30 minutes at 210C uncovered.
I’m now at 1500 metres altitude in the southern French Alps and it’s all going horribly wrong. I hope it’s simpler than my starter having effete London microbes in it…
I’m struggling a bit with the french flours of course…
My previously successful recipe has 375g starter, 300g fairly strong wheat flour, 32g wholewheat flour, 32g Rye flour, 250g warm water and 8g salt. All this goes into the machine.
Now, when the programme finishes I pour out the contents into the basket and find quite a lot doesn’ want to pour out. It doesn’t rise in the basket now. Similarly when I decant the dough from the basket on to the baking paper, I leave a centimetre thick layer attached to the basket.
Too wet ? Too much starter ? Wrong flour ? Any thoughts ?
Hi Robin,
Sounds like you have quite a challenge. Off the bat, I should tell you I have never baked at a high altitude. But I know you need to make several adjustments. I found a really good article here. https://www.wheatmontana.com/content/high-altitude-baking-how-make-your-recipes-work-mountains Maybe that will be helpful. It sounds like you need to add more flour and less yeast.
I don’t quite understand what you mean by the 3 1/2 hour program on the bread machine. Normally, the DOUGH cycle on a bread machine is more like 1 1/2 hour or 1 hour and 45 minutes.
Am I missing something? Probably so. 3 and 1/2 hours is way too long for your bread to be rising unless you are using a very small amount of yeast. Sorry, I can’t be more helpful. Good luck with your bread.
when my bread is all done in my bread maker
Do I take it out and butter the top and sides or let it cool down in the machine
Hi Carman,
Normally, I let any bread (whether baked in a bread machine or the oven) cool down before trying to remove it from the pan–at least 10-15 minutes. Otherwise, you risk squashing it. Honestly, I have never buttered the sides of a loaf and rarely the top. I only butter rolls. However, if you want to butter just the top of your bread before you remove it from the pan, I don’t see any harm in that.
In case you are wanting to butter the sides of the loaf to make the crust more tender, I have two suggestions:
1.) Look for a bread recipe with more butter or oil in it.
2.) Use the dough cycle on your machine and remove the bread at the end of that cycle. Shape it, let rise again in a standard bread pan, and bake in a conventional oven. Bread that is actually baked in a bread machine tends to have a thick and somewhat tough crust.
If I have not used my bread machine in quite some time (a few years I suspect), is there any problem with just going ahead and using it again? Do I need to do anything to get it ready for use again?
Hi Russell,
I can’t think of anything you need to do other than to be sure the pan is clean. Can’t wait to hear about your bread.
One thing the bread machine maker never tells you is to ALWAYS (even in summer) put warm water in empty bread machine pan and leave it sit for 10 minutes then dump it out and proceed with your bread recipe. A warm pan helps your yeast to work properly. Also another tip I found out on my own – put ALL the ingredients in your bread machine pan EXCEPT the yeast – PUT THE YEAST IN LAST AND YOU WON’T KILL THE YEAST WITH YOUR WARM LIQUID. Hope this helps newbies and us older bread machine users.
My crust on my bread is always hard as a rock when my bread is done from my machine how do I correct this
Hi Kathy,
“Hard as a rock” does not sound very appetizing. Are you weighing your flour or using a measuring cup? Most people who use measuring cups add too much flour. You might find this post helpful. https://saladinajar.com/bread-machine-tips/measuring-flour/
Personally, I almost never “bake” bread in a bread machine. It comes out SO SO much better if you make your bread on the dough cycle, then remove the dough from the machine, shape it, let it rise again, and bake it in your conventional oven. This post will give you more details. https://saladinajar.com/recipes/bread/oatmeal-sunflower-bread-recipe-how-to-knead-in-a-bread-machine-but-bake-in-a-conventional-oven/
Hi Paula
Is it possible to bake a sourdough bread in a bread machine?
If its possible do you have a recipe to share and recipe for the starter as well.
Thank you
Hi Peggy,
Yes, it is possible. I don’t have a recipe on my website. However, if I did, I would only use the bread machine to mix it up, not bake it.
I love sourdough bread but I’m not a big fan of making it at home. Whenever I’ve made sourdough in the past, I can’t keep up with the starter. Since it needs to be used or fed just about every week, that means I start making and eating more bread, which equals more inches on my hips, or I have to waste starter by throwing some away so I can keep the starter fresh. I have a hard time throwing good food out unless it’s dessert. Sourdough leaves me in a quandary, so I haven’t perfected any recipes worth sharing. (That’s probably more than you wanted to know. Sorry.)
My ciabatta recipe is a good substitute.
@Paula,
No worries Paula & thank you for your response ?
Dear Paula,
I have just encountered a problem I have never seen before on my bread dough just about finished rising in my Cuisinart convection bread machine.
I live in Nova Scotia, Canada, where right now it’s raining and damp and dishclothes have to be changed and Javexed every day because they smell of mold.
I’ve been making bread in my machine for years, and like you, I use it for the kneading and rising part of the process. BTW, I always lift the lid and peek.
Today, after it had finished the 1st rise, I cannot opened the lid to take the dough out and saw a grey spot about the size of a dime on the top of the dough. It was mold! Of course I removed it but I have several questions for you, please.
Although the mold was visible on top of the dough will it have permeated the whole dough?
Can you please suggest a way of preventing this from happening again?
Would washing the interior of the bread machine with vinegar kill any lingering mold spores?
Instead of going ahead and baking the dough should I have dumped it in the garbage?
I would really appreciated any answers or recommendations you may have about this problem.
Yours sincerely,
Betty Pearce
Sent from my iPad
Hi Betty,
This is so weird. It’s hard to believe mold could grow that fast. Since I’m not sure of the cause other than your extremely damp weather conditions, I’m not sure of the solution. Surely a vinegar wash wouldn’t hurt. But not sure it will help either. I think I would have been tempted to dump the dough. On the other hand, cutting out the bad part and then baking it should make it safe. Right? I’m going to research this more.
I do have a thought. What if you open the lid and leave it open so the air can circulate? Throw a tea towel over the top of your machine while it rises. OR, remove the dough from the machine when the kneading is finished. Put it in another bowl to rise (or you could leave it in the pan I guess) and cover with a towel. I suspect there was some condensation that allowed the mold to grow rapidly. What do you think?
Hi I forgot to ask is there a specific kind of yeast i need to use when using bread machine? I watched different videos and they don’t mention if they used dry yeast or active dry yeast they just say add the yeast
Hi Jean,
You CAN use any type of yeast you have available or prefer, but they all need to be handled differently. Using instant yeast or bread-machine yeast (same thing) is the easiest yeast to use in a bread machine, so it is my default yeast. I use it in all my bread recipes.
Bread-machine or instant yeast does not need to be dissolved. Dump it in on top of the flour. It’s usually the last ingredient you will add to your machine. It will dissolve on its own as the bread mixes. Active-dry yeast needs to be dissolved in a liquid before it’s added to the other ingredients. It’s one more step you won’t have to worry about with instant yeast. The end result is the same to my eye and tastebuds. Hope this helps.
Can I use APF in my bread machine instead of bread flour?
Hi Jean,
Yes, you can use all-purpose flour in a bread machine with great results. Doesn’t matter if it is bleached or unbleached.
@Paula, why some people suggest to add Vital Wheat Gluten when using APF? Also how do i know how much VWG should I add to my bread machine
Adding Vital Wheat Gluten to a bread recipe may improve the texture and help it rise higher because it increases the amount of protein. It will tend to make your bread chewier. This is good for many artisan recipes and things like pizza dough. It might not be so great with tender dinner rolls.
Many people add VWG to recipes calling for whole wheat flours because they tend to be heavier and not rise quite as high.
As far as the amount, most bread-bakers add 1-2 tablespoons per recipe. You might want to experiment to find the perfect amount needed for the specific recipe you think needs a little more rise.
p.s. I very rarely use it. If you buy good quality bread flour, most of your recipes will turn out great.
Hey Betty , thanks for the mind blowing tips….I have just bought a breadmaker but my breads are too dense and chewy ….how can I improve it ?
Can it be due to hard dough ?
Congratulations on your new bread machine. Have you read this post about “6 Bread Machine Secrets You Need to Know“? I think you will find it helpful.
To answer your specific question, here are the possibilities: too much flour (improper measuring) or not enough liquid, old yeast or improperly handled yeast, recipe not written for a bread machine, kitchen is too cold, because of certain ingredients like a lot of sugar or using whole wheat flour, the dough is rising slowly, so the machine bakes it too soon. I could go on but this gives you a place to start.
Dear Girl,,
You are right in many ways. I used the bread machine many times. I never had the book that comes with them. I looked up the book for my old REGAL type,,,,, and found different recipes I didn’t have.
I THINK YOU ARE RIGHT,,,,, LET THE MACHINE DO THE MIXING AND STIRRING,,,, BUT USE THE OVEN FOR THE BAKING,,,,
TAKE CARE AND THANKYOU.
Thanks for the confirmation, Byron. Happy Bread-Eating!
At the end of the baking cycle my bottom paddles are stuck inside the bread. Is there a way to remove them without wrecking the bread.
Hi Susan,
Your dilemma is one of the main reasons I never bake my bread in my bread machine. You can read more reasons here. The only way I know to avoid those holes is to note when your machine is just starting the final rise. Remove the bread dough and the paddles. Place the dough back into the machine and let it rise and bake normally. The problem? You will still have holes where the posts are but they won’t be as big. In my opinion, it’s better just to run the dough cycle, remove the dough, shape it, place it into an appropriate bread pan and let it rise before baking it in your conventional oven. The loaf will turn out far superior and you will have no ugly holes. Thanks for writing.
The most important tip? IMO put the measuring cups aside and buy a digital scale to measure ingredients.
Measuring the big stuff like liquids, flour etc. is faster and accurate to one gram using a scale. OTOH when I checked them against the scale my Kitchen Aid measuring cups were adding 14% too much flour per cup. And even that can be a “give or take” depending on how finely the flour is milled. For anyone who has had consistently inconsistent results making bread – machine or no machine – using a scale to measure makes all the difference in the world. (I know you watch those British baking shows. There is good reason why they are dumping all those ingredients into a bowl sitting on a scale. lol)
Added bonus: You can measure ingredients right into the bread machine pan. Put the pan on the scale, zero the scale and start adding ingredients. End result? No extra bowls or multiple measuring cups to wash.
The sensors in today’s digital kitchen scales have improved remarkably to the point where it’s almost impossible to find one that is not accurate – for less than 10 dollars even. (Check out the line made by Ozeri.) And the KAF website has a huge listing of practically any bread ingredient you can think of that converts cups to ounces to grams. Huge help when measuring by weight.
Using a scale might seem a bit intimidating at first but once you start using one you will wonder why you didn’t do it sooner. The results in the bread pan don’t lie.
That $9.47 I spent on a digital scale is the best thing I have brought into my kitchen since… my bread machine. Collapsed loaves of bread have been banished!
Hi Rick,
You make a good point. But realistically, it’s not going to happen in most American kitchens. Bakers can make up for most inaccuracies in measuring by learning to check the dough and adjusting the liquid or flour accordingly.
This is, of course, the magic advice to make bread. A great machine, no thinking capacity. Each day, each flour, each liquid is slightly different. I don’t close my machine until the ball is slapping happily on the sides, slightly sticky (ooooonly slightly), cleaning up the flour. THEN I put the lid down and my work is done until I hear the end signal.
Hi Sharon,
Sounds like you and I are in complete agreement. I often say “a bread machine has no brain,” but I like the way you put it, too.
I have made several loaves of bread by machine only, including baking and have had almost no problems with any of the results. I have made cinnamon raisin to sesame to plain breads and they were all wonderful using instant fast rise yeast. The wet ingredients all go in the bottom before I add the dry and I use proportions I used to use for oven baking. The only issue I have is putting the raisins in too soon and they get broken up by the machine if I don’t add them until nearer the end of the kneading time.
A good reminder…sometimes I don’t know the dough isn’t just right until the bread machine starts thumping and trying to walk across the counter! 🙂
Whoa! That would be some dry dough for sure!
What model bread machine is that?
I’ve been looking for a one that can do small loafs.. any thoughts on this one?
https://www.youtube.com/watch?v=uhbVAsijGrQ
Ben, You can read about my Zoji here. The one pictured in the Youtube video looks like this one. I suspect it is excellent for smaller loaves although I haven’t tried it personally. Mine is also good for smaller loaves because it has two blades. I almost never use my bread machine to bake bread so don’t know how well it actually bakes a small loaf.
Gosh, you mean you want us to think? Geez, Paula, that’s no fun! LOL! But as a bread machine user, I can second that advice. It is crucial to making good bread. I didn’t think a few times when my karma was not good, and I had failures. This is excellent advice.
Thanks for the confirmation, Becky. I’ve had my share of failures, too.
Hi! I’m new to bread machine use. I have tried baking loaves in the machine and just haven’t been too excited about them. They came out too dense at first but got better as I tweaked the recipes- less flour, more liquid, a tad more yeast. I don’t like the shape of the loaf, either. I tried your recipe for oatmeal bread with sunflower seeds yesterday and instead of baking it in the machine, I used the oven as directed. It came out PERFECT! I did lower the flour by 30 grams and added a few teaspoons more milk though. The bread came out light and fluffy and very flavorful! What is the best way to store the bread- fridge or in plastic on the counter? Thanks!
Hi Diane,
Welcome to our bread machine community. Congrats on your successful loaf. Baking in the oven instead of the machine is life-changing in the bread machine world if you want to make shareable bread.
As far as the best way to store homemade bread, I always keep mine in a plastic bag on the counter. It will mold faster in the fridge because of the humidity.