Sealing Mason Jars: Fixes for a Perfect Seal
Sneak Preview: Having trouble getting a vacuum seal on your Mason jars? Whether you’re preserving chopped lettuce or storing dry goods, an uncooperative lid can be frustrating. Here are practical troubleshooting tips and fixes to help you get a dependable seal every time.
This post contains affiliate links. As an Amazon Associate, I earn from qualifying purchases at no extra cost to you.
Why Won’t My Mason Jar Seal?
Whether you’re using a handheld pump, a countertop jar-sealer attachment, or one of the newer portable Mason jar vacuum sealers, most sealing problems come down to the same small issues.
Recently, I faced a stubborn jar that simply wouldn’t seal—no matter what I tried. (See tip #6!) After some trial and error, I discovered a few new tricks that might help you, too.
Quick Things to Check First
Before working through all 12 fixes, try these:
• Is the jar overfilled?
• Is the lid bent?
• Is the jar rim clean?
• Did the machine change pitch while sealing?
• Is the battery charged (for portable sealers)?
If your jars aren’t cooperating, the checklist below covers the most common causes and fixes.
Troubleshooting Tips for Getting a Tight Seal on Mason Jars
1. Is the flat lid bent?
Flat lids can be reused for vacuum sealing, but if they’re dented or warped, they won’t form a tight seal. Try a fresh lid.
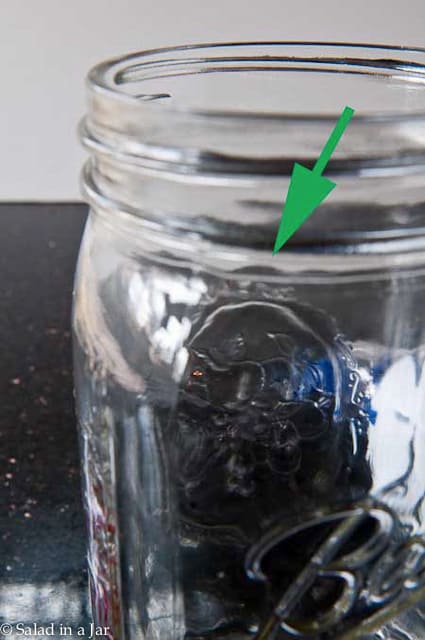
2. Check for chips or cracks in the jar rim
Even the smallest flaw on the rim can prevent an airtight seal. Run your finger along the edge—if you find damage, use the jar for non-sealed storage instead.
3. Is food debris blocking the seal?
I hope this is the problem because it’s an easy fix.
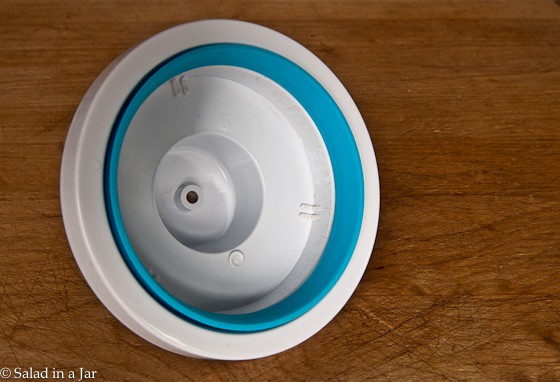
4. Clean the rubber gasket on the vacuum sealer attachment
If the gasket is dirty or worn, it won’t create a proper seal. Wash it with warm, soapy water and let it dry completely before use.
5. Is the battery fully charged?
This is one of the most common problems—and one of the easiest to fix. Rechargeable Mason jar sealers may stop before pulling a full vacuum if the charge is low. Try sealing again after recharging the unit.
6. Are you using the right brand of jars?
Ball and Kerr jars work best with FoodSaver attachments, but some off-brand jars may not fit securely. If you’re having trouble, try switching to a different brand.
7. Do you have a ‘mutant’ jar?
Some jars have slight manufacturing defects that prevent a vacuum seal. If the attachment doesn’t fit snugly around the top ridge, the jar may be the problem. Swap it out and try another.
8. Is the vacuum attachment clogged?
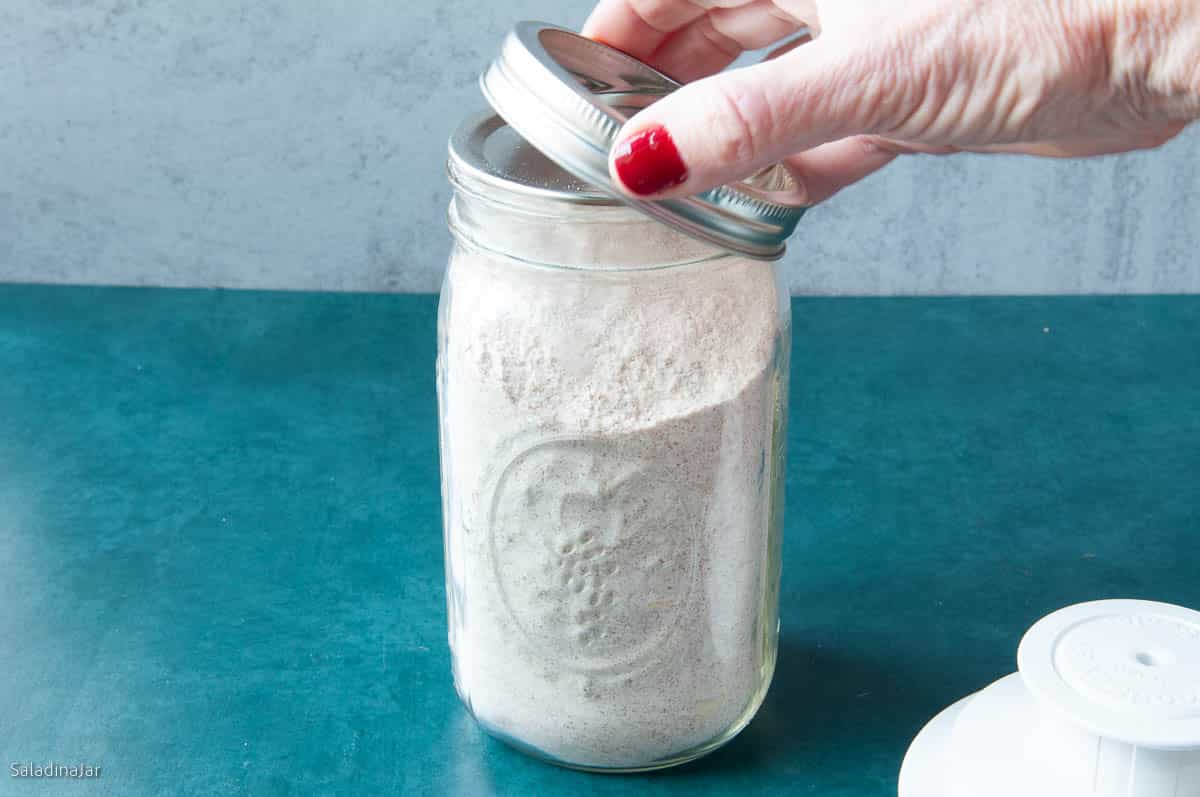
Powdery foods like flour or powdered sugar can block the suction port. Place a small paper disc over the contents before sealing to prevent particles from clogging the attachment.
9. Using a handheld or portable vacuum sealer: Check your angle and pressure.
If the sealer isn’t making full contact with the attachment, it won’t pull a strong vacuum. Adjust your angle and apply firm, even pressure when sealing.
Readjusting the angle of approach solves the problem for me 95% of the time.–Paula
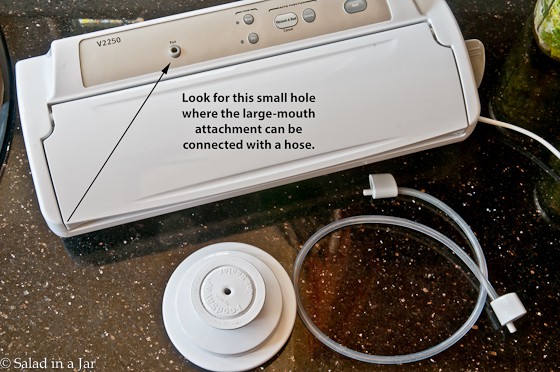
10. Is the vacuum hose securely connected?
For countertop vacuum sealers with a hose attachment, ensure the hose is fully inserted into both the machine and the jar sealer attachment. A loose connection can prevent proper suction.
11. Are you vacuuming long enough?
Give your machine enough time to remove the air completely. Listen for the pitch change that signals a finished seal.
12. Try the two-lid trick
Stacking two flat lids can create a stronger vacuum, especially with regular-mouth jars. Remove the extra lid after sealing—it’s only needed during the process.
13. Having trouble with regular-mouth jars? Switch to wide-mouth
Regular-mouth jars can be harder to seal consistently than wide-mouth jars. If you’re having repeated trouble, switching jar sizes often solves the problem.
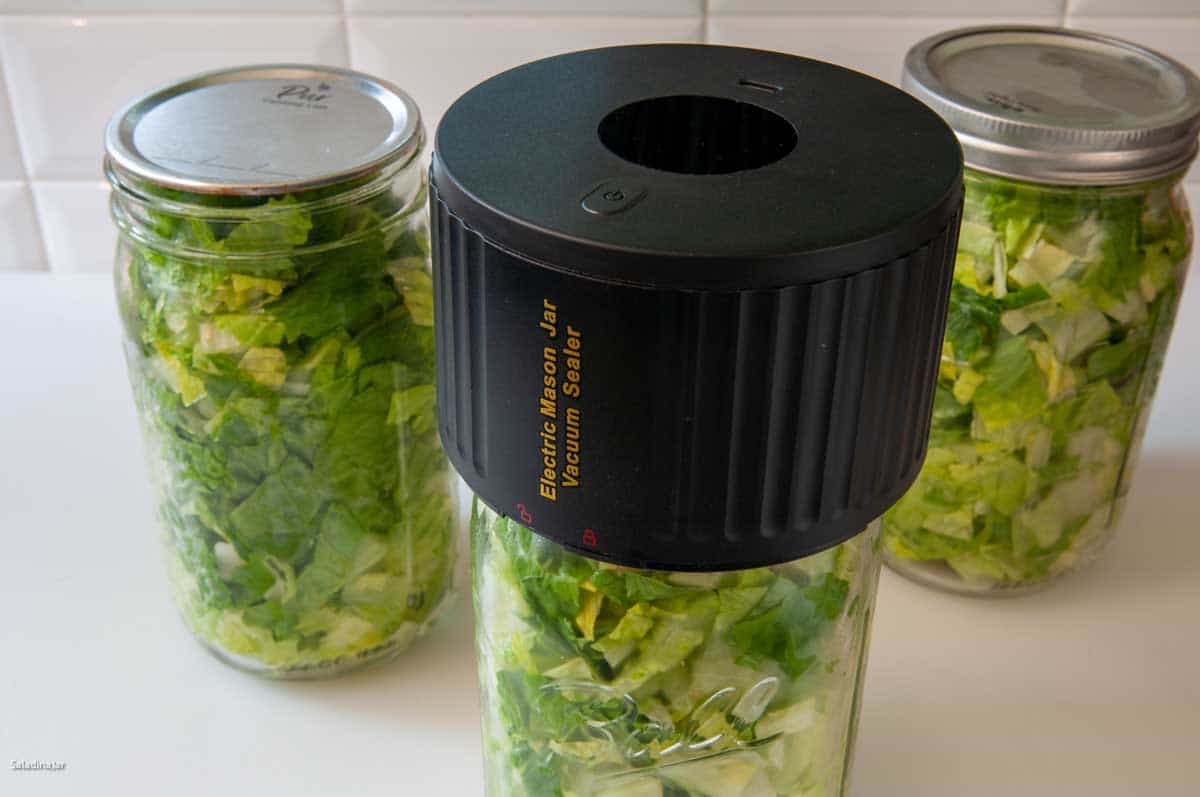
My New Favorite Vacuum-Sealing Method
I now use a small portable Mason jar vacuum sealer instead of hose-style attachments. You can see how it works here. This newer style seals directly on the lid and eliminates hoses and adapters.
Final Thoughts
Vacuum-sealing Mason jars is a fantastic way to store dry goods and keep chopped lettuce crisp, but when lids won’t seal, it can be frustrating. With these troubleshooting tips, you should be able to get an airtight seal every time.
Reminder: Vacuum sealing is not a replacement for heat canning. Perishable foods still need refrigeration.
— Paula, Home Economist
Homemade Food Worth Sharing
Need help troubleshooting?
Email me: Paula at saladinajar.com — photos help!

I just bought a new handheld vacuum machine today. The flats they sent me with the sealer all had an “air hole” in them and it will not seal, so I put a small patch of electrical tape over the hole. Now it seals just fine. Remove the tape to break the seal and remove the flat.
Hi Pat,
This little trick reminds me of the process for using a non-electric handheld vacuum pump. You can read more about it here. Thanks much for writing.
When I first got the sealer, I enjoyed it so much. Once in a while I would have a problem sealing a jar but lately I have not been able to get regular mouth jars or wide mouth jars to seal at all. Is there anything else I can do besides the suggestions already given but haven’t worked.
Thank you.
Becky Bledsoe
Hi Becky,
I sent you an email with several suggestions. Let me know if you don’t get it. (Check your junk file if you don’t see it.)
why does the silicone seal from inside the machine disengage when I remove the vacuum-sealed jar? Every time I use it I have to reset the rubber ring
Hi Maureen,
What you are describing should not happen. I would call the company, if possible, and tell them about it. How annoying to have to constantly reset the rubber ring.
I love dry sealing my jars after using a freeze dryer (Harvest Right).
I have many small mouth jars. So far I have only been able to find sealer systems for the wide and regular mouth jars. Is there such a thing as the small mouth jar sealer with my food saver? Can you reply a link if there is one somewhere on the market?
Hi Dean,
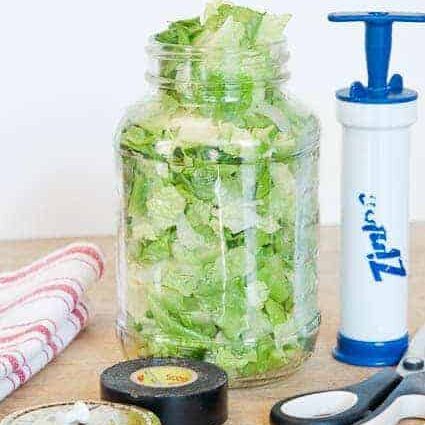
I don’t know of any vacuum sealer for the small-mouth jars. But I have another idea. If you find a jar big enough to hold the small mouth jar, you can vacuum seal it by putting it inside and vacuum sealing the big jar. When you remove the lid from the big jar, the small jar will remain sealed. See the picture. The vacuum sealer in the picture is available in my Amazon store or get it here: https://amzn.to/3UIsIZs
Here are some bigger containers for vacuum-sealing that would be easier to get small jars in and out of.
Great article. I have my mom’s old jars and that thick band on those old jars will not seal with the food saver jar sealer. I bought a PVC vacuum chamber from a seller on Esty. I can use those old jars again! Now for the old square shaped ones… so far a no go!
Hi Karen,
I’ve can’t remember ever seeing square-shaped glass jars. Interesting!
Bought my Food Saver and jar sealers over 20 years ago (2012), and today was the first time I’ve ever had an issue with the lids not sealing. I would have never thought of the 2 Lid solution for the regular jars. I use regular jars for long term storage of dry goods like beans, lentils and quinoa. THANK YOU for this article!!
You’re welcome, Laurie. So glad the article was helpful.
I have just started using the Foodsaver to vacuum seal some dry foods. I think I’m getting a good seal; the jar, 8 oz. regular mouth, can be lifted by the lid and does not come off, and, the lid does not pop up & down when I push it with my finger. But, I can pry it off with my fingernails, not easily, but with some pretty hard tugging. Do I have a good seal? Thank you dg
Hi Donna,
That is a GOOD question–and I’m not just saying that. The harder it is to pry off the lid, the better the seal. If the device you are using to create a vacuum is getting old, or the batteries are getting weak, or it’s not a quality device to begin with, your seal won’t last as long. Always use the collar as insurance. I use a portable device and I’ve noticed that when I put in new batteries, it seals much tighter. My counter-top FoodSaver will no longer seal jars. It guess it’s feeling old and cranky.
p.s. Regular-mouth jars are more challenging to seal than wide-mouth jars. I always have to press harder and run the machine longer. I try to use wide-mouth jars only.
My jars vacuum seal at first but do not stay sealed after 4-24 hours?
Hi Jennifer,
I’m glad you asked. Just to be sure, we are talking about vacuum-sealing jars as opposed to heat-processed sealing, right? If your vacuum seal is not holding for more than a few hours, the seal is not as strong as it should be. When sealing, you should hear the sound of the vacuum device change–usually to a higher pitch when the jar has no oxygen left in it. If you don’t hear this, you either aren’t sealing long enough, or your machine doesn’t have enough power to do the job. Always use the collar part of the lid to reinforce the seal. Does that help?
Vacuum sealers don’t vacuum seal liquids in mason jars! I only vacuum seal dry goods in mason jars.
Hi Hannah,
Nice to hear from you. You absolutely can seal liquids inside a Mason jar with a vacuum sealer. However, since they have not been through a hot water process, most liquids would need to be kept under refrigeration. If your vacuum sealer won’t do it, then you might need a new vacuum sealer or clean the inside of your lid adapter. Vacuum-sealing anything in plastic bags is a different subject and not addressed in this post.
I just want to say thank you so much for suggesting to put two regular canning lids on while sealing, WORKS GREAT. For a year I could not figure out why my vacuum seal only sealed wide mouth and you solved my problem, thanks again, you made me very happy.
Thanks for taking the time to write back. I’m so glad this worked for you. Sometimes it’s the little things that make a big difference, right?
My hose keeps coming out of the food saver port how do I fix that it hasn’t been used but 6 times
Hi Jean,
That sounds annoying. I have no idea how to fix that, so I would call the company.
I just want to add, I just ordered both sizes for the future, as one is cracked on the side and still works. Arriving 9-5-2020. They are back in stock on Amazon and Pleasant Hill Grain soon. No need to go on Ebay and pay 50.00 each!! 24.95 for both sizes together on Amazon. They have been back ordered for a long time.
I called FS a year ago and they told me about using 2 lids for the regular size jars. Sometimes the second one sticks on and I just leave the two lids on together. I bought an extra box of lids. I only use them because somethings I use come in the right size jars and they are free so I don’t recycle and use them mostly for liquid things. Thanks for sharing even though I know these things. Many people do not.
Also if you do not have the jar lid sealers, and you have a Foodsaver Canister, you can put your jar with the lid on inside the canister, seal the canister and the jar inside will now be sealed! You release the canister lid, remove the jar and put on a ring! I also do this to Reseal small jars like red curry paste I only use once in a while. I reseal the lid by putting it insdie a canister or quart jar and then remove it after it’s sealed! Have a wonderful time in the kitchen!!
Thank you for writing about the lids, Morgine. I have pictures of using the canisters to vacuum seal on this post: https://saladinajar.com/salad-in-a-jar/which-vacuum-pack-machine-should-i-buy-to-make-salad-in-a-jar/
That is the only think those canisters are good for. In my experience, they all crack eventually.
Thanks for the great tip about resealing small jars. I buy many condiments that I don’t use very often so this is the perfect solution.
i believe the problem is as mentioned above. it is the jar that is defective or not even so the sealer does not work. everytime i change the jar, seals every time.
I couldn’t agree more.
I thought that the type of jars you are using would make such a huge difference when it comes to sealing them. I wonder if industrial sealing systems can do multiple sized cans and jars. It seems like that would be a lot easier if you are doing something on a massive scale. I know that I wouldn’t want to worry about having to change our parts.
I can not thank you enough!!! 45 minutes of fighting, just about ready to throw my lid sealer in the garbage, and a last ditch effort lead me to your post. A dozen 12 ounce jars of home made turkey stock later…The 2nd lid worked perfectly!
THANK YOU!
Yay!!!!
Great article Paula!
My question is in regard to sealing other commercial jars using plastisol screw on lids. No heat. Just vac sealing for a line of pet treats from a home business please.
Thanks!
Hi Marie,
I’m sorry, but I don’t have a clue about the plastic screw-on lids used commercially. I only have experience with vacuum-sealing 2-part canning lids onto Mason jars.
I have a 5060 and it wouldn’t seal a regular mason jar. THANK YOU for providing a solution by adding the second lid. This is a design flaw that Foodsaver knows about and should have corrected long ago. The 5060 is an excellent machine so I couldn’t understand the failure. Thanks again!!
You’re welcome! ?
Unable to seal my Ball mason jars. I’ve attached the the accessory hose correctly and feel it click in place. The accessory is attached properly and I’ve even used teo lids. When I operate my sealer though I realized there is absolutely no suction going on thru the accessory tube. What could be wrong?
Thanks!!!
I figured it out. I have the FM2000 and I had already cleaned the gaskets to no avail. I hooked everything back up and started vacuum sealing the jar but this time I pushed down slightly on the the lid of the FoodSaver. Boom, all good. I probably need new gaskets but that added pressure got me thru todays project.
Hi Dutch,
Glad you figured out the solution for now. Thanks for writing back.
Thank you so much for the 2-lid tip. I had ordered a second regular mouth sealer because I couldn’t get the 1st one to work. Wish I’d seen this post before. Would’ve saved me $10. If I use 2 lids, the regular mouth sealer works every time! Easy-peazy!
My wife and I are trying to find new ways to do meal prep and save money on food every month. Canning seems like a great option but not everything we want to eat will do well in boiling heat. I’ll use your tips to wash our jars well with hot soapy water to get a clean seal and then try vacuuming the air out of the jars.
Hi Tristan, I can understand wanting to save money. This is just a reminder that perishable foods (lettuce, prepped veggies, etc.) need to be refrigerated even when vacuum-packed. They still will not keep near as long as heat-sealed Mason jars. Non-perishable foods such as flour, seeds, sugar, etc. can be vacuum-packed and stored in the pantry.
I was having a big problem with my lids sealing on regular mouth jars. I do warm them on a heating pad, but still h D
This is much easier than 2 lids and works perfectly every time:
Take a roll of duct tape and unfurl about 3 or so inches and fold back sticky side to stick side so you end up with about 3 inches of double thick duct tape with no sticky sides. You can roll over another fold for a third time if you need it to see if double or triple thickness works for you. Very easy.
Next, trim the 3″ strip you just made with scissors so no sticky edges. Now insert that folded over pad of duct tape into the sealer cap, just push it in and it should stay there (if not try with a longer pad — tape is cheap!). You can now just leave the pad there since is should wedge in and hold. No tape should overlap the sealing edge that goes against the jar. What this does is put extra pressure on the lid when vacuuming.
When you finish vacuuming a jar, to remove the vacuuming lid start from one side and push up with your thumb under that side of the cap while making sure you are also pushing up the blue cap seal along with the cap so it doesn’t become separated. Then work off the entire sealing cap.
This works perfectly with the smaller foodsaver jar sealer cap where I previously had a problem sealing regular jars.
Good luck.
Thanks John. Can’t wait to try it.
How is that easier than 2 lids??? Trying to follow your instructions would take a while, let alone leaving the kitchen to find the duct tape and a pair of scissors.
I slid another lid in there and it sealed immediately. Thank you so much. I’m just going to always use 2 to prevent complications. Again, thank you!
I know many people think your suggestion was rather difficult… however, in my case I believe the vacuum to be inferior to the norm. I was unable to keep the seal as the blue gasket was enough to lift the sealed lid. I was finally successful when I used both suggestions together. I placed the lid top be sealed on the jar, then a thin pad of duct tape and on the top of that a second lid. This was enough to seal the jar. Thank you all so much for making my project a success.
What an ingenious solution! Thank you for taking the time to share. It might be just the tip someone else needs to make their seal work.
Thank you. the two lid trick worked. we were goin’ crazy trying to figure it out. Awesome!
You’re welcome! 🙂
Sooooo glad I found your post!! I went crazy all day trying to figure this out! I have come up with another idea that I wish you would all give a try. The 2 lid system works just a little too well! I landed up unsealing my jars trying to pry apart the the two lids not to mention ruining my manicure! lol So, I thought to trace the circle of the lid on a flat rubber/silicone jar opener and cut it out with scissors. I then inserted my rubber circle up into the top of the FoodSaver Mason Jar sealer. Now only one jar top is necessary and I get a good seal all the time. I made a circle for each size of jar sealer and they work like a charm with no prying or wasting two lids. Give it a try and save you lids and your sanity!!
Barbara,
You are an absolute genius!! Thank you so much for sharing. Can’t wait to try it myself.
I have my own freeze dryer. it maybe is overkill, but I pack freeze dried food
in vacuum sealed jars with an oxygen absorber packet.seems to work very
good. i’ll let you know in 20 yrs.
It might be overkill but…..:-)
Awesome website Paula, keep it up!
I really enjoy your content. My ideas have expanded so much because of your posts here. Thank you 🙂
Does this method also work with dried fruit?
Yes. Also nuts and other grains, coconut, cereal, seeds, etc.
Help. The blue gasket came off and stayed on the jar. I removed it without paying attention to how it was positioned. I don’t know how it goes back into the jar sealer. Does the open or closed side of the gasket go facing the jar?
Hi Martha,
Hoping you got your jar sealer put back together by now. The larger flap goes toward the jar.
I had the same problem with the regular size lids. What I was told to do was to
put the lid on the jar, then put another lid inside the lid sealer, and then go through the sealing process. This works great for me. Sometimes both lids
stock, and very carefully I have to pry the top one off. I just keep an old lid in the
box with the sealer.
The wide mouth lid sealer works great just as it is
Hope this helps.
I finally solved the problem by a combination of 3 things. Using two lids but heating the lids with a hair dyer before placing the on the jar and putting the cap on. Once the cap is on, I give it a little twist to ensure the lids are seated properly. Never had a problem since. Just thought in canning the lids are warm to hot from being in the water so thought to heat the lids.
Thank you for the two lid trick on the regular mouth jars!! I thought I was going crazy because my machine works fine. That did the trick! It got everything lined up beautifully.
Great informations on vacuum sealer. I am currently doing some research and found exactly what I was looking for. Thanks for guide!
Hi Paula,
I couldn’t find the cheap hand pump, so I went ahead and bought the Foodsaver handheld vacuum. I don’t have the Foodsaver wide mouth jar attachment. Can I use the hole prick/electrical tape method with the handheld vacuum?
Yes, Melissa. You can. See this post.
Just replaced a broken Jar Sealer and also bought a new tube. The old was cracked, and before I discovered the crack had tried to clean the machine gaskets etc. Also adjusted the altitude setting on the bottom, but believe it back to where it was.
I can seal jars, but not get them machine to offer the green light or turn off. Tried new and old tubes and jar sealer gaskets.
Any ideas where my problem may lie?
Steven,
I am not a technician or repairman so I don’t really know. But I do know the average vacuum pack machine seems to have a relatively short life–especially if you use it almost daily like I do. I feel good if I can get 2-3 years before I have to get a new one. Maybe another reader will have an idea. Paula
The vacuum sealer makes a weird noise as it sucks the air out of the jar. The closer the sealer gets to creating a vacuum in the jar the higher pitch the noise becomes. The vacuum sealer will automatically stop when a vacuum has been created in the jar.
Thanks so much for the double lid trick. I just did 2 quart jars of Raw Pistachio Kernels. I was getting very frustrated before I read the “double lid” trick. I also had to gently hold down the sealer attachment to get the seal. Now, back to the kitchen to vacuum seal jars of Hersheys Cocoa and anything else I can find to vacuum seal in a jar. 🙂
I’m so greatful for your website as I am planning to give salad in a jar for my birthday at work. Already bought the bottles last month. Blessings
Hey great tips Paula it totally helpful!
hi, we have tried all the suggestions but so far what has worked for us in mhy home was to boil the lids to soften them up . hope this helps
Thank you!! I have had a very difficult time getting my regular mouth jars to seal when using my vacuum sealer. I added another lid as you suggested and PRESTO!! It worked!! Thank you!!
Thank you for the informative review! I have a question regarding perishables. I have FoodSaver & just ordered the lid for jars & will buy wide mouth jars. Does this method extend a “best before” date? I have a large bag of cat kibble that expires Feb 23, 2014 & I wonder how best to store it once in the jars. Do I keep it in a cupboard, the fridge or freeze the jars? And do I still need to use it by Feb 23rd? I’m just not sure what the point is for dry foods other than the obvious, like keeping little critters out, but that’s not my issue. I need to extend the life of the kibble as the formula changed & this is my last bag of the old formula. I can’t use it all up by Feb 23rd…Tks for any advice!
Lynn,
I don’t have a good, authoritative answer for you. With dry human foods, I can taste that they are fresh much longer than they were before I started vacuum-packing everything in mason jars. But I couldn’t tell you for sure how much longer–I just have to smell/taste. I am afraid of most dogs so I have never had a dog and have zero experience with dog food. And I’m pretty sure you don’t want to taste it yourself. Maybe you could ask the FoodSaver people?
I’m not from the US, so the ziploc vacuum isn’t really an inexpensive option. Wondering if this would work? Aka, how big is the hole on the top of the foodsaver suction device?
http://www.ebay.com/itm/Manual-Air-Pump-Seal-For-Compressed-Saving-Saver-Bag-Storage-Vacuum-Space-Green-/390569716853
Way late to the party here, but I found you on a google search because I couldn’t get my jars to seal. Was making me crazy! I’m not doing this for lettuce, but for a conserve I’m going to freeze and I wanted to remove the air before the freezer. The 2nd lid worked like a charm.
Thank you for posting this!!!
Hi I made two jar salads the other nite and just put tops on with my hand Should no be vacuuming first? Seems like a large expense?
Hi Lynne,
I’m not exactly sure what you mean by “jar salads”. If you mean you put lettuce and other veggies in a jar together, it is best NOT to vacuum-pack them. They won’t stay fresh long but since you only made two jars, I guess it won’t take you long to eat them. See this post. On the other hand, if you put only chopped lettuce in the jars and you want them to last a week or longer, they will stay much fresher when vacuum-packed. It doesn’t have to cost a lot of money. See this post. You can also do it cheaply with a hand-held vaccuum-pack machine. See this post.
How do you unseal the lid without bending it?
Very carefully. I use a pop top can opener.
I would like to add one little thing that can also make a difference in the longevity of ANY fruit or vegetable: use a porcelain knife!!!!
You can get them at any Harbor Freight store and I just noticed they have them at Walmart now too. The difference between using steel versus porcelain is incredible! No more brown edges. Period. Try it and you will be sold! 🙂
Hi Marla,
Thanks for writing. I did a little experiment with knives and vacuum-packing in regards to chopped romaine lettuce. You might find it interesting. You can read about it here.
I have not been successful printing any of you instructions from the print/pdf. Not sure if it is my printer for sure. Thought I would let you know. I end up highlighting and printing that way. Your method for making Greek Yogurt is the best. Thanks so much for simplifying it. I have done it twice now and have told several friends.
Hi Paula,
Sorry you aren’t having good luck with the print button. I just tried it myself and it worked fine so not sure what to tell you. But if highlighting and printing works for you, then all is well, although not as convenient. 🙁
Thank you for sharing this awesome technique! My foodsaver does not have a attachment port, would the same result occur if I used a food sealer bag?
TimAyn, I do not use the bags for lettuce because the leaves would be crushed. The jars protect the lettuce.
I love this and am on my second batch of lettuce (Romaine and Iceberg) BUT I also use it for cucumbers and another jar for green peppers. My husband and I are retired and with just the two of use, we don’t use up some of the produce as a family would. I am going to use a smaller jar for my ginger and for garlic. Before I know it – I might have a whole refrigerator full of jars! Thanks I love this idea.
Hi Karen,
Thanks for writing. Both my refrigerator and pantry are full of Mason jars which also means my dishwasher and cabinets are often full of them too.
I’ve never tried the double lid method- that will come in handy! 🙂
I wipe the jar rim with a damp paper towel before applying the lid. It always works for me. Rare time it does not, I use the double lid method.
Good habit, Rachel.
I was just talking with a friend and suggested something I would like to add. I always use a canning funnel when I add my lettuce or pantry goods to the jars. That way the jar rim stays nice and dry when packing lettuce, or powdery things don’t get on the rim to interfere with the sealing process. The funnel only costs about $1.50 and lasts forever.
Thanks for the suggestion about the funnel. Great idea! Don’t take up storage space either.
Thank you, Paula, for this post. I am definitely passing it on to friends who are vacuum sealing mason jars. I agree with you that it is much easier to seal the wide mouth jars. If buying new, that’s what I go with. However, I have a lot of the regular mouth sizes and as I store dry goods in my pantry, I do use them. The double lid trick is what usually works for me. If I had not found out about that trick, I imagine I would have been one frustrated lady, lol. Just yesterday I showed a young man (whose family is into emergency preparedness) how to vacuum seal with a Ziplock hand pump and a widemouth Foodsaver jar adapter and jar. It took several tries (even with me guiding) to get it. But once he got it – he got it! So hopefully everyone will not give up. And I really think your videos are REALLY helpful. If they follow your suggestions, I’m sure they will have success.