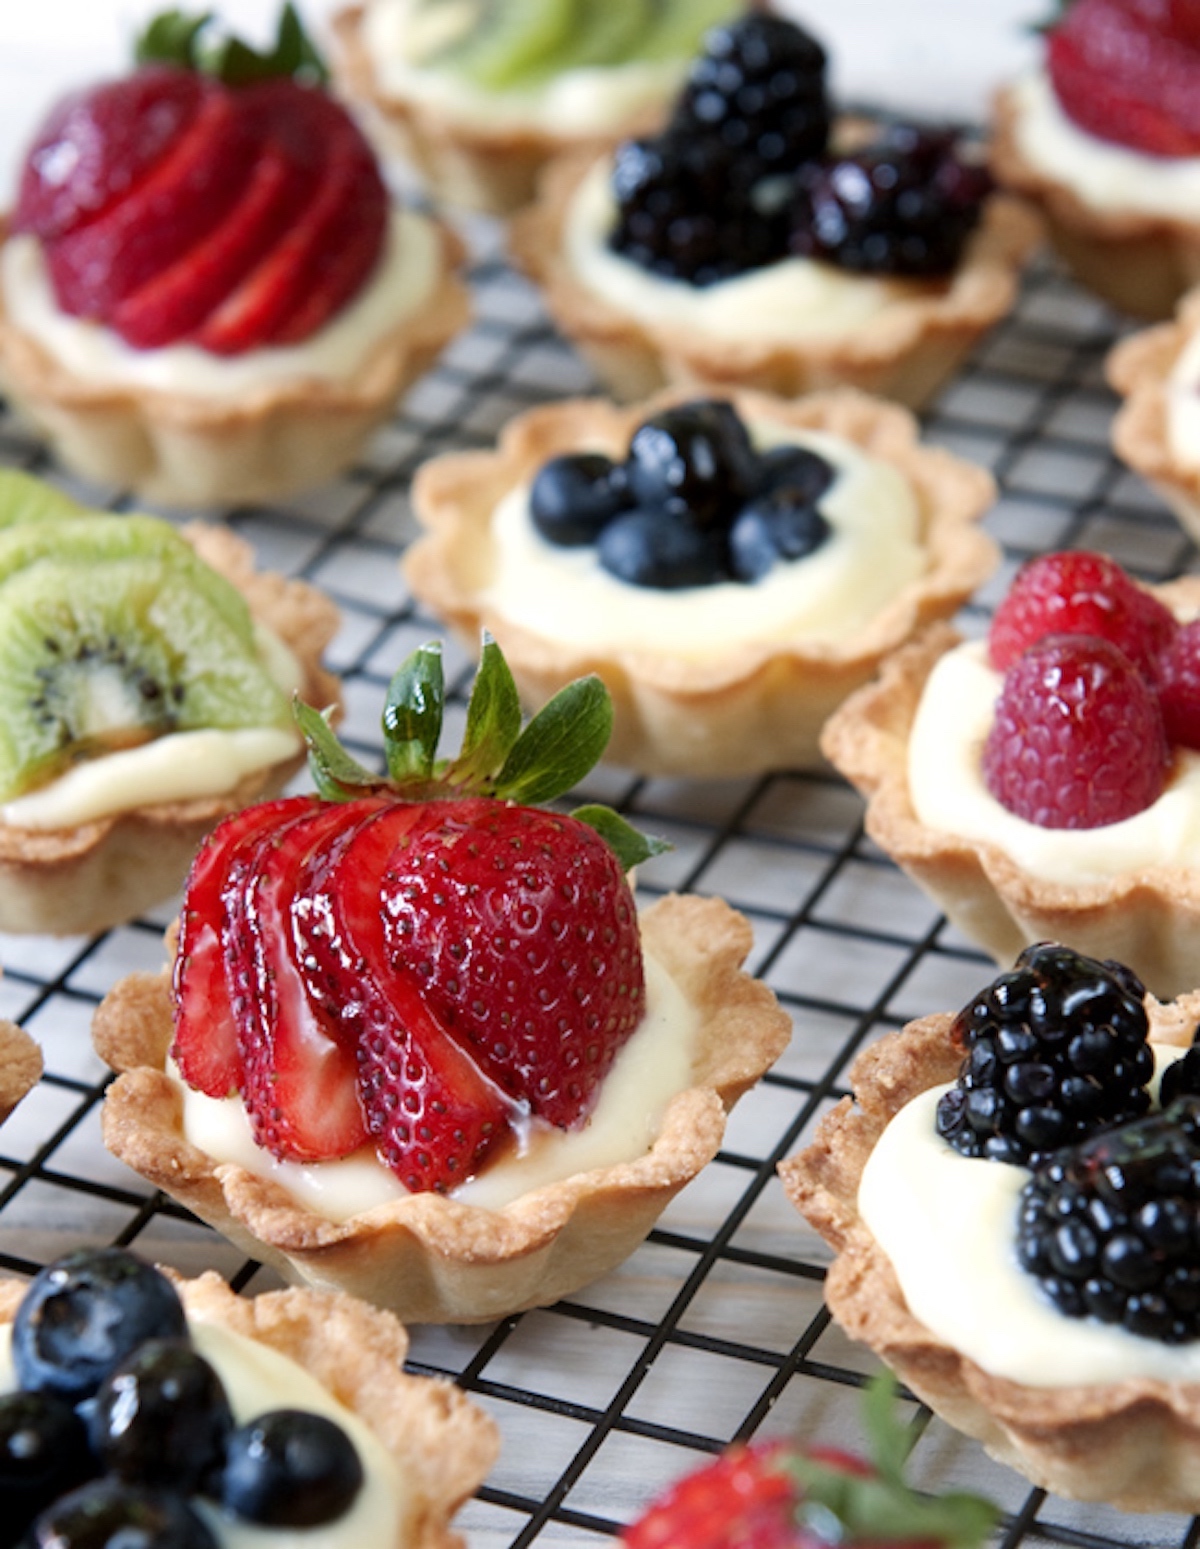
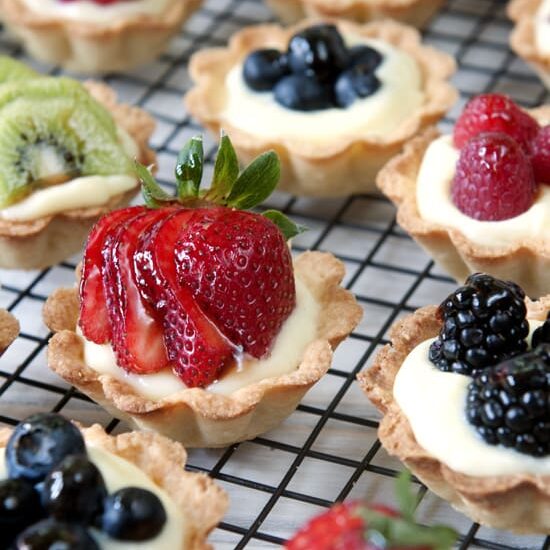
Ultimate Mini Fruit Tarts with the Best Shortbread Crust

Sneak Preview: These mini fruit tarts have a crisp, buttery shortbread crust, a creamy vanilla pastry filling, and a fresh fruit topping. They’re pre-portioned, easy to serve, and perfect for any gathering.
This post contains affiliate links. As an Amazon Associate, I earn from qualifying purchases at no extra cost to you.
What Makes these Tarts Worth Sharing
- No slicing needed-bite-sized and easy to serve
- Use seasonal fruit
- Perfect crust-to-filling ratio
- Crusts can be made ahead of time (or use store-bought mini crusts)
- Quick and lump-free microwave pastry cream
Ingredients and Substitutions
• FLOUR: All-purpose, bleached or unbleached
• CONFECTIONERS’ SUGAR: Don’t substitute granulated—makes shaping harder
• BUTTER: Use cold salted or unsalted butter
• EGG YOLKS: Adds richness and binds the dough; use large eggs
• HEAVY CREAM: No substitute—it’s why these crusts stand out
• MILK: Whole preferred; low-fat works
• CORNSTARCH: Cornstarch gives a silkier result; Arrowroot is a backup
• VANILLA EXTRACT: Use vanilla bean extract for a fancier version
• CURRANT JELLY: Just a little adds sparkle—worth buying a jar
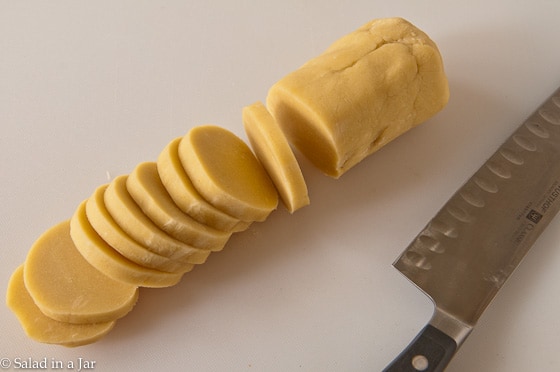
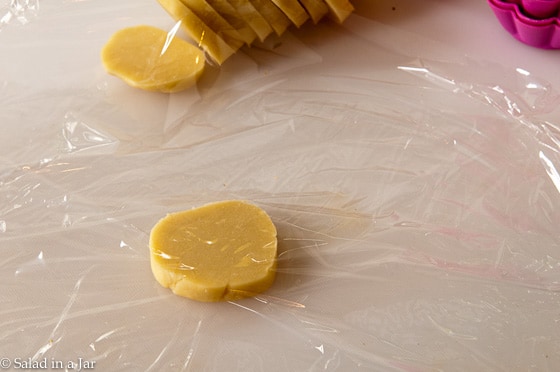
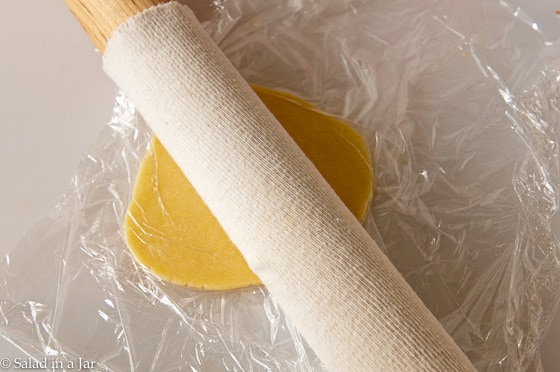
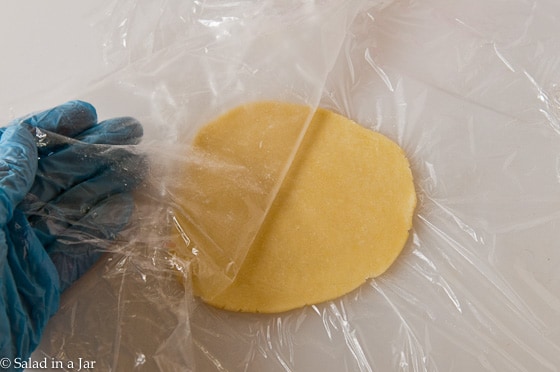
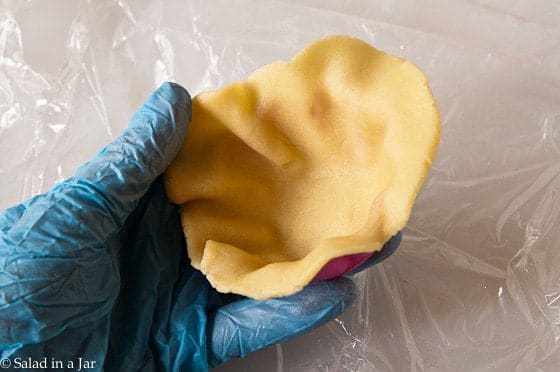
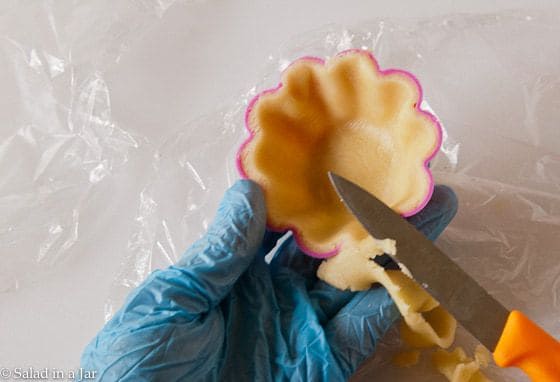
Step-by-Step: Shaping the Crusts
Refer to the recipe card below for exact amounts and detailed instructions.
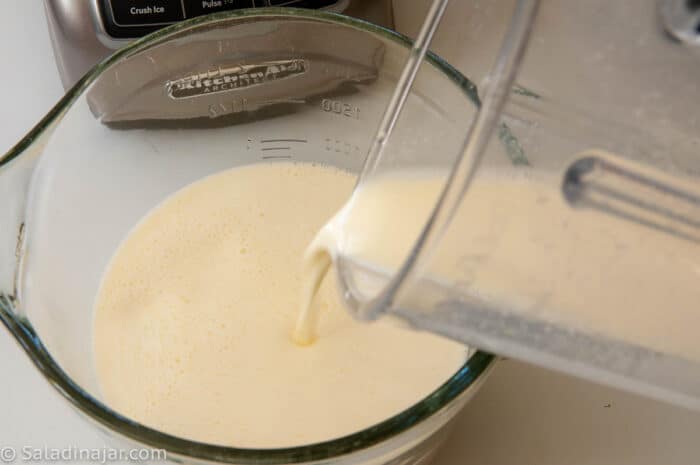
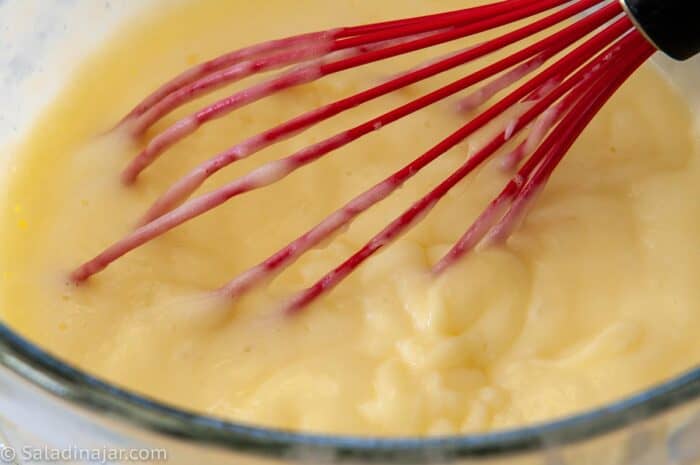
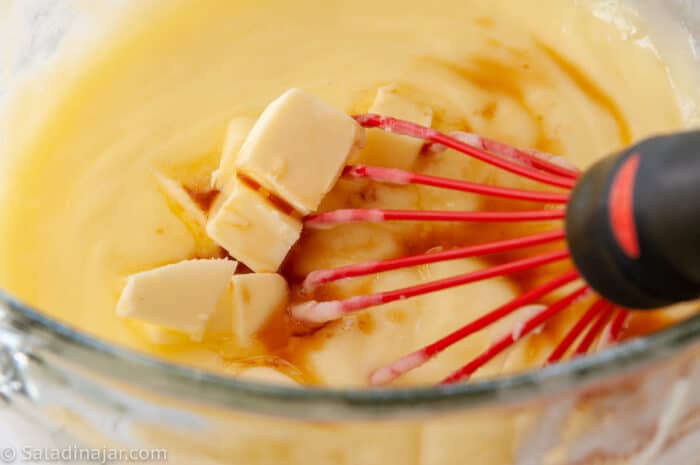
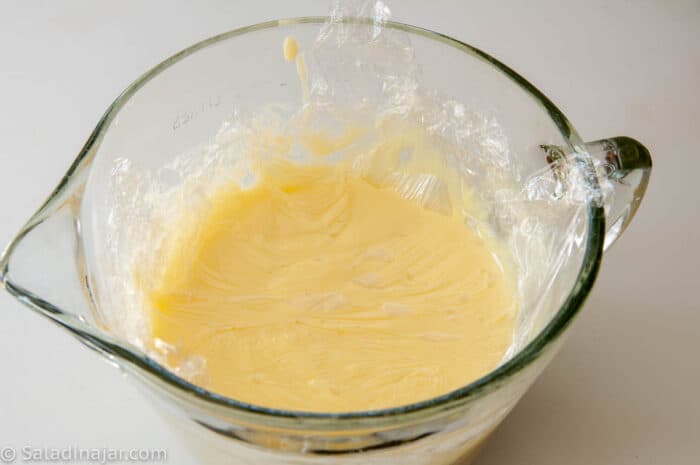
Step-by-Step: Making Vanilla Pastry Cream in a Microwave
📌Tips That Make a Difference
• Make pastry cream at least 3 hours ahead or up to 1 day in advance. Whisk before using.
• Assemble the tarts the same day you serve them to keep the crusts crisp.
• Pat fruit dry (don’t rinse) to keep it looking fresh and prevent soggy toppings.
• Do a practice round if you’re making homemade crusts for a special event.
• Use store-bought tart shells if you’re a beginner or baking in bulk—they’re reliable and time-saving.
• Mini tart molds are available from Amazon (paid link).
• Freeze unbaked crusts for up to 2 months. Bake the day before serving for best texture.
Ultimate Mini Fruit Tarts with the Best Shortbread Crust
Video
Ingredients
Mini-Tart Crust:
- 1½ cups (180 g) unbleached flour
- ⅓ cup (67 g) powdered sugar
- ¼ teaspoon salt
- ½ cup (114 g) unsalted butter chilled
- 1 (18 g) egg yolk
- 1 tablespoon heavy cream
Cream Filling:
- 2¾ cups (624 g) milk
- ⅔ cup (133 g) sugar
- ¼ cup (32 g) cornstarch
- ⅛ teaspoon salt
- 4 (72 g) egg yolks
- 2 tablespoons (28 g) unsalted butter
- 1 teaspoon vanilla extract
Glaze
- ¼ cup (85 g) currant jelly
Instructions
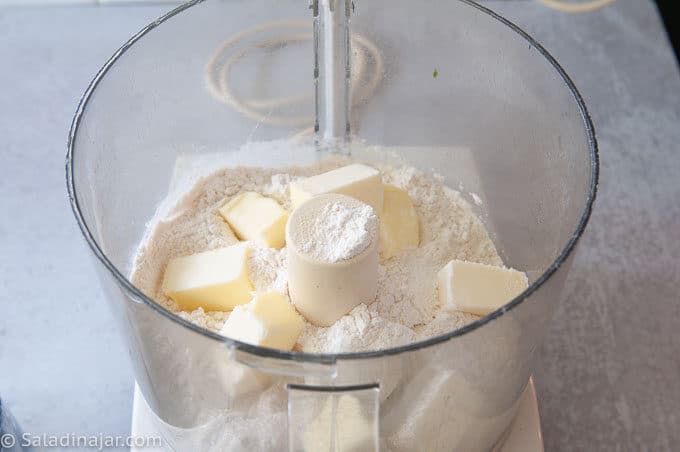
- Make the Crust Dough: In a food processor, combine 1½ cups (180 g) unbleached flour, ⅓ cup (67 g) powdered sugar, and ¼ teaspoon salt.Add ½ cup (114 g) unsalted butter (cut into 8 pieces) and pulse until the mixture looks like oatmeal.Add 1 (18 g) egg yolk mixed with 1 tablespoon heavy cream. Pulse until moistened and dough begins to come together. If too dry, add a few drops of cream.
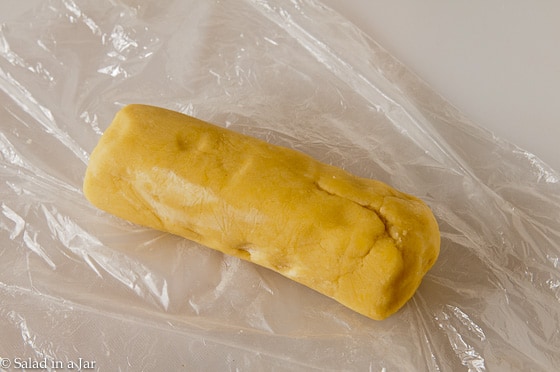
- Shape Crusts: Form dough into a log, wrap in plastic, and chill for 30 minutes.Generously spray tart molds with flour-and-oil spray (like Baker’s Secret). Skip this step for silicone molds.Slice chilled dough into 12 pieces. Roll each piece between plastic wrap into a circle slightly larger than the mold. Press into molds evenly and trim the edges. (See video for reference.)Freeze the shaped crusts for at least 30 minutes, or up to 1 month. This prevents shrinking or melting during baking.
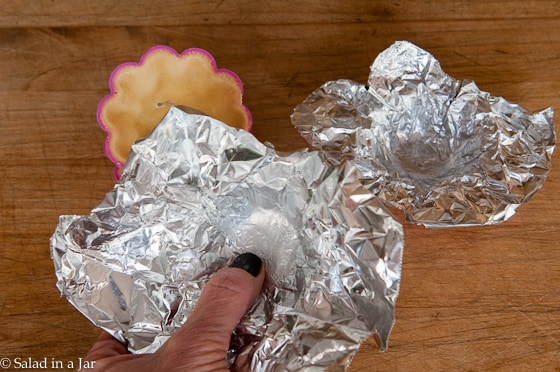
- Pre-Bake Crusts: Place frozen crusts on a baking sheet. Line each with a small square of foil, pressing it gently into the shape of the mold.
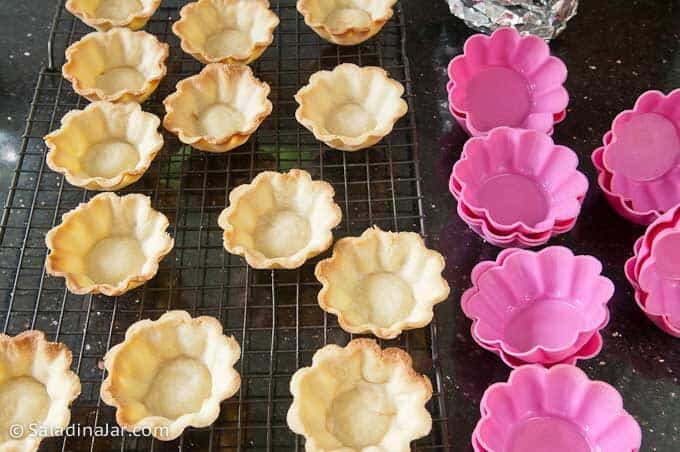
- Bake at 400˚F (200˚C)for 10 minutes. Remove foil and bake until golden brown, usually about 3-4 minutes. Remove crusts from the molds within 3 minutes of coming out of the oven. Allow crusts to cool on a rack.
- Cream Filling: In a blender, food processor, or bowl, combine: 2¾ cups (624 g) milk, ⅔ cup (133 g) sugar, ¼ cup (32 g) cornstarch, ⅛ teaspoon salt, and 4 (72 g) egg yolks.Blend briefly and pour into a 2-quart microwave-safe glass bowl.Microwave on HIGH for 6–7 minutes, whisking at the 3-minute mark, then every minute until thick. (Microwave times may vary.)Whisk in 2 tablespoons (28 g) unsalted butter and 1 teaspoon vanilla extract until smooth.If not using right away, press plastic wrap directly onto the surface to prevent a skin.
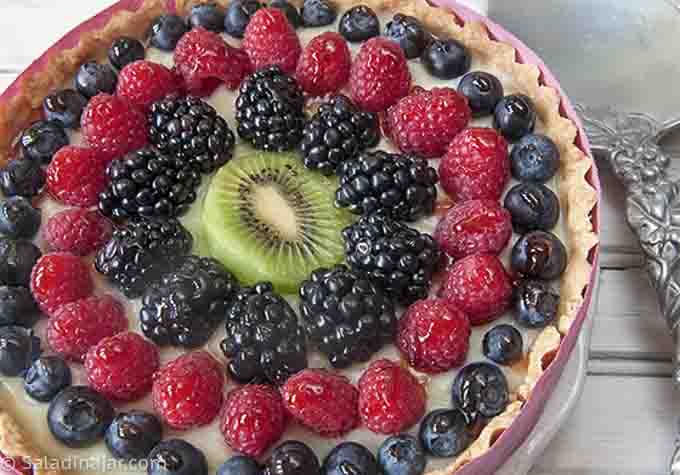
- Assembly: Fill cooled crusts with warm or chilled custard. Cover and chill until ready to serve.Wipe fruit gently with a damp cloth or paper towel. Avoid rinsing under water to keep it looking fresh.Top each tart with prepared fruit.
- Glaze: Melt ¼ cup (85 g) currant jelly just until liquefied. Brush over the fruit for a glossy finish. A little jelly on the cream is fine.Serve immediately for the best texture.
Notes
- If the dough seems too dry to press into a ball, add a teaspoon or two of milk or cream.
- Be gentle – the warm crusts are fragile but delicious for snacking if you accidentally break one. ?
- Tarts are best eaten the day they are assembled.
- A dollop of whip cream makes these even better.
Equipment
Nutrition
All images and text ©️ Paula Rhodes for SaladinaJar.com
FAQ
Keep microwaving—it thickens as it cooks. Cooking time may vary based on microwave wattage.
Small berries (strawberries, blackberries, blueberries, raspberries) and kiwi work well. Avoid watery fruits like melons.
Refrigerate tarts for up to 24 hours, but they’re best served and eaten within a few hours after the tarts are filled and the fruit is placed on top.
Final Thoughts
These are my signature dessert. Everybody loves them, especially when offered several fruit choices. They are definitely designed for sharing. I would love to hear how they turn out for you in the comments.
— Paula, Home Economist
Homemade Food Worth Sharing
Need help troubleshooting?
Email me: Paula at saladinajar.com — photos help!
Six More Tart Recipes for Pie Lovers
- Chocolate Ganache Mini-Tarts: Rich chocolate ganache in chocolate or vanilla crusts—perfect for your sweetheart.
- Pumpkin Pie Mini Tarts: Portable and bite-sized, ideal for dessert buffets or family gatherings.
- Mini Lemon Tarts: Lemon curd and homemade crème fraîche in shortbread crusts, topped with fruit for a perfect after-dinner treat.
- Mini Strawberry Tarts with a Homemade Shortbread Crust: Celebrate fresh strawberries with these tartlets in buttery shortbread crusts.
- Mini Cheesecake Tarts: No-bake delights (filling) with mascarpone cream cheese—party favorites!
- Chocolate Cream Tart (Made in a Microwave): Quick chocolate cream filling in a graham cracker crust—effortless and delicious!
[popout_newsletter]

That tart pan is super cute! Love it
The small promise in “pre-portioned, easy to serve” does a lot here—it keeps the tarts from feeling fussy. You’re preserving the pleasure of something pretty without making it feel precious.
This is a divine recipe!! Thank you so much for sharing it.
Hi Debbie,
So happy you liked this recipe. Thank you so much for taking the time to leave a comment.
How long would you bake a single big tart for? And at what degree?
Hi Briana,
That’s a good question and something I will add to the notes in the recipe.
How to Bake a Full-Size Tart Crust: Be sure to cover the inside of your frozen tart crust with buttered foil, pushed down tightly against the crust. Place the tart pan on a baking sheet and bake the crust for 25 minutes at 375˚F. Carefully remove the foil and gently push down any bubbles with the back of a spoon. Continue baking for an additional 8 minutes, or until the crust is set and golden brown.
Great recipe! I didn’t use a food processor/blender for the cream but it still turned out well.
Hi Kim,
Thank you for the feedback! I’m so glad to hear the recipe turned out well even without a food prodcessor or blender. A good old-fashioned whisk is all you really need. I hope you enjoy making it again.
Hi I plan to make these this week. What size molds should I purchase for this recipe to make 12? Thank you.
Hi MG,
I have a link in this post to the tart shells that are similar to what I use. (Paid link) They are described as 3-inch Brioche Molds. Cup Size: 3 inch top x 2 inch bottom diameter x 1-1/8 inch depth. Volume: 12 x 2.5 oz, Total 30 oz. Includes 12 cups. That’s what I would recommend.
Do I bake the tart in the metal mold on the cookie sheet, or just on the cookie sheet by themselves frozen? Thanks
Hi Mary,
Always bake them in the mold. Remove the crust after they are baked and slightly cooled.
Made these for engagement party this weekend. They were amazing. However, I read you’re supposed to eat them the day they’re put together, but I’m gonna say I ate some this afternoon from yesterday and they were even more explosive in flavor. They had been refrigerated the whole time. They were amazing.
Hi Danette,
I’m thrilled to hear that your tarts were amazing. How well the tarts will hold depends a lot on the freshness of your fruit.
Absolutely delicious and so pretty! I strongly suggest rolling the dough between sheets of parchment paper, rather than plastic wrap. It is infinitely easier and won’t stick it all. Making the pastry cream in the microwave is genius and worked perfectly. Thanks for the great recipe!
Thanks for the 5-star rating. Good idea if you have parchment paper. Thank you for taking the time to share.
I have only made the crusts so far but Girl, you have CRACKED THE CODE!! I’m making 100 of these for a wedding Saturday & I’ve tried 3 recipes. I was not happy with the crust of the first 2 recipes (Hungry Huy was not sweet at all. And the crust was not crusting from Rich and Delish.) Your crust recipe is perfectly sweet with the perfect texture. I’m going to try the filling tomorrow. I’ll report back. 🙂
Hi Deb,
I can’t wait to hear how you like the completed tarts when you finish. These are my signature dessert!
I cheated and used store bought shells, but the custard is my new favourite recipe! Everyone at Xmas Dinner loved it. So easy and convenient, great balance of flavours. Thank you 🙂
Sounds like you were the star of the show at your Christmas dinner. Thumbs up!
The cream filling is delicious and creamy but I wish there were more clarification of whether to take them out of the tin or keep them in. Luckily I found the picture! Also, it’s effortless!!
Hi Annika,
I have noted your confusion about the crust. As you figured out, you will always remove them from the tart mold after they cool for a few minutes out of the oven. Glad they worked out for you.
EATING THIS 10/10 VERY GOOD
Made these this weekend for a church event. OMGoodness! The tart shells are perfection, the pastry cream is absolutely THE best, and the instructions couldn’t be any simpler. Everyone thought these were store bought! Thank you so much for sharing such an awesome recipe!
Hi Richele,
I love your description. It made me want to head for the kitchen and whip some up immediately. I’m glad you found the instructions easy to follow. That’s always my goal, but it doesn’t always turn out that way. Your fellow church members are blessed to have you in their midst.
good
Followed the recipe, cream was in the fridge overnight, whipped it in the morning like it said, still just soup, never thickened after putting it in the fridge, only got thinner
Hi Kristina,
I’m sorry this didn’t work for you. Did the pastry cream coat the back of a spoon heavily when you finished cooking it? That’s what you’re going for. I normally tell people to keep cooking until this happens no matter how long it takes. If you measured correctly, it will happen but may take longer due to differences in microwaves.
You mention a video a few times in your text, but there is no video anywhere on this page. Any tips about freezing the crusts?
Hi Deb,
I just checked and there is a video on that post about making the crusts. You might have to close out the post and open it again. I’m sorry if you can’t get it to work. I would send it to you, but I know from experience that those things won’t go through email.
About freezing the crusts, I assume you’re talking about after they are baked. I’ve never done that because I don’t have the freezer space. My suggestion would be to double wrap them and store them in a hard-sided container as the crusts are quite fragile. If you’re talking about unbaked crusts, that’s a different story. Stack and store them in a plastic bag. Once they are frozen hard, they aren’t fragile at all. I freeze mine for a month or two just so I can have some on-hand whenever a dessert emergency arises.
I was wondering if instead of using a microwave to heat the filling we could use a stove top?
Yes, you absolutely can use a stove top. I recommend a double boiler for the process. If you don’t have one, perhaps you can use a smaller pan or pyrex glass bowl inside a larger pan that holds boiling water. You don’t want to scorch it, which is easy to do on the stove.
@Paula, Thank you!
How many tarts would it make if I just used the frozen individual tart shells?
Hi Deb,
It depends on how much the frozen tarts hold. For reference, the silicone mold I use holds about 3 ounces without the crust in them. With a crust, I’m guessing 2 ounces. They measure 3 inches in diameter at the top and are 1-1/4 inch in depth.
The recipe for the pastry cream makes more filling than you can use with 1 batch of the homemade tart recipe. So unless your store-bought tarts are really big, you should get more tarts that the recipe says.
Can we replace the heavy cream with milk? Because they don’t sell heavy cream where I live.
Yes.
We went cherry picking over the weekend so I wanted to make cherry tarts. I took the crust recipe from this post and filled it with cherry filling. Made this in a muffin pan and it turned out really good. I must have done a better job in buttering the pan in some but not all because I had a really hard time lifting them out without the crust breaking apart. I only succeeded with 8 out of 12. It was also a little difficult to put the crust in the muffin pan because the dough broke easy. Is that how its suppose to be? I’ll be making this crust again and experiment with different fillings. Thank you for sharing this!
Hi Nerissa,
I’m sorry you had a hard time getting the crust out of muffin tin. The crust should not be crumbly when you are putting it into the muffin pan. Are you using a food processor or stand mixer? Mix it longer until it no longer crumbles. To be honest, I have never used muffin pans. The silicone molds are WAY EASIER. They are quite inexpensive on Amazon. I don’t know where you are–maybe not available where you live? My last suggestion is to spray your pans well with Baker’s Joy. It is so much better than butter. There’s really no homemade substitute although you can try greasing with butter, then coating with flour. Shake pan upside down to get rid of the excess flour. Good luck.
I make this every year for my boyfriends birthday. It’s his favorite!!! Literally the best to pack for a picnic and the cookie crust is so delicious. The custard is so easy to make and taste creamy and amazing. BEST FRUIT TART RECIPE EVER!!!!
Thanks for the comment, Khy. I agree that the custard is creamy and amazing.
Does the filling set or stay runny?
The filling should coat a spoon rather heavily. Keep cooking until it does. The custard will also thicken as it cools.
I made the custard filling. Oh wow wa sit easy and delicious!! Looked for many recipes for this typr of cream before. Perfect for eclairs or Japonesas ?
Hi! I just made these tarts, and everything worked beautifully. I followed your instructions to the T. I am so pleased with my delicious little desserts!
Hi, I was following this recipe step by step and it did not turn out at all. I have baked a lot before so, for the most part i know what im doing. I dont have a food processor nor do i have any means of getting one so i tried both my mixer and blender and still nothing worked well. They look amazing in the pictures but the recipe just did not work out.
Saw these on Pinterest, fruit tarts are my favorite! They turned out so good, thanks for the recipe!
Also, do you ever stab the crusts with a fork? Would that keep them from puffing?
thanks for such an accurate recipe n simple too! best tarts ever!!!my family just licked all the leftover cream filling !!!i know i ll have to make these more often now….
And I have to give your recipe 5 stars
Umm they look really good cant wait to make them for the next holiday.Cant wait 🙂
Great recipe for the cream filling! It was so easy and turned out perfect in the microwave. I’m never going to slave over a stove for pastry cream again. One note for those that didn’t get it to set up – I had to microwave mine for 7 minutes instead of 6 before it thickened.
Hi Paula,
I stummbled upon your blog….and i’m speechless !!
I love these tarts !!! I haven’t seen anything better looking and inviting than these !!!
They are simply DELISH !!!
I love your food photographs…..why don’t you share some food photography lessons to your blog !! Would love to take some lessons from you.
Great place.
I’m making some mini tarts for a wedding I’m doing in November and I’ll be remembering this recipe! I know I’m making chocolate and pumpkin but I might I have to add a vanilla too! Your little tart crusts look perfext!
Welcome back! These look so delicious, Paula. I adore the mini-pink molds. Have a great holiday weekend!
Please share an eggless version for the cream filling. Thanks ?
Hi Tejal,
Nice to hear from you. I have never experimented with eggless custard. So I don’t have any in my recipe collection.
Here’s a couple you might consider. https://www.geniuskitchen.com/recipe/eggless-chocolate-pudding-pie-filling-356767
https://myegglessworld.com/2014/07/22/coconut-cream-pie/
Hi there, ill be making these cute tartes this week but ill be using disposable golden fluted tarte cups. I would like to know if i need to flour the cups before adding the crust, and do i need to prick with a fork on the bottom of each cup.
Thank you.
Marie,
No need to flour the cups. There’s plenty of butter in the crusts. I’m wondering what size cups you will be using. After getting your question, I tested using the small “nut cups”. Wow! Those are small. Won’t hold more than a tablespoon of cream, if that much. You will be eating mostly cookie. Not all bad.
Or are you using a standard cupcake size? I didn’t try those. With the small cups, you don’t need to prick the bottom as long as you freeze the crusts solid before baking, which you should always do anyway. If using the large cups, I would line the inside of the crusts with non-stick foil as I describe in the recipe.
I always recommend a practice run on the crusts unless you are a highly-experienced crust maker.
These are absolutely delicious! Everything turned out beautifully and everyone loved them! I have to make more for my mother. She is crazy over them. I just served them with a little sliced banana and Hershey’s chocolate syrup. I am anxious to try other fruits.
The recipe looked tasty, so I tried it. Can not get the cream filling to thicken. I noticed the same comment from Emily back in Dec 2011, no reply. By chance can you think of what may be going wrong?
Beautiful but too much work.
Hi. I tried making this recipe and the only problem I had was with the instructions for the custard filling. I followed the instructions and measurements just how it was written and my custard didn’t thicken at all in the microwave. I even microwaved it a few minutes longer and still nothing happened. It was very upsetting as it was planned for a dessert that day and it never hardened in the fridge. After following the instructions, I looked back at the pictures and saw that custard was really thick and the instructions never explained how to make the custard thick. Very disappointed.
Laura,
I am so sorry about your custard. I am have made this recipe many, many times with great success as have others. My only guess is that perhaps your microwave is not very powerful and it needed to be cooked much longer or that you left out the cornstarch. Also, the pudding does get much thicker as it cools. Again, my regrets.
Made your recipe for a graduation party yesterday. It was outstanding. I am amaze how easy it was to make the filling in the microwave. No risk of scorching or constant stir like traditional method.
This will definitely be my go to recipe from now on. Thanks!
I am soooo not a baker but I found your cream recipe so easy to follow and delicious! Will be using it again and again. Thankful I found your website!
I’m making these cute mini fruit tart for a school event and the cream came out a little weird. Its yellow and very thick. Is the cream suppose to be a light beige, similar to the picture? Is there a way for me to make it more smooth?
Hello
What can I replace the heavy cream with?
You might try using the whole egg instead of just the yolk. I don’t think the tarts are quite as tender when substituting egg white for heavy cream, but they are still quite wonderful and perhaps a little more sturdy.
when we fill tart with cream ,cream must be cold or hot? , after filling how many hour can stay? please reaply me thank u!!
I let the cream cool down a little bit but it is still warm when I pour it into the tart shells. They are good the day you make them but the crust will begin to get a little soggy the next day–although it wouldn’t prevent me from eating them. 🙂
It is great tnx.
I made the big one the crust was perfect but I have changed the filling. I really liked it because it was my first time and it was ok.
Please send me a nice smooth custard recipe
Lyn,
The custard recipe included with these fruit and cream mini-tarts is wonderful, in my opinion. I have found nothing better or easier.
I did not take them out of the container to cool but the custard I made I folded whipped cream in to it then spooned it in after few hrs we had it after lunch within 4 hrs it was very soggy please share your custard recipe with me thank you
I did not take them to cool but the custard I made I folded whipped cream in to it then spooned it in after few hrs we had it after lunch within 4 hrs it was very soggy please share your custard recipe with me thank you
When I put my custard filling. It sat in the fridge for about 3 hrs before serving
It went to much the custard made it soft I could not pick the tart out of is container I had to eat it with a spoon
Hi Lynn,
I’m not sure I understand what you did. After you bake the tarts, you should take them out of the molds to cool. They become very crisp like a shortbread cookie. If you leave them in the molds, the moisture put off while cooling and the moisture from the cream filling would most likely make the crust soft. These tarts are best the day they are made.
Thank you for a wonderful recipe. I tried it today and it came out really well. I have a 1000 watts microwave and 6 minutes did the trick. I don’t have a website but I put in a link on pinterest of the tarts I made following your recipe. I found silicone molds at Walmart (6 for 2 dollars) and it was so easy to remove them. Thanks again 🙂
Hi Paula your fruit tart looks good. I’ve made this tart, but at the end of the day the fruits looks wilted. How do I make it look fresh all day?
Hi Mariter,
I’m sorry I don’t really have a good answer other than to use the freshest fruits possible and don’t wash them until minutes before you put them on the tart or just wiping them is even better. That’s why I wrote in the recipe that the fruit is best added just before serving. It’s the nature of the beast. The melted jelly helps them look fresher too but I assume you did that already.
hi I was having the same problem a few of u mentioned, my filing wouldn’t thicken, even after about an hr of working on it. so I put that same filing in a sauce pan n began to cook it on the stove low flame while stirring it n right away it began to thicken
Glad the stove worked for you Jezabel. Microwave ovens are wildly different from each other so it’s difficult to specify an exact time because the same time won’t work for everybody. paula
I tried these and the chocolate cases with ganache and they were an absolute hit!!! Thanks a million for the recipe .. I was able to prepare them in advance as in freezing the shells etc so not much work on then assembly day!
Hi Leanne,
So glad to hear they were a hit! Thanks for writing.
Using the silicone you mention, what is the thickness of the crust that I should make?
Casey,
Hmmm. Good question. All I can say is that I get about 14-15 individual tart crusts from one recipe. They aren’t very thick but have not actually measured them.
Hey, I liked the recipe very much. But there is a problem I’m pure Vegetarian. Can I try this recipe without the eggs. Would there be a major difference in the taste or not. Please guide me.
Regards
Shagun Handa
Shagun,
Oh dear. I am not vegetarian and I LOVE eggs so I can’t be trusted to give you advice. I would think there is a major difference without eggs. Seems like the pudding would be like sweet gravy. But surely there are recipes for vanilla pie filling/pudding on the web you could Google.
Hey there, this recipe looks great! I’m looking to make these for mother’s day and I just have one question..
If I don’t have the shaped baking molds like that, can I just use a mini muffin tin and press the dough into it instead?
Hi Sara,
I can’t honestly say I’ve tried the mini-muffin pans. Thinking that is a bit too small. Perhaps better to use regular muffin pans. The crusts will shrink a bit. Be sure you spray them well with Bakers Joy or something similar. Also, be sure unbaked crusts are frozen hard when you put them in the oven.
I have tart dough in the refrigerator now and was looking for a great filling– I have found it here– thanks! Also, it’s my good luck that I have the same molds from World Market and I appreciate your photos showing how to fill them with dough. I hope mine turn out nearly as pretty as yours.
I am wondering if you have instructions anywhere to make the cream on the stovetop. We don’t use a microwave for health reasons, but these sound amazing! Let me know if you do! Thanks!
O M G these were so amazing and so easy to make. I just had a little trouble finding the molds but right when I was ready to give up I found them…..you were right the molds make it much easier. They are so good I even put little marshamellow’s in before I put the cream I made these for our church’s breakfast everyone loved them and are asking for more thank you so much.
Hi Paula,
I just tried out your tart crust recipe and it’s absolutely delicious! Your tarts look amazing! I’m looking forward to making more fruity tarts now that I have a finally found a great cookie recipe. Thanks for sharing! 😀
Rebecca
I tried making the filling and did exactly what you said but it’s not thickening. Do I wait or leave in the fridge for it to thicken? I microwaved it for 6 mins and it’s still liquidy:/
Nancy,
It will get much thicker when it is chilled but I suspect you need to microwave it a little longer. It should coat a spoon rather heavily, just like it would if you cooked it on top of the stove. Microwave ovens vary greatly, so it is difficult to specify an exact time to cook. Also, it can thicken in a matter of 10 seconds so watch it closely as it cooks until you know exactly how long it will take in your specific oven.
(p.s. Sorry for the duplicate answer but I wanted to put this on the blog for others who might have the same experience as you.)
Can I make the filling over stovetop since I need to make a large quantity?
Your fruit tarts are very beautiful. I love to see them very much. Thank you very much for your wonderful recipe. I will try to do as your instruction once day and i hope the fruit tarts that i make by myself will very delicious and good looking like yours. Thank you and wish you much more famous on the world.
Hi Paula, these tarts look amazing! Fruit tarts are one of my favorite desserts, so I had to try them. However, the cream filling never set for me. It was runny as milk. I followed your directions exactly. Any idea why this may have happened?
Kristin, Microwaves vary a lot. Perhaps yours is a lower power than mine and you just need to cook longer. The other possibility is that you accidently left out the cornstarch. Otherwise, I’m not sure. pr
it was so good i loved it thank you for this great recipe 🙂
I’m making these tarts for Thanksgiving for my boyfriends family, I am making them the day before. Will they still be good tomorrow? Any tips for how to keep them longer?
hi , thank you for replying… i had trouble with transporting the filled tarts, and some said the tart were not cold ,like some store bought tarts have that cooled taste. do u have to keep it in the fridge before serving?
my tart shells also came out very thick, like a biscuit, it was nice but too thick for a tart..would luv some advice on this…
lovely reciepes..
thank u again
Alecia,
Yes, I would keep the tarts chilled as much as possible. Transporting them can be a challenge. Maybe use a big ice chest.
Regarding the thickness of the tarts: this is something you will figure out with experience. It is very hard for me to advise you since I don’t know the size of the pans you are using. If you make them too thin, they will tend to break so you have to experiment with the specific tart pans you are using. The more you make them, the easier it will be.
Thanks for writing and letting me know how they turned out.
since i noted a tart should be cold when serving so how dou transport ad serve it cold at friends party, especially when u make in big quantities ..how long before do u prepare it .. thanks
hi i just wanted to know , whats the best time to assemble it before a party and do we refrigerate it after assemling the tart… how long can we prepare it before hand and keep it… especially if u want to prepare it for a friends party and u have to transport it to her house.. thanks
Alefia,
I recommend assembling the same day you want to eat it. Then store in the fridge. It won’t hurt for them to sit out a little while during transit or on a serving table. If you need to do all the work ahead of time, make the crusts and the filling. Store separately. The day of the party, put the filling in the crusts, then the fruit on top. If the filling sits in the crust too long, the crust will soften but that takes anywhere between 12-24 hours. Hope this helps. Write back if you still have questions.
@Paula, can the tart crusts be baked then frozen in advance?
Yes, but be sure to double wrap to keep them as fresh as possible.
Can corn flour work and replace cornstarch
Hi Ana,
I honestly have no idea. Guess you can try it. The ingredients aren’t very expensive so no big loss if you have to throw it out.
Hi Paula,
You said that pre-made crusts work great for this recipe–which brands do you recommend (and which grocery stores carry them)? I can’t seem to find them anywhere!
Thanks!
Kay
Kay, I’ve seen them at my local Krogers and also at Central Market. Sorry I can’t recommend a particular brand. I always make my own.
Help, I just made the cream and it’s not thick at all. Is it suppose to be thickening at all after the 6 minutes in the microwave or does it start to thicken after? And if it only thickens after, do I cool it in the refrigerator or room temperature?
Hi Paula! thanks for sharing such a wonerfull recipe I have a question If I want to make a whole tart instead of small tarts am i supposed to use same ingrediants?
Kinda,
Yes, same ingredients exactly. The cream recipe will probably be a little too much as it is with the small tarts. It’s not too difficult to eat the leftover cream with a spoon. 🙂
Hi! I just made these tarts, and everything worked beautifully. I followed your instructions to the T. I am so pleased with my delicious little desserts!
Allisa,
Thanks for coming back to say so. Glad you enjoyed them.
I used all nonfat milk, and the cream never thickened. Any ideas?
Hi, I was following this recipe step by step and it did not turn out at all. I have baked a lot before so, for the most part i know what im doing. I dont have a food processor nor do i have any means of getting one so i tried both my mixer and blender and still nothing worked well. They look amazing in the pictures but the recipe just did not work out.
Jessica, Tell me more. Was it the crust or the filling that did not work? What exactly was not like you expected? What did you try to make in the mixer? I hardly know where to start but would love to help you. The tarts could be made by hand and you can use a whisk for the cream filling if you don’t have a blender. If you only had trouble with the crust, you might look for some ready-made ones. The homemade shells are somewhat labor-intensive, but the taste is worth the trouble. Look forward to hearing from you.
Saw these on Pinterest, fruit tarts are my favorite! They turned out so good, thanks for the recipe!
Glad to hear it Michelle!
Also, do you ever stab the crusts with a fork? Would that keep them from puffing?
Erika,
I don’t stab the crusts although if it works for you, do it. If they are puffing, I just open the oven door and use my thumb to push them down.
And thank-you so much for the link. Glad you liked them. I couldn’t agree more about the cream filling.
Ah, I see–I made a raspberry tart last night but froze the crust for about 20 hours beforehand…that definitely kept it from puffing! I probably didn’t freeze it long enough last time 🙂
Thanks for the tip on freezing the crust before baking. I will this next time.
You’ve probably already seen this from the trackback, but I just wanted to let you know that I tried these with my cousins and loved them! They’re now on my blog 🙂 http://panprinandproprin.wordpress.com/2012/06/06/miniature-fruit-tarts/
We were a little wary about microwaving the cream filling, but it was AMAZING and now my go-to tart filling! Thanks for the great recipe 🙂
Also could I use this tart crust recipe to flatten, cut out with a cookie cutter, and then put it into a muffin tin?
I did this with mini-muffin tins and it definitely works great. I cut little triangles on four different sides of the circle cookie-cutter, that way when I settled it into its little nook the edges fall nicely together. Just make sure you don’t cut too much out otherwise the edges won’t touch and then fuse and therefore will be prone to busting when your guest goes for the delectable little dessertysert. DO it 🙂
What does 1-1/2 cup mean?
does it mean 1 cup to 1/2 cup or 1 and a half cups?
Sorry if this seems like a bit of a stupid question
Im still sort of a baking noob.
thanks for such an accurate recipe n simple too! best tarts ever!!!my family just licked all the leftover cream filling !!!i know i ll have to make these more often now….
Hi Sim, Yep, the cream filling is the best part. It’s just pudding really, but oh so good!
I just made these and the custard is amazing. I used skim milk and was doubtful that it would thicken but it absolutely did. Wow. Now, if I had only waited until the custard was cool before trying to fill the mini tarts….
And I have to give your recipe 5 stars
Thanks Cherry,
So glad they turned out for you. I will add a note to the recipe.
Happy mother’s day. I took your suggestion and used a whole egg and they turned out very good. The filling is amazing. Thank you so much for the recipe, they are delicious. I’m bringing these for the mother’s day gathering tonight.
Hi Paula:
I have the same problem as Adeline. I made the mini fruit tarts, but the crust just fell apart. I was able to get a few good ones, but when I put fruits in, the strawberry slices are a bit heavy and broke the edge too. Is there anything I can change to make the crust more firm? THanks.
Cherry, I am so sorry to hear this. It sounds like the edges may be too thin and therefore, too delicate. You could also try using the whole egg instead of just the yolk to make the crust a little more sturdy.
Hi Paula. I tried making your tarts for my mom’s Mother’s Day dessert, but the tarts just crumble and fall apart whenever I pull them out of the molds! I don’t know what I’m doing wrong. Can you help?
Adeline,
Since I didn’t watch you make them, I can only guess. Did you make any changes or substitutions to the recipe? Are they sticking to the molds? If so, spray them with Pam first. I REALLY like the silicone molds because nothing sticks to them. Be sure the crust is an even thickness when you make them and be sure they are cooked long enough. You can always buy pre-baked tart shells if necessary. Hope this helps. PR
Umm they look really good cant wait to make them for the next holiday.Cant wait 🙂
Could you tell me what size your tart molds are? We don’t have a World Market near here and they are not on their website. There are so many sizes of molds I wanted to make sure I got as close to yours as possible. Thanks!
Hi,
I am making these for supper club tomorrow and was wondering if I can make the shells and the filling ahead of time? would I just cover the shells with foil overnight? would i put saran wrap over the cream and refrigerate overnight? If I let the cream stay in the fridge all night, I was wondering how I will fill the shells tomorrow, because won’t it be a lot thicker once it gets cold?
thanks!!
crystal
Hi Crystal,
Yes, you can make it all ahead of time, just don’t assemble until and hour or two before eating. You can store the shells in an airtight container, like cookies. And yes, Saran wrap over the cream will work fine. Yes the cream gets thicker but no problem. Just use a whisk and whip it up good and it will loosen up.
Hope all turns out well. paula
Can I make the tarts about 2 weeks ahead of time? Should I freeze them cooked or uncooked?
Thank you!
Shannon,
You can make the tart crusts ahead of time but don’t bake them. I would wait to bake them a day or two ahead. That will still save you a lot of time at the last minute. I would wait to make the filling. Once you make the filling and add it to the shells, the filling will eventually make the crust a little soggy–after about 20-24 hours (still very edible, however). Like any cream pie. Put the fruit on top at the very last minute. After a few hours, the fruit will start to weep and run over the pastry cream.
So here is my schedule. 2-4 weeks ahead of time: make tart crusts and freeze the shaped tarts raw. Day before: Bake tart crusts. Morning of the day you want to serve them: Make pastry cream and fill baked tarts. Chill the rest of the day. Prepare fruit by wiping with a damp cloth or paper towel. Decorate the tops of your tarts as you are serving them or up to a couple of hours ahead of time. After you do this a time or two, it goes pretty fast. If you’ve never made them before and you are planning for a big celebration, I would advise a practice run. You won’t have any trouble finding people who will help you eat your practice tarts.?
Great recipe for the cream filling! It was so easy and turned out perfect in the microwave. I’m never going to slave over a stove for pastry cream again. One note for those that didn’t get it to set up – I had to microwave mine for 7 minutes instead of 6 before it thickened.
How many mini tarts does this recipe make?
I doubled the recipe because I needed to make around 30 of these… and I couldn’t get my cream to thicken, even after adding an entire 6.5oz container of corn starch. Guess next time i’ll try to separate batches :/
Hi Ms. Not Betty Crocker,
If you were making it in the microwave, you should almost double the cooking time. That’s why microwaves are best for small batches. Other than that, I’m not sure what went wrong although an entire container of cornstarch would make it inedible, I would think. YIKES! I do hope you’ll try it again with a single batch and I think you’ll be happier with the results. pr
I tried making the Cream Filling. I did everything it says on the directions, but my filling ends up liquid filling instead of thick filling like yours. What am I doing wrong?
Hi Paula,
I stummbled upon your blog….and i’m speechless !!
I love these tarts !!! I haven’t seen anything better looking and inviting than these !!!
They are simply DELISH !!!
I love your food photographs…..why don’t you share some food photography lessons to your blog !! Would love to take some lessons from you.
Great place.
Thanks for your kind words Gauri, I’m still learning on the food photography. Not even close to giving lessons myself. 🙂
So, my missionary farewell is this Sunday. I am expecting 300+ for brunch. I am doing every bit of it myself since it is Sunday, I can’t hire anyone. Just finished making the pastry cream for the tarts. So delightful and easy. I am hoping it is okay to keep it chilled in the fridge until I fill the shells. I have a box of premade pidi shells from a company in New York. I plan on filling them with your pastry cream and decorating them with the fruit and jelly like you said to. I need to make these the night before, and hope they will hold up, as our church meeting is at 8:30 A.M. and we will be eating about 11:00. I will let you know how they turned out. Thanks for your wonderful recipes!!!!!!!
Oh my goodness, I’m kinda nervous for you. Praying that everything turns out perfectly! I actually am making these myself right now for a party at my work tomorrow. I am baking the shells tonight and also preparing the cream. I’ll put the cream in my tarts in the morning and top with the fruit before I head to work. Can’t wait to hear how it all goes for you. paula
omgg these are amazing!
I will def try these out at home!
These tarts are the perfect way to serve all of the beautiful fruit that’s in season right now. Your little pink tart molds are adorable too! 🙂 Can’t wait to hear about your trip!
Looks stunning and very yummy!! 🙂
Beautiful and the technique of making pastry cream in the microwave is a novel idea for me! Will try it one of these days!
Looks adorable… To make the cream in the microwave … I have to try it…
These tarts look so beautiful. You arranged the fruit perfectly. Your photographs made me very hungry!
Welcome home….we missed you! So glad you were able to visit the Holy Lands. We toured Israel in March of 2006 and it was breathtaking and overwhelming to see. Many goosebump moments. Thank you for sharing through your blog…I enjoy your insights, photos and recipes.
Beautiful! Glad you arrived back safe and sound. These photographs are mouth-watering!
Saw your little tarts on FG and just wanted to pop in to say how cute they are. They are adorable and that filling looks really yummy.
Oh my goodness don’t these look fab? Yum!
I’m making some mini tarts for a wedding I’m doing in November and I’ll be remembering this recipe! I know I’m making chocolate and pumpkin but I might I have to add a vanilla too! Your little tart crusts look perfext!
I love the mini pies, they are so cute. I can’t wait to hear about your trip.
Have a great holiday weekend.
Mimi
Hi Paula! Welcome home! Love these tarts, so pretty and being the shortbread lover that I am, I think I could eat at least 4 or 5 of these in one sitting! Thanks for the tip about where to get the tart shells, so cute!
Gorgeous! I love to serve ‘little bites’ for dessert, and these are perfect. Love the use of seasonal berries, too.
Oh dear…major impulse to bite the screen! So beautiful Paula, and yet simple too. Thanks for sharing these.
And just when I think your pictures of food can’t get any better, you make these beauties!!!
Welcome home!!!
Welcome back! These look so delicious, Paula. I adore the mini-pink molds. Have a great holiday weekend!
These are gorgeous! I want to eat one right now. So festive for the upcoming holiday weekend.
Beautiful! The little tarts looks amazingly delicious and your photo is over the top gorgeous! Such clarity!