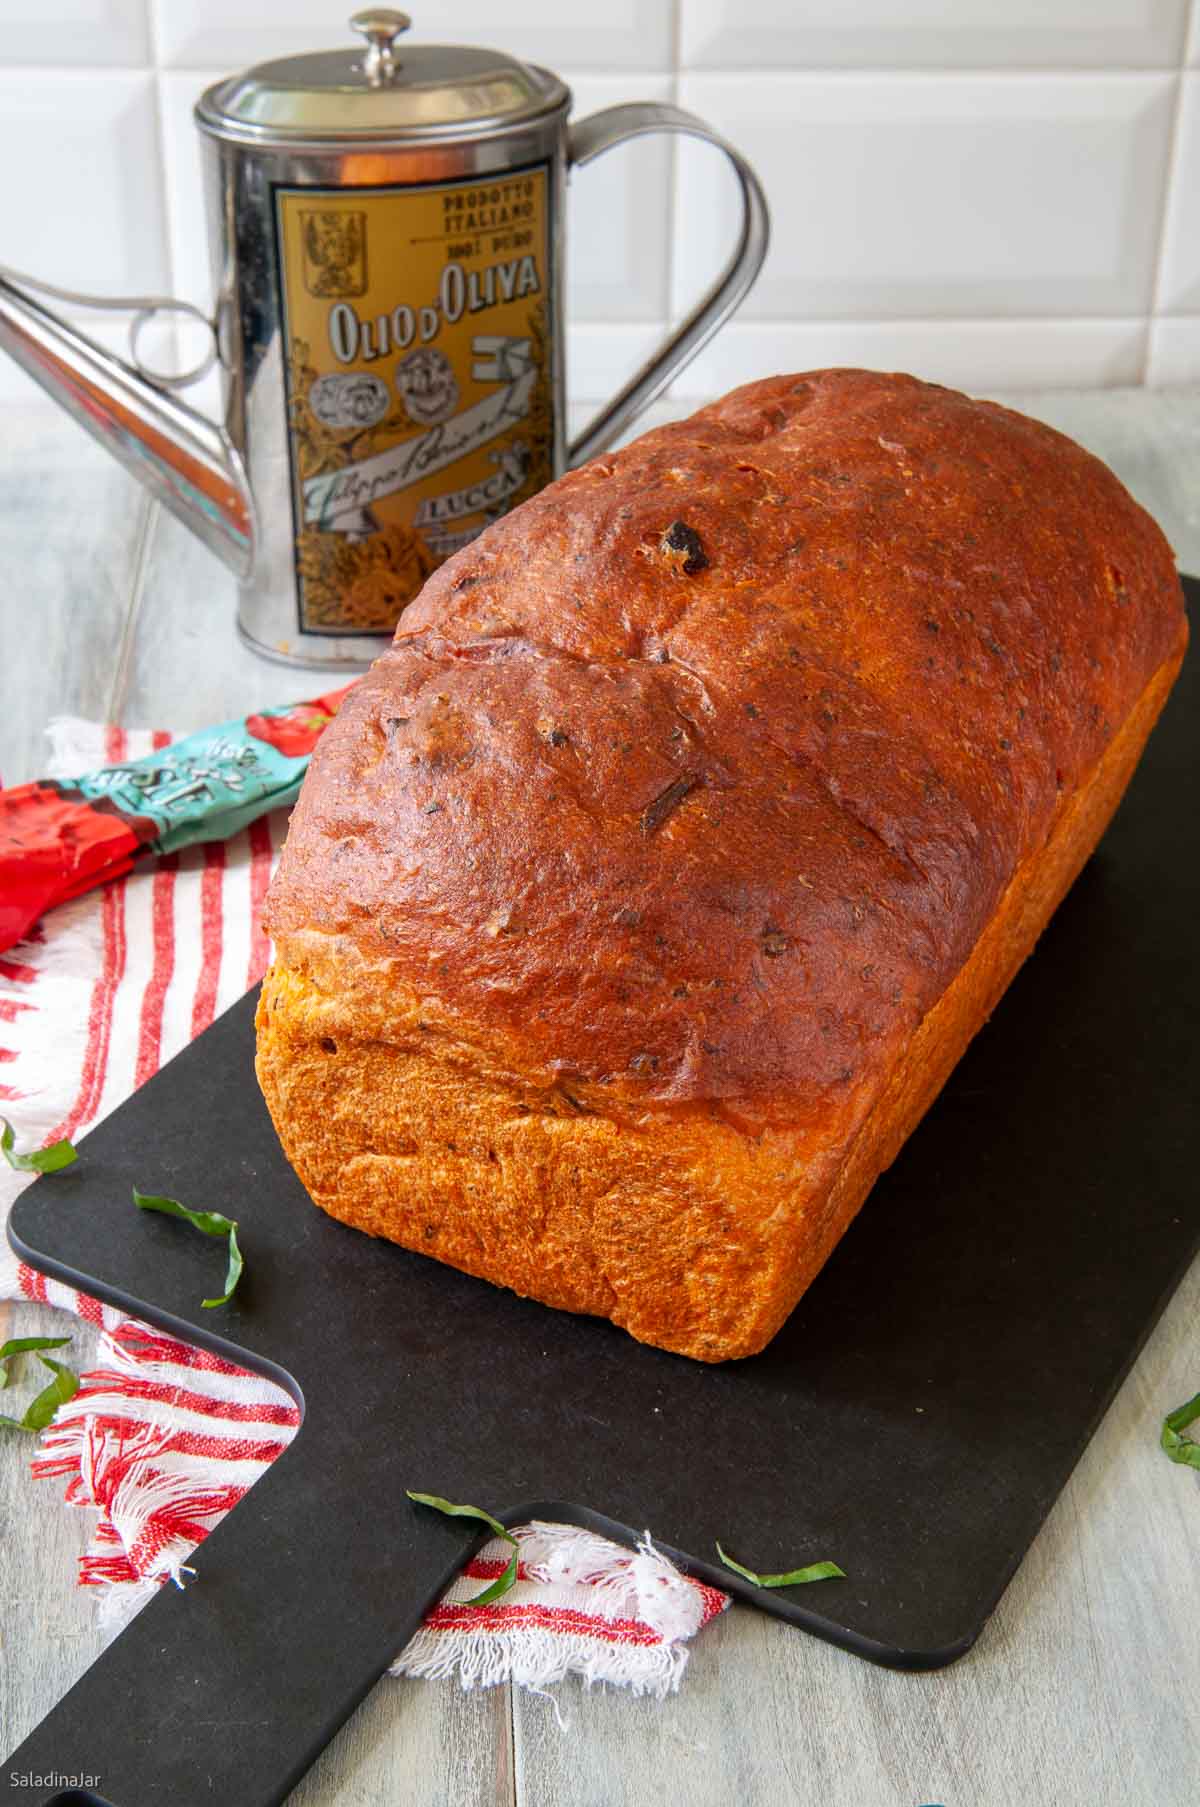
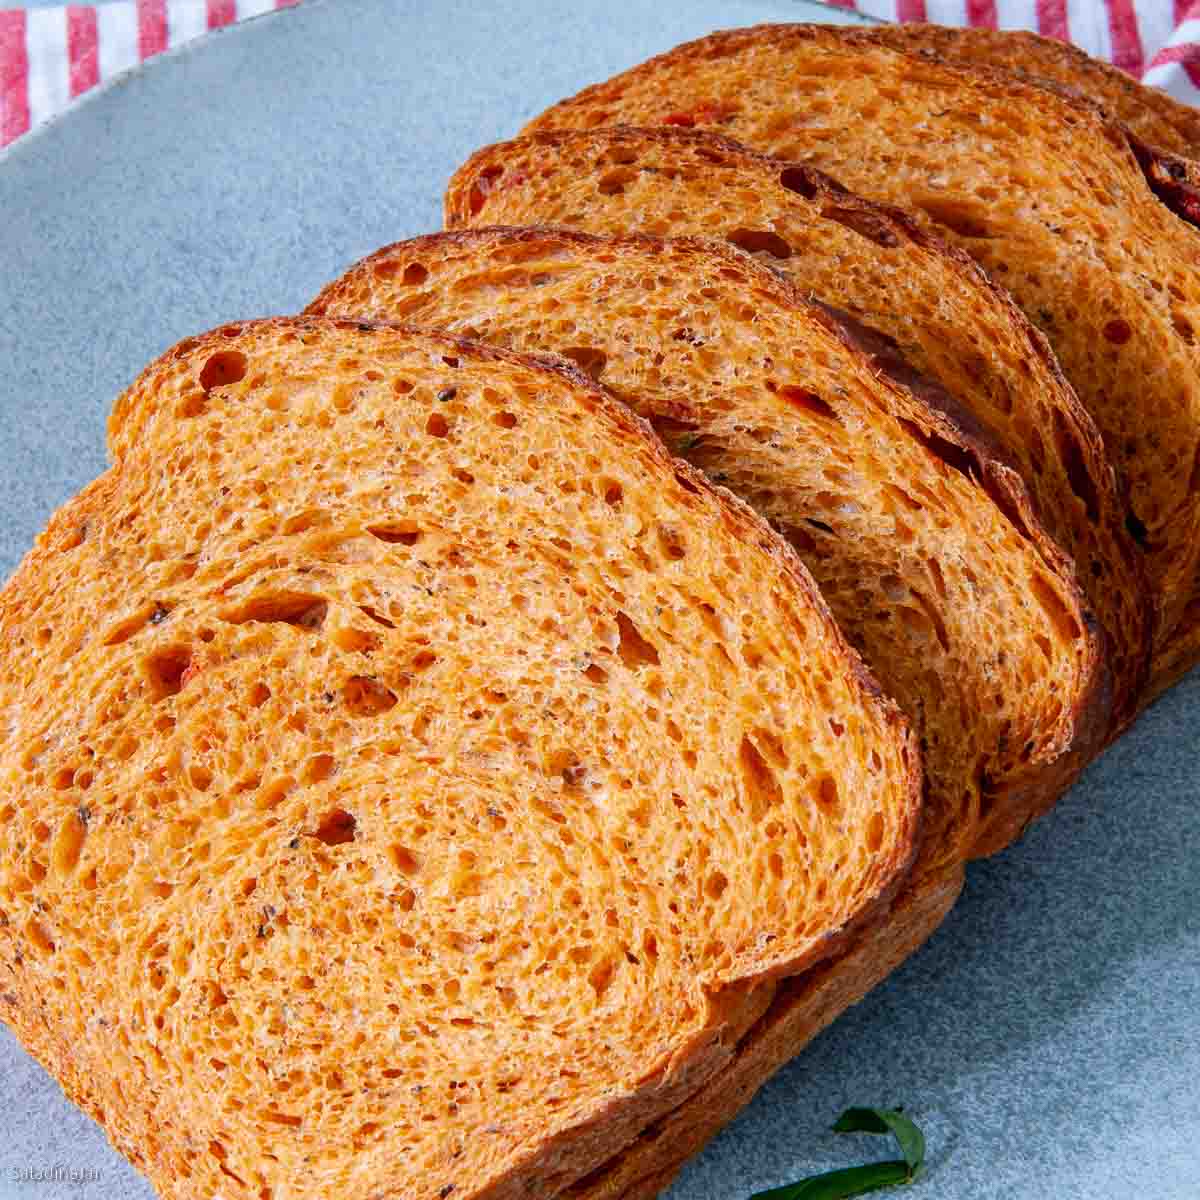
Tomato Basil Bread (Bread Machine Dough + Oven Bake)
Sneak Preview: Make this bold, savory Tomato Basil Bread with tomato paste, sun-dried tomatoes, and dried herbs, using your bread machine’s DOUGH cycle. Bake it in the oven for a sandwich-worthy crust and structure in about 3.5 hours.
This post contains affiliate links. As an Amazon Associate, I earn from qualifying purchases at no extra cost to you.
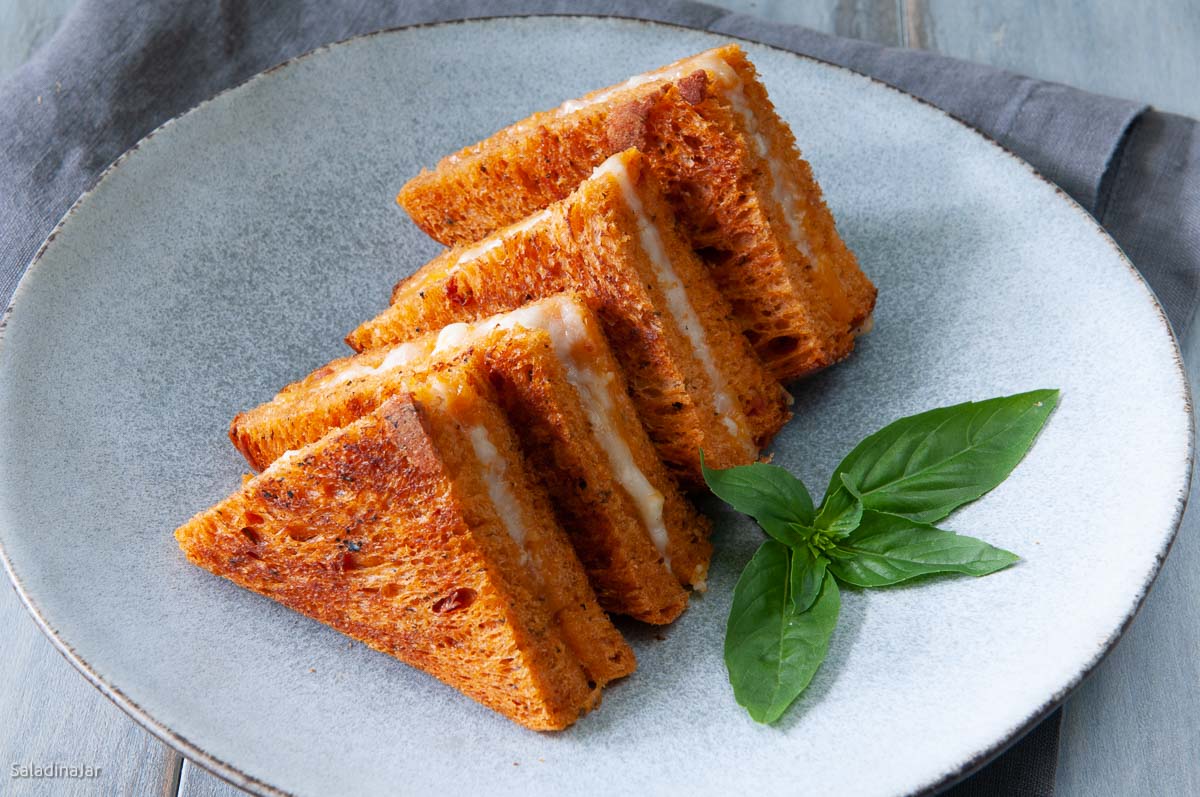
I originally started making this bread for grilled cheese—but it didn’t stop there. It’s excellent toasted, strong enough for open-faced sandwiches, and surprisingly good as a base for things like guacamole or fresh mozzarella. If tomatoes are your thing, you’ll find plenty of reasons to bake this more than once.
How I Use a Bread Machine for Better Bread
I use my bread machine (my favorite) to mix and knead the dough using the DOUGH cycle, then shape the loaf and bake it in a conventional oven. This approach gives me better rise, structure, and crust — results I’m happy to share with family and friends.
If you prefer to bake bread entirely in your machine, you can—but results will vary depending on the recipe, humidity, and your bread machine model. My free Bread Machine Crash Course explains my approach in more detail.
Ingredients and Substitutions
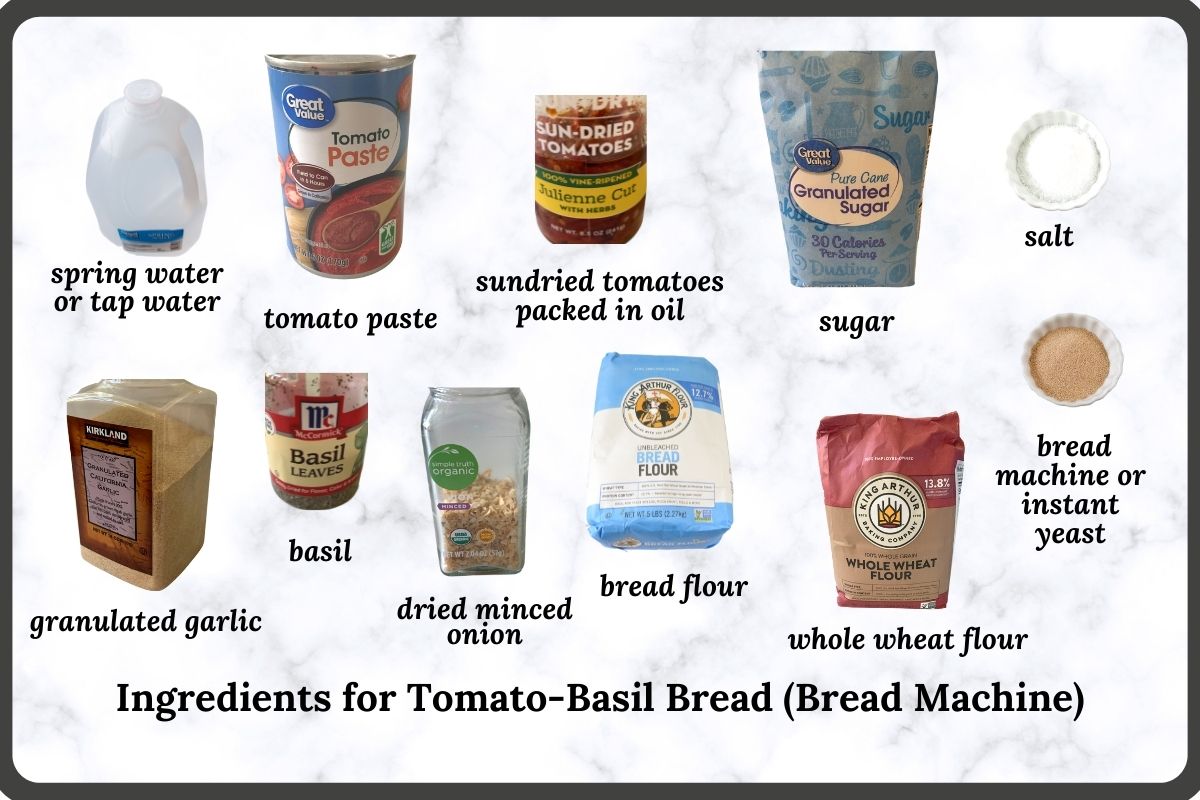
• WATER: Tap is fine unless very hard; no need to warm it when using a bread machine.
• TOMATO PASTE: Use 3 tablespoons from a 6 oz can. Don’t substitute tomato sauce.
• SUN-DRIED TOMATOES: Use oil-packed or rehydrate dry-packed and add a spoonful of olive oil.
• SALT: Table or sea salt works. Add ¼–½ tsp more if using Kosher salt
• SUGAR: Granulated sugar works best; brown sugar is fine too.
• SPICES: Stick with garlic powder, onion flakes, and dried basil for consistent flavor.
• WHOLE WHEAT FLOUR: Adds fiber and flavor. Try white whole wheat flour for a lighter touch.
• BREAD FLOUR: Gives better chew and structure. All-purpose will work, but results may vary.
• YEAST: Use instant or bread machine yeast. For active dry, add ¼ tsp more and allow extra rise time.
How To Make Tomato Basil Bread
⬇️ Jump to the recipe below for exact amounts and detailed instructions.


Tomato Basil Bread – (Bread Machine Dough, Oven Baked)
Video
Ingredients
- 1 cup (227 g) water
- 3 tablespoons (50 g) tomato paste
- 1 tablespoon oil from sundried tomatoes packed in oil
- 2 tablespoons chopped sundried tomatoes
- 1 teaspoon sea salt
- 1 tablespoon sugar
- ¼ teaspoon garlic powder
- 2 teaspoons dried minced onion
- 2 teaspoons dried basil
- 2 ¾ cups (330 g) of bread flour
- ½ cup (60 g) whole wheat flour
- 2 ¼ teaspoons bread machine or instant yeast
Instructions
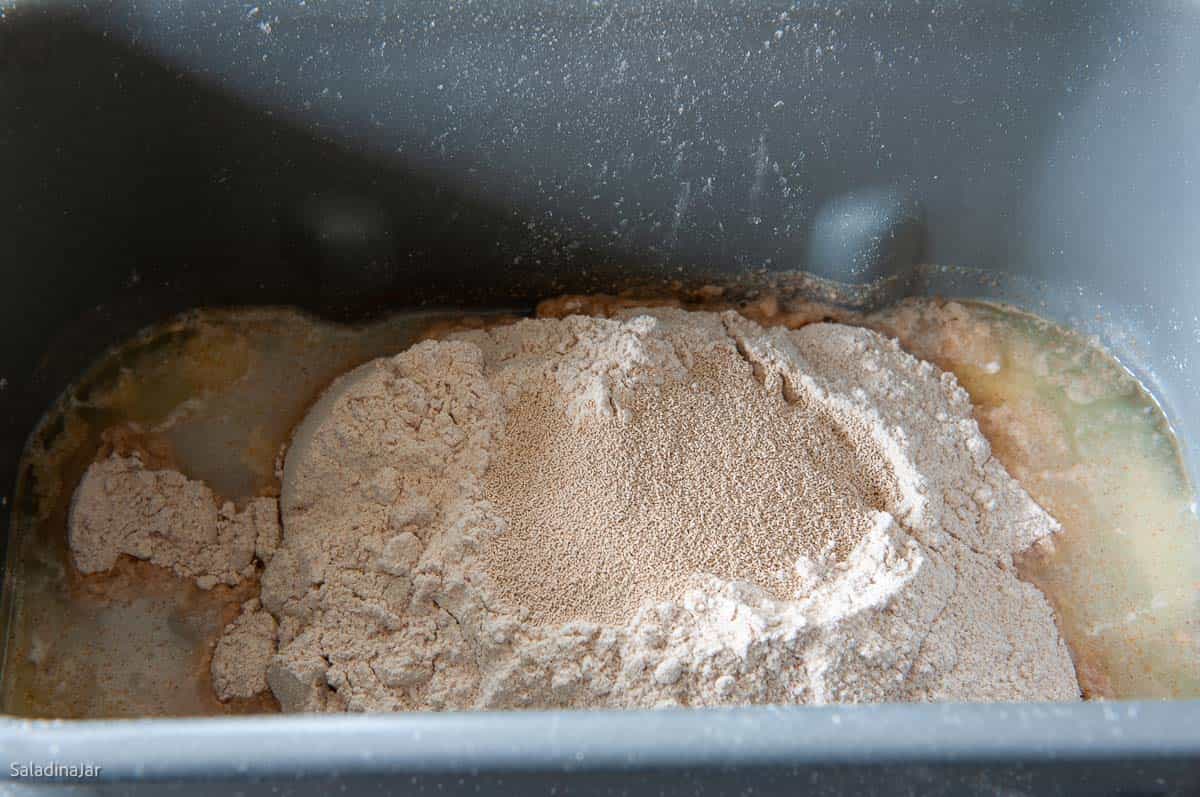
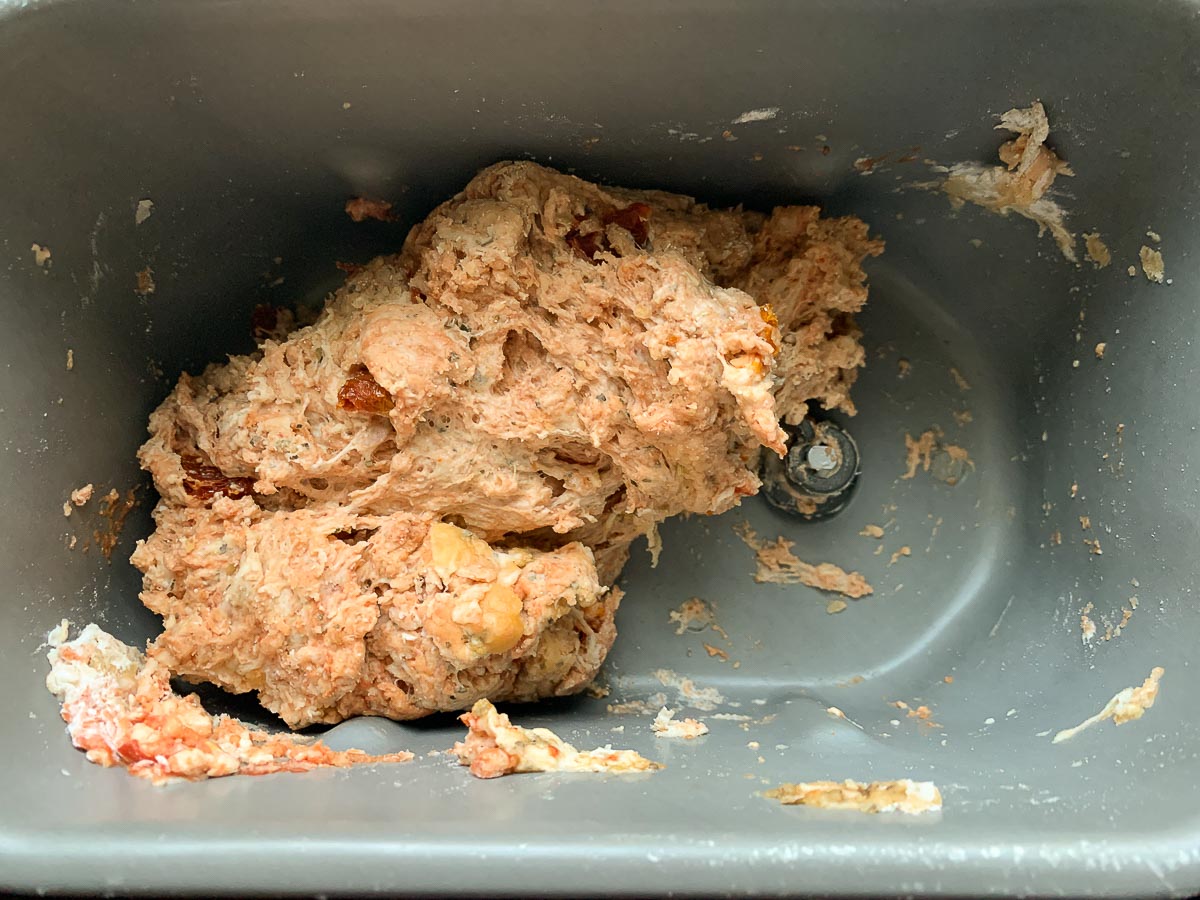
- Load the Bread Machine: Add all ingredients: 1 cup (227 g) water, 3 tablespoons (50 g) tomato paste, 1 tablespoon oil from sundried tomatoes packed in oil,2 tablespoons chopped sundried tomatoes, 1 teaspoon sea salt, 1 tablespoon sugar, ¼ teaspoon garlic powder, 2 teaspoons dried minced onion, 2 teaspoons dried basil, 2 ¾ cups (330 g) of bread flour, ½ cup (60 g) whole wheat flour, 2 ¼ teaspoons bread machine or instant yeast) listed to a bread machine pan (with the paddles in place) in the order given.
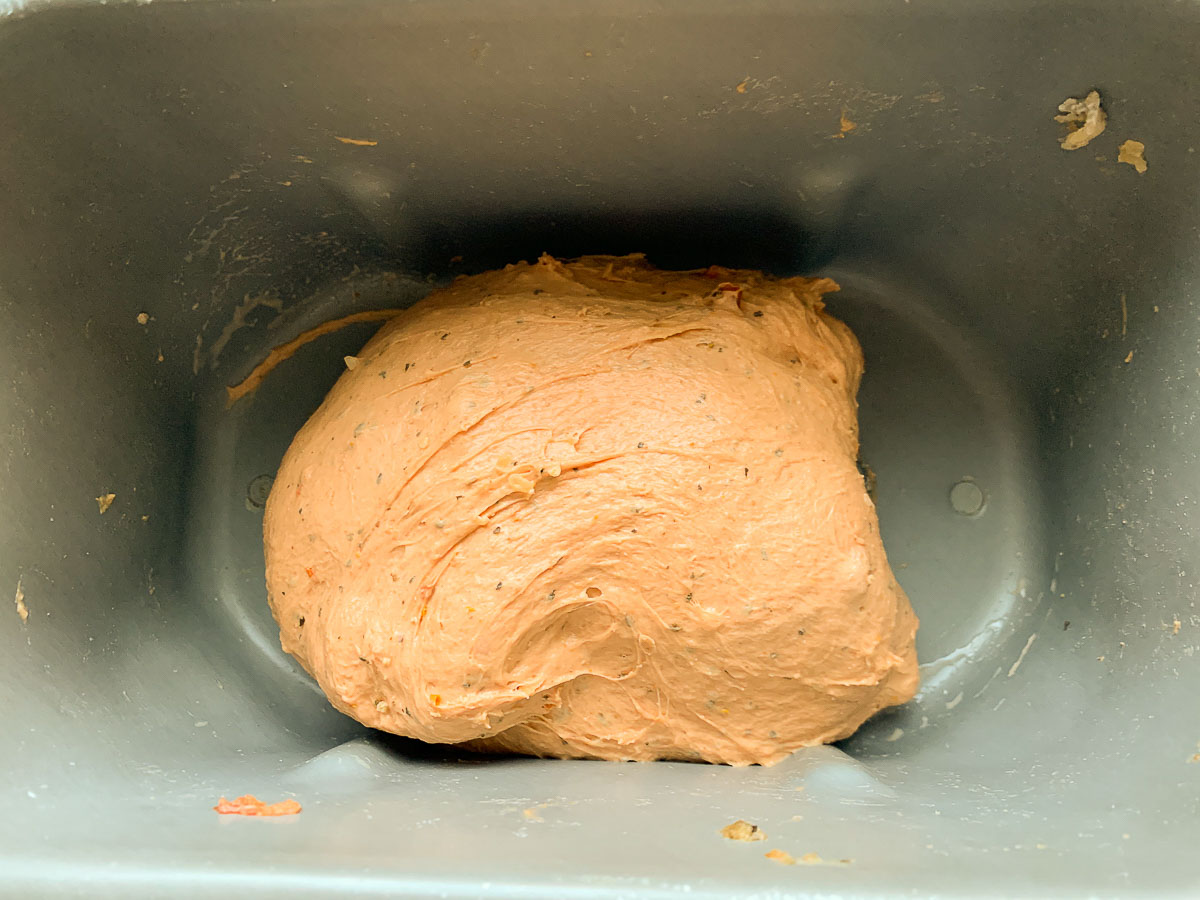
- Select the DOUGH cycle and start.First check: After a couple of minutes, check the dough to make sure it is coming together into a raggedy ball. If not, add more water 1 tablespoon at a time. If you see pancake batter instead of dough, you forgot some flour—just add it slowly until everything pulls together.Second check: Check dough again after about 15 minutes. The dough should stick to the sides of the pan, then pull away cleanly. If too wet, add flour 1 tablespoon at a time. If too dry and the dough doesn't stick at all, add more liquid. See more details–Surprising Secret for Making Better Bread with a Bread Machine.NOTE: Bread dough is influenced by flour, humidity, and even your kitchen temperature—so use this step to fine-tune the dough for your environment.
- End of DOUGH cycle: The dough should be doubled. If not, give it more rise time until it is. Restart the DOUGH cycle and knead for 5 seconds to deflate the dough. Stop the machine and turn the dough out onto a lightly floured surface, shape into a smooth ball, cover, and let rest for 10 minutes.
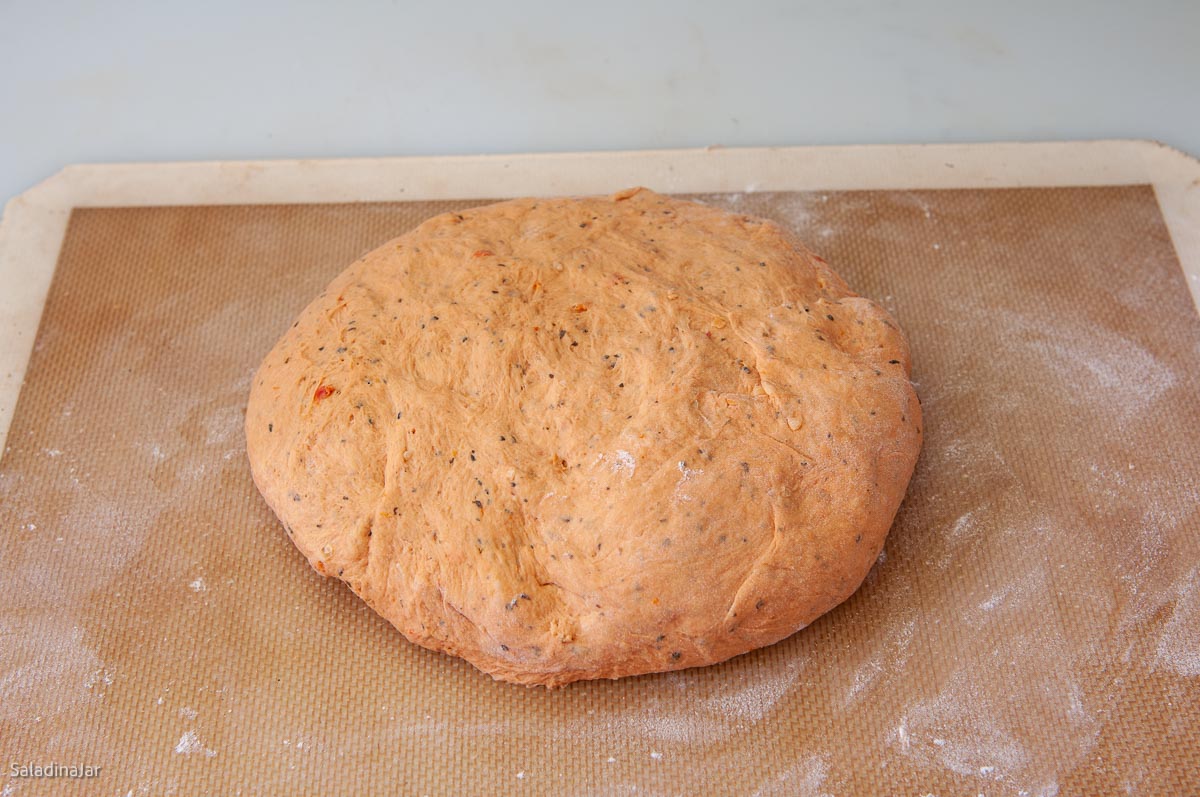
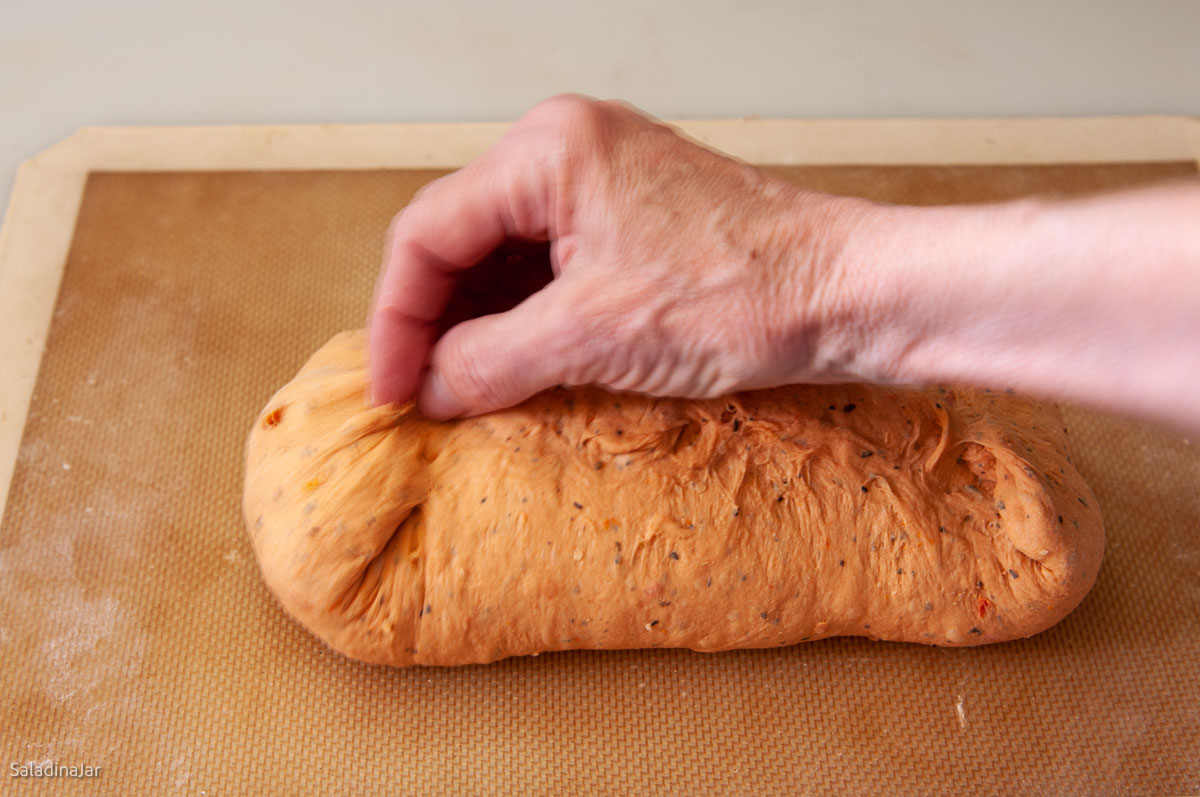
- Shape the Dough: Remove the dough from the bread machine pan onto a lightly-floured surface. Lightly press with your fingers into a rectangle shape. Make sure all large bubbles are gently compressed. If the dough is bouncy and won't cooperate, cover it with a tea towel and let the dough relax for 10-15 minutes. Come back and try again.
- Make a rectangle: It should measure about 12 inches long and about 2 inches + the length of your loaf pan. I use an 8½ x 4½ inch loaf pan. So my rectangle should measure approximately 12 x 11 inches. You don't have to measure–just eyeball it.
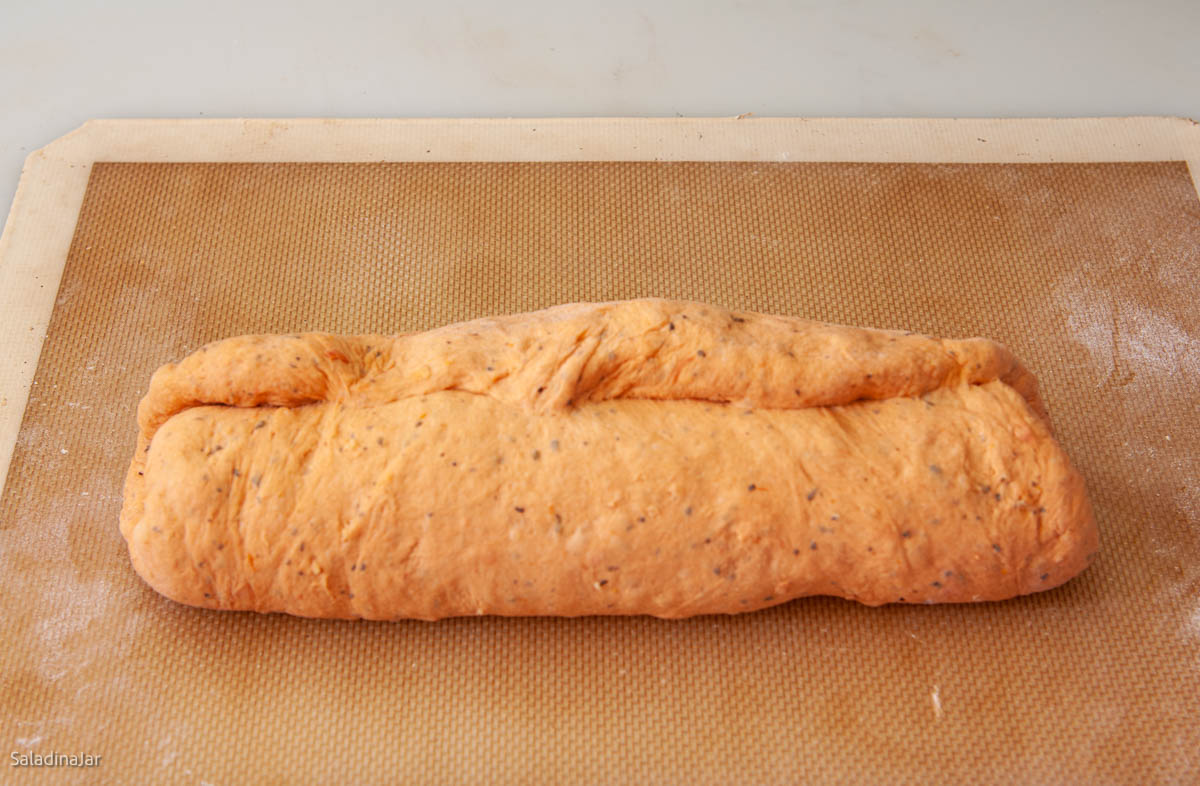
- Form the Loaf: Spray your loaf pan with non-stick spray. Starting with the short side of the dough rectangle closer to you, roll up the dough. Pinch the seal with your fingers. Pull up each end of the dough cylinder toward the long seam and seal it to make nice round corners on the end. Flip the roll of dough over so the seam side is down and place it into your pan. Pat it down to evenly distribute the log of dough in the pan.
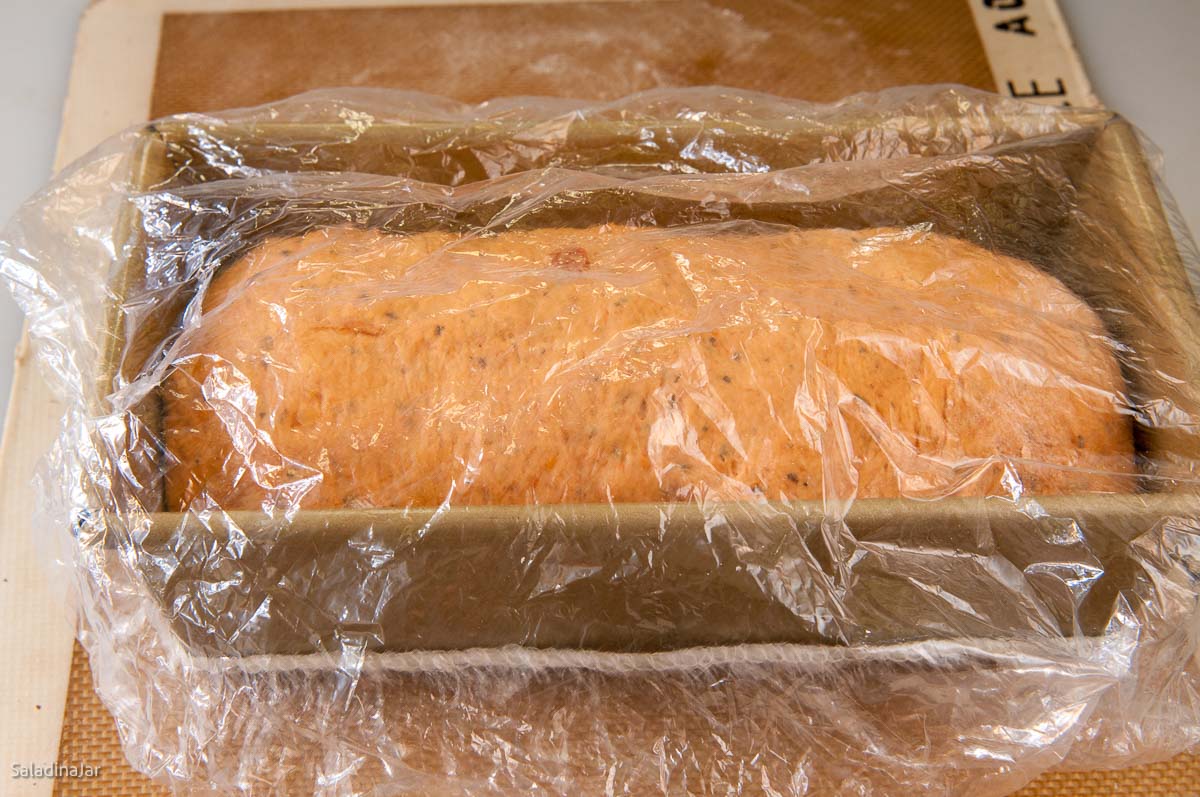
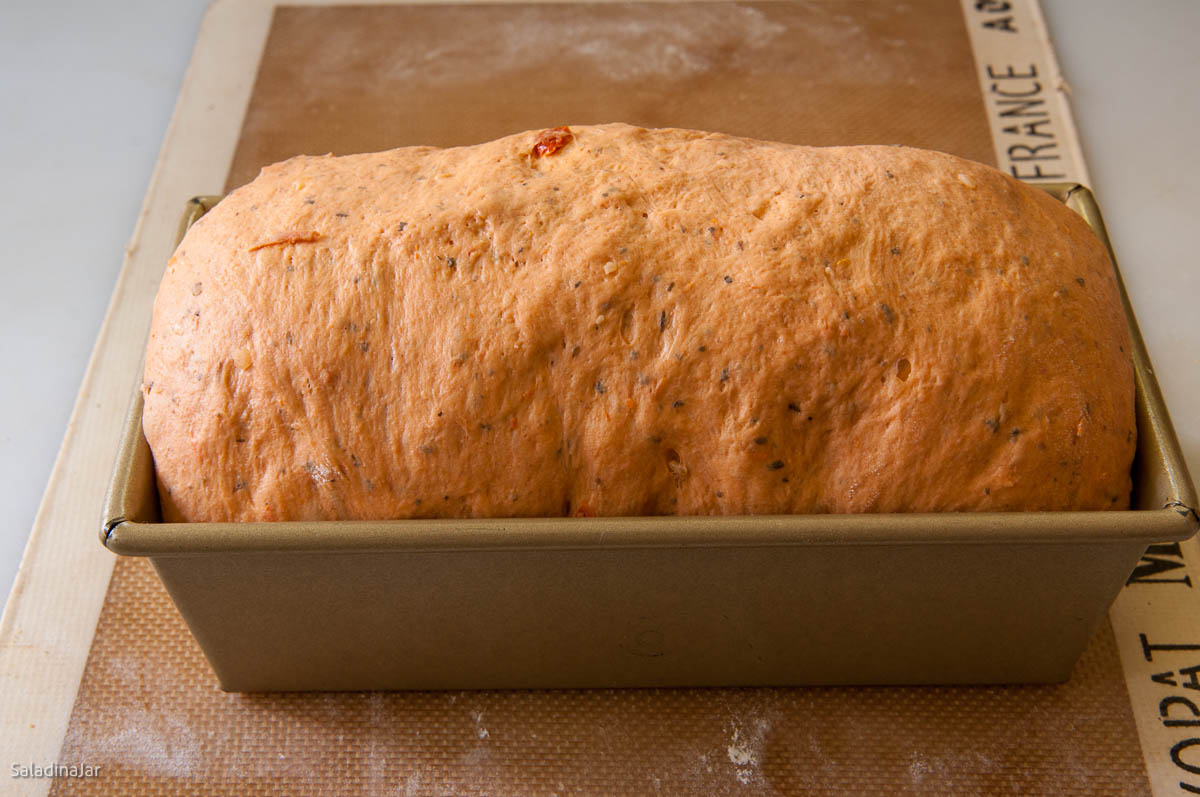
- Second Rise: Cover the bread dough with a tea towel or cheap shower cap. Place it in a warm place (but not too warm) to rise until almost doubled in size. The longer it takes your dough to rise, the better the flavor.
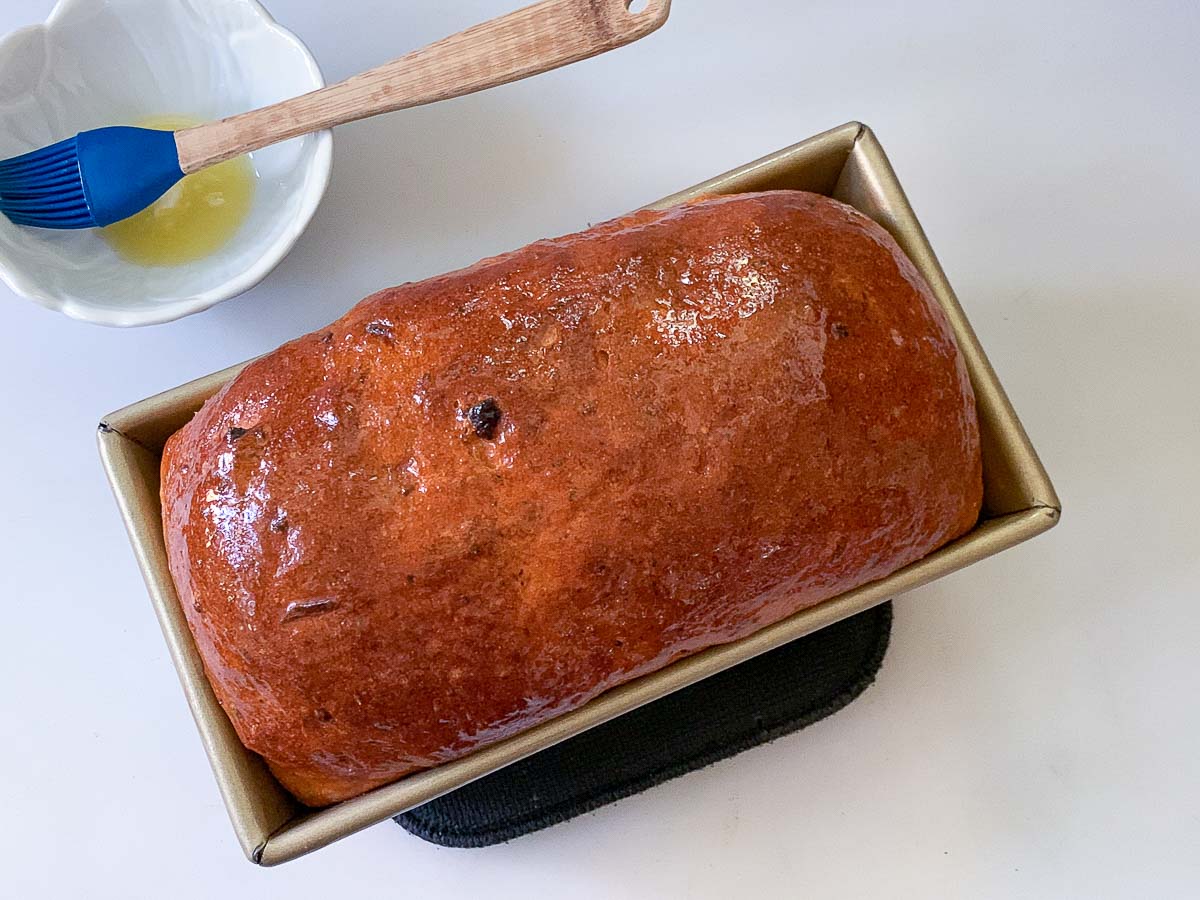
- Bake: When the dough is close to being ready to bake, preheat your oven to 400˚F (200˚C).Turn the oven back to (180˚C)350 °F °F. Bake the bread for 30-35 minutes or until the internal temperature reaches (90-93˚C)195-200 °F
- Cool & Serve: Remove from the oven. Let rest in the pan for 15 minutes, then cool on a wire rack for at least 45 minutes before slicing. Slicing into the bread too quickly may result in a gummy loaf and unappetizing squishing.
Notes
- Unbaked dough: Freeze after the DOUGH cycle or after shaping (before final rise). Defrost in the fridge overnight.
- Baked bread: Double-wrap and freeze up to one month. Reheat gently.
- Add ingredients to the bowl in the listed order.
- Mix on LOW until moistened, then knead on speed 2 or 3 with a dough hook for 5-10 minutes until smooth and elastic.
- Cover and let rise in a warm place until doubled.
- Gently deflate and shape as directed in the recipe.
- Mix all ingredients into a shaggy dough ball in a large bowl.
- Turn onto a floured surface and knead for 10-20 minutes until smooth and elastic.
- Place in a greased bowl, cover, and let rise until doubled.
- Gently deflate and shape as directed.
Equipment
Nutrition
All images and text ©️ Paula Rhodes for Salad in a Jar.com
What Readers Ask Me About This Recipe
• Can I bake this bread entirely in the bread machine?
Not recommended. It will have a dense texture and thick crust. Using the DOUGH cycle and baking in the oven yields better results.


Final Thoughts
This Tomato Basil Bread makes outstanding sandwiches, especially grilled cheese. Try it with pimento cheese and crispy bacon for a treat. If you prefer a rustic round loaf, shape it into a boule and bake on a cookie sheet instead. Check this post to find a suitable glaze.
— Paula, Home Economist
Homemade Food Worth Sharing
Need help troubleshooting?
Email me: Paula at saladinajar.com — photos help!

I’m looking at this. I want to add in shredded mozzarella and diced pepperoni to turn this into a pizza loaf.
Hi Bob,
A pizza loaf sounds delicious. My only caution would be to start minimally with the additions (i.e. not more than ½ cup of cheese, and maybe a 1/4 cup of pepperoni). If that works and the loaf isn’t too heavy and/or doesn’t contain big holes (cheese is bad about that), gradually increase the amount to where you want it. Good luck!
Paula
Can you reduce the size to 1 1/2 pound or 1 pound loaf?
Hi Leo,
The recipe, as is, makes a 1-1/2-pound loaf. You can reduce it to a 1-pound loaf, but if you are using a bread machine, watch to make sure all of the dough is getting kneaded well. Some machines don’t do well with that small amount.
Made this bread yesterday. Started in the bread machine, as the recipe called for, but then after proofing in my closed microwave with a damp teatowel over it, I baked it in a pre-heated air fryer on “Bake” mode, turning half way. 320F for 25 Minutes. I also added a sweet glaze to the top 5 mins before cooking ended.
Hi Vivian,
People often ask if they can bake their bread in an air fryer. Your comment is proof that it’s possible (depending on the configuration of your air fryer). Thank you for writing.
We all love this bread! After the first loaf was gone making grilled Panini sandwiches, I made two more loafs and used up a jar of sun-dried tomatoes. The recipe is quick and easy, and I cannot wait to make it again.
Hi Paula,
So glad you are enjoying this flavorful bread! Thank you for writing and the 5-star review.
This was excellent and great directions! Do you think after the first rise and shaping in the pan I could cold ferment overnight and set it on the counter the next morning for its second rise?
Hi Trish,
I think that would probably work. Worth a try. I like to reduce the yeast a little– ¼-½ teaspoon less–when I do an overnight ferment. It helps to prevent the bread from tasting too yeasty. Let me know how it turns out.
recipe looks nice can I cook it in breadmaker
Hi Rachel,
So nice to hear from you. If you take a look at this post, go to the first question under the FAQ’s where I address this. You will see a picture of this recipe after I baked it in my bread machine. It’s so ugly and doesn’t have a nice texture. However, if you are only making this for yourself and don’t care so much about the looks and texure, you might be OK with it. Unfortunately, I can’t make any guarantees about bread actually “baked” in a bread machine. There are so many variables, not the least of which is your actual bread machine. But you’ll never know if you don’t try. I would love to hear how it goes.
I made this bread yesterday for the first time. I made it to have bacon/cheese/tomato/lettuce sandwiches with soup for dinner. Before I even got that far, I had it for breakfast with peanut butter. It’s delicious. This is not a bread we’d eat every day, but it makes hearty sandwiches even better.
Hi Elisabeth,
I haven’t tried this with peanut butter, so I’ll add it to my list. Thank you so much for writing.
Hi Paula! since I’m a school teacher, I decide last summer I would teach myself to make bread. HOWEVER, you have been the teacher and I the student. I’m making this bread for a staff celebration tomorrow. It never fails to impress! Thank you so much! You have changed my life.
Hi Marcus,
Oh my goodness! Your letter has changed my day. You’re so kind to write and now I’m encouraged. I hope your staff loves your bread.
Love your recipes and website!
First time trying this tomato basil bread, and it was delicious! Pairing with a homemade chicken salad!
Had no sundried tomatoes or oil, so used EVOO, used 60g spelt instead of white whole wheat and used 1tsp dried Italian herbs with 2 tsp fresh basil! It looks AND tastes delicious! Thanks again Paula!
Thank-you. I never get tired of hearing this.
I heartily approve of your substitutions. Makes me want to whip this up tomorrow so I can try it myself while the basil is looking good in my garden.
I have made this bread multiple times. Huge favorite with my family. I baked a loaf and gave it to my neighbors. Their kids were upset when they found out that mom can’t go to the store and buy more.
Hi Christine,
I love your comment about the kids who were upset that their mom couldn’t buy more at the store. You scored!!
If this isn’t just the best ever piece of bread heaven nothing is! I was looking to make a new bread (kind of over the standard white, wheat, crusty French or Italian) and this crossed my path. The smells alone are enough to drive one insane! Then the ease of prep, cooking and the simplicity of precise directions…well this bread is a TOTAL WINNER
Hi Robyn,
Glad you loved it!! Thank you for taking the time to come back and comment.
I wanted some bread that wasn’t boring but I was not sure if I would like this. This bread is fantastic! I rarely follow recipes but I only changed the sugar to 1.5 TB of brown sugar instead of the granulated. I thought the molasses might add some smokiness since I didn’t have sundried tomatoes and just used olive oil. It came out great. I want to make a pam and cheddar/gouda panini with it soon. Your website has significantly improved my bread-making. I didn’t realize that I’ve been making my dough a bit too dry until I read your notes on how it should be kind of sticking but pulling away while mixing. I also made your pizza dough a few days ago and it was the best pizza dough I’ve made. Thank you for explaining things so well. I look forward to trying many of your other recipes in the future
Thanks for your kind words, Megan. What an encouraging comment. I love the modifications to the tomato-basil bread. Also, thank you for the 5-star review.
I can’t rate it yet, but I plan on making this in the morning. I worked at Panerai for a while but never managed to get this recipe. Sigh!
In any case, how would you adjust this for high elevation? (6035 ft. to be precise.)Please…
Does this bread plait well?
Hi Karen,
I’m no expert on high elevation, but I’ve read that you may need to decrease the yeast. The directions for this recipe are written like all of my recipes–mix and knead in a bread machine on the DOUGH cycle, then shape by hand, let rise one more time, and bake in your oven. When you do it this way, you can watch the bread for the perfect time to shape and bake. No more cardboard crusts, holes in the bottom, or crumbly texture. In your case, it’s a good way to avoid a sunken top because your machine let the dough rise too long.
Hi.
Thanks. It’s in the bread maker now-with 42 minutes to go. so, we’ll see how it goes from there.?
It looks as it should thus far.
This bread is fabulous! I made a test loaf night before last and it was gone by last night. (only 2 of us in the house). Another batch jn the bread machine as I type. yum!
Hi Donna,
Thanks for the 5-star rating. I’m so happy to hear you loved the tomato bread. Enjoy.
OK, I rated it without yet making it, but I’m so impressed! This is EXACTLY what I was looking for – YAY!!! I bought a pre-owned bread machine from FB Marketplace over the weekend, and I wanted a tomato-basil bread to be the first one I tried. The addition of the tomato paste is BRILLIANT. Love it. I’m so excited. I am probably going to use all bread flour and omit the whole-wheat, since I don’t keep it around, but I am stoked to try this beautiful-looking recipe. Thanks so much!!!
Hi D.,
I hope you love it. Let me know how it turns out.
WOW – what a fabulous recipe! I have read and tried so many recipes for tomato bread and this one is OUTSTANDING!! I made it yesterday and it was gone in no time! My family devoured it. Now – I am going to look at your other recipes to see what else I will make today. Thank you so much for a wonderful site with unusual and delicious recipes. Your recipes are well written and your explanations are perfect!
Thanks for taking the time to leave your thoughts. Glad your family loved it!!
My daughter loves the tomato basil bread from Panera so in searching for a copycat, I found this. Great recipe! I had all the ingredients in my pantry, made it with a mixer (subbed dried basil for an Italian herb mix). It smelled so good right from dough stage and the baked product rose nicely and tasted amazing. Thanks for sharing this recipe!
Glad to hear it worked great for you with a mixer.
I used 4+ teaspoons of fresh basil! I’ll let you know how it came out!
Fresh basil? Yes, I want to know. I’m afraid it would turn black.
Can I just continue on baking this bread in the machine? I have arthritis in my hands and the less I need to lift etc in preparation the better. This recipe sounds great, what setting would I use?
Hi K,
Take a look at question #1 in the FAQ section. That is my long answer. In a nutshell, it’s OK if you just want toast for yourself but not nice enough to share with others.
This bread is fantastic. I have made it twice now, just this week. My personal suggestion: use a very good version of sun dried tomatoes. I also upped the garlic and basil (personal preference). It smells fantastic coming out of the oven.
I like your suggestion!!
Oh…one more thing. I’ve ordered a little square Pullman loaf tin. Any tips for fitting the right amount of dough in to get a nice square finish? Any recipe suggestions?
Thank you for your kind comment. You have no idea how much your positive words mean to me.
Re Pullman loaf tin: In general, you want the dough to fill the pan halfway before it starts to rise. Experimentation is the best way since every loaf rises a little differently. Some are high risers. Others, especially those with whole grains, are not.
The photos say it all, from the gorgeous “crumb” of the cut slice to the grilled cheese cut into quarters! I am making this right away. I may put Everything Bagel spice mix in too. Thanks for figuring out the ingredients, amounts and method for us in advance. Bet it keeps you busy. We appreciate you and your informative blog so much.