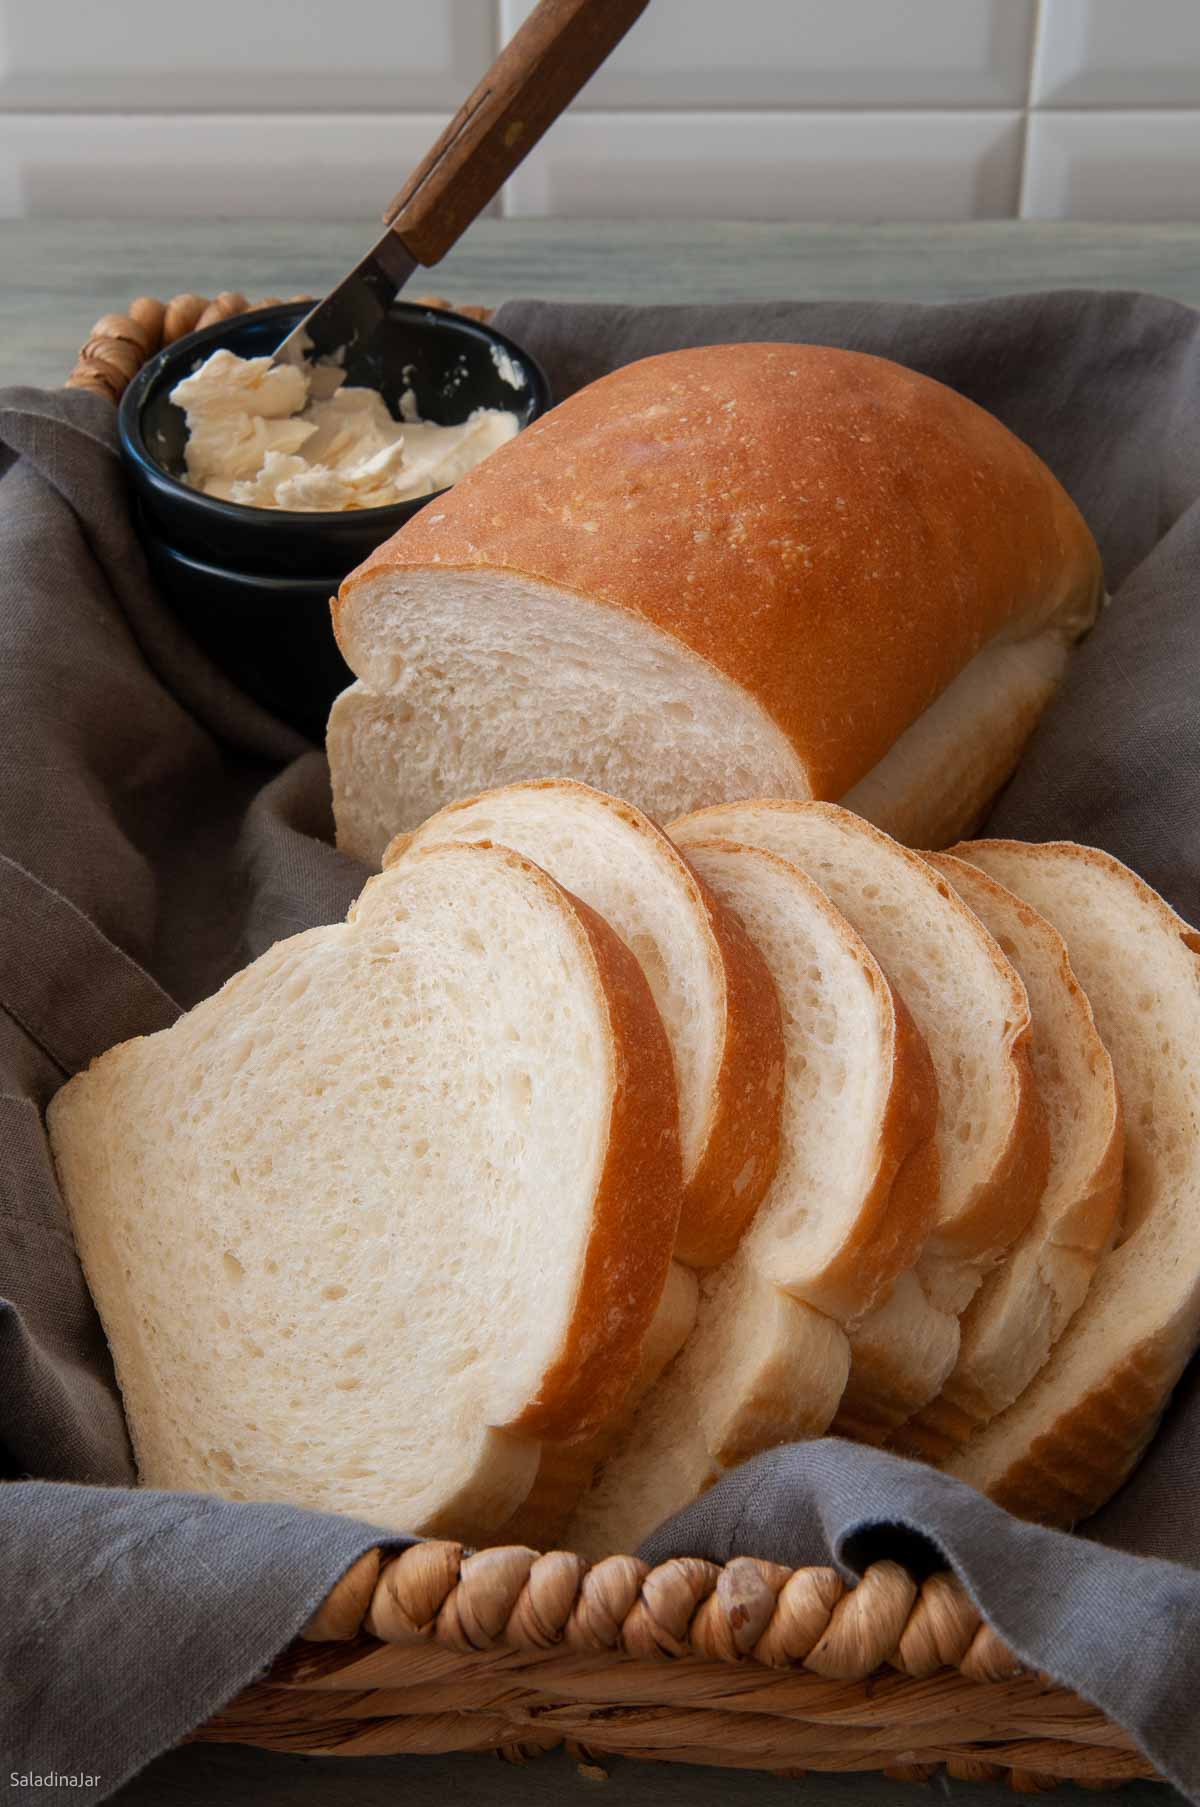
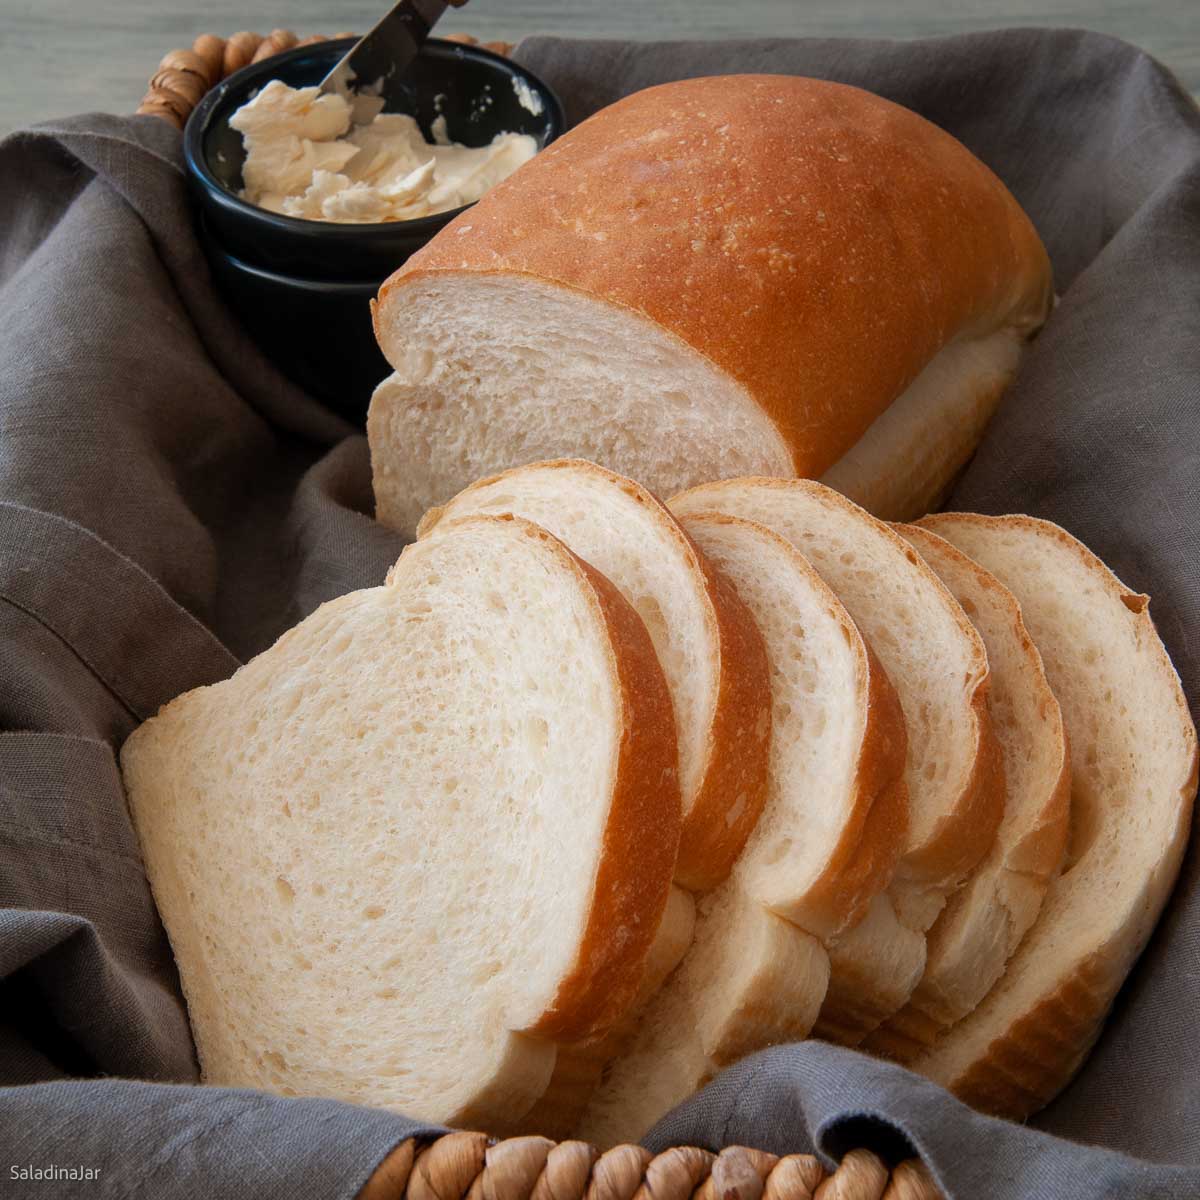
Basic Bread Machine White Bread (Soft 1.5 lb Loaf & Oven-Baked)
Sneak Peek: This basic white bread starts in your bread machine and finishes in the oven for a soft, fluffy loaf. No eggs and minimal sugar—just a clean, classic sandwich bread in 3-3.5 hours.
This post contains affiliate links. As an Amazon Associate, I earn from qualifying purchases at no extra cost to you.
Have you tried the basic white bread recipe from your bread machine manual and felt a little… underwhelmed? You’re not alone. Those default recipes often turn out pale, uneven loaves with a dense bottom and thick crust.
That’s why I created this version–a soft, fluffy 1.5 lb loaf with a clean, classic taste. Although it seems unlikely, a splash of lemon juice adds lightness and helps with the rise.
How I Use a Bread Machine for Better Bread
I use my bread machine (my favorite) to mix and knead the dough using the DOUGH cycle, then shape the loaf and bake it in a conventional oven. This approach gives me better rise, structure, and crust — results I’m happy to share with family and friends.
If you prefer to bake bread entirely in your machine, you can—but results will vary depending on the recipe, humidity, and your bread machine model. My free Bread Machine Crash Course explains my approach in more detail.
No bread machine? Make this recipe with a stand mixer or by hand. See the recipe notes for details.
Ingredients & Substitutions
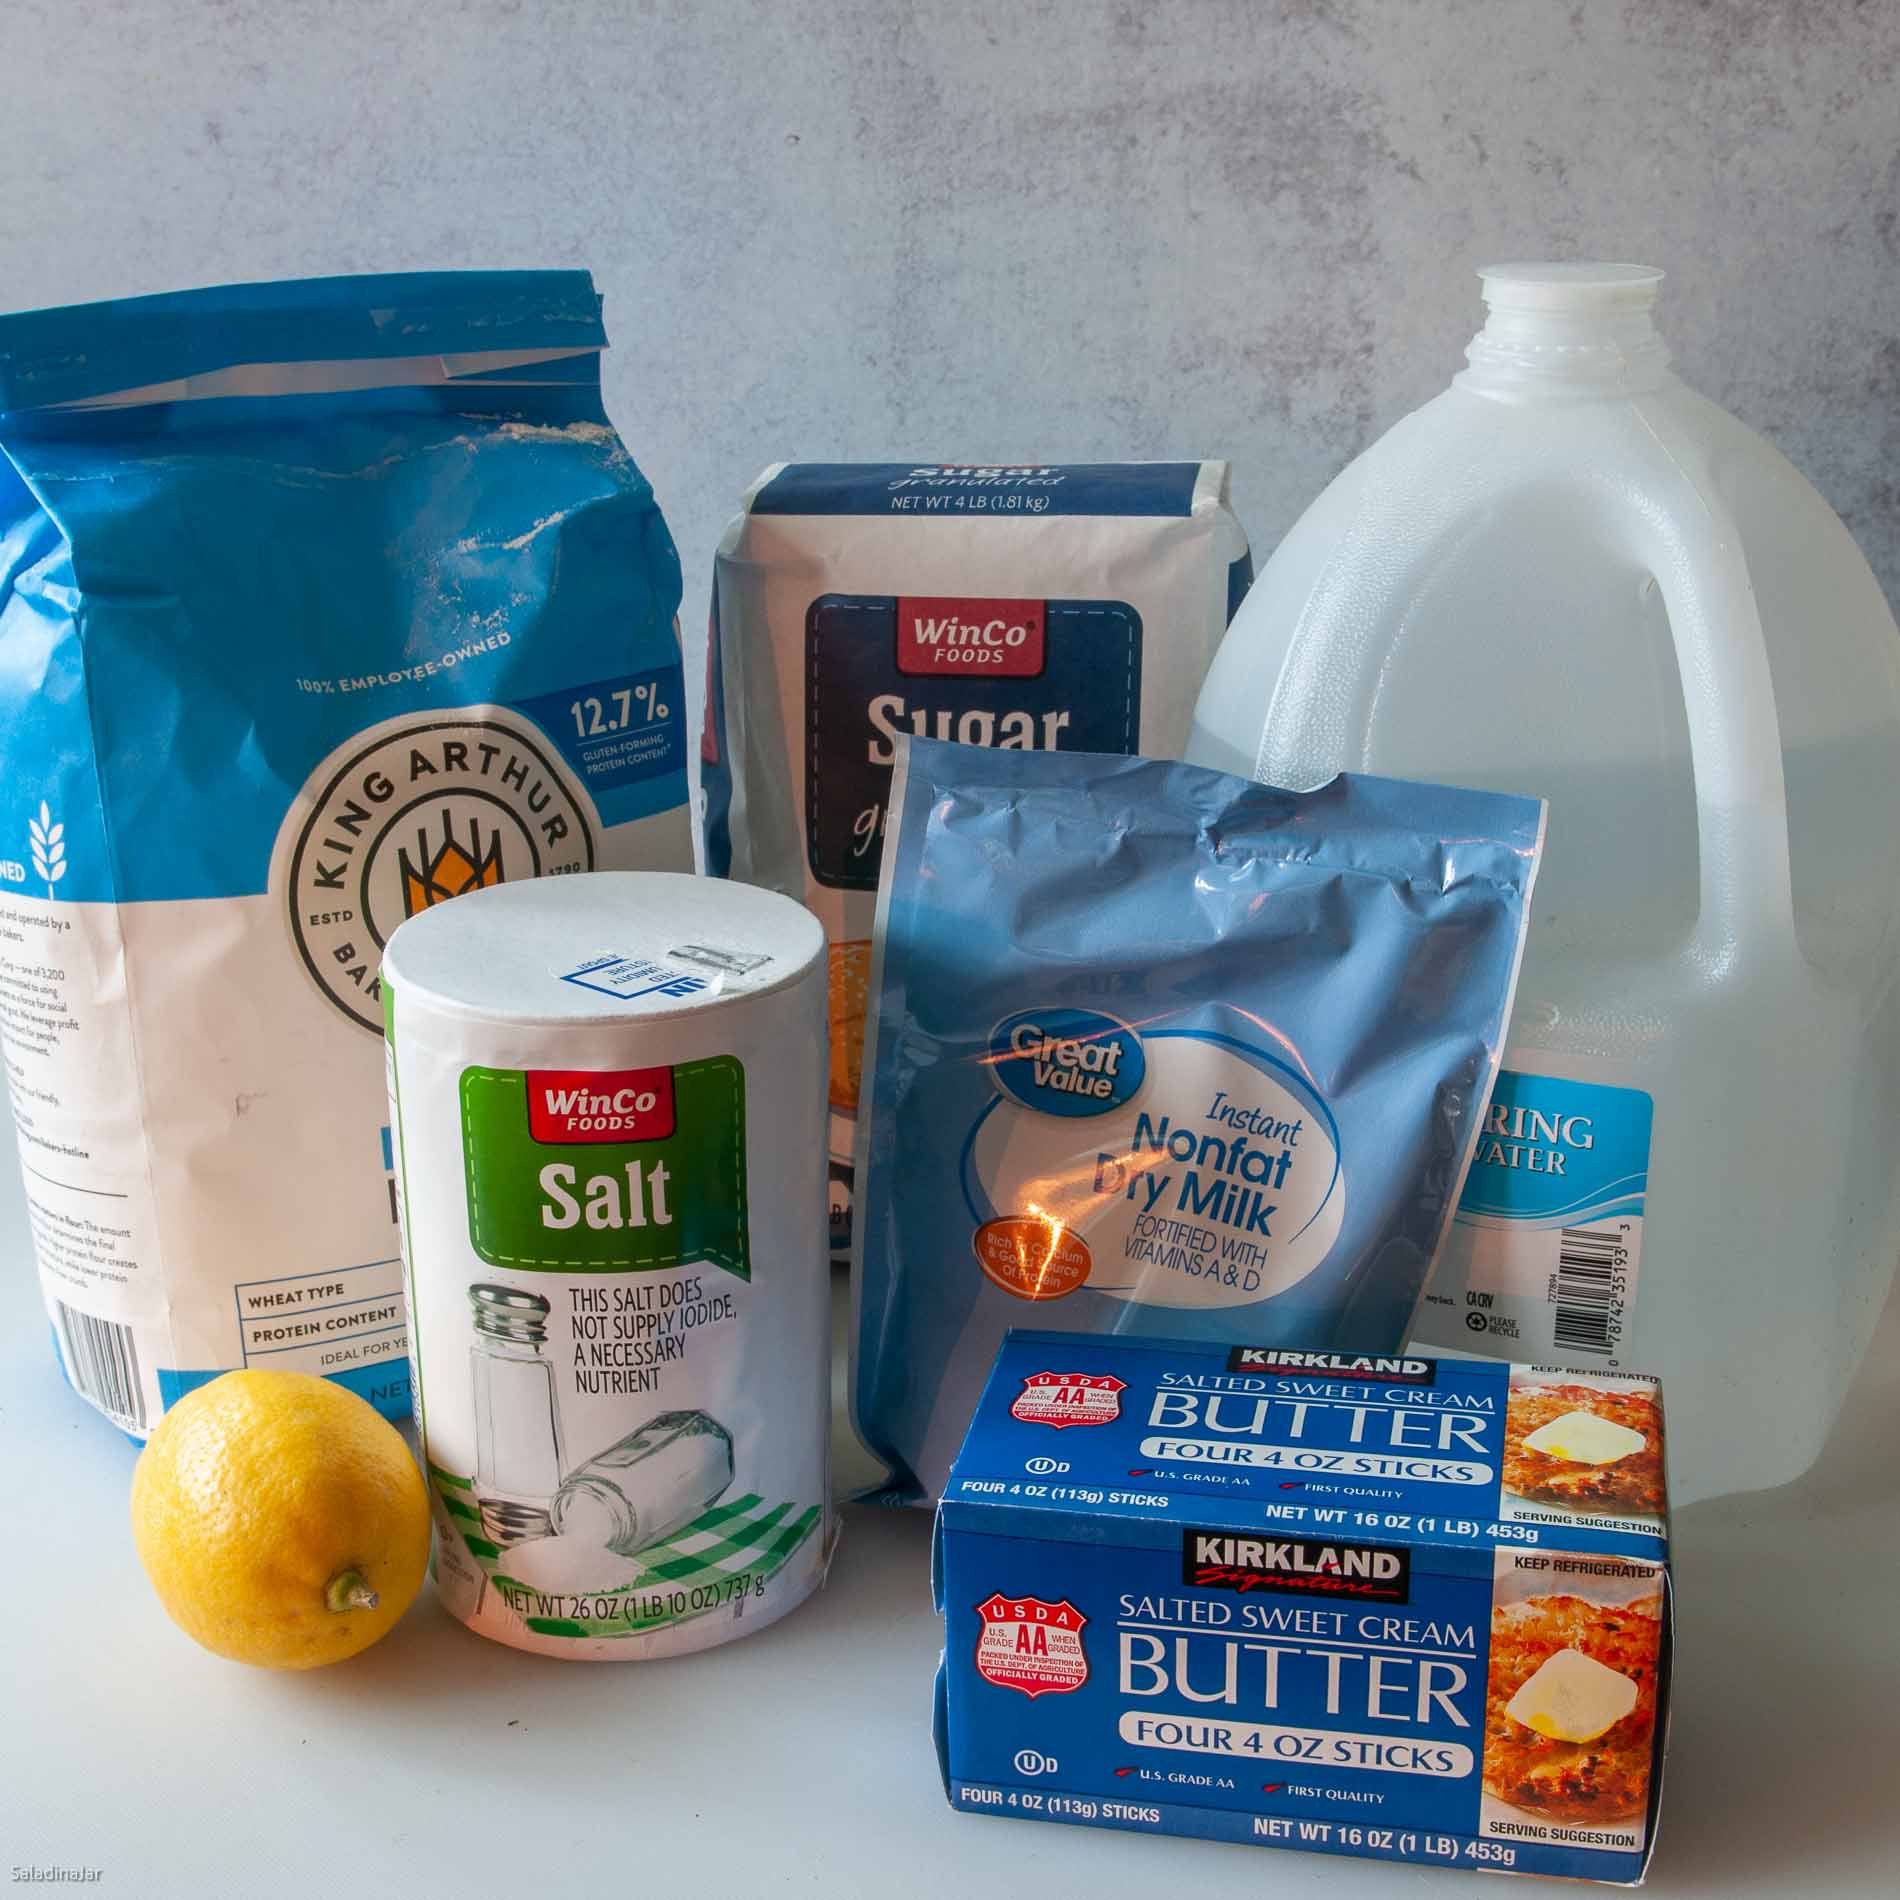
• WATER: Use cool tap or spring water; avoid hot water in bread machines.
• SUGAR: Granulated sugar works best; substitute honey or brown sugar if desired.
• SALT: Use table or sea salt; add ¼ teaspoon extra if using kosher salt.
• NONFAT DRY MILK: Sub fresh milk and adjust flour as needed.
• BUTTER: Use finely chopped cold unsalted butter or sub with vegetable oil or non-dairy butter.
• LEMON JUICE: Optional but recommended.
• BREAD FLOUR: Best rise and chew; all-purpose flour works but may result in a shorter loaf.
• YEAST: Instant or bread machine yeast is preferred; use ¼ tsp more if using active dry yeast.
Step-by-Step Instructions
⬇️ Jump to the recipe below for exact amounts and detailed instructions.
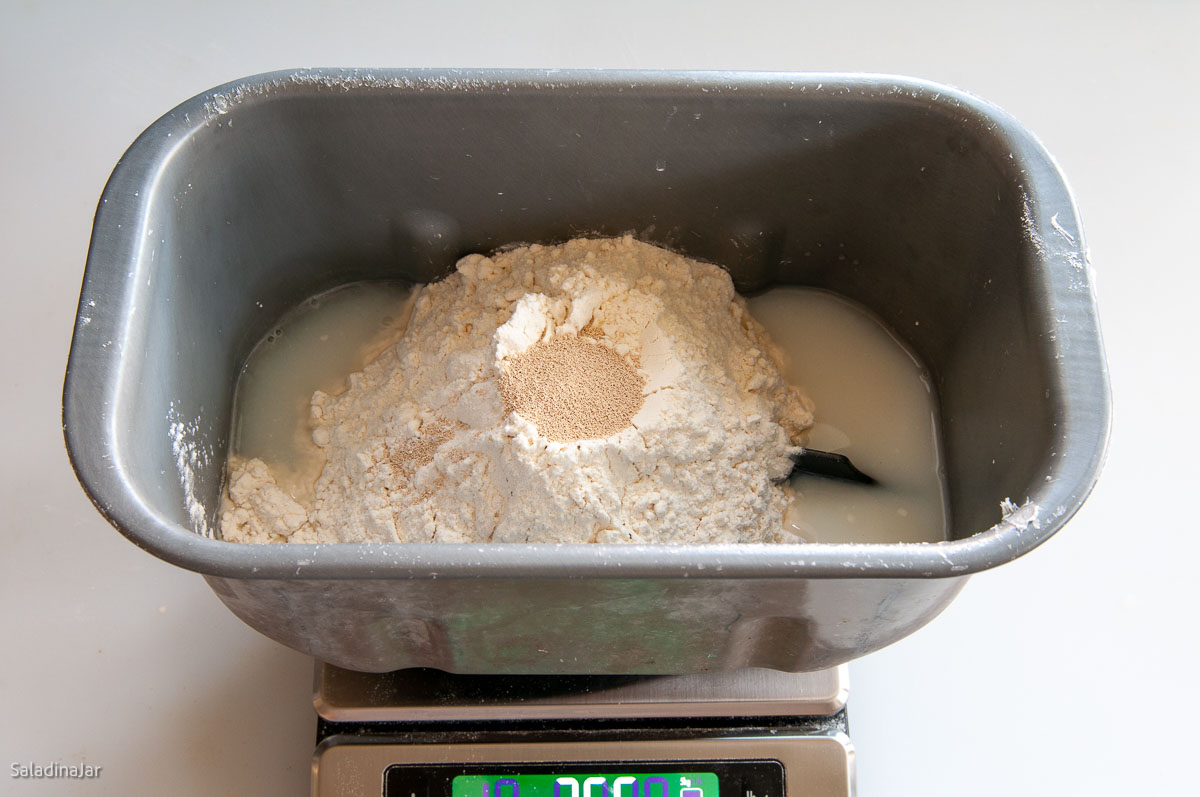
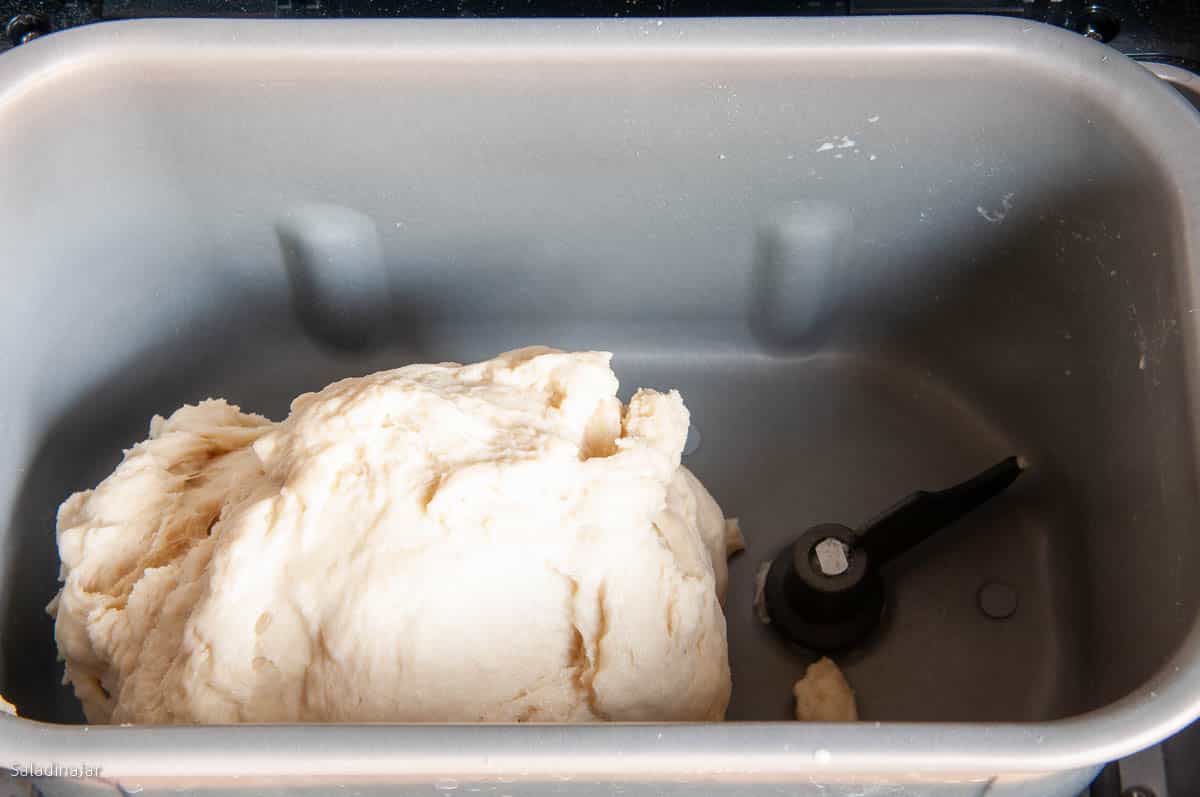
Load bread machine pan

Basic Bread Machine White Bread (Soft 1.5 lb Loaf and Oven-Baked)
Video
Ingredients
- 1 cup (227 g) water (cool)
- 1 tablespoon granulated sugar
- 1¼ teaspoon table or sea salt
- ¼ cup (21 g) nonfat dry milk (powdered)
- 1 tablespoon butter (chopped)
- 1 teaspoon lemon juice (optional)
- 3 cups (360 g) bread flour
- 1½ teaspoon instant or bread machine yeast
Instructions
- Add ingredients to pan: 1 cup (227 g) water, 1 tablespoon granulated sugar, 1¼ teaspoon table or sea salt, ¼ cup (21 g) nonfat dry milk, 1 tablespoon butter, 1 teaspoon lemon juice, 3 cups (360 g) bread flour, and 1½ teaspoon instant or bread machine yeast.
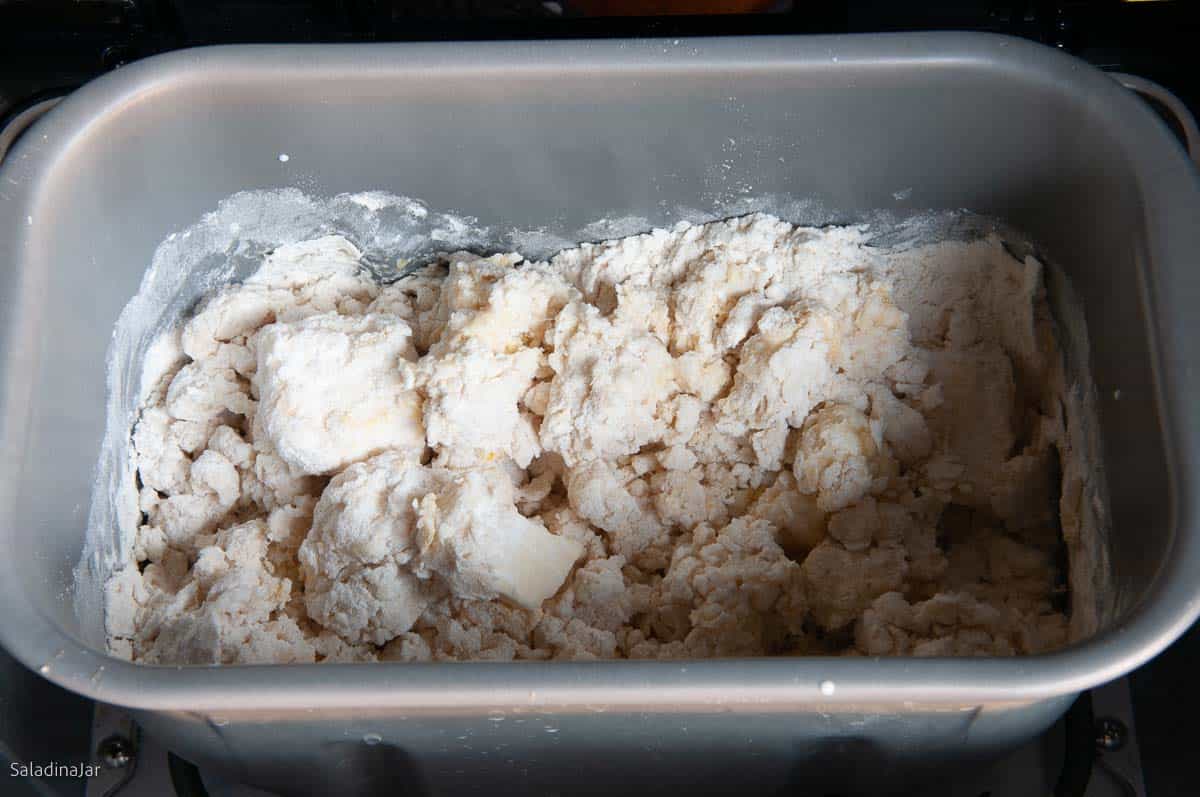
- Select the DOUGH cycle and start.First check: After a couple of minutes, check the dough to make sure it is coming together into a raggedy ball. If not, add more water 1 tablespoon at a time. If you see pancake batter instead of dough, you forgot some flour—just add it slowly until everything pulls together.Second check: Check dough again after about 15 minutes. The dough should stick to the sides of the pan, then pull away cleanly. If too wet, add flour 1 tablespoon at a time. If too dry and the dough doesn't stick at all, add more liquid. See more details–Surprising Secret for Making Better Bread with a Bread Machine.NOTE: Bread dough is influenced by flour, humidity, and even your kitchen temperature—so use this step to fine-tune the dough for your environment.
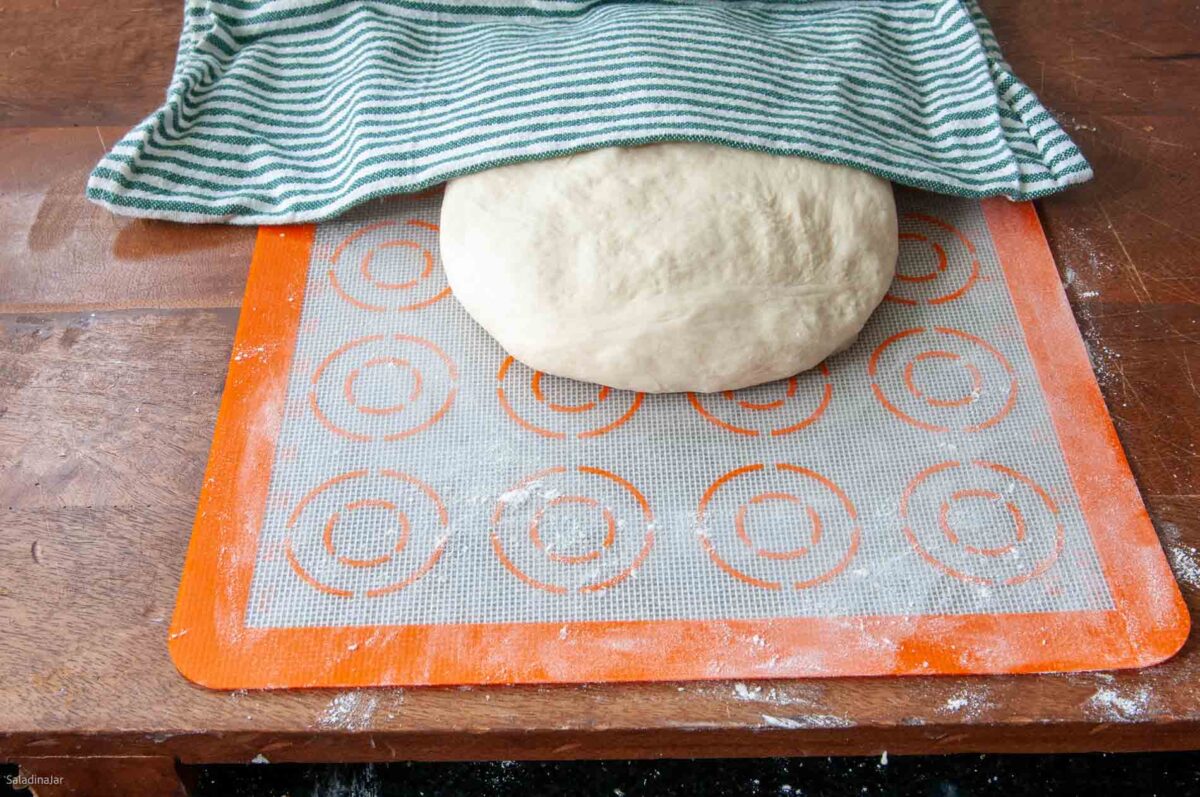
- End of DOUGH cycle: The dough should be doubled. If not, give it more rise time until it is. Restart the DOUGH cycle and knead for 5 seconds to deflate the dough. Stop the machine and turn the dough out onto a lightly floured surface, shape into a smooth ball, cover, and let rest for 10 minutes.
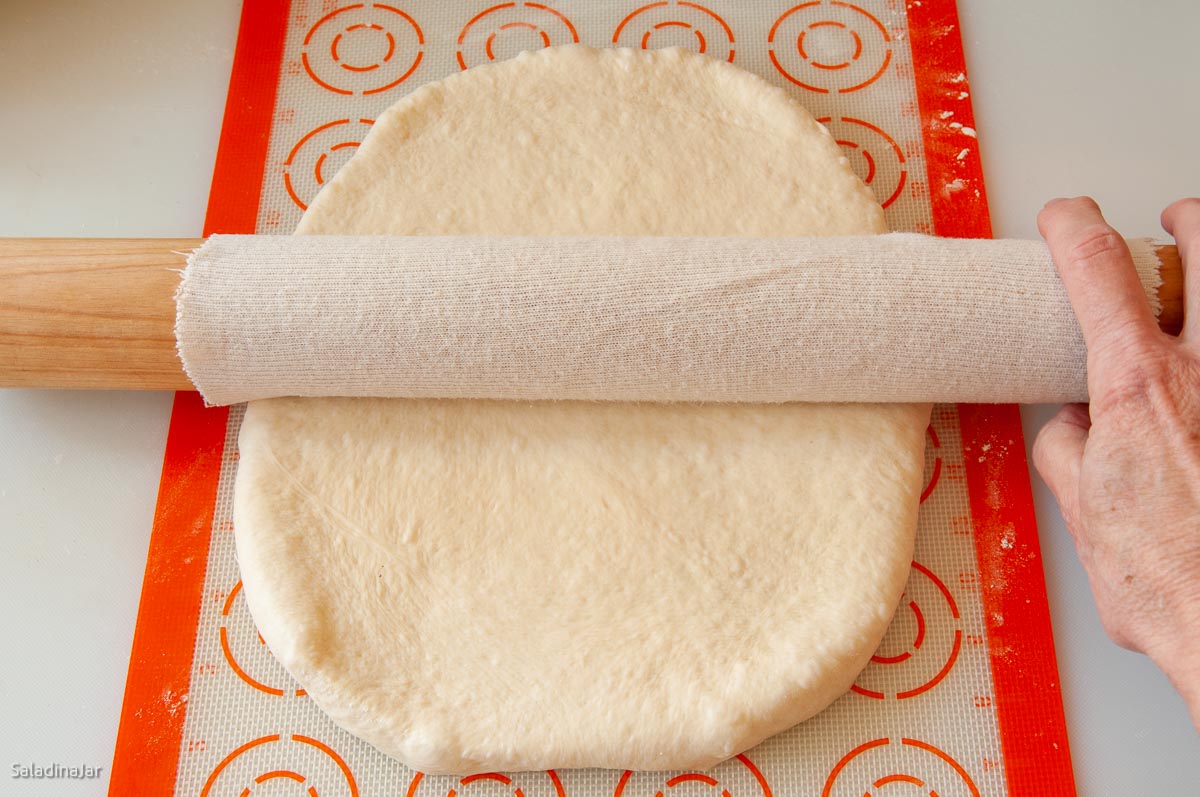
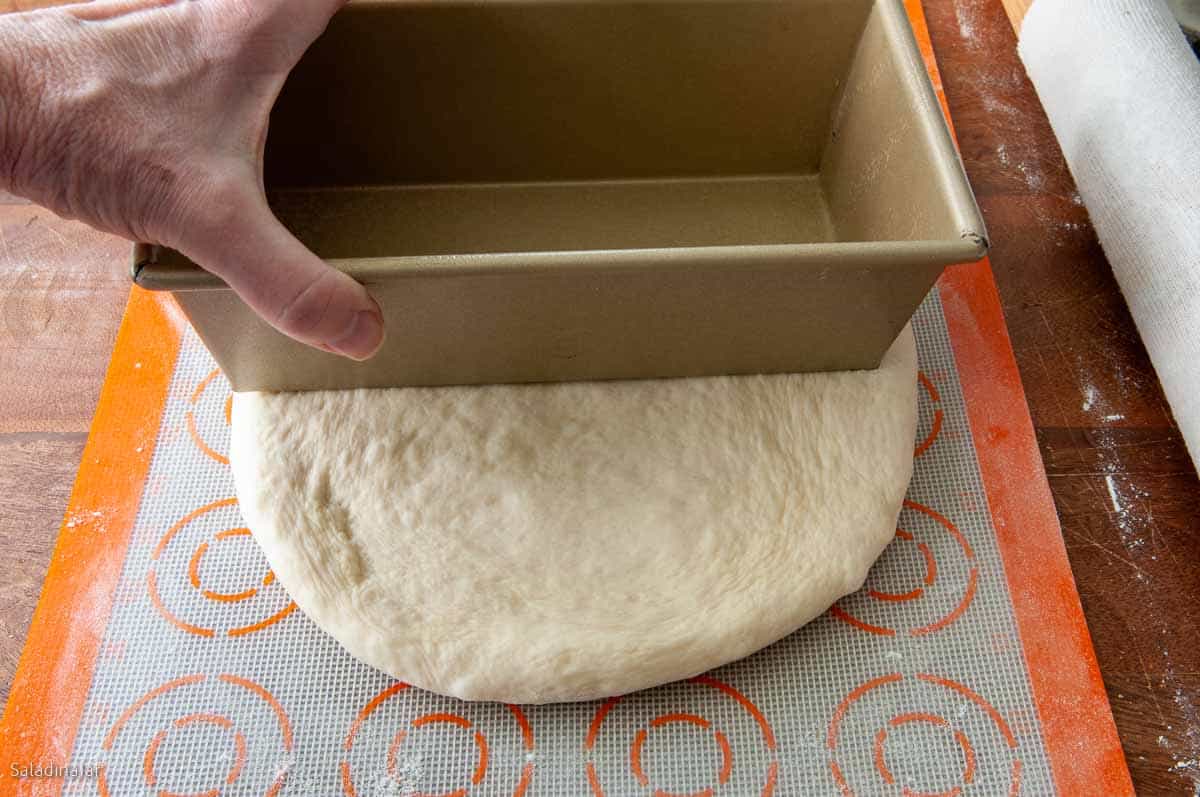
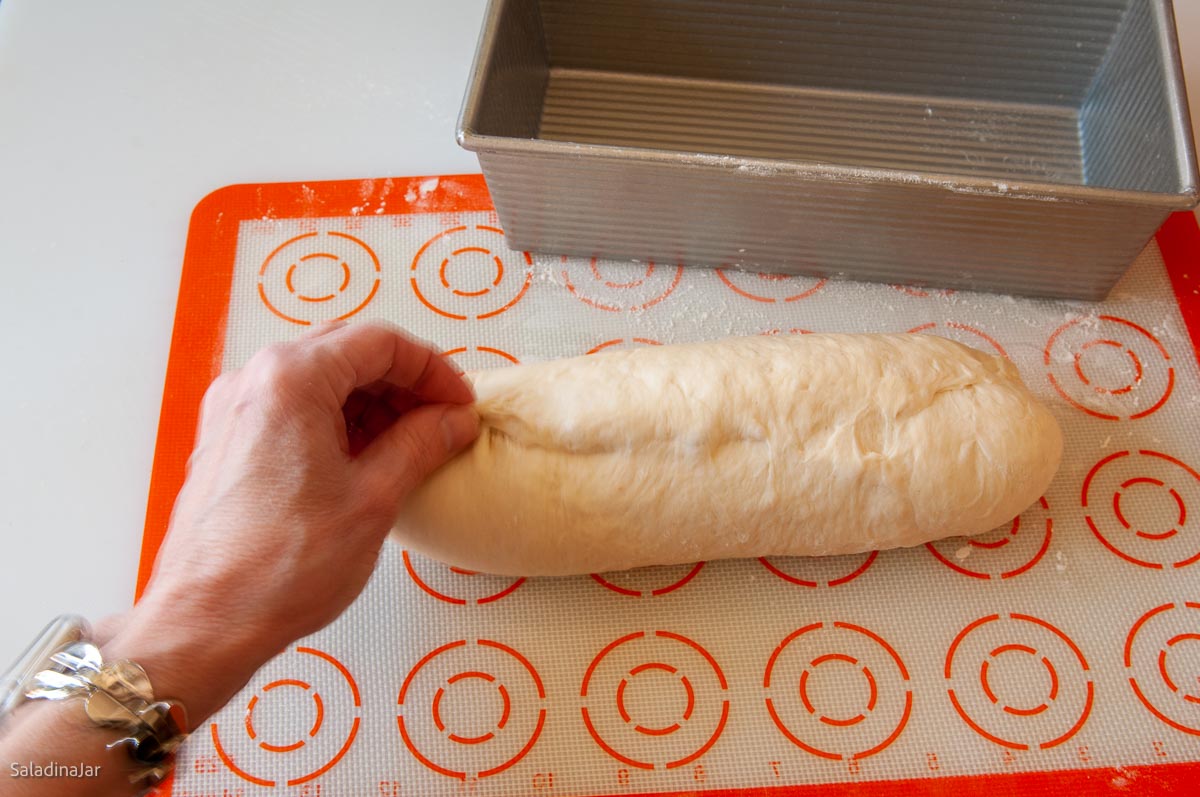
- Roll and shape: Roll the dough out into a rectangle, aiming for dimensions of about 10 x 13 inches. Use a rolling pin to gently press down any large bubbles, especially around the edges, to improve the bread's texture and prevent unwanted holes.Starting from the short side closest to you, roll it snugly without stretching the dough. Use your fingers to pinch the seam closed. Then, pull up each end towards the seam and pinch those shut as well. Refer to the process pictures in the post for guidance.
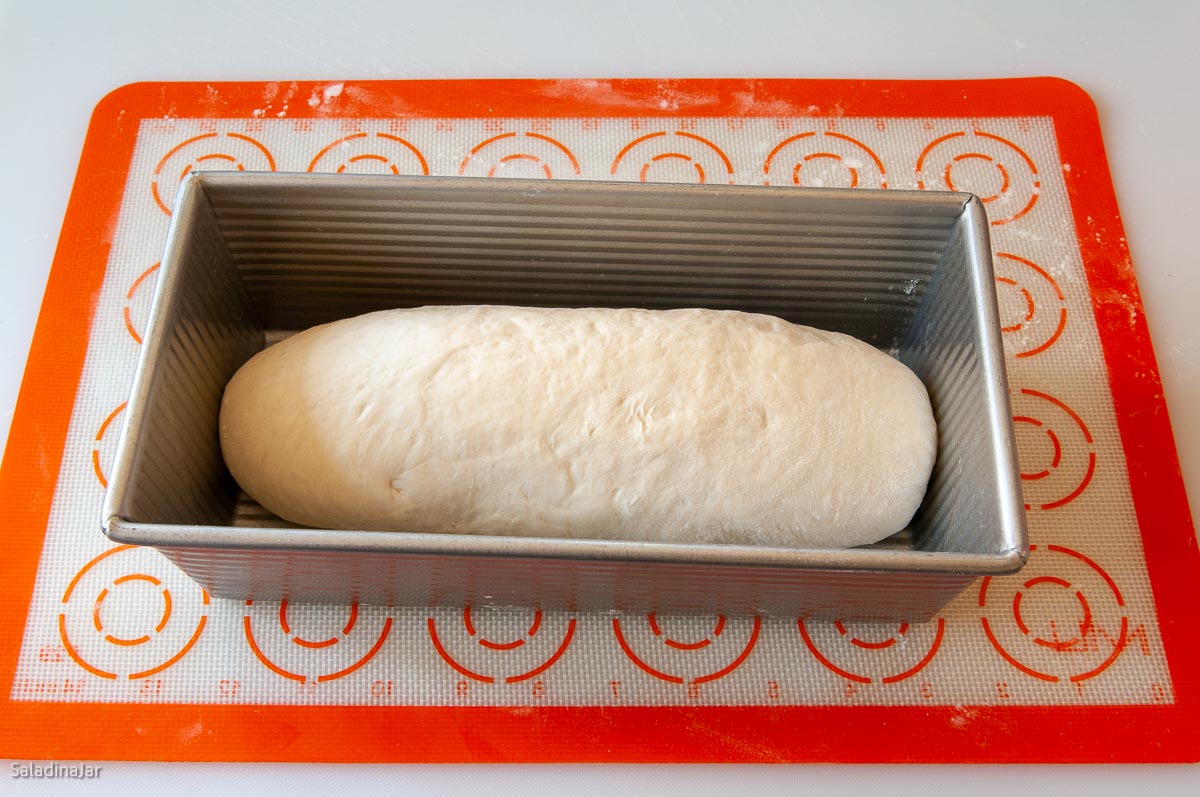
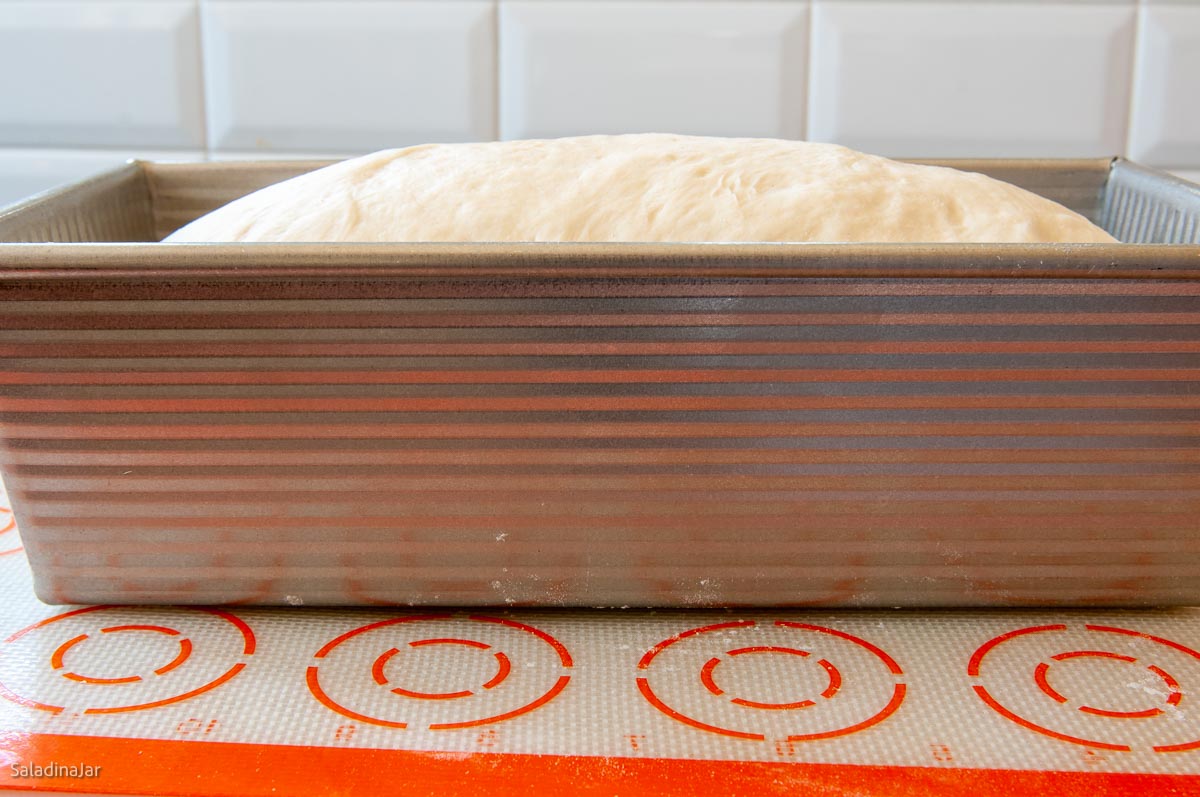
- Final Rise: Turn the dough cylinder over so the seam is on the bottom and gently place it into a greased loaf pan. (This recipe is suitable for either a 9×5-inch or an 8½x4½-inch loaf pan. Each size will yield a slightly different loaf shape.) Use a 9x4x4 Pullman pan for straight sides and a more professional look.Cover and let rise until it crowns by 1 inch over the top.
- Preheat the oven to 350 °F (180˚C) roughly 15 minutes before you expect the bread to be ready for baking.
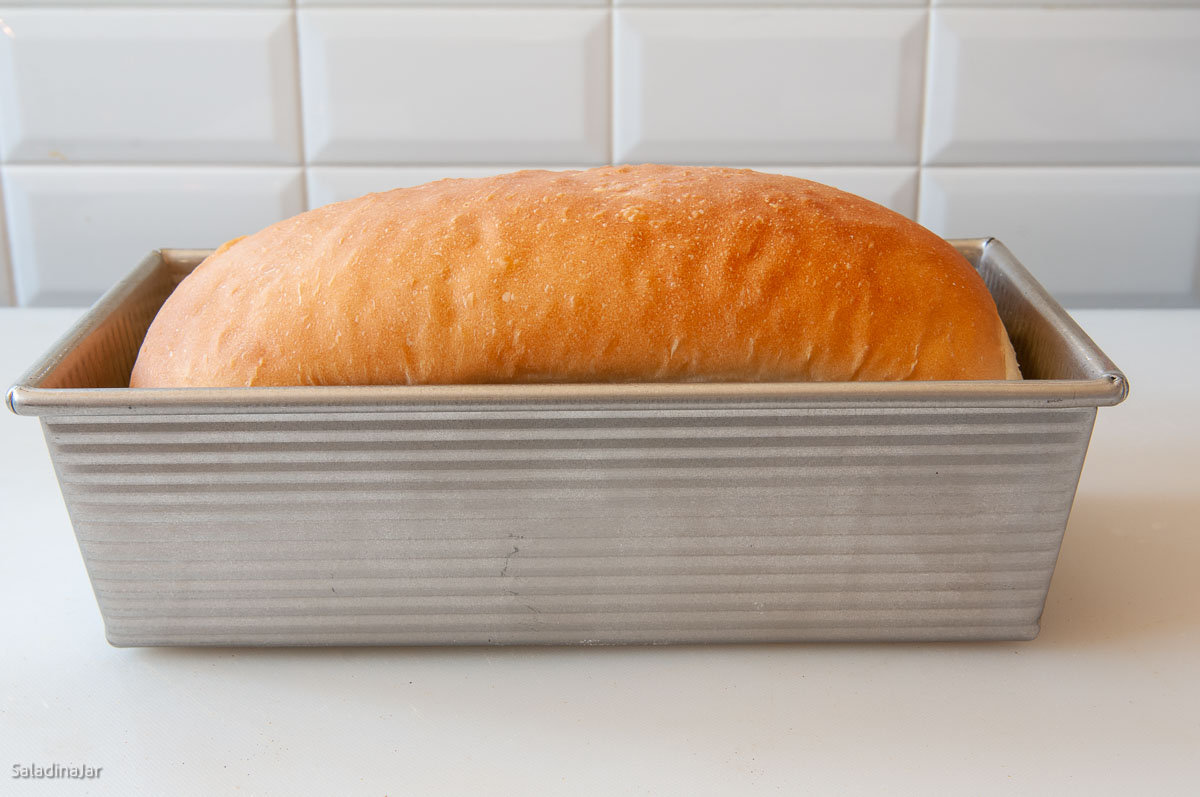
- Bake: When the bread has nearly doubled in size, bake it in the middle of the oven for 25-30 minutes. The internal temperature of the bread should reach between 195-200 °F (90-93˚C) for it to be properly baked.
- Cool: After baking, take the bread out of the oven and let it sit in the pan for 15 minutes. Then, transfer to a cooling rack and let it cool for at least 30 minutes, ideally an hour, before slicing.
Notes
- Unbaked dough: Freeze after the DOUGH cycle or after shaping (before final rise). Defrost in the fridge overnight.
- Baked bread: Double-wrap and freeze up to one month. Reheat gently.
- Stand Mixer: Mix until moistened, then knead with a dough hook (speed 2–3) until smooth and elastic (5–10 minutes). Let rise, deflate, and shape as directed.
- By Hand: Mix to a shaggy dough, knead on a floured surface until smooth and elastic (10–20 minutes). Let rise, deflate, and shape as directed.
Equipment
Nutrition
All images and text ©️ Paula Rhodes for Salad in a Jar.com

What Readers Ask Me About This Recipe
- Can I make this bread entirely in a bread machine.
- Can I substitute whole wheat flour?
- Start with no more than ½ cup in place of the bread flour. For best results, use one of my wheat bread recipes made specifically for whole grain.
- Why is my bread crumbly?
- The dough was too dry—try weighing the flour instead of using measuring cups, as most people tend to add too much flour.
- Crumbly bread can also result from poor shaping. Shaping structures the gluten, improving the bread’s appearance and helping to hold the crumb together, which is especially important for sandwich bread.
Final Thoughts
If you’ve struggled with pale or dense loaves in the past, this recipe offers a fresh start. Using your bread machine for the dough and finishing in the oven gives you more control—and better results. Once you try it, you may never go back to baking bread entirely in the machine.
— Paula, Home Economist
Homemade Food Worth Sharing
Need help troubleshooting?
Email me: Paula at saladinajar.com — photos help!
Looking to Increase Your Bread Repertoire?
Looking for a sturdy and chewy loaf, look at my Sourdough Sandwich Loaf or Bread Machine Oatmeal Bread. If you prefer whole wheat bread, try my Honey Wheat Bread Machine Recipe or this Wheat Berry Bread.
If you prefer sweeter and richer white bread, be sure to take a look at my Condensed Milk Bread: A Not-to-be-Missed Bread Machine Recipe or this Buttermilk Bread Machine Bread Recipe.

In your note about what amounts to use for a 2lb loaf you write ‘1 1/3 T butter’
Is this 1 Tablespoon plus 1/3 of a tablespoon (which is one teaspoon)? Or is it another measurement?
I have a USA set of measuring cups and spoons so I don’t have to convert to my countries measurements but wanted clarification on this please.
Hi Lorraine,
Yes, 1/3 of a Tablespoon is one teaspoon. I change it in the recipe to make it more clear. Thank you so much for calling that to my attention.
Happy New year to you Paula,
Hi Paula can you tell me what size Pullman loaf tin for the 2Lb loaf please?
Can I just say your recipes are fantastic and always come out delicious so thank you very much .
Thank you for your kind words, Julie. To answer your question, I can only guess. I only buy USA Pans. The next step up from the 9x4x4 is the 13x4x4. You might try that one.
What can I use in a bread recipe instead of powdered dry milk for a substitute?
Hi Pauline,
You can leave it out and substitute milk for the water. Does that answer your question, or do you have issues with all milk in any form?
Hi Paula,
I’m in the middle of first rise in and the machine and I had a question that I’m definitely overthinking: am I waiting for the whole dough cycle or just the first knead? I have an old Hamilton that I got for $20 and the dough cycle is 1.5 hours long, including first knead and dough rise, then second knead, second rise, and final rise before baking.
At what point am I supposed to take out the bread to shape?
Hi Kathleen,
Here’s the scoop: if you’re using the DOUGH cycle, let it run all the way until the machine stops on its own. That cycle includes the kneading phase and the rise that follows. Some machines will punch the dough down once and let it rise again—that’s normal. But the DOUGH cycle never heats up or bakes anything.
Unless my recipe specifically says, “take it out right after kneading,” you’ll leave the dough in the machine for the entire DOUGH cycle.
Your machine’s 1.5-hour DOUGH cycle sounds exactly right. That time covers kneading and rising, but not the final rise. After the DOUGH cycle ends, you’ll take the dough out, shape it, and let it rise on the counter in your pan before baking.
Have a good Thanksgiving.
I absolutely love the recipe as does my family! I’m wondering if anyone has tried making this recipe gluten free successfully?
Hi Stacey,
I’m so glad you loved this bread. In my experience, baking gluten-free yeast bread is a completely different game with different rules. But if any of my readers have tried this, be sure to leave a comment and let us know how it went.
Love this bread. It has replaced your buttermilk white bread recipe as my favorite. It also toasts beautifully.elaine Hunter
Happy to hear you loved this bread. Thanks for writing.
Made this today, this is by far the best white bread. I cut into the loaf before taking picture. Will be making this from now on. It is so soft. Thank you for sharing love it
Hi Cheryl,
Love hearing this!! I think you will have many wonderful loaves of bread in your future.
One day when I was preparing a meal to take to my neighbor’s place, I included this bread. They REALLY liked it – the taste and how firm it stayed to make sandwiches. We both make bread, so it was nice to take a new recipe.
I learned an easier way to get all bubbles out (thanks!) and an easier way to shape the loaf. I also realized I had been letting my bread raise a lot longer than I needed to. All these years I could’ve gotten the bread done quicker and it would have fit in the toasted easier. I really appreciate all the tips you include.
Hi Debbie,
I’m so excited to hear all this. Glad the Basic White Bread is working for you and that the neighbor appreciated it. Keep up the good work!!
Thank you so much for this recipe! I have tried others and was disappointed every time. My bread machine tonkered out on me just after it started mixing the dough and I had to move the dough to my old Oster Regency mixer but it still turned out great! It rose great and baked the correct amount of time. It is so frustrating when a recipe has to be altered to come out right but this one is right on target! Thank you again! I will be looking at more of your recipes in future.
Thank you for your kind words about the bread machine white bread. I’m glad it worked out for you. Did you bake it in your machine or in your conventional oven? I have not tested this recipe to be baked in a machine, so if that’s how you did it, you got lucky.
I can understand your frustration about a recipe needing to be altered. However, that is the nature of a bread recipe because so many factors come into play, like the brand of flour you use, the bread machine you use, the humidity in your house, the ambient temperature, and the level of your experience with handling bread dough. Hopefully, you have read this article about the secret to success with a bread machine. A Surprising Secret for Making Better Bread with a Bread Machine
Glad it worked out good for you, Donna. Be sure to watch your email for a more detailed answer.
I just made this bread this morning, and had to rush to come rate it 5 stars! This bread tastes delicious! Thank you so much for another great recipe that I’ll be adding to my rotation!
Hi Melody Anne,
Thanks for starting my day off right! I’m so happy you liked the bread.
Happy Baking!
Best bread yet! So happy I found this site. I have a bread machine but was not pleased with the outcome of my bread and I have tried many recipes….the best thing about bread machines is they make the dough for me!!!! Now I have a better way to use the Bread Machine….Thanks!!!!!!!!
Agreed!! Thank you for writing.
Hi Paula , is the x2 for 2 loaves 2Lb size sorry if a sill question .
Kind regards
Jules
Hi Jules,
Not silly at all.
x 2 is for a 3 lb. loaf when the original loaf is a 1½ lb loaf (I think that includes nearly all of my recipes.) If you want a 2 pound loaf, click on the x 1 ½ for one 2-lb. loaf. Very few bread machines can handle the amount of dough it would take for two 2-lb loaves.
Does that answer your question? Have I understood your question correctly? Let me know if you still have a question.
p.s. Remember that when you multiply a bread recipe, don’t multiply the yeast. Leave it the same or increase only slightly.
Hi Paula ,
Thanks for getting back to me so quickly . Glad you understand what a mean. I have made this loaf a few times now , but normally scroll down to the 2Lb part. I passed the recipe to my son and just wanted to know if I had advised him correctly. I absolutely love this recipe it has turned out great every time delicious! So thank you for the recipe . I’m looking forward to trying the others .
Kind regards
Jules x
Thanks honey !
You’re welcome! Enjoy.
I can’t stand the disgusting hole in the end of the loaf when baked in the breadmaker from the little stirring flapper. So I use the automatic cycle on the bread machine to stir rise,knockdown and knead. I take the dough out of the machine and shape it to fit in my glass loaf pan greased well with Crisco or shortening . Then
I bake at 350 for about 25 minutes.
This recipe works great for my needs. Thanks for sharing.
Hello,
I’m with you. Holes in my bread and weird shapes are not good enough for me. All of my bread recipes are written for mixing and kneading the dough in a bread machine, shaped by hand, a final rise on the counter, and finally, baked in a conventional oven. Glad you enjoyed the recipe. Thanks for taking the time to leave a comment.
I have been using your recipe and method for a few months. Your bread is now the only bread we have in our house – no more commercial bread. I make the 1-1/2 lb loaf, and as a treat hubby asks for the heel of the loaf as soon as it comes out of the pan.
I have tried several ways to slice the loaf, as it’s so soft it’s hard to slice when it’s first cooled. I tried freezing it for an hour then slicing it, that sort of worked, but now I put the loaf in a plastic bread bag, leave it in the cupboard overnight, slice and then freeze it. Works a charm. Thank you for this terrific recipe.
Question about bread pans. The sides of my bread pan are slightly angled, and I’d one with straight-up sides so that the end slices are a uniform thickness. Any suggestions?
Hi ELizabeth,
For straight-up sides, use a pullman pan. I recommend the USA 9x4x4 Pullman pan. See the link for one at Amazon in my post above.
Hi Elisabeth,
I recommend a USA 9x4x4-inch Pullman pan. It will give you those straight up sides you want. I know it seems a little expensive for one pan, but they are totally worth it. Once you use one, you’ll want to replace every pan in your kitchen. USA doesn’t pay me to say that but I do get a small commission from Amazon if you buy through a link on my website.
” Place all dough ingredients into the bread machine pan in the order listed”
Not to be picky but your directions usually have “by the manufacturer of your machine” or something near that. Is this what you mean by the directions in line one above or does it mean as YOU have them listed in the recipe?
Your recipes are always so good I don’t want to mess this one up!!
Thanks, Peggy
Hi Peggy,
You are very observant. I have moved away from mentioning the manufacturer’s directions. If they are different from what I specify, I would only follow their directions if you want to bake the bread in the machine. As you know, I never bake bread in my machine unless it is to demonstrate what happens to the bread when somebody does it.
Hi, i recently purchased a bread maker and all the ingredients needed for most bread recipes, i bought a BIG bag of powdered milk but it is Full Fat, will this make any difference? thanks again for all of your recipes, your site was one of the first i came across so will save me lots of searching now Thanks Karen
Hi Karen,
Congrats on your new machine. The extra fat will probably make most of your bread recipes even better.
I never review recipes but this one definitely deserves 5 stars. I’ve made bread in my machine several times but was never impressed.
This is by far the best bread I’ve ever made and it was easy. The texture, color and taste were perfect. Thanks so much for the recipe!
Hi Ashley,
I’m so happy to hear from you. Thrilled that you love the bread. Thank you for the 5-star rating.
Absolutely delicious. Following the instructions and ingredient and it is incredible. Paula, you make bread making easy and so flavourful. I normally make a vegan white bread as my 3 daughters are vegan. I will continue to make that bread for them but for myself and my husband this will be the staple bread.
Thank you for sharing Paula.
Glad you love this basic white bread! Thanks for the 5-star rating and your kind words.
I received a bread maker as a gift in April and whilst loving the ease of use, l really wished l could get the bread darker (even on the darkest setting).Whilst researching what to do, l came across your website. Loving your tips and guidance. Instructions are easy to follow especially given l’m new to bread baking. I’ve learnt so much. I’ve made this loaf twice now and results have been awesome each time. Such a beautiful texture and taste. I wish l could post a picture to show you. Can’t wait to try another recipe of yours. Thank you for a great website.
Hi Stef,
I would love to see a picture of your bread. You can always send it to my email address: Paula at saladinajar.com.
I have made several loaves of white bread in my bread machine, with good but less than great results. Thank you for your detailed information, I can’t wait to make my next loaf using your dough cycle/oven process.
For the dry ingredients, are they added to the break machine one by one in the order given in your recipe, or should they all (except for the yeast) be whisked together, then added? Or does it matter?
Hi Elisabeth,
Add all ingredients one at a time on top of each other with the flour, then yeast on top. There is no need to whisk anything together ahead of time unless the recipe specifically tells you to do that. The bread machine will mix everything for you in the first 15 seconds unless your machine has some kind of preheat or resting phase. You can turn those off if the machine will let you.
Good luck with your bread!
Great recipe! I started using the dough cycle because of seeing your beautiful bread, so I wanted to try it. I AM now a bread machine dough cycle and bake-in-the-oven person. I love making bread this way now. I have made this recipe several times and my household has never been disappointed. I am so glad I found your website. Thanks SO much for all your knowledge and for passing it on to others.
Thanks for the 5-star rating and your kind words, Samantha. Hopefully, this will encourage other people to try it.
I made this recipe today and it is probably the best bread I have ever made, delicious ?
Thank you from Australia!
Hi Margaret,
You’re welcome. And thank you for taking the time to come back and write.
Good morning Paula. I want to make Parker House Rolls for this Easter Sunday. Of all your bread recipes, which would you consider using? I love all your recipes so far, so it is hard to pick one. Thanks for so many delicious recipes and such a beautiful blog. Wishing you and your love one a blessed Easter.
Hi Connie,
It’s always fun to hear from you. I would consider these Tangzhong Dinner Rolls or my Classic Dinner Rolls which are a touch simpler.
my go to bread now.
Fantastic, Patty! Thank you for the 5-star rating.
Thanks so much for sharing this simple recipe! I don’t have to look any further for a better one! My whole family loves it!
High Five! It sounds like you hit a home run.
Wonderful and easy. Turned out perfect!
You are the BEST.
It’s lovely to hear from you. Thank you for your kind words.
I love your 1 1/2 pound loaf of white bread. How would I convert this recipe for a 2 pound loaf? Thank you so much.
Hi Joy, I hope you weigh your ingredients. That makes it easier.
This is how I do it: Start with the original flour weight. In this recipe, that’s 360 gr. Decide how much flour you want in your new version. I chose 4 cups of flour which equals 480 grams. Start at the top of the list with water. 227 gr (the original water weight) ➗ 360 gr (the original flour weight) = .63 x 480 gr (the new flour weight) = 302 gr (the new water weight) You will need 1⅓ cup of water. I figured the weights for you below and then picked measurements that are close.
2-lb. loaf
* water – (302 gr) 1⅓ cup
* granulated sugar – (19 gr) 1½ tablespoon
* table or sea salt – (9.6 gr) 1½ teaspoon
* nonfat dry milk, powdered -(27 gr) ⅓ cup
* butter – (cut into small pieces) (19 gr) 1½ Tablespoon
* lemon juice – (6.66 gr) 1½ teaspoon
* bread flour – (480 gr) — 4 cups
* instant or bread machine yeast – (5-6 gr) use the same or 1¾t.
Note: Weighing is more accurate than measuring unless it is for small amounts like lemon juice or yeast. On the other hand, 1/3 teaspoon of a liquid is almost impossible to measure so that I would go to 1½ teaspoon.
In general, you don’t want to change the yeast much–do not automatically double the yeast because you doubled the recipe. You might increase a fourth or half of a teaspoon. After experimenting, you might discover you need the same amount of yeast for even for a bigger batch. Yeast is funny like that.
Hope this helps.
I love this recipe. However this time in my winter home in Florida , I found i didn’t have any dry milk so I added creamer. Let’s hope it turns out. Waiting to see.
Hi Maria,
I bet your bread will be fine, especially if you checked the moisture level on the dough as the machine was kneading. Cream improves almost everything.
This recipe is such a pleasure! From the initial bread machine mixing through to the oven baking time, everything was letter perfect! The finished loaf was everything I could have hoped for and that tiny bit of lemon juice really does make a difference. Thank you for my new “go-to” White Bread recipe!
Pat, This is my favorite kind of comment. Glad all went well with your bread and that you loved it. Thank you for taking the time to come back and say so.
I’ve not made the recipe, But, I’ve owned 2, expensive bread makers and neither have baked a decent loaf of bread with any recipe. I decided years ago to never finish a loaf in the machine. I was thrilled to have your wonderful tips.
I am planning to make your brioche recipe today and reviewing your tips will give me a far greater chance of success.
Thanks for the great tips.
You’re welcome Strawberry Jan. (Love your name.) I couldn’t agree more about baking bread in a bread machine. Not good. I can’t wait to hear how your brioche turns out. If you get some good pictures, I would love to see them: Paula at saladinajar.com
In the top part (description) of the recipe, it says to roll the dough from the ‘long’ side of the dough. Later, in the actual recipe, it says to roll the dough from the ‘short’ side…. which is it? Also, only 1 tablespoon of butter??
Hi Donna,
Thank you for writing. I clarified the recipe (I hope). If you use a Pullman pan, roll from the long side. If you use the 8½ x 4½ loaf pan, use the short side.
And yes, I only use 1 tablespoon of butter. But you are welcome to experiment and add more if you like. In case you want a richer white bread, this recipe or Condensed Milk White Bread is my very favorite.
I have been using as many as 3 bread machines at one time over the years. This loaf is wonderful. I agree with you that using a rolling pin helps make a loaf with a better texture and less air holes. When the bread was ready to bake, I brushed with a beaten egg mixed with a tablespoon of water and sprinkled with sesame seeds. Came out perfect and delicious.
Hi Patricia,
Your comment is high praise considering your experience with a bread machine. I like the idea of sesame seeds. (They are hard to come by right now where I live. Go figure.) Have you seen this bread recipe with whole grains that is covered with seeds? I think you might like it. You can always substitute whole wheat flour for sprouted wheat flour.
Excellent!! Baked in oven in a 9 x 5 glass dish and followed direction. This is the best!
So glad you love it, Nancy. May you enjoy many more successful loaves.
I just made this recipe for the first time. It was the softest, best white bread I’ve ever made. I have a bread machine that makes 3 lb loaves. I made your recipe as written in an 8″ pan. I have a large 13″ pan and would like to know if I can double the recipe so I can make a larger loaf and if so, should I double the yeast as well? Thank you so much for such a great recipe!
Elaine,
So glad you wrote. Do you have a West Bend? I think you can safely double the recipe. However, do not double the yeast. You can use the same amount or maybe an extra 1/4 teaspoon. In general, your bread will taste better when you don’t use as much yeast. The longer it takes your bread to rise, the better it tastes. But since we’re all in a hurry, we’ve become accustomed to using larger amounts.
Happy to hear you were happy with the bread. Enjoy–(and tell your bread-baking friends where you got the recipe, thanks so much ?)
@Paula, yes it is a West Bend! Thank you so much for your response. I will try doubling it with your instructions. I will definitely be recommending your recipe.
I made this recipe as instructed and it was perfect and delicious!
Fantastic!! High-five!!
1 ¼ tsp of salt and 1 ½ tsp of yeast are same 7grams?
Yes. Approximately. Table salt is a bit heavier than yeast. Actually, when the weights are so small, it can be more accurate to just measure with teaspoons but some people don’t even own them so I add the weights for convenience. Thanks for writing.
how do i save your recipes?.i hit save nothing happens..looooved your cinnamon buns..tia huggzz
Hi Gail,
Due to some technical changes with my blog, the save button no longer works. I have removed it from the website. Hopefully, I will be able to add it back before too long. I’m so sorry for the inconvenience.
Glad you liked the rolls. Wish I was there to help you eat them.
Thanks so much for taking the time to write about the SAVE button.
Paula, I’ve been wanting to make your white bread for the past 2 days. Finally, today was the day. Believe me, I was so excited this morning. My husband just looked at me and said “You really like that bread machine don’t you?” I said “Yes but I’m really excited about using Paula’s recipes.” Just wanted you to know I followed your easy instructions and I have to say my loaf turned out beautifully as well as delicious. I’m a newbie to bread making and I’m so glad you’re here for me. Thank you so much! Gonna try your pizza dough next and then maybe some cinnamon rolls and who knows what next. My grocery list is “big”. I’m loving this!
This is fantastic Melissa! Did I ever warn your that baking bread is very satisfying? I hope you’re feeling that satisfaction today. Thanks so much for taking the time to leave such a nice comment.
Hi, Paula. I’m back again to tell you this is our family’s daily bread. I bake once a week or so and this recipe is the perfect white sandwich bread. Store-bought is fine, but once you have your own fresh bread on hand, you don’t want to go back. I’ve recommended this recipe to several friends and all agree — best bread ever!
So glad you loved it!
Great advice
Thank you, Ruth. Glad to have your here.
An A+ One of the best white bread recipes I’ve ever made.
Paula, this one is a World Series winner!!
Thank you!’
Thank you, Vanessa. So glad you love it.
Hi Paula! This was a really good refresher post on basic white bread. I have somehow wound up with two 6″ square pullman loaf pans. Would this recipe make two loaves using these pans? Also how high should I allow the rise before sliding on the lids. Is baking time any different using these two pans? Thanks in advance for any info.
Viv
Hi Vivian,
I’m sorry for the delay in answering your question. I just found it. I can’t speak knowledgeably or from experience about a 6-inch Pullman pan. My advice is to try it. In general, you want the dough to fill the pan about half full when you first put your shaped dough into the pan. A little less is OK, too. I would put the lid on when the dough is within a half to one inch from the top and put the bread into a preheated oven immediately. After you do this once, you’ll have a much better idea how to do it the next time. Remember to take the lid off about 10-15 minutes before the bread is finished baking so the top can brown. Bread making is all about experimenting and adjusting until you figure out what works best in your kitchen when using your equipment. Good luck. I would love to see a picture of the finished bread.
I’ve been making bread with a bread machine for at least 25 years now. I am currently on my third machine! I rarely bake my bread in the machine, mainly because the paddle leaves a great hole in the bottom, so I’ve been using the dough cycle and then shaping the dough in a bread pan. I don’t normally use a rolling pin but rather flatten the dough and then shape it right in the pan and let it rise. It comes out great. I’ve experimented with different types of flour – white, whole wheat and rye – and I find that if I’m using non-white flour, I add some wheat gluten flour to give the dough more rise – up to a tablespoon depending on the size of the loaf. There’s nothing like a fresh home made bread. One more proviso, I use only room temperature ingredients – like butter, milk, eggs, etc. I have found that if any ingredients are too hot (melted butter) or too cold (milk, eggs, etc.) the yeast will not preform as well.
Hi Stephen,
Thanks for writing. Sounds like we are in agreement about the bread machine and baking in the oven. Re: using a rolling pin, I find that it makes a more even texture in the bread–fewer holes and tunnels. Rolling out the dough and then rolling it into a cylinder makes a beautiful swirly texture throughout the interior crumb. Just my opinion. I agree with you that there’s nothing like fresh homemade bread. Perhaps you live in a really cold climate and need to preheat your ingredients. However, I live in Texas where it can be really cold or really hot (in the same week). After years of preheating ingredients, I don’t do it anymore. The reason? I took the temperature of my dough at the end of the kneading phase. It is always 80˚F or higher in the summer. I don’t use hard butter (I chop it into little pieces) but everything else comes straight out of the fridge. The friction of the blade will heat everything in a hurry. That’s my experience and may not apply to everybody. Check the temperature.
@Paula, I live in Canada, and right now it is COLD!!! But even in summer I bring the ingredients out of the fridge an hour or so before I’m ready to bake. I find it just ends in a better product.
Hi Stephen,
I can only imagine how cold it is where you live. Br-r-r-r. If you are baking bread in your machine, it is very important that you bring all ingredients to room temperature before starting. If you are just using the machine to mix and knead the dough as I do in all my recipes, it doesn’t make as much difference unless you are on a time schedule. As I often say, the slower the rise, the better the taste. But in the end, if your current method works for you, please keep doing it. That’s the beauty of making your own bread. You get to do it exactly how you please. Thanks so much for writing. Your method is something other readers in cold climates may want to consider.
Can I make this as a French loaf and bake on a sheet pan?
@Cynthia,
Yes I have made French loaf with a very similar recipe, but generally it requires more butter or fat. Also, when baking on a sheet pan, I have lined the pan with parchment and corn meal on top of that and then the dough. Also, you should probably have an egg wash to give it a more crusty texture which you apply just before baking.
Hi Cynthia,
I’ll add my two cents to this conversation. I have not tried it, but I hope you will and let me know. The dough is pretty soft, so I would expect an uncontained loaf to spread some. However, it is the prerogative of home bakers to try anything they want. That’s my opinion. ?