Shaping Bread Machine Dough: Why It Matters & How to Do It
Sneak Peek: Shaping dough matters, even when using a bread machine. Here’s why it’s essential along with a simple tutorial on how to shape a simple sandwich loaf.
This post contains affiliate links. As an Amazon Associate, I earn from qualifying purchases at no extra cost to you.
Are you a stuffer or a shaper when making bread? Do you plop the dough in a loaf pan and call it good, or do you guide it with gentle precision?
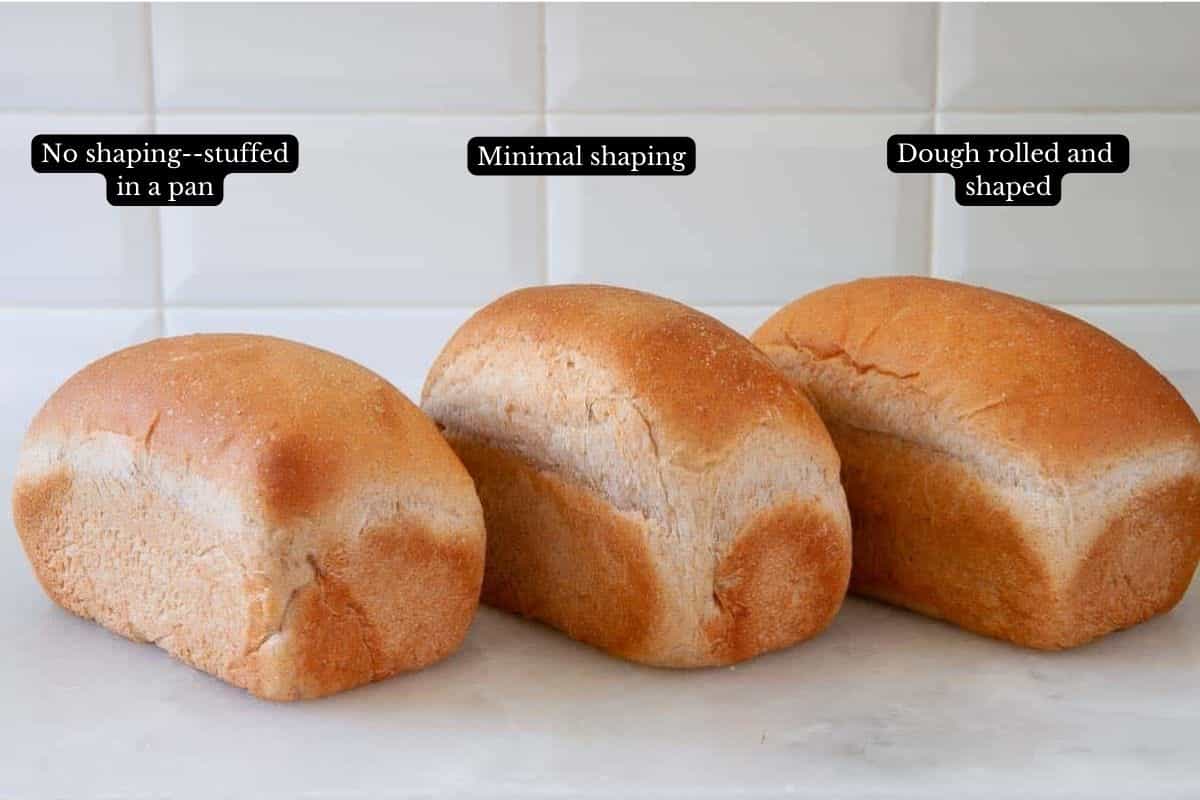
No matter how you mix and knead your dough—bread machine, stand mixer, or by hand—shaping improves the crumb texture, crust, and appearance.
This post is for bread machine (paid link) users aiming for bakery-quality bread. While the tips apply to most yeast dough recipes, exceptions include classic sourdough (no commercial yeast) and no-knead bread.
Need shaping tips for something unique like a braid or boule? Check out the step-by-step guides in my 71+ bread machine recipes on this website.
Happy Cooks Speak Up
“Thank you for this article. I’m always afraid of messing with the dough too much after removing it from the machine. Not any more. … Your method makes total sense. Again, thanks for this article and all your great recipes. The honey wheat is our go to every week for sandwich bread.”–KATHY
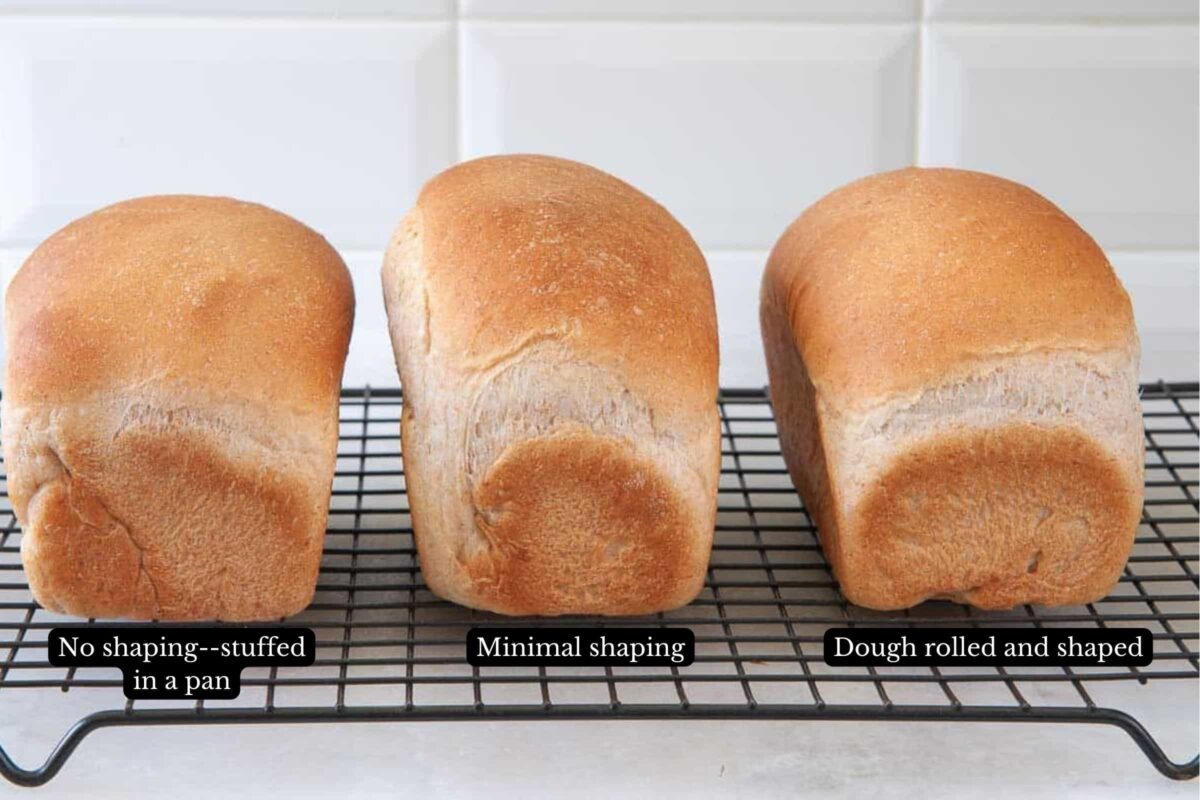
Why Shape Dough?
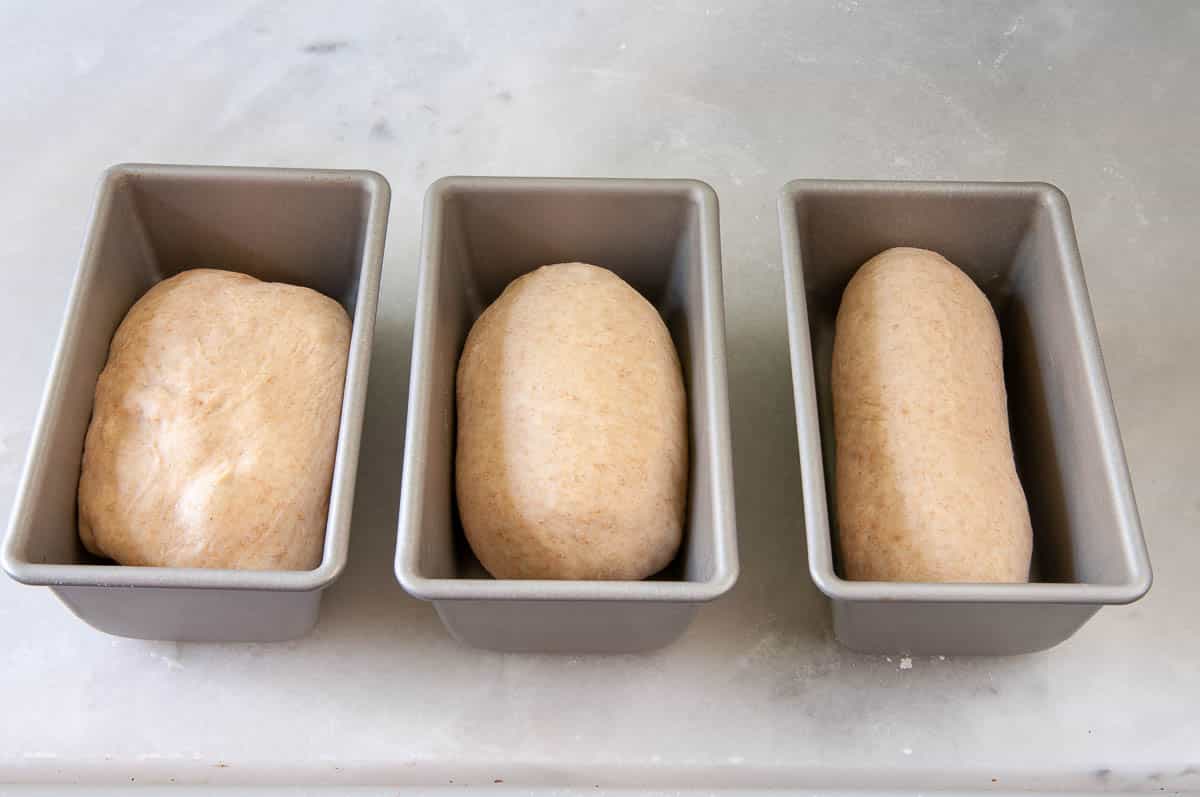
Left: unshaped; Center: lightly shaped; Right: properly shaped
1. Better Texture:
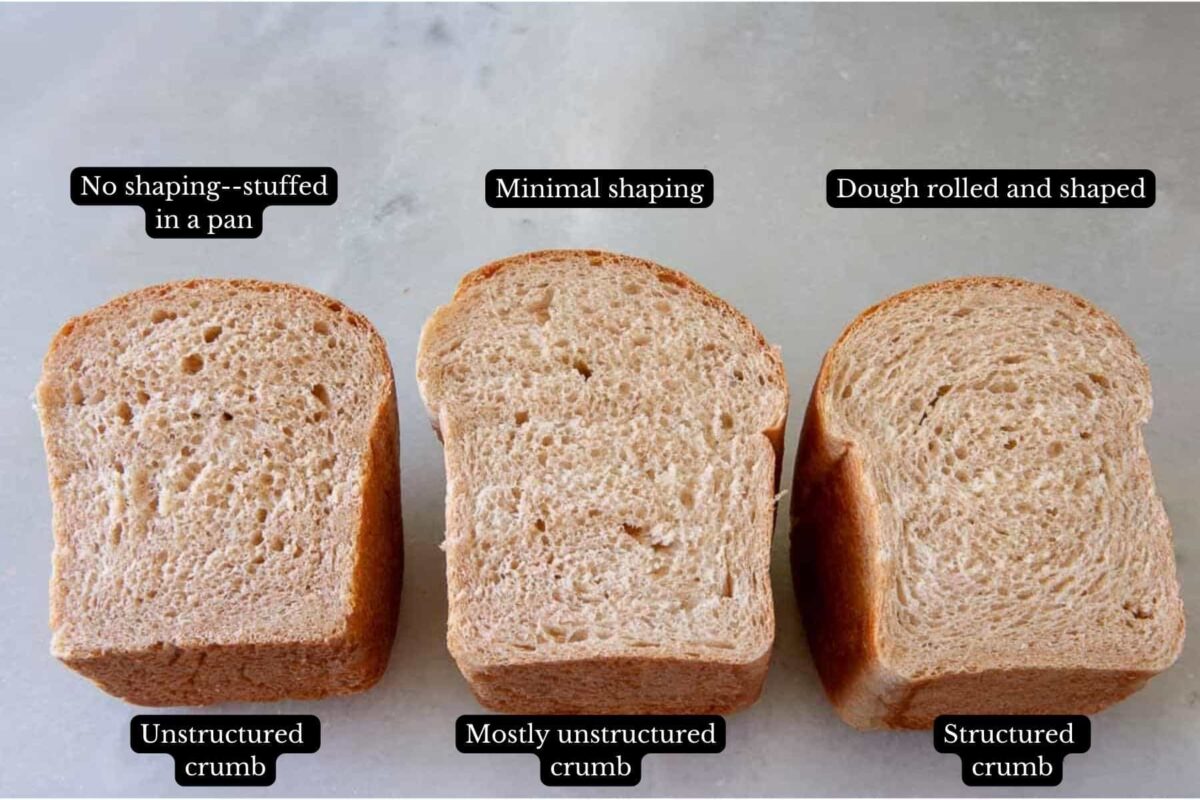
- Compresses gas bubbles for a cohesive crumb.
- Aligns gluten for better structure.
- Reduces large holes or tunnels.
Improved Crust:
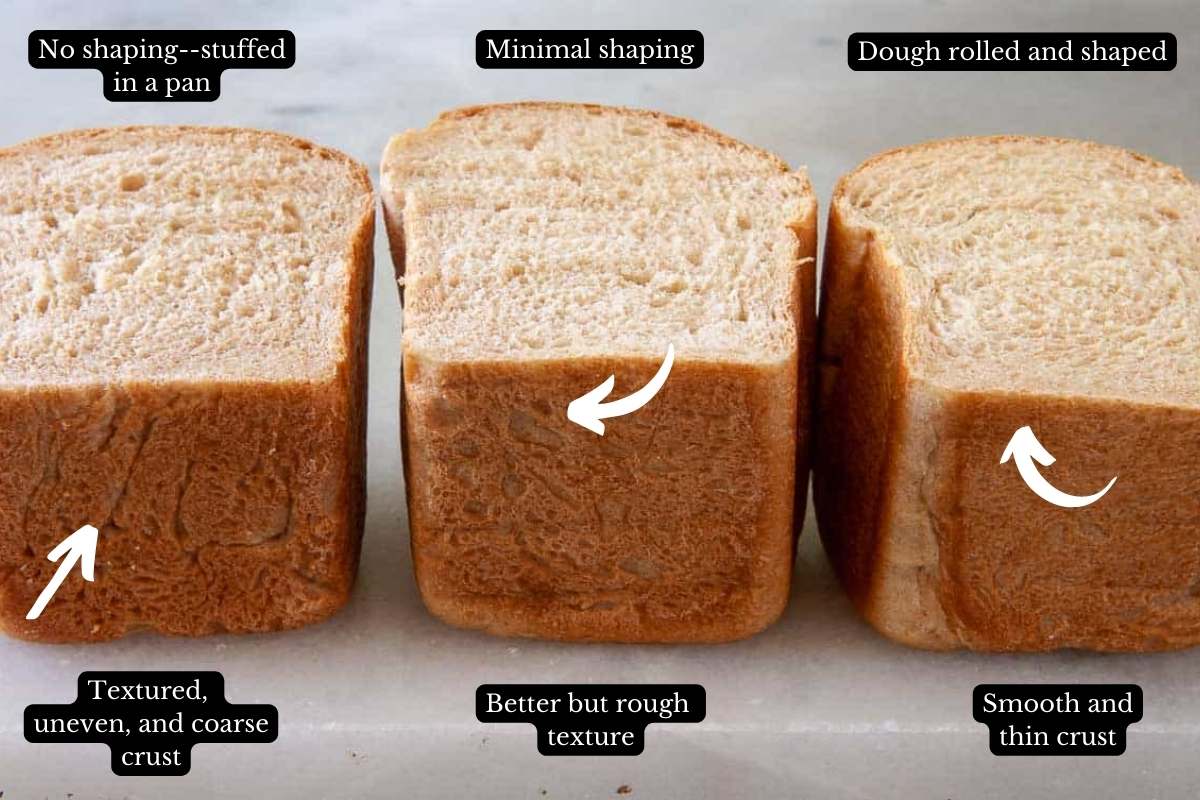
- Creates a thin, smooth crust.
- Enhances appearance and makes slicing easier.
- A smoother crust makes it easier to remove the bread from the pan.
Enhanced Oven Spring:
- Surface tension aids rise during baking.
- Prevents dense or misshapen loaves.
When to Shape Dough
- After the DOUGH Cycle (Preferred):
- Let the machine complete the DOUGH cycle.
- Remove dough, shape, and bake in a loaf pan.
- Tip: Use the “poke test” to avoid under or overproofing.
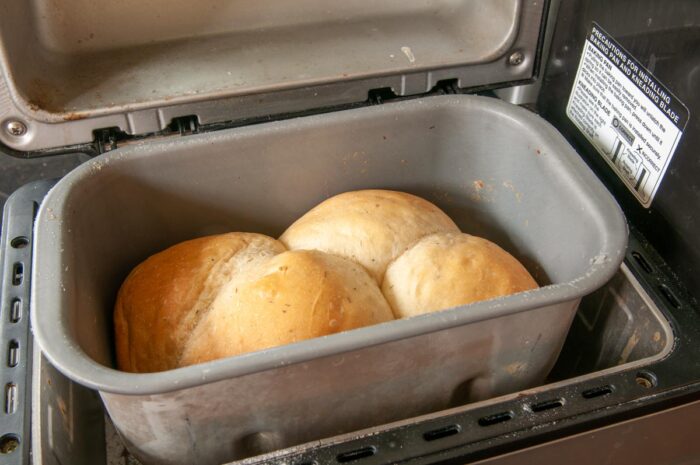
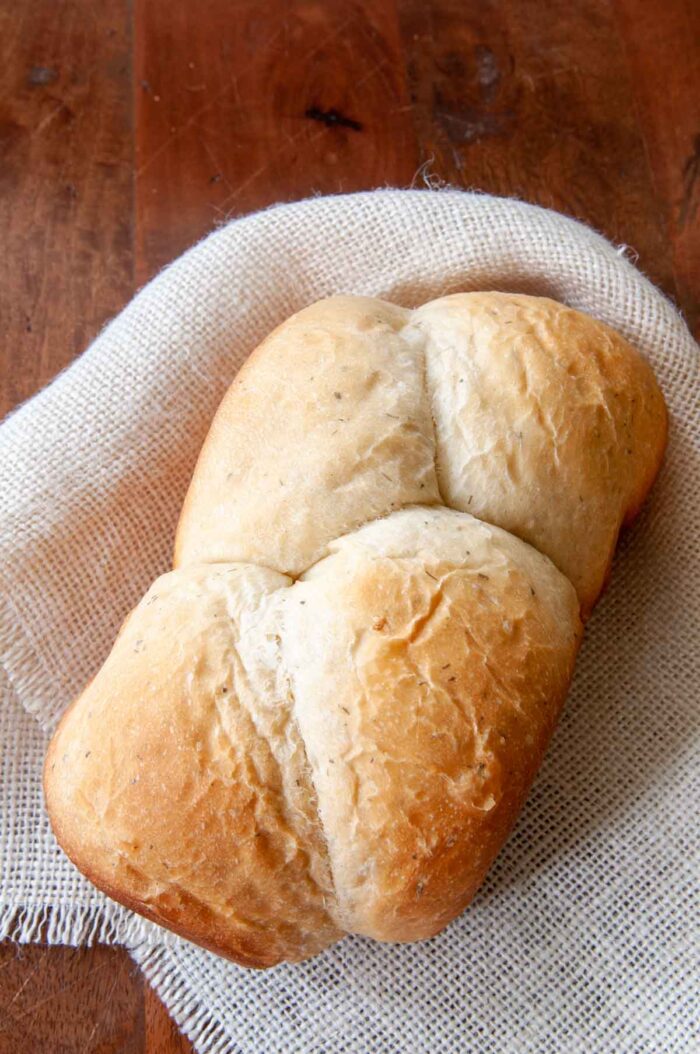
- Before the Final Proof (If Baking in the Bread Machine):
- Remove the dough, shape it, and return it to the machine for proofing and baking.
- Tip: Pull out the paddles to avoid large holes.
You can see an example here of bread dough pulled out of the machine, shaped, and replaced back into the machine to bake.
?Kitchen Tips for Shaping Dough
- Use a bench knife (paid link) to handle sticky dough without overworking it.
- Work on a silicone mat(paid link) for easy clean-up.
- Let the dough relax if it’s too elastic. Cover with a towel and wait 15-30 minutes.
- Choose the right-sized loaf pan. The dough should fill the pan no more than halfway before it rises.
- Use a rolling pin to compress rogue bubbles around the edges.
- Choose quality pans for beautiful browning. USA baking sheets(paid link) and loaf pans(paid link) They don’t usually need any greasing–the bread will fall out on its own.

How To Shape Dough for a Loaf Pan
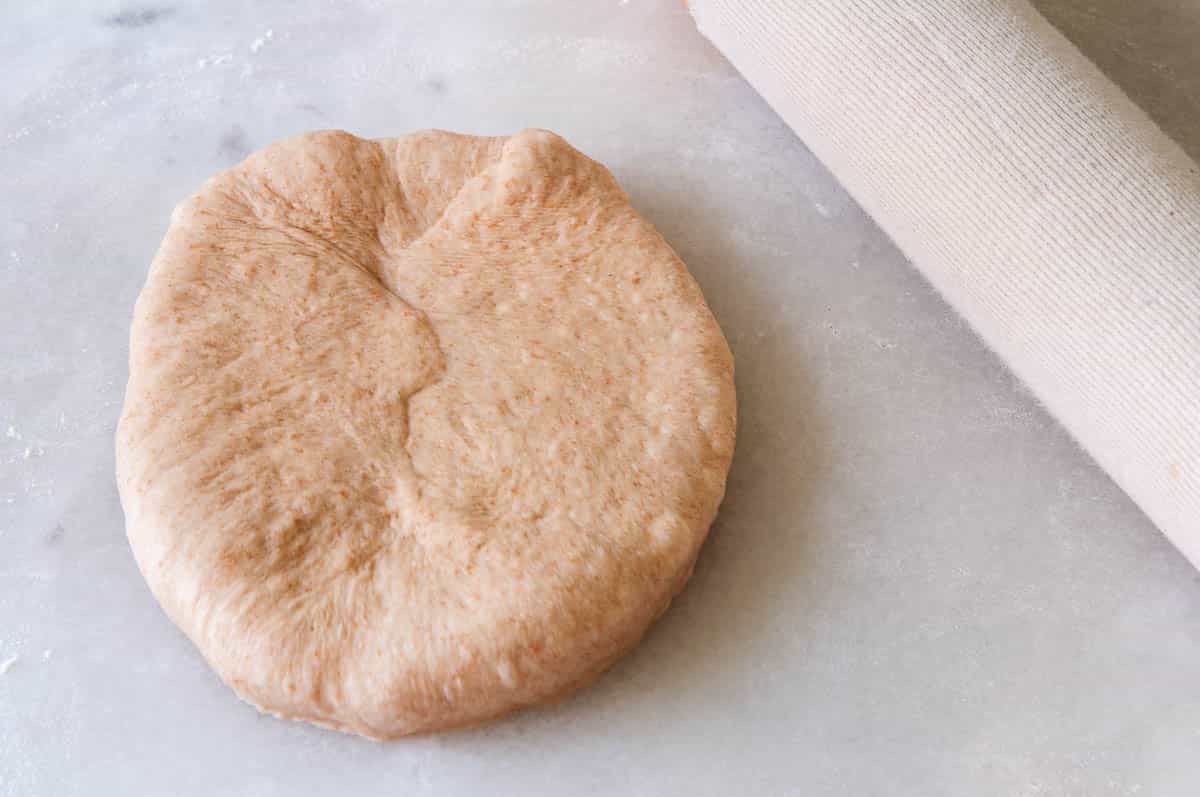
Knead 4-5 times to deflate gas bubbles.
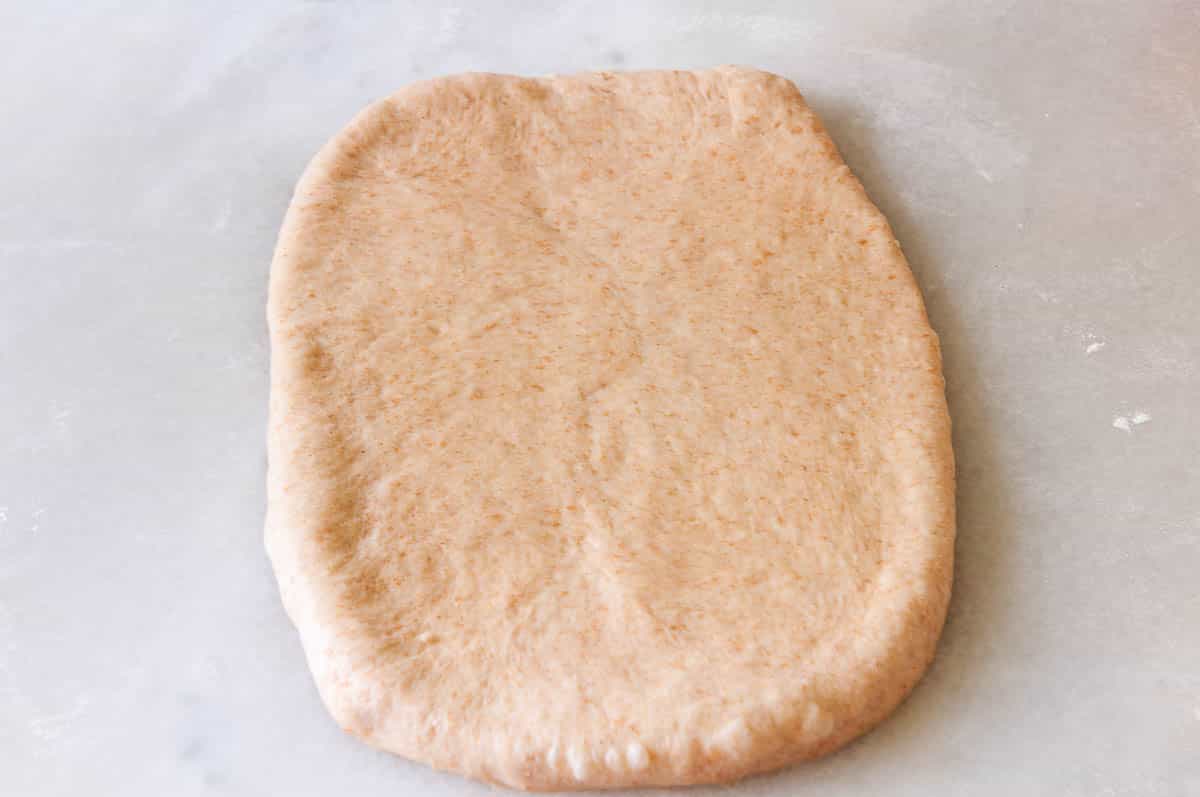
Use a rolling pin to form a rectangle.
Press out rogue bubbles, especially at the edges.
If the dough is bouncy and rebellious, walk away like you would with a toddler having a temper tantrum. Give it time to calm down, relax, and find a more compliant mindset. 15-30 minutes should do it.
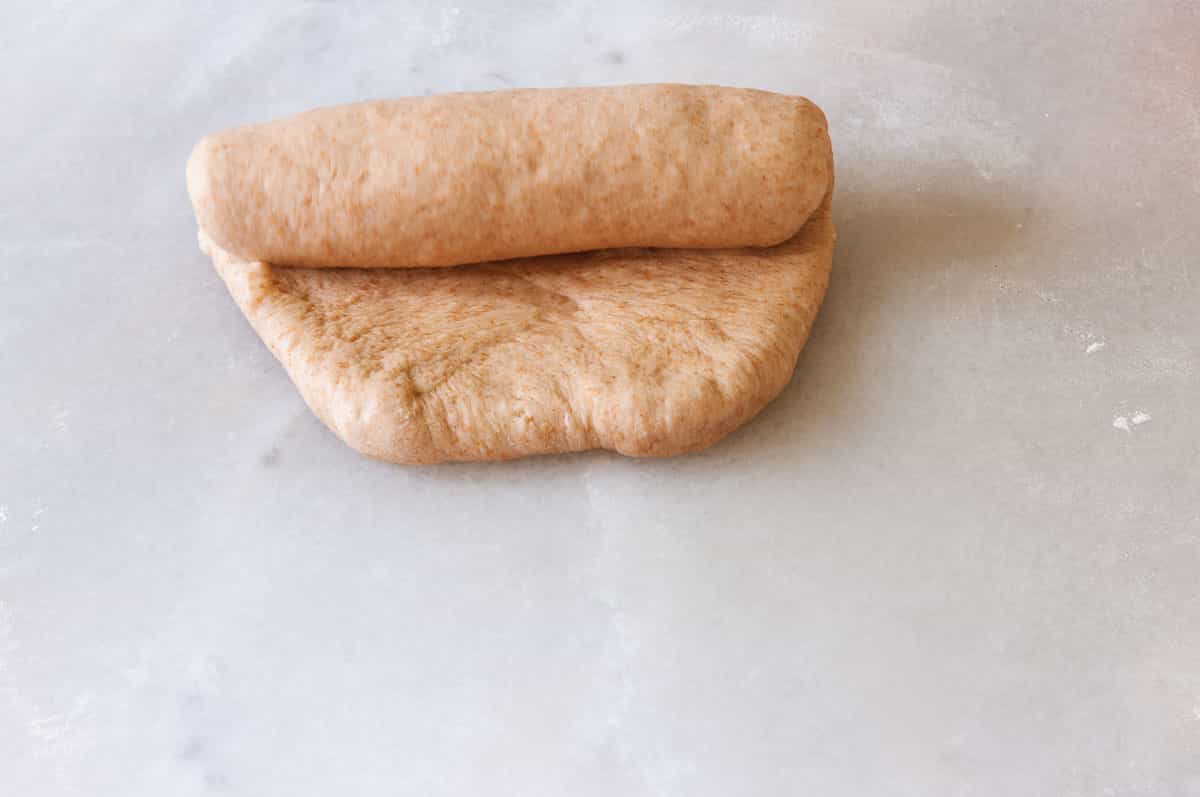
Roll dough into a cylinder approximately one inch wider than the width of your bread pan.

Sealing the dough securely provides the all-important surface tension you need for a good oven spring and a beautiful loaf.
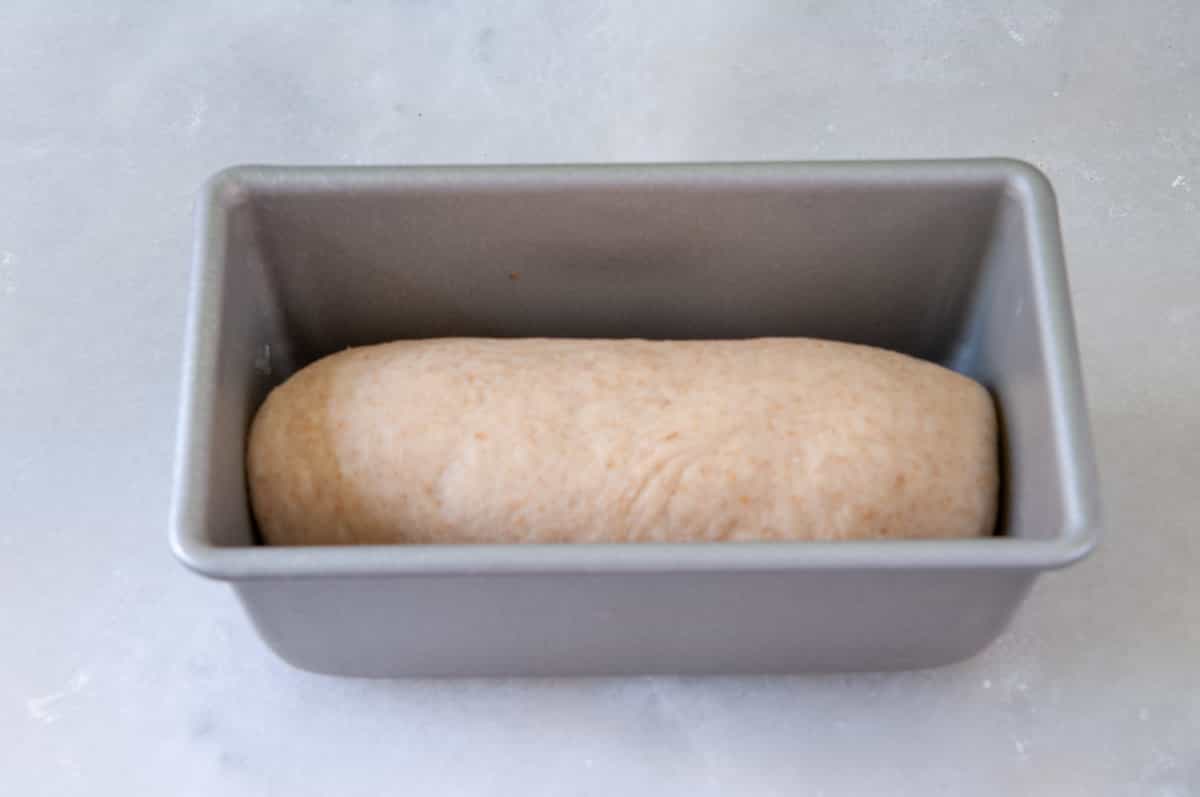
Place dough seam-side down in the loaf pan.
Press gently with a flat palm for a uniform shape.
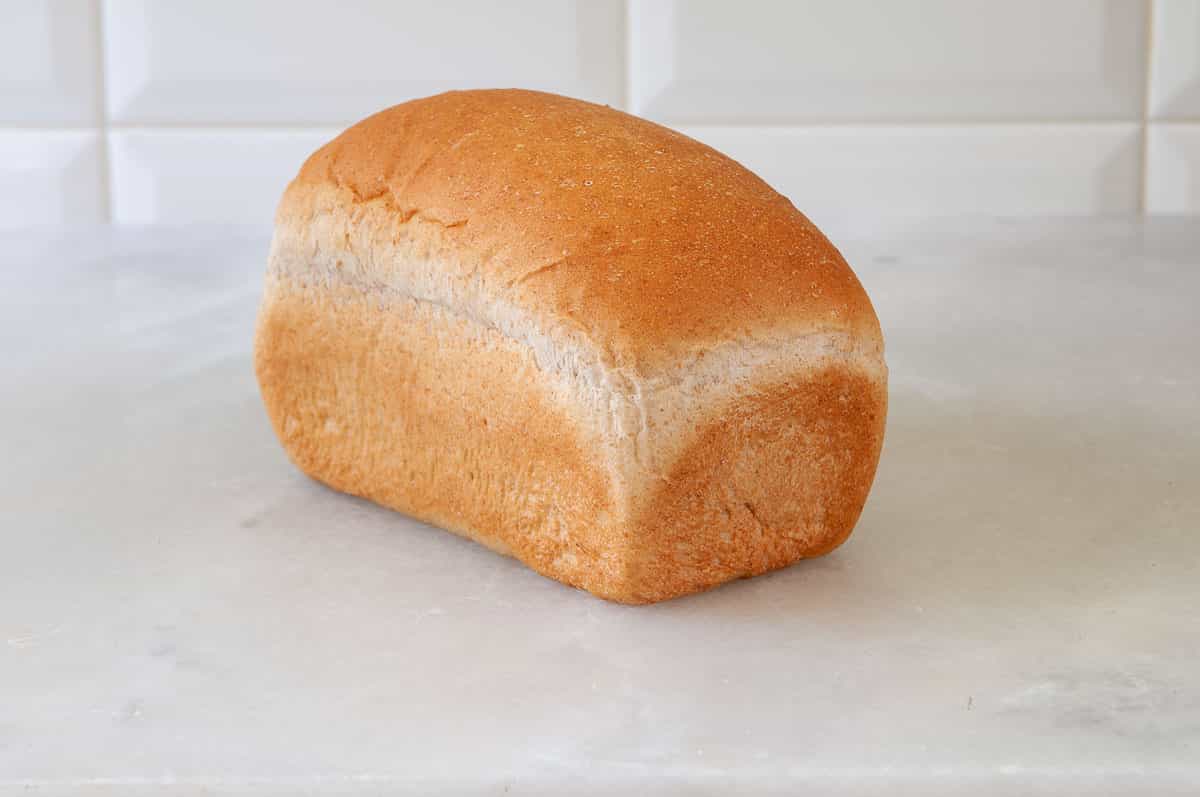
Bake the dough in a preheated oven according to the recipe directions when it peeks over the top. A small amount of wrinkling is normal.
Parting Words: Patience during shaping pays off. Properly shaped dough creates bread with a uniform texture, better taste, and an attractive crust.This is how you make bread that you’ll be excited to share with your family and friends.
Questions? Email me: Paula at saladinajar.com. Hope to see you again soon!

I have made your cinnamon raisin bread with a twist and feel like it is better than any I have ever bought in a bakery! as they say, it’s to die for! I am wondering if I can substitute honey in place of the sugar? if so by what proportion? thank you so much for all of the information that you share to help us bakers make the best bread ever!
Hi Polly,
Two things to remember:
1. Because honey adds moisture, you will probably need to reduce the total liquid in your recipe by 1½ to 2 tablespoons for every ½ cup of honey used. I alway recommend you check your dough at the 15-18 minute mark in the kneading phase of your bread machine to make any corrections needed.
2. Honey causes bread to brown faster. If you’re baking in the oven, you may need to tent the loaf with foil near the end to prevent over-browning.
Hope that helps.
Thank you for your site. Later in life, I find that baking at home soothes me, and I love getting tips like yours. Bakers tend to tell each other their techniques differently than car restorers and psychotherapists do (I’m both).
After rereading your tips on scoring bread I did it perfectly the first time – which means I won’t reproduce that accomplishment for a while – but I am grateful! Thank you!
Hi Michael,
Thank you for your kind note! I’m thrilled the scoring tips helped and that you’re enjoying the soothing art of baking. It’s always rewarding to hear how baking connects us in unique ways.
Wishing you continued success and joy in your baking adventures!
Making bread today (dough cycle)
I checked the consistency n it was forming a ball n slightly tacky n looking good… I checked on it on the second rise n it was quite sticky n when I pulled it out it was sticking to my fingers… like it felt quite wet.
Humidity or??
Soo kneaded in more flour before putting it into the pan…
This is the second time it’s done that….
It’s 1/2 whole wheat 1/2 white flour
Hi Cheryl,
Great to hear from you. Yes, it could have been humidity. It also could be the flour. Different brands vary. I don’t know if you were using my recipe, but it could have been a mistake in the recipe. Did the recipe include eggs? Maybe they were a tiny bit bigger than the ones used by the author of the recipe. Did you weigh your ingredients precisely as written in the recipe?
Nevertheless, it’s fixable if you check the dough about 5-10 minutes before the kneading phase ends (so that you won’t have to knead the flour in with your hands—although that works, too.) You want the dough to be tacky but not terribly sticky (although that is the norm and expected with Ciabatta, Brioche, and a lot of rye recipes).
You can read more details in this post: A Surprising Secret for Making Better Bread with a Bread Machine
Hope this helps. Did you sign up for the free Bread Machine Course?
Write back anytime.
Hi Paula. Thank you for doing all the hard work so we can bake good bread using our bread machines. I’m still in learning mode with your process. I’ve made several 1.5 pound loaves, and although delicious, I find the slices too big – a sandwich is just too filling. I could reduce the recipe quantities to make a smaller loaf, or use a longer baking pan such as 12”x4.5”, or use the 2 pound recipe and split it into two 8.5”x4” pans. Which would you suggest?
Any of your ideas are fine if you are OK with loaves that look a little squat. (Can’t think of a better word.) Some bread machines don’t do well with a smaller recipe, but many are fine. You may have to experiment.
Sometimes, I like to use one 8.5 x 4.5 inch pan and make mini loaves with the rest of the dough. They are perfect for giving to my neighbors who live by themselves and are overwhelmed with a whole loaf of bread.
Hi Paula,
I’m a 66 yr. old bachelor and retired in September, anyway been using my bread machine for bread for about 2 years now off and on, including baking. 2 friends said so much better baked in oven, so why not try! Yesterday did a loaf of 100% WW with some flax seed for dough and removed and shaped. Mine was like #2 and #3, I rolled out rectangle and folded it to size, tastes good and looks good for first time. Next loaf will be rolled to size instead of folding and less flour on surface, thank you, #3 coming up next, will let you know! PS I used the WW cycle instead of dough cycle because dough cycle is only 1.5 hrs. and thought needed more time with 100% WW and flax, the time was 2:05 until final rise and bake and I removed it from machine and so on! I’m gonna prove you can teach old dogs new tricks! Thank You Paula 🙂
Thanks for writing, Ray. Glad to hear you’ve learned a new trick with your bread machine. I predict there will be more wonderful bread in your future life.
Hi Paula, my dough has completed the dough course and I am supposed to shape them into buns for final rise, then bake.
But, I have an emergency and cannot do the shaping, final rise and baking in oven.
Question: Is it ok to put the dough in a plastic bag and put it in a fridge until I return to work on it?
Once I remove from the fridge, let stand until it goes back to room temperature, then shape, final rise, and bake?
Thank you. Always appreciate your valuable tips and recipes.
Yes, Miles. You can do this. You don’t have to wait for the dough to return to room temp before shaping. Shaping will help warm it up faster. Of course, if it’s too hard, you might have to wait until it softens and becomes pliable.
We’ll hello Paula from here in australia. Your emails are wonderful and so informative. I’ve only really just started experimenting with different breads and your advice is fabulous
I thank you for making it seem that little bit easier. Cheers Christine
Thank you for your kind comment, Christine. I’m so happy you find the emails informative. That is my goal. Have a great week.
Thank you, very informative, my granddaughter is getting into bread making, so I will share your knowledge and this info.
Thank you so much for sharing, Dora. I can tell that your granddaughter is a lucky gal to have you in her life.
Greeting from Austin,
Thank you for this article. I’m always afraid of messing with the dough too much after removing it from the machine. Not any more. As I read the article my mind went to the old term, “punching it down” and then there it was. Most recipes tell you to roll or press the dough out to a certain size. Always seemed to big for me. Your method makes total sense. Again, thanks for this article and all your great recipes. The honey wheat is our go to every week for sandwich bread.
good morning, Paula! yours was the first email i opened this morning…and can i just say WOW?! i really am blown away by the all encompassing information and well done visuals you packed into this article! your midwestern can-do approach to all your topics is such an inspiration for me, Paula…thank you so much!
Hi Kathleen,
Thank you for the wonderful encouragement. I hope this helps you in your bread baking adventures.
Good morning. It was so nice to read your new post this morning. Never used a rolling pin, just patted out the dough with my hands. Can’t wait to make a batch for Sunday dinner. Hope you have a wonderful week.
Connie,
So good to hear from you again. I haven’t always used a rolling pin, but the texture improved after I started doing it. Hope my trick works for you.
This is so helpful to me. I have just started baking bread within the last year. I very much appreciate this. Thanks!
Hi Lori,
Thank you. I was specifically thinking about people like you who haven’t been baking bread very long. In the future, if you have ideas for a topic I should write about, don’t hesitate to write.
Hi Paula
You’ve turned me into a bread junkie! I love your website and all the effort you’ve put into the recipes. I swear I saw at one time something about Pullman pans but I cannot find again.
I’d like to try using one but not sure what I should buy and if I do what should I look for quality wise. Then once I get it/them what fun things can I do?
I tried your condensed milk bread this last weekend, and it is fabulous.
Thank you!
Teri
Hi Teri,
Yes, I’ve written about Pullman pans on several of my posts, especially my Cinnamon-Raisin Loaf. I recommend the USA pans, which you can buy from my Amazon store if you like. I have the 9x4x4-inch pan. It’s perfect for a 1½ lb recipe (around 3 cups of flour). IF you need to make a bigger loaf, buy the 13x4x4 pan.The USA pans are truly the best in my experience and worth the extra money. They make a beautiful crust, and you might have noticed I’m a fanatic about getting a perfect crust.