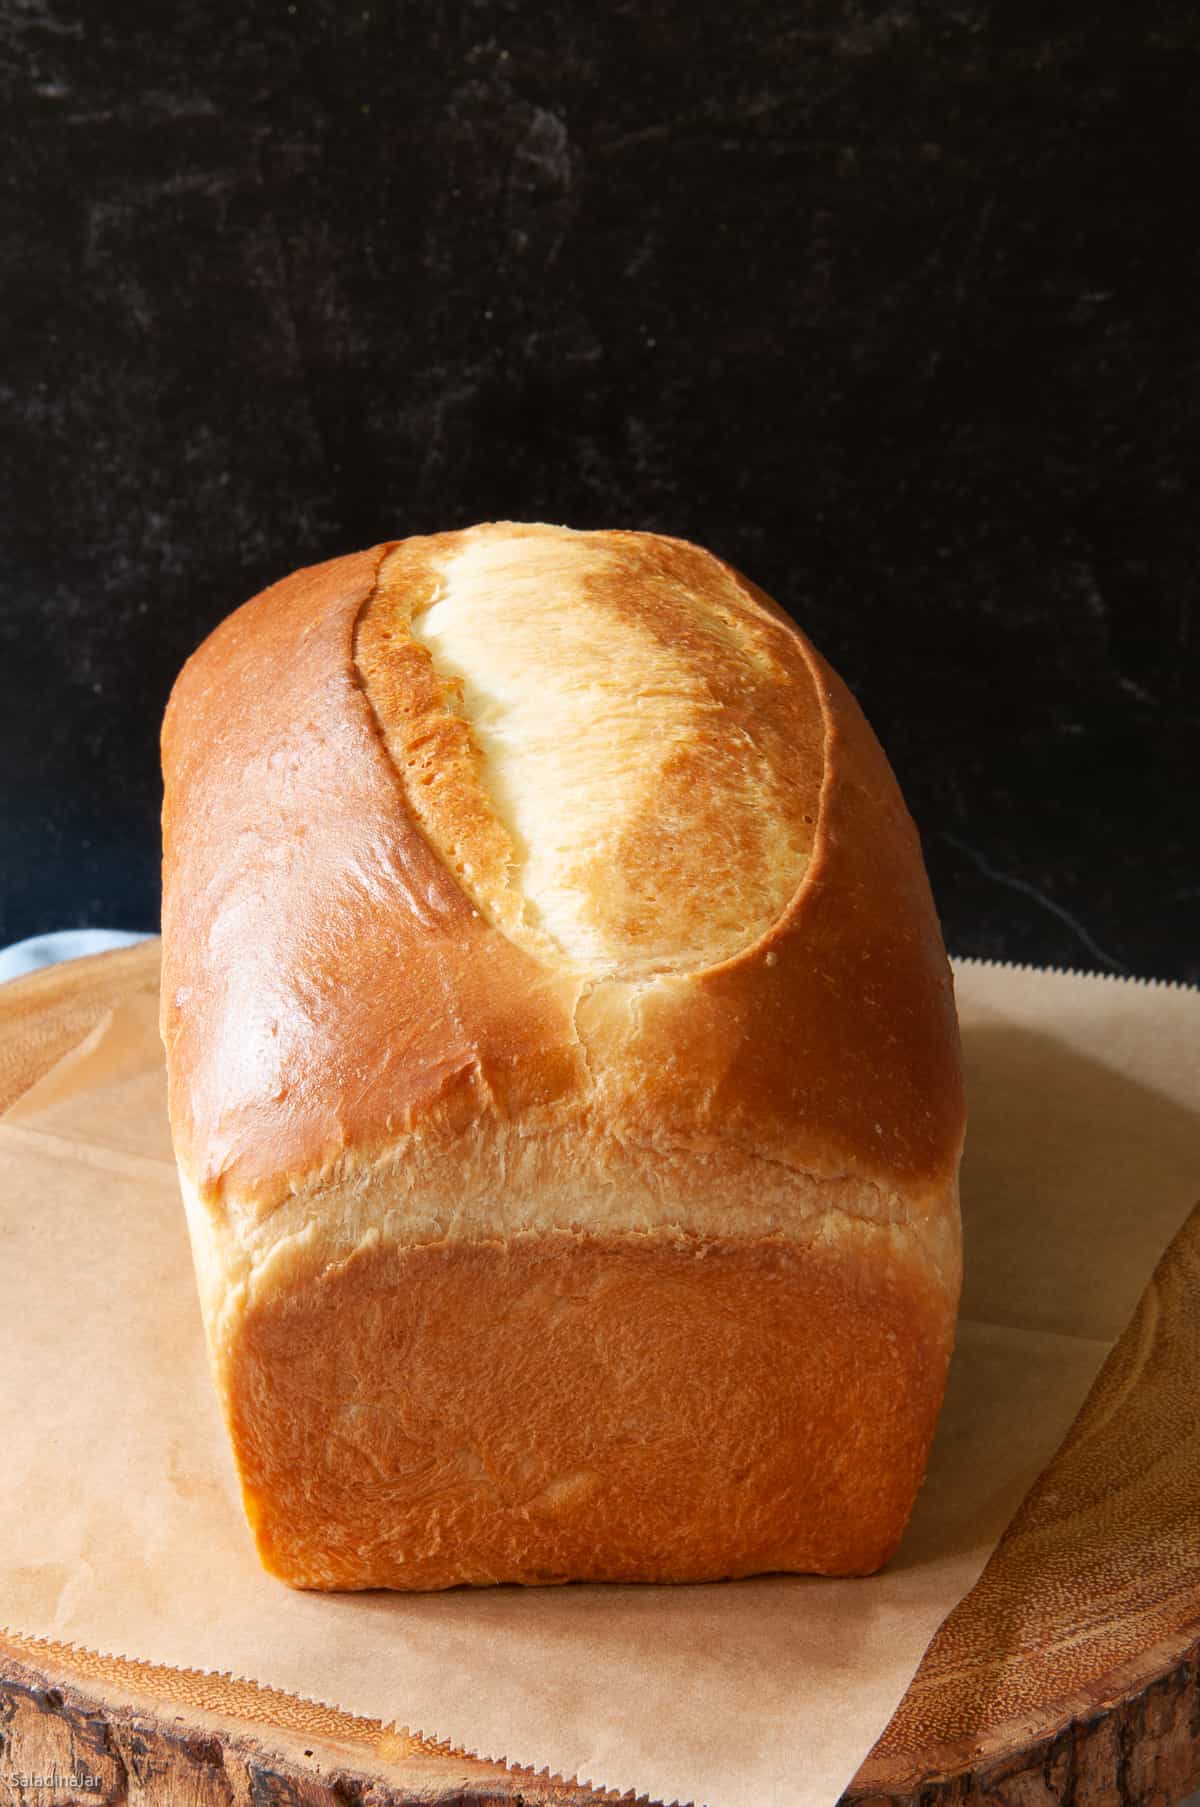
Blue-Ribbon Buttermilk Bread (Bread Machine + Oven-Baked)
Sneak Preview: This Buttermilk Bread Machine recipe yields a soft white sandwich loaf. Let your bread machine knead the dough, then shape and bake it in your oven for a blue-ribbon result.
This post contains affiliate links. As an Amazon Associate, I earn from qualifying purchases at no extra cost to you.
Have you tried the basic white-bread recipe in your bread machine manual? I have a better idea if you weren’t in love with it. Try this buttermilk white-bread loaf and rest assured your efforts will reap mouth-watering rewards.
My two grandsons pronounced it the “best bread you’ve ever made.” Serving it alongside a big jar of Nutella didn’t hurt.
No worries if you don’t have a bread machine or bread maker. See the recipe notes for making this recipe by hand or with a stand mixer.
How I Use a Bread Machine for Better Bread
I use my bread machine (my favorite) to mix and knead the dough using the DOUGH cycle, then shape the loaf and bake it in a conventional oven. This approach gives me better rise, structure, and crust — results I’m happy to share with family and friends.
If you prefer to bake bread entirely in your machine, you can—but results will vary depending on the recipe, humidity, and your bread machine model. My free Bread Machine Crash Course explains my approach in more detail.
Ingredients and Substitutions
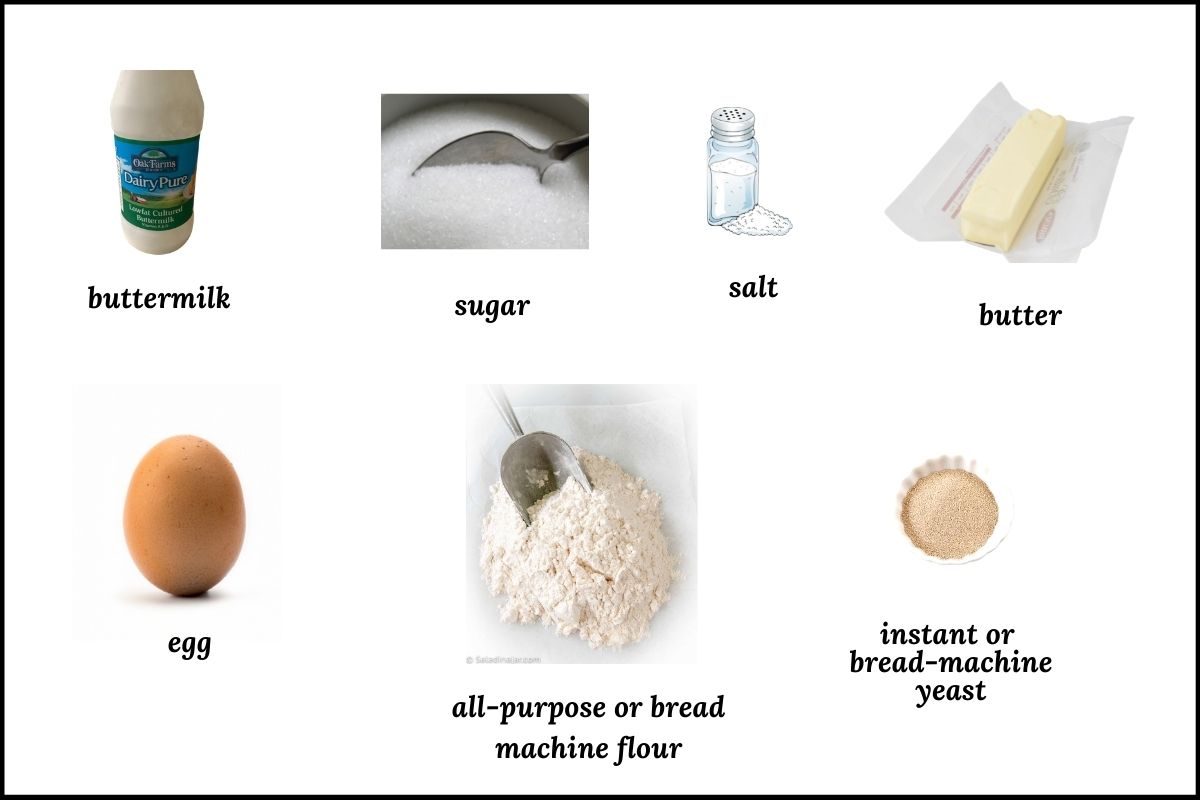
• BUTTERMILK: Tangy, tender, and moist results. Sub with powdered buttermilk, yogurt whey + 3 tbsp dry milk, or thinned yogurt or sour cream. No need to warm.
• SUGAR: Feeds yeast and adds mild sweetness. Reduce to 1 tbsp for a less sweet loaf. Sub with honey.
• SALT: Use table or sea salt. Increase by ¼ tsp if using Kosher salt.
• EGG: Tested with large eggs (≈50 g).
• BUTTER: Sub with vegetable oil or melted coconut oil. Chop cold butter finely to blend easily.
• FLOUR: All-purpose = softer bread. Bread flour = chewier, higher rise. Bread flour absorbs more liquid—add extra buttermilk if needed.
• YEAST: Use bread machine or instant yeast. Active dry also works—no need to proof, but the rise may be slower.
How To Make a Buttermilk Bread Machine Loaf
⬇️ Jump to the recipe below for exact amounts and detailed instructions.


Blue-Ribbon Buttermilk Bread (Bread Machine + Oven-Baked)
Video
Ingredients
- ⅞ cup (210 g) buttermilk
- 1 large (50 g) egg
- 2 tablespoons granulated sugar
- 1¼ teaspoon table or sea salt
- 1½ tablespoon (21 g) butter (finely chopped)
- 3 cups + 2 tablespoons (375 g) all-purpose flour
- 1½ teaspoon bread machine or instant yeast
Instructions
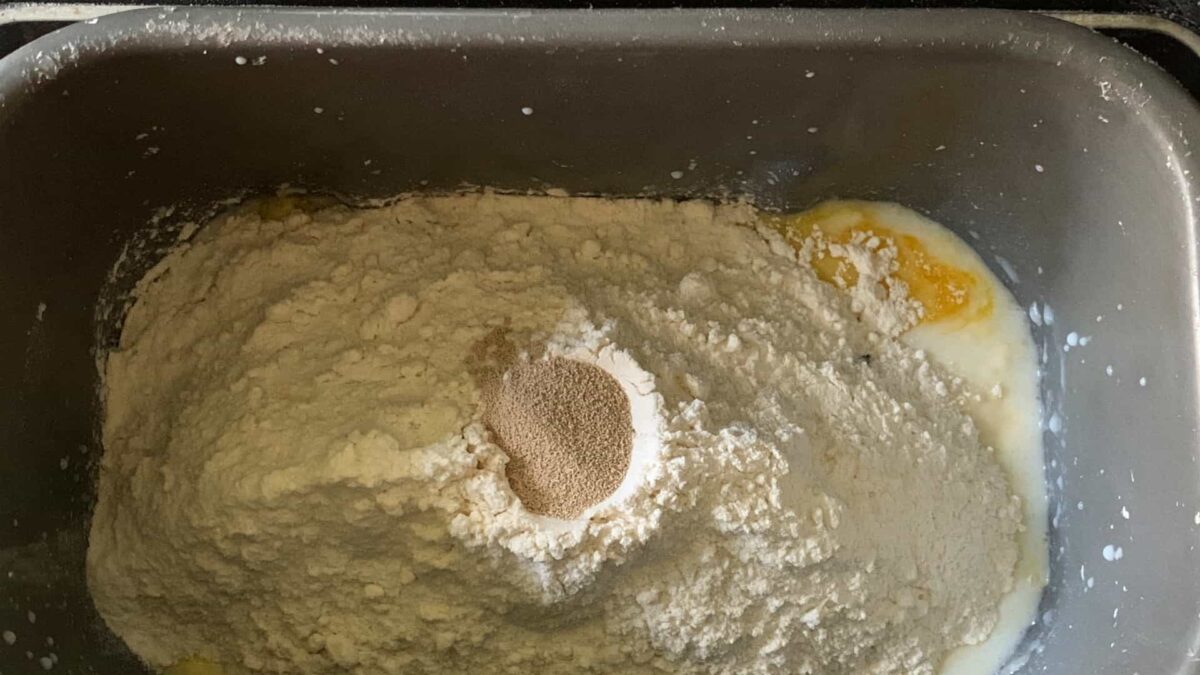
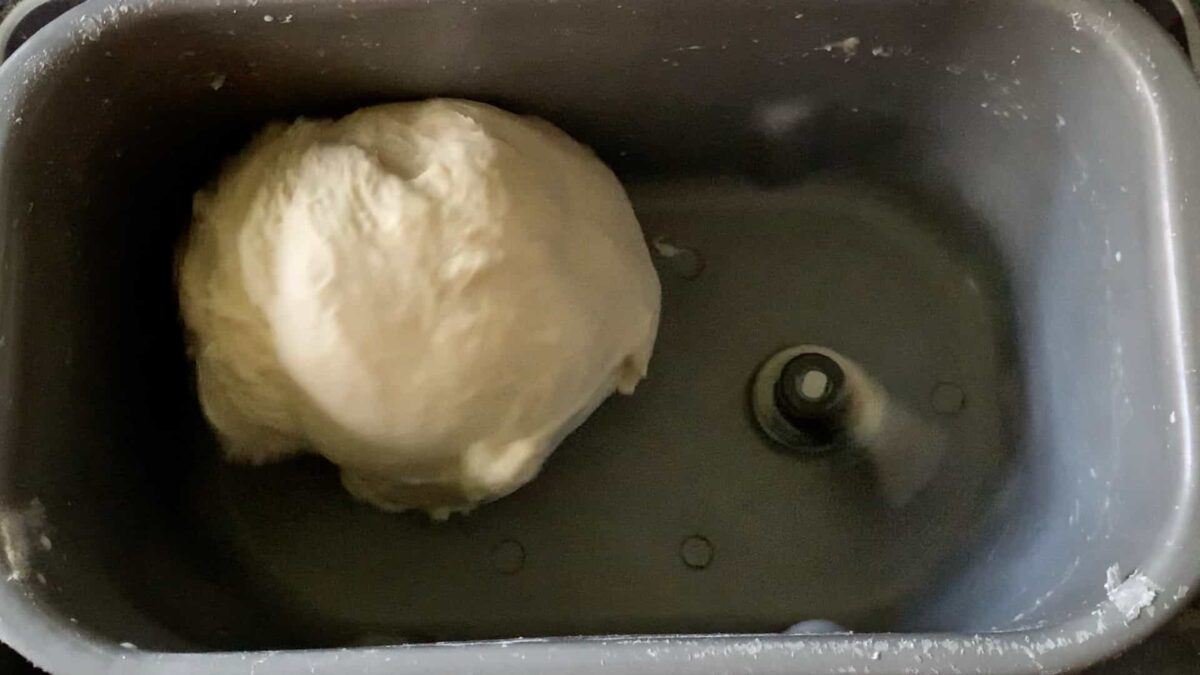
- Load Ingredients into the Bread Machine: ⅞ cup (210 g) buttermilk, 1 large (50 g) egg, 2 tablespoons granulated sugar, 1¼ teaspoon table or sea salt, 1½ tablespoon (21 g) butter (finely chopped), 3 cups + 2 tablespoons (375 g) all-purpose flour, 1½ teaspoon bread machine or instant yeast into bread machine pan in the order listed above.Select the DOUGH cycle and press START.
- Dough Check: Lift the lid to peek at the dough at least twice during the mixing and kneading phase. The first time, look immediately after the machine starts mixing to ensure the paddles are engaged correctly. Look again 15 minutes into the DOUGH cycle to assess the consistency of the dough. For most recipes, the dough should stick to the side, then pull away cleanly.If your dough is too wet, add flour one tablespoon at a time.Conversely, if the dough is too dry, add one tablespoon of liquid at a time until the dough looks just right. Read more about this surprising secret to success with a bread machine here.
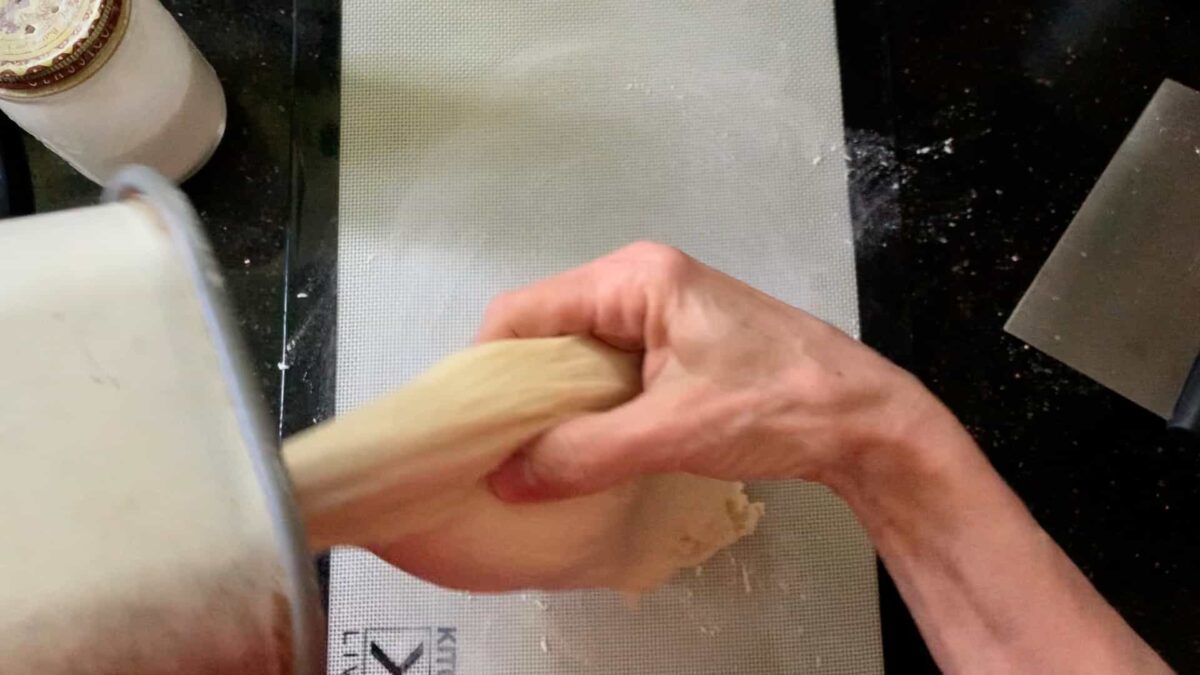
- First Rise: Once the DOUGH cycle is complete, turn the dough onto a lightly floured surface.
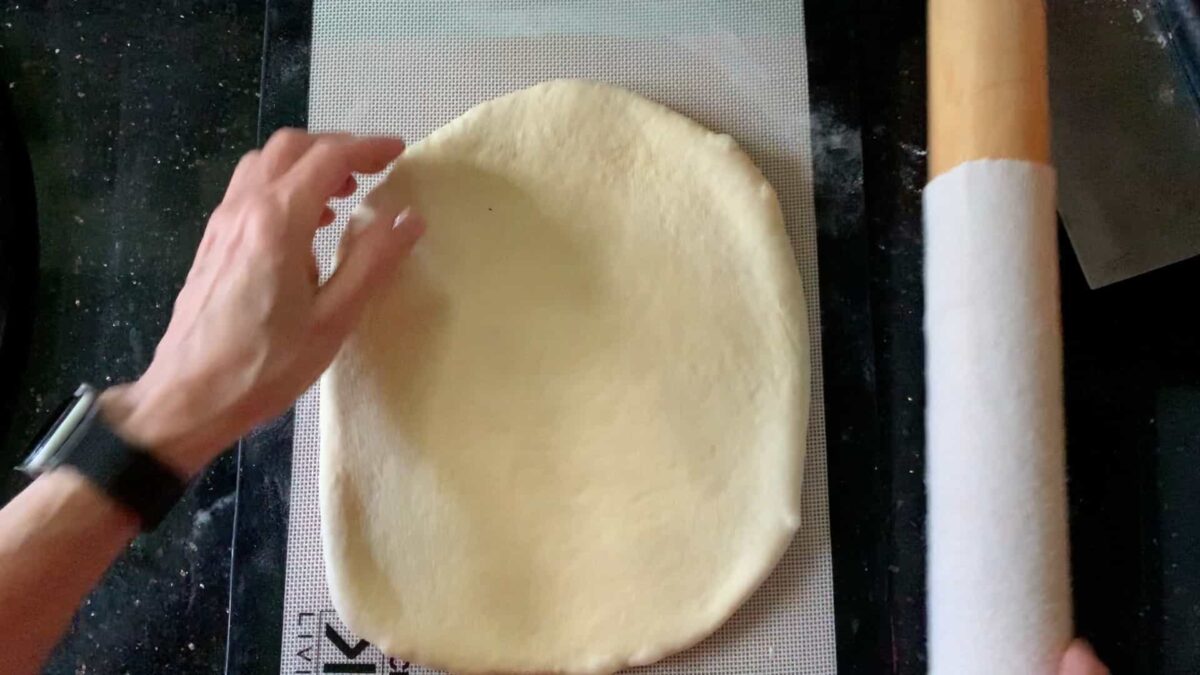
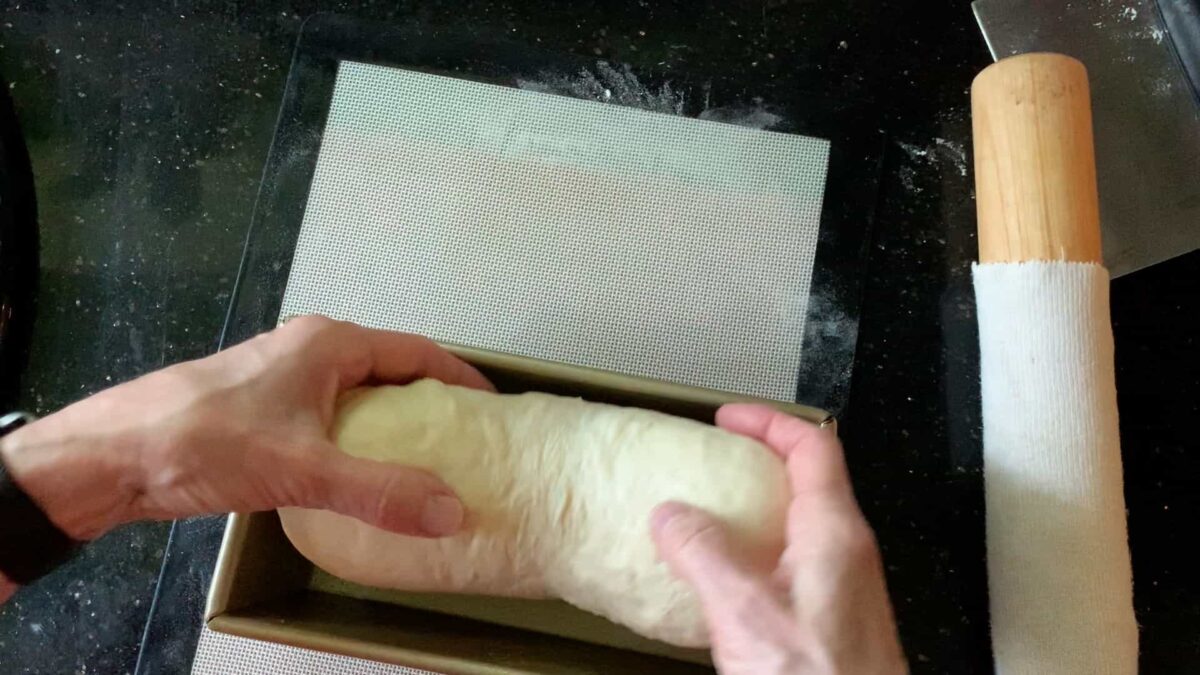
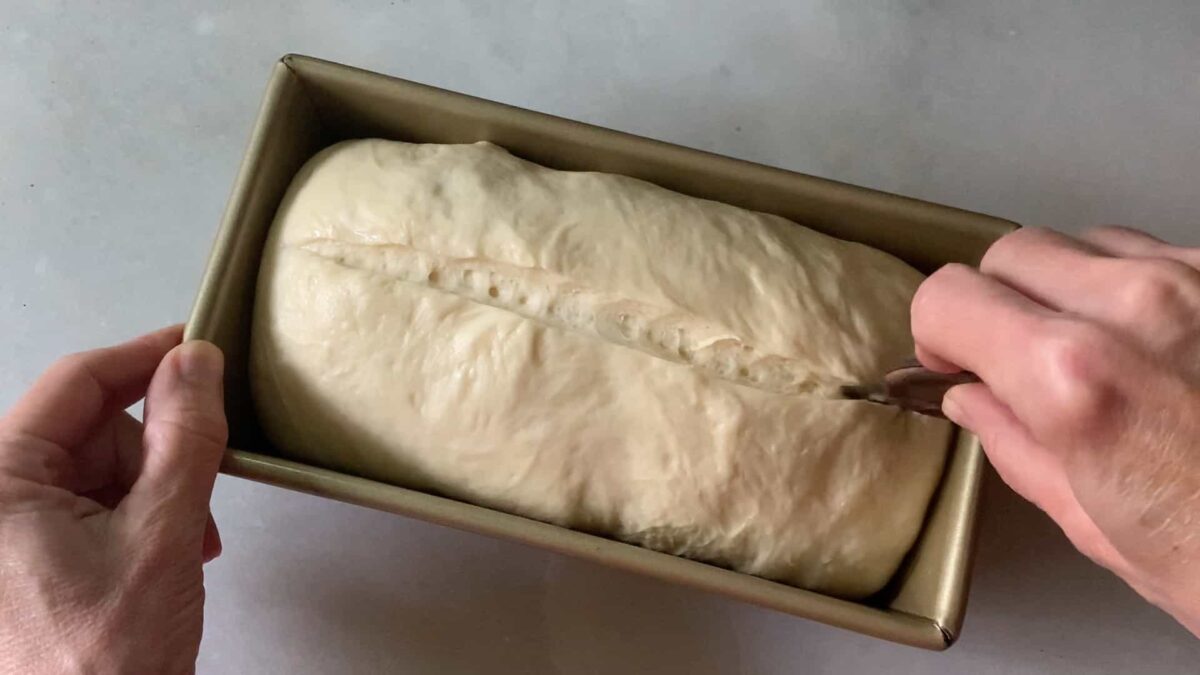
- Shaping: Shape dough with your hands or a rolling pin into a rectangle roughly 14 x 10 inches. If dough is too elastic to shape, cover with a tea towel and let it rest for 10 minutes before trying again.Be sure there are no large visible bubbles, especially on the sides of the rectangle. Press them out or pinch them with your fingers to avoid tunnels in your bread. Also, brush off any excess flour as you go.Starting from the short side nearest you, roll the dough into a cylinder. Try not to stretch the dough, but neither should it be too loose. Pinch the seam shut and pull up the ends toward the seam and pinch them closed.Turn the cylinder of dough over to reveal the smooth top. Place it into a lightly greased 8½ x 4½-inch loaf pan or a 9 x 4 x 4-inch Pullman pan. Gently smoosh the dough with your palms to make it level throughout the pan.
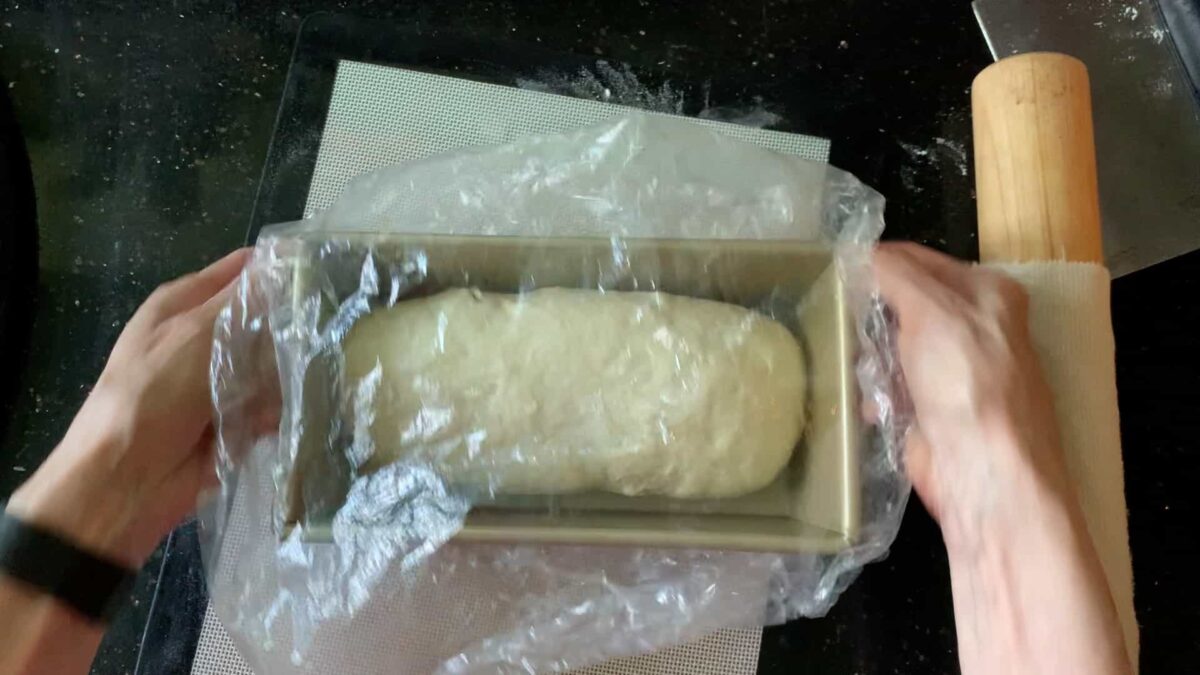
- Second Rise: Cover with a cheap shower cap or a tea towel. Let rise until peeking over the edge of the pan.
- Preheat: About 15 minutes before you think your bread will be ready to bake, preheat your oven to 350 °F (180˚C).
- Bake: Brush the top of the loaf with melted butter. Make one slash down the middle with a sharp knife or a razor blade. Pop into the oven for 30-40 minutes or until the internal temperature is 200 °F (93˚C).
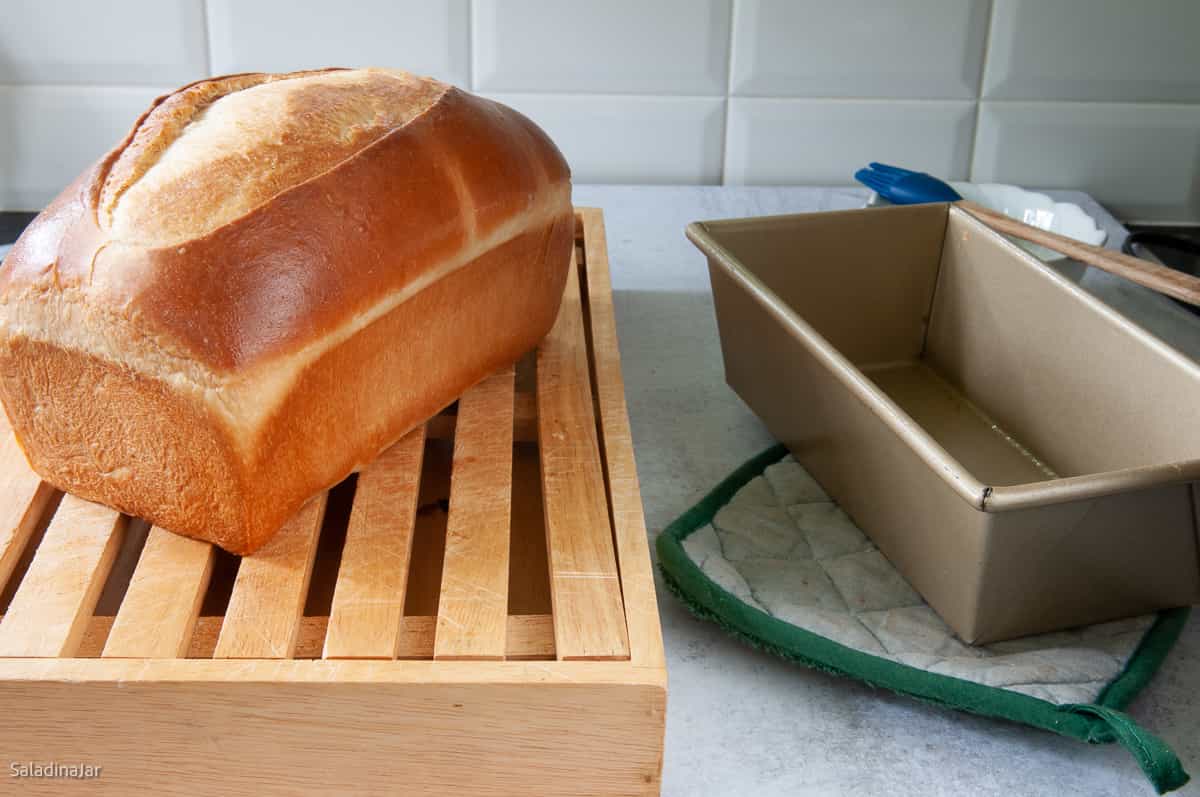
- Cool: Let bread cool for 5 minutes. Remove the loaf from the pan and cool on a wire rack. To avoid squashing the loaf, let it cool at least 30 minutes before cutting.
Notes
- Unbaked dough: Freeze after the DOUGH cycle or after shaping (before final rise). Defrost in the fridge overnight.
- Baked loaf: Double-wrap and freeze up to one month. Reheat gently. Frost after thawing.
- Stand Mixer: Mix until moistened, then knead with a dough hook (speed 2–3) until smooth and elastic (5–10 minutes). Let rise, deflate, and shape as directed.
- By Hand: Mix to a shaggy dough, knead on a floured surface until smooth and elastic (10–20 minutes). Let rise, deflate, and shape as directed.
Active dry yeast may be substituted. Use about ¼ teaspoon more than instant yeast. Dissolving first is optional. Storage tips: Cool completely before storing. Keep unsliced in a plastic bag or bread box. For freezing, double-wrap and use within one month. Avoid refrigerating—bread molds faster in humid cold.
Equipment
Nutrition
All images and text ©️ Paula Rhodes for Salad in a Jar.com
What Readers Ask Me About This Recipe
What can I do with leftover buttermilk?
Portion the leftover buttermilk in a small plastic bag and freeze it. It may curdle when thawed, but it is OK to use in baked products like muffins or bread.
Final Thoughts
Once you try baking buttermilk bread in the oven after using the bread machine’s dough cycle, you may never go back! The texture and crust are vastly superior to “one-button” bread machine loaves. Give it a shot—your sandwiches will thank you.
— Paula, Home Economist
Homemade Food Worth Sharing
Need help troubleshooting?
Email me: Paula at saladinajar.com — photos help!

can this recipe be adapted to be made gluten free?
Hi Parrot,
I’m sorry, but I am not the expert on gluten-free bread or flour. I don’t think that bread machines make good gluten-free bread–just my opinion. If it’s possible, I haven’t figured it out yet.
Just popped it in the oven! Corned Beef & Cabbage tonight with this ought to be perfect. I hand painted some daisies on top of the loaf for fun. If you’d like to see the finished bread please visit me on instagram
annie_kight_art 🌼
Hi Annie,
Oh, I can’t wait to see the picture. Hope your bread turns out great!
Hi Paula , can I use butter milk made from lemon and milk for this recipe ?
Thanks.
Hi Julie,
I don’t think it will have quite the same flavor, but it should work just fine.
I made the dough into cinnamon rolls, and they worked out wonderfully! I absolutely love this bread 🙂
Hi Arwen,
Good idea to try cinnamon rolls with this dough. I like the way you think!
I make this bread all the time. Lately, I’ve been unable to source liquid buttermilk at my usual stores. I’m not a home yogurt maker- maybe some day I’ll give it a try. I was a little leery of using powdered buttermilk. I checked around on the web and with baking friends. All recommended it highly. I followed packaged directions and added the powder and water separately without mixing first. I decreased the water weight a bit (15-20 gms) from the original fluid buttermilk weight to allow for milk solids weight. Followed recipe as usual. It turned out even more delicious! Cost is actually less with most powdered buttermilks vs. fluid. Directions do tell you to refrigerate the can after opening.
Hi Laurie, That’s great to hear! Powdered buttermilk is a fantastic alternative, and it’s nice that it worked even better for you. Adjusting the water weight was a smart move to account for the milk solids. Thanks for sharing your experience—it’s a helpful tip for anyone struggling to find liquid buttermilk!
I do not usually comment on recipes, good or bad, but I felt it was necessary to comment on this one. I followed the excellent instructions exactly and turned out the most beautiful and tasty loaf of bread I have ever made! Going to try the honey whole wheat next.
Hi Debbie,
How kind of you to leave such a nice comment about the buttermilk loaf. I think you’ll like the honey whole wheat bread, too. Right back anytime you have questions or comments.
Another “Home Run”!!!!
Thank you Paula for another fabulous and most excellent recipe!!
🙂
So glad you like it! Your neighbors will appreciate it, too.
Hello,
The video for this bread is inside the recipe at the bottom of the post. There are other videos on the side but they are different. If you have an ad blocker on your browser, crazy things can happen. You might try again.
Thank you Paula for yet another absolutely wonderful bread recipe. I used greek yoghurt diluted with milk to a similar consistency of buttermilk. Followed all your other steps. The bread turned out absolutely divine. With this bread at home, I wouldn’t envy any Michelin star restaurant breads! Thank you, thank you, Thank You! – Ps, I tried my crazy idea of using Neapolitan pizza dough method for the ciabatta bread by slow-aging the biga 2 days in fridge like your recipe, followed by slow-aging the dough 2 days in the fridge, the ciabatta was a little firmer, personally I think it is not as good as your recipe – only aging the biga is the best. I couldn’t reply to that same thread of comments we had.. wish you a wonderful day! xx
Hi CJ,
The Greek yogurt trick as a substitute for buttermilk is a good one. Thank you for reporting back on your experiment. For me, the ciabatta recipe is way too much trouble compared to pizza dough when that’s all I need. Anyway, it’s fun to try these things and satisfy your curiosity. I love hearing about it.
Delighted with this recipe. It was easy to follow with excellent results. I have since made another batch double volume which was equally as good. Second batch I used wholemeal flour and olive oil. Delicious
Thank you for the 5-star review and the kind words about your experience with this recipe! Hopefully, this will encourage others to give this recipe a try.
My new favorite bread in the bread machine. I use a lot of your recipes. My question is can I use buttermilk in other recipes that call for milk or does it change the taste. I have sandwich dough in the machine now but I was afraid to use buttermilk. Thank you
I don’t typically leave reviews on recipes, but THIS ONE! The dough was a dream to work with, Paula’s instructions were easy to follow, and the bread turned out *perfectly*. Do yourself a favor and make this bread.
Thank you, Stacie. Your kind words are greatly appreciated. I love hearing success stories.
Hi Paula, I have a 4 1/2″x81/2″ baking pan that is glass. The other aluminum bakers are all 5″x9″. I put it in the oven in a 5×9 and am hoping for the best. Too late I realized I owned the right size. I read that if using a glass pan I will need to reduce the heat from 350 to 325. Is that correct is my 9×5 is a mistake?
Thanks
Hi Margaret.
Yes, when baking with glass, reduce the temperature by 25˚F. Bread in glass tends to overbake the crust, especially in the corners. Reducing the temperature helps.
Your bread should taste fine, even if it looks a little “squat.” It will take less time to bake, too. So test with your digital thermometer to avoid overbaking.
This is my favorite bread recipe. I make 2 loaves a month. Slice them and freeze them. I just divided the dough today to try out rolls for thanksgiving. It made 12 perfect rolls.
I made this bread recipe the other weekend. I had to use active dry yeast as I didn’t have instant yeast on hand. I heated the buttermilk just a little to help with activating the yeast. It turned out great (could have had just a tinier bit higher rise) and everyone loved it. I’ve purchased bread machine yeast and will try again this weekend, hoping to get a quicker and a better rise in the bread. I did bake it in the oven because I don’t like bread baked in bread machines. This will definitely be a go to bread recipe. Thanks for sharing it!
Hi Bev,
This is good news. Glad the recipe worked out for you. Instant yeast works faster and doesn’t need to be dissolved (so you won’t have to heat the buttermilk). Much simpler. Hurray for baking bread in the oven!
hi what is the buttermilk powder conversion if I’m not using the liquid?
Add 4 Tablespoons of powder to 1 cup of water. Then measure out 7/8 of a cup to use in the recipe. Save the extra in case you need it when checking the dough moisture while it kneads.
I would like to bake in the machine. Has anyone tried this? What size loaf would you recommend? TY
Hi Diane,
I have not baked this in my machine, but you can. Be sure you check the moisture level of the dough while it kneads. It’s no guarantee, but ensuring that the dough “sticks to the side, then pulls away cleanly” is very important. You can read more about it here. Good luck.
After several years of working on bread, mostly since March 13, 2020, this was the first 100% successful loaf! I have created my own sourdough starter, made bread all by hand, made loaves completely with the machine. Several loaves have been ok but most have turned into incredibly dense bricks. This time I used your recipe and tips for Buttermilk Bread and used the machine for the dough only. This is a perfect loaf! Thank you so much!
Shana,
Fantastic! I love this. Thank you so much for writing. You and others with the same kind of stories are the reason I do this website. ?
Paula, oh my gosh, I can’t thank you enough. New to the bread machine, the manual recipe wasn’t very good and found out the hard way that the conversion measures that were listed were incorrect but YOURs was perfect, I followed to the letter including taking it out to remove that paddle and placing it back in the machine to finish, thanks again. Will definitely try some more of yours??
This is my go-to sandwich bread. I made several loaves in a 9 inch baking pan but for sandwiches I prefer the13 inch pullman pan. I had to do some adjustments so I would have more dough.
Buttermilk 320 g
1 Lg egg
4 T sugar
2 t salt
2 1/2 T butter
4 1/2 C bread flour 544 g
2 t instant yeast
Thanks for giving us the larger recipe. You’re the best!!
Hi, thank you for sharing. I’ve come across your blog and I’d like to try this recipe. I was wondering if I could just leave the dough in the bread machine and finish the full bake cycle. I’m new to bread baking, so please forgive me for the silly question.
I have not tested or designed that recipe to bake in a bread machine, but you can try it. If you are a new baker, I recommend you try both ways and see which works best for you. Instead of choosing the DOUGH cycle, select the regular cycle if you want to bake in your bread machine.
Best Bread ever. I used the dough cycle on my bread machine, then baked in the oven. Also I made it using the weight measurements (thanks for that) and the bread turned out perfectly.
High-Five Donna! That’s fantastic. Thanks for coming back to leave a rating and comment. Much appreciated.
I’ve been making bread like this for years, but I’ve never seen any recipe that tells about the dough method so well. I had to figure it all out for my self. Thank you! I hope this helps others.
Hi Jean,
I’m so happy to hear from you. My goal is to help people make fabulous bread with a bread machine. As you know, that means using the DOUGH cycle. Your comment is encouraging!
I have a 13×4 pullman pan. How much would I need to increase this recipe to fit it??
Hi Donna,
I do not have one of these pans because my machine isn’t designed for a batch this large. 4½ cups of flour is about the limit for my machine to do a good job of kneading without overheating. But from what I can tell online, you should be able to bake a 2½-pound loaf which would be 5½-6 cups of flour in the 13 x 4 x 4 pan. I haven’t actually used this size pan, so you might want to double-check this. It also depends somewhat on the recipe, as some breads are high-risers while others are not.
Hi Donna,
A little research tells me that Pullman pan would hold a 2½-pound loaf which equals about 5½ to 6 cups of flour. So nearly double the original recipe. That is too much for most bread machines unless you have an extra large machine. Of course, you could always mix the dough with a stand mixer–no problem. Hope this helps.
Delicious and smells so so good! It’s my first successful loaf after 7 failures using other bread machine recipes. I especially like your shaping video – my loaf looked like a real loaf of bread with your method. Lol
Thank you so much
Yay for you, Donna!!! I admire your persistence. It paid off. Some people say looks don’t matter, but I disagree. Glad your loaf turned out to your satisfaction. Look forward to hearing about more successes in the future.
I feel compelled to comment here because after the very detailed and heartfelt explanation of each step, nowhere do you explain whether this recipe (or any of the others that I scanned) is for a 2 lb loaf sized machine, a 1 lb loaf or whichever. It’s frustrating if you have a 1 lb machine to sift through the 1000’s of recipes online and it seems rare that this is ever mentioned. Just thought I’d share. Great work btw.
Hi Moose,
All of my recipes are for 2-pound bread machines. I have thought about including the recipes for 1-pound loaves but I can’t add them to the recipe card for technical reasons. I’m in a quandary about it. I did add it to the popular French Bread recipe. However, I haven’t any feedback that it has been useful to anybody. ?
The recipes are easy to cut in half since I have included the weights. Have you tried that? (If you aren’t weighing your ingredients yet, I strongly encourage you to try it.)
Just to add a tip. If using AP (All Purpose) flour, I recommend using vital wheat gluten to match the gluten of bread flour. I would suggest ~1/2 TBS per each cup of flour used. You need to deduct the exact amount of flour that you add in vital wheat gluten to keep your dry/wet ratio as required by the recipe.
On a separate note, Paula, is it okay to add yeast nutrient also?❓
Hi Guitar Pro,
Thanks for writing. Just to clarify, you don’t always need to add vital wheat gluten when using AP flour–only when substituting for bread flour. I have several bread recipes that work better with AP flour. Vital wheat gluten is not readily available to many people in the States so I don’t use it much.
As far as yeast nutrient, it is not something I have used or experimented with because, again, it is not readily available in our supermarkets. Because I write primarily for beginners, I try to keep my recipes as simple as possible.
If I bake in a dark pan do I need to lower the temp by 25 degrees
Hi Charlotte,
It’s difficult to make a blanket statement. It depends on how heavy your pan is and the personality of your oven. (No two ovens are alike in my experience.) But a lighter-weight dark pan will tend to make a dark crust. You’ll probably have to experiment.
I have tried making bread using the dough cycle and it never worked. I found out with my machine I need to leave it in there longer after it’s done so it finishes Rising. I noticed you stated that it needed to rise double size. I realized that mine wasn’t doing that by the end of the dough cycle. So I left it in there and it started Rising. I’m waiting now for it to finish and then I will go to the next step. I’m so glad I read your directions carefully because that was the missing key with my machine. I will comment further at the end of the baking process to see how it comes out. ?Thanks for the tips.
Hi Christine,
Good catch. I’m curious. What is the temperature where your bread machine is sitting? If it’s kinda chilly (less than 72ˆF), that could be part of the problem. Are you using instant yeast or active dry yeast? Active dry yeast tends to be slower. Hope your bread turned out well. Can’t wait to hear.
This bread recipe is absolutely amazing! I love that the bread machine does all the “hard” work for me. The bread came out so beautifully and delicious, I made my kids peanut butter and jelly with this bread and it was so so good. I will be keeping this recipe in my back pocket for sure. I don’t even think I have a reason to buy sliced bread anymore. Thank you!
I love hearing this, Debra. Glad your kids enjoyed the bread. Thanks so much for coming back to say so.
Tried this recipe this weekend. I used Almond milk, turned out excellent. Definitely a keeper!!
Hi Diane,
I’m so glad you wrote. My readers are always asking about substitutions and now you have verified the almond milk. Thank you so much!
Paula knows what she’s talking about. Take the time to read through her tips! I am/was the “Scooper” and had failed a number of times on my own. I followed Paula’s tips and the bread turned out spot-on. THANK YOU, Paula, for making my bread-making skills a success! You’ve made my family VERY happy! This is my second day with the buttermilk bread. After today, moving on to another of your recipes. Thanks again!
Hi Michele,
Thanks for the high praise. Glad I could help. We’re all happy when our family is happy. Right? Can’t wait to hear about future successes.
I’ve made the Ciabatta bread, the french bread and today the buttermilk sandwich bread. They have all come out PERFECT! The recipes are easy to follow and I love that I can weigh the ingredients. My husband couldn’t get enough of the french bread. He told me not to lose the recipe since it was the best I’ve made since I have tried several different recipes and this was by far the best! Thank you!! Can’t wait to try some other of your recipes.
How kind of you to write. Sounds like your husband is a fan of your baking. Way to go!!
@Paula, Hi again! Was wondering if you have a recipe for kaiser rolls? That’s the next thing my husband wants me to bake, haha
Hi Patty,
The closest I can come to Kaiser rolls is the recipe for these Really Crusty Rolls. They are round but don’t have the characteristic Kaiser design on top.
@Patty Olson, Thank You Paula, I’ll let you know how they come out 🙂
This bread had a wonderful taste and texture.However, I couldn’t get a nice dome shape when I cooked it in the oven. It burst open on one side after baking in an 8×4 and 9×5. I cut back on the rising time. What is making it rise too much when cooking?
Thank you, thank you… thank you for putting the ingredients by weight! Delightful recipe!
You’re welcome, Steven. Glad you enjoyed the recipe. Hope you come back for more.
great recipe/great bread