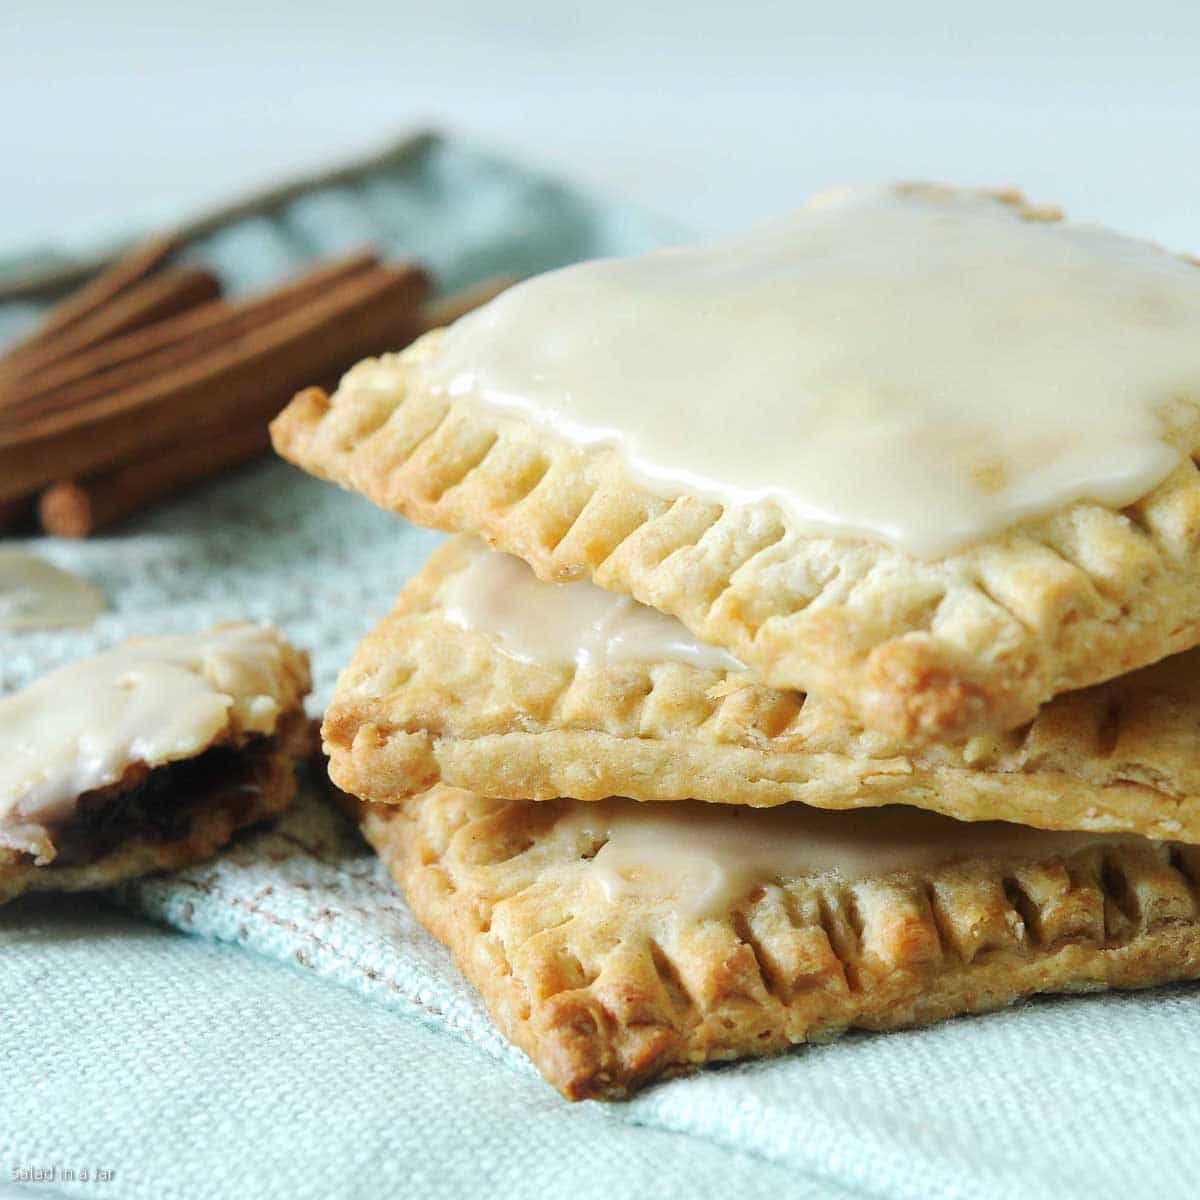
Whole Grain Oatmeal Pop Tarts (A Make-Ahead Homemade Treat)
Sneak Preview: Skip the store-bought box and make whole grain oatmeal pop tarts with a crisp, flaky crust and simple fillings. The dough is rolled in a zip-top bag and frozen in stages, which makes the process far more manageable than it looks.
This post contains affiliate links. As an Amazon Associate, I earn from qualifying purchases at no extra cost to you.
TThese homemade pop tarts have a crisp, flaky crust made with oatmeal and whole wheat flour, filled with simple options like brown sugar–cinnamon or fruit preserves. They’re freezer-friendly and work just as well for breakfast as they do for snacks.
If you’re thinking this looks like too much work, stay with me. This recipe is built in stages—mix, roll, freeze, bake—which makes the process far more manageable than it looks, even if pastry dough usually makes you nervous.
Below, I’ll show you exactly how I make these pop tarts—from mixing the dough to freezing and baking—so you can decide where to pause and pick it up later.
Ingredients & Substitutions
*CRUST*
QUICK-COOKING OATS: My first choice for texture and flavor. Substitute oat flour for a smoother dough.
WHITE WHOLE WHEAT FLOUR: Milder and better for pastry than regular whole wheat. Whole wheat pastry flour or all-purpose flour also work.
ALL-PURPOSE FLOUR: Adds structure. You can replace part or all of it with more whole wheat flour for a heartier crust.
SHORTENING (COLD OR FROZEN): Helps create a flaky crust. Butter can be substituted, but freezing the shaped tarts before baking is essential.
BUTTER (COLD): Adds tenderness and flavor.
BUTTERMILK OR PLAIN YOGURT: Either works. Yogurt adds a slight tang; no need to pre-warm.
EGG: Adds structure and richness. For an egg-free option, use a flax egg (mix 1 tablespoon ground flaxseed with 3 tablespoons water and let sit 5 minutes).
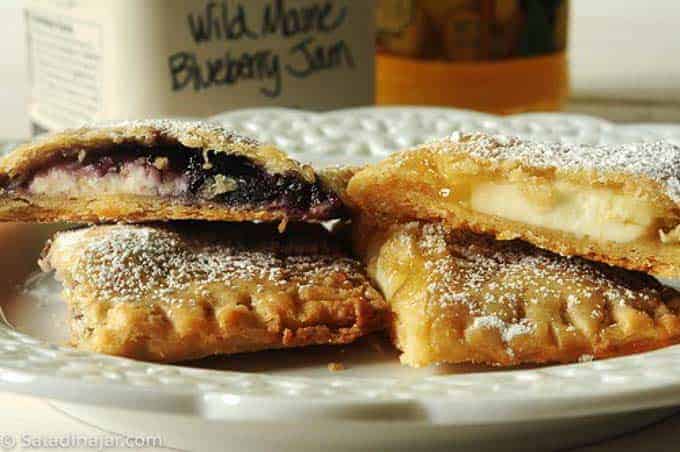
*FILLINGS*
BROWN SUGAR & CINNAMON: The classic choice.
FRUIT PRESERVES: Use thick jams or homemade fruit spreads.
CREAM CHEESE + FRUIT OR LEMON CURD: A cheesecake-style option for adults.
*FROSTING*
POWDERED SUGAR: Sweetens and sets the glaze.
BUTTER: Adds creaminess.
MILK OR COFFEE: Adjusts consistency; coffee adds a light caramel color.
Step-by-Step: The Simple Game Plan
1) Make the Dough
- Combine dry ingredients.
- Cut in shortening and butter until crumbly.
- Add egg and buttermilk (or yogurt) and mix just until the dough comes together.
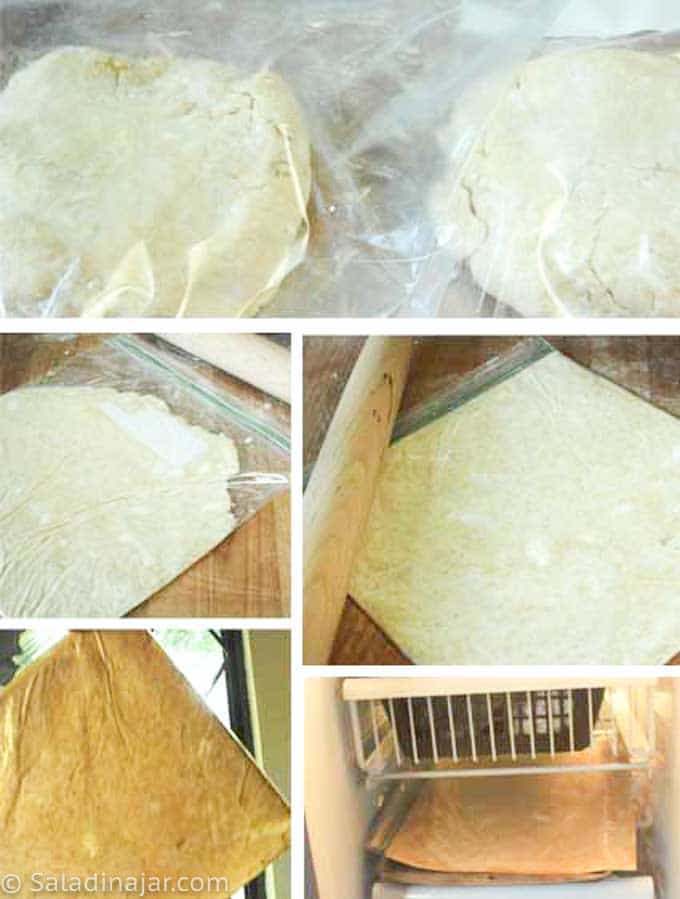
2) Roll and Chill
- Divide dough in half.
- Roll each portion flat inside a zip-top bag.
- Freeze until firm.
This step makes the dough easy to cut and handle—no sticking, no stress.
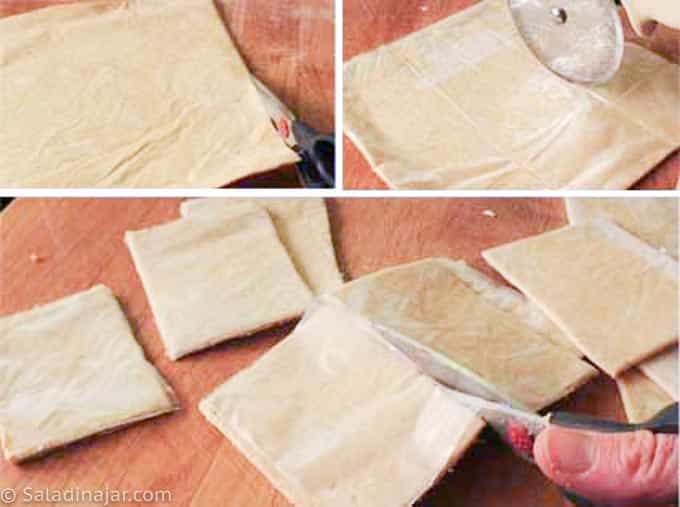
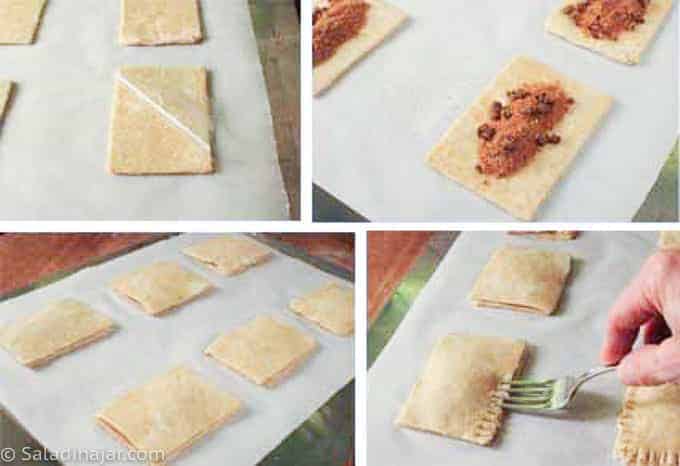
3) Fill and Seal
- Freeze again until solid.
- Cut frozen dough into rectangles.
- Add filling to half, top with remaining pieces, and crimp edges with a fork.
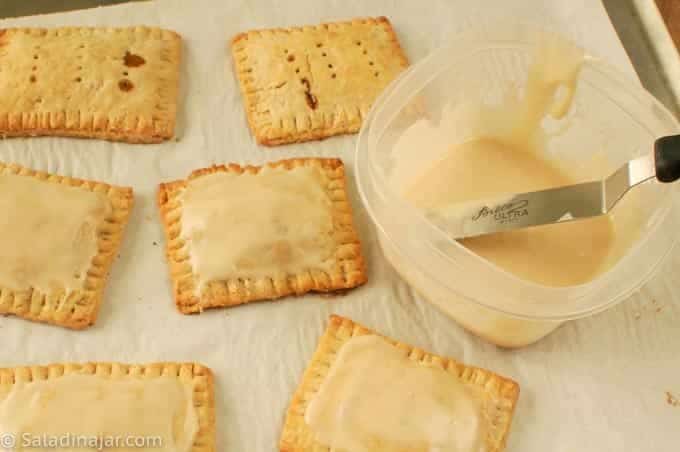
4) Bake (or Save for Later)
- Cool completely before frosting, if using.
- Bake at 425°F until lightly golden.
Whole Grain Oatmeal Pop Tarts (A Make-Ahead Homemade Treat)
Ingredients
Filling:
- ⅓ cup (73 g) brown sugar
- 1 ½ teaspoons unbleached, all-purpose flour
- 1 ½ teaspoons cinnamon
- 1 tablespoon raisins (optional)
Crust
- ½ cup (45 g) quick-cooking oats (not instant or old-fashioned)
- ½ cup (60 g) white whole wheat flour (milder and better for pastry than regular whole wheat)
- 1 cup (120 g) unbleached, all-purpose flour
- 1 teaspoon salt
- 1 teaspoon sugar
- ⅓ cup (68 g) cold or frozen shortening (if you are averse to shortening, butter may be substituted. However, pop-tarts should be frozen before baking.)
- 2 tablespoons (28 g) cold butter chopped
- 1 large (50 g) egg
- ⅓ cup (76 g) buttermilk or plain fat-free yogurt
Frosting
- ½ cup (60 g) powdered sugar
- 1 teaspoon butter
- 1 tablespoon coffee or milk
Instructions
- Filling: In a bowl or food processor, combine 1/3 cup (73 g) brown sugar, 1 1/2 teaspoons (1 ½ teaspoons) unbleached, all-purpose flour, 1 1/2 teaspoons (1 ½ teaspoons) cinnamon, and 1 tablespoon raisins (optional). Pulse or mix until the raisins are broken into small pieces. Set aside.
- Make the Dough: Combine 1/2 cup (45 g) quick-cooking oats, 1/2 cup (60 g) white whole wheat flour and 1 cup (120 g) unbleached, all-purpose flour, 1 teaspoon salt, and 1 teaspoon sugar in the bowl of a food processor and process for 15-20 seconds. Add 1/3 cup (68 g) cold or frozen shortening and 2 tablespoons (28 g) cold butter and pulse 12-15 times. The mixture should be coarse. Whisk 1 large (50 g) egg and 1/3 cup (76 g) buttermilk or plain fat-free yogurt Add to the flour mixture and pulse 5-7 times or until combined. Remove the lid and blade. Use hands or a spatula to press the dough together. All crumbs should come together into a ball.
- Roll and Freeze: Divide dough in half. Place each half into a separate gallon-size zippered plastic bag. Place the dough ball at the center of the bag. Roll out evenly. Freeze until firm.
- Shape the Pop Tarts: Remove frozen dough from bags and trim edges. Cut into 12 rectangles. Place 6 rectangles on a parchment-lined sheet. Add a spoonful of preferred filling to the center of each. Top with the remaining 6 rectangles and press edges with a fork to seal.Return assembled pop tarts to the freezer until firm.
- Bake: Preheat oven to 425°F (220°C).Place frozen pop tarts on a baking sheet and bake 15–20 minutes, until lightly golden.
- (Optional) Frost: Mix ½ cup (60 g) powdered sugar, 1 teaspoon butter and 1 tablespoon coffee or milk (coffee gives a brown color). Spread on cooled pop tarts.
Notes
Storage: Cool completely before storing. Freeze baked pop tarts up to 1 month.
Equipment
Nutrition
All images and text ©️ Paula Rhodes for SaladinaJar.com
Final Thoughts:
Homemade pop tarts are a fun project and taste far better than anything from a box. The whole-grain oatmeal crust bakes up crisp and flaky, and the simple fillings let you choose the flavor you love. Because these are freezer-friendly, you can bake a batch now and enjoy them later for breakfast, snacks, or lunchbox treats.
If you’re looking for a comforting breakfast with a bit of homemade flair, this recipe delivers — without being overwhelming.
— Paula, Home Economist
Homemade Food Worth Sharing
Need help troubleshooting?
Email me: Paula at saladinajar.com — photos help!

How do you store them and how long are they good for?
Ok, I was looking for muffins and stumbled across your strawberry recipe and then this one… These look yummy!! We have not had pop-tarts in years b/c who knows what’s in them…lol! Anyway, I would love to try this recipe when I get a few minutes…and I’m gonna share it on fb now…to prove to my friends, yet again, that I have found the BEST all-around cooking site! Thanks Paula!
Julie, you are so kind! The poptarts ARE a little bit of trouble but that makes them a great treat.
Oh my Gosh!!!! I have got to try these . My Mom brought some Pop Tarts home the other day and I almost fell over in shock! We were never allowed to have these as kids and I didn’t buy them for my kids but I liked the brown sugar ones that they made way back when (I don’t know if they even make them nowadays).These are going on my things to make when we are’t going to have a 100 degree day like we are today:-} And thanks for the great roll out idea.
Hi Joy,
Yep, too hot to turn on the oven these days. But this would be a great project for this fall.
The ideas you come up with…. WOW
goin to try this now….wish it comes out as good as yours…shortening resting in the refrigerator lol…..
Hope the pop-tarts turned out well for you. Practice helps.:-). Paula
I have to say that I absolutely love these, and so does my 2-year-old! I had to give up store-bought poptarts b/c they aren’t vegetarian, so I was thrilled to find this recipe! I did make a couple of minor changes to use what I had on hand (1 cup whole wheat pastry flour instead of the white whole wheat and oatmeal). Thank you so much for sharing!
Hi Kate, Great substitution! Especially if you keep that stuff on hand. Thanks for writing.
I made these and, oh my were they good. Can’t wait to make them again this weekend.
And they were as easy as they were good 🙂
I love this. It is so easy to make up in advance and cook up when you want. It is also so much healthier than the “pie crust poptarts” other people have made. I am linking up to this recipe on my blog so I hope you don’t mind. I give you all the props. thank you.
OMG–so good! brown sugar-cinnamon is clearly the best store bought P-T, and I love how you’ve whole grained them! delicious!
I just mixed up the dough. It is in the freezer along with some slices of cream cheese. I am going to try fillling mine with blackberry preserves and the cheese. Hope they turn out as beautiful as yours!
My son loves pop tarts and they are only special treats for vacation and such. He will love to help in the making these I’m sure. How fun to do, thanks.
I can imagine your son will have so much fun baking with you. I can’t wait to do the same with my grandson–when he gets a little older.
Hey Paula, these are beautiful. I saw them on refrigerator soup and just had to click over to see them.
They have actually inspired me to try a vegan version of them. I would love to link to you as the blogger that inspired them if they work out! Please let me know if that’s okay with you…
Oh, and I love the name Paula. It’s my Mom’s name, and will probably be my first daughter’s name if I ever have one.
Thanks, Stella
I can’t wait to try these this summer with my granddaughters! Thanks so much for sharing.
These look fabulous and you are a genius for the easy procedure! I can think of loads of good fillings for these. Good work!
If your facts are indeed straight…161 CALORIES?!?! I can enjoy Pop Tarts again!!!! This is so on my hit list of stuff to make.
Your pop-tarts look perfect! I love your use of oatmeal and wheat flour. I wouldn’t be able to cut so many Ziploc bags, though. That would kill me to waste so much plastic when we already have a surplus of the stuff on this planet. I could just make this the old-fashioned way and help save the Earth at the same time hahaha. You said you made these many times, so I don’t even want to know how many bags you’ve gone through. Great process photos!
You are right. You don’t want to know. But honestly, I could not make these without the plastic bags. Because the dough needs to be rolled out fairly thin, they tear easily and are hard to scoop off the cutting board when rolled like a pie crust. It’s tempting to use too much flour to make them work. When using the plastic bags it’s easy to stick back in the freezer whenever the dough gets a little soft. So easy to handle!
the brown sugar cinnamon pop-tarts were always my favorite growing up. now i won’t touch that blue box with a ten-foot pole, but i’ll definitely make my own! i love the addition of oatmeal. must try.
cheers,
*heather*
These look amazing and delicious! I’ve been trying to stop eating processed foods so this is a perfect way to help!
i have made pop tarts a few times and i am still trying to perfect. thanks for sharing. they look wonderful!
I’ve been thinking about making homemade pop-tarts for so long, and these look so good! Brown sugar-cinnamon was my favorite flavor, and I love the use of whole wheat flour and oats in your version. Must try!
omgosh ziplock bags…genius! definitely making these one day! Thanks =)
Finally made a batch last night! I used a (as close to natural as possible when it’s store bought) peach preserve. They turned out yummy!!!!
I’m not going to lie. These look so irresistible that I’m NOT going to make them. They wouldn’t be safe from me. Nom nom nom…
Wow, looks awesome and sounds even better!
I am def going to make these. I love original recipes and this one is a sure winner I’m sure.
This looks wonderful! I love that you can choose how big these are what ingredients they contain. My husband would do flips if I made him some of these.
Your soup above looks amazing, by the way!
Brilliant, Paula. LOVE it. My boys love Pop Tarts and always beg me to buy them, but I won’t. Now I can’t wait to make these for them! A jam inside would make them fruity, too. (Duh, Katrina.)
Love that they are oaty and more healthy.
I want to be Brody and be on the receiving end. Great pictures. If I only dedicated my time, like you, to cooking… You have the talent girl!
These pop-tarts are so beautiful, i would want to order them from you! I refuse to buy any commercial ones anyway! Thanks, you made my day: Outstanding work.
So….last night I had a a dream that I was eating one of your pop tarts…and they were REALLY good! Funny that I’m dreaming about the food on your blog!
I saw these in Bon Appetite a few months ago….. and now that I’ve seen yours, truly have to make them. Yours are exquisite – (that means peachy in toaster-pastry talk). I love the flour variations – and brown sugar is my favorite flavor – pop tarts or cream of wheat or oatmeal (all store-bought, of course)! Beautiful, beautiful!
Cool. Look like a good rainy day project.
Yep, file it with your gingerbread house.
THese were/are delicious! For the kid in me, they are great! Definitely worth the calories over the boxed version. Feel free to drop off any of these at my door anytime. They will be eaten. 🙂
This looks great- you’re amazing, I know Brody LOVED them… Tyler LOVES pop tarts too, so I’ll have to try this out sometime!
this is awesome! i will have to try this recipe for sure. thanks!
This is amazing, thank you! I have bookmarked it for future use 😉 YUM!
Wow, so many people are making these all of a sudden. I never had a Pop Tart until a few years ago when my son requested them to take to an away swim meet b/c they would travel in his bag. I can’t think that it was all that great, but seeing yours, I might just change my mind…yours looks spectacular!
Here’s a picture of Brody eating one of your homemade pop tarts: http://mikeandstaci.blogspot.com/2010/05/yummmmmy.html
Those look great! I’ll have to give these a try with my kiddos!
I just hit “print recipe”!!! I can’t wait to try this on my own! The samples that you brought by yesterday were delicious!!!! I really like your method for rolling the dough out. I always have a hard time getting dough rolled into a square. Now I know you’re trick!!
Thanks again for figuring this out for me! I’m so excited about experimenting with different fillings and letting the boys help make them!
I love your method!!! I’m actually not really afraid of the flour and the sticky dough, I even enjoy it… but your method is really awesome! And they look delicious! Fantastic!
MMMM… loves me some pop tarts!
But I’ll bet yours are even better and no doubt infinitely healthier just from the reduction of preservatives and mystery chemicals. Bravo! they look fantastic!