9 Clever Ways to Incubate Yogurt Without a Yogurt Maker
Sneak Preview: Making yogurt at home is easier than you think! Keep it warm and cozy with one of these 9 clever incubation tricks—no fancy equipment needed.
This post contains affiliate links. As an Amazon Associate, I earn from qualifying purchases at no extra cost to you.
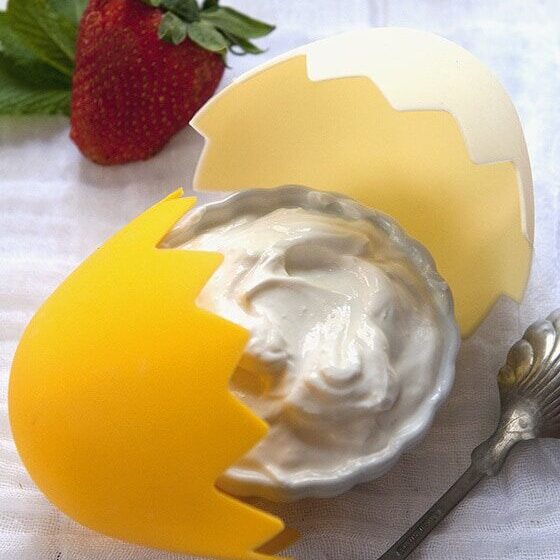
The way a few spoonfuls of yogurt starter transform warm milk into thick, creamy yogurt never ceases to amaze me. It feels like a tiny miracle every time!
It reminds me of my daughter-in-law’s first ultrasound—was there really a baby in there, as the test said? And then, we saw it—a flicker of life–evidence of another miracle of God.
Thankfully, making yogurt isn’t nearly as complicated as growing a baby, but I still marvel at the process every time.
Why Incubation Matters (and Why You Don’t Need a Yogurt Maker)
Like a hen keeping her eggs warm, you need a steady, cozy environment for yogurt to set properly. The magic happens between 100-110°F—any hotter and the bacteria die, any colder and they’ll hibernate, leaving you with a disappointing bowl of warm milk.
Here are those ideas meant to inspire you to look around your place for what might work for you.
1. Oven Method
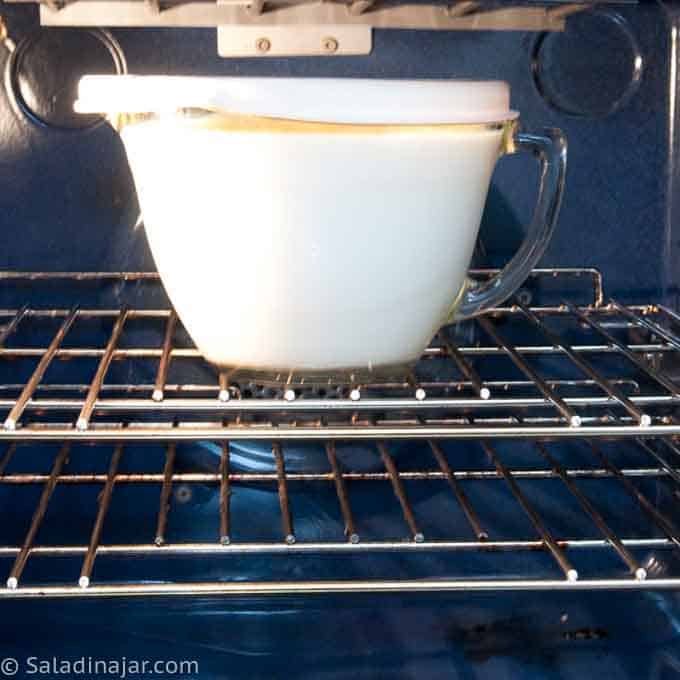
Most ovens work well, even without a low-temperature setting.
- If your oven has a “proof” mode, it may work depending on how hot it gets. I prefer 100-110°F (38˚C-43˚C) which is high for a “proof” mode. Experimenting may be in order.
- No proofing setting? Turn the oven on for a couple of minutes, then switch it off and wrap your yogurt container in a towel. Leave the oven light on for extra warmth.
- Keep the door closed! Resist checking too often, or the temperature will drop.
Reader Tip: “I preheat my oven for one minute, turn it off, and leave my yogurt inside overnight. By morning, it’s perfect!” – N2ition
2. Slow Cooker Method
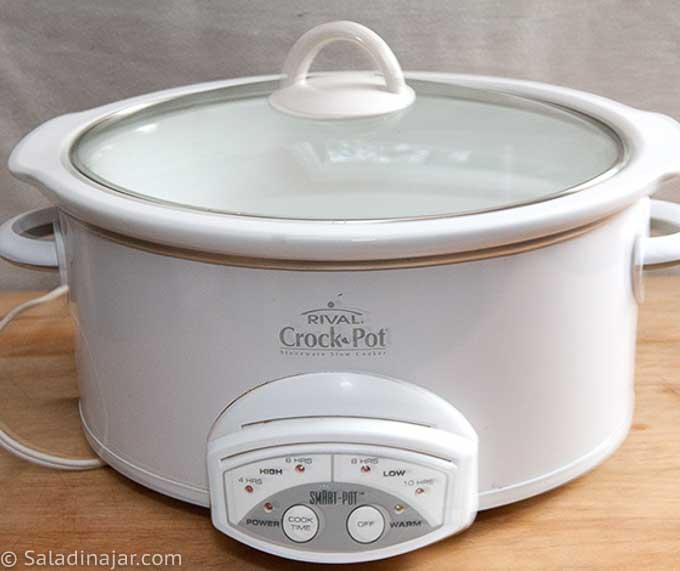
Your slow cooker can double as a yogurt incubator in two ways:
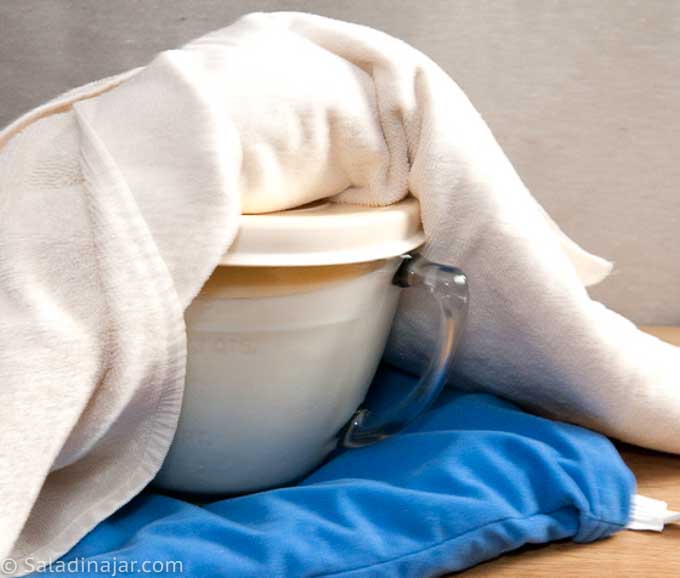
- Water Bath: Heat water in the slow cooker to 115°F, then unplug it and place your yogurt container inside. Wrap the whole setup in towels.
- Warm Setting: Some slow cookers maintain a perfect incubation temperature when set to “Warm.” Just check with a thermometer.
Reader Tip: “My slow cooker stays at a steady 103°F in a water bath—perfect for incubating yogurt!” – Whitney
3. Heating Pad Method
A heating pad can keep your yogurt warm for hours.
- Set your heating pad to low and place your yogurt container on top.
- If your pad runs hot, put a towel between it and your container to prevent overheating.
- Look for a model without an automatic shutoff, or reset it periodically.
Reader Tip: “I use a heating pad with two layers of towels underneath. It holds at 105°F overnight, and my yogurt always turns out great!” – Julie
4. Microwave Method
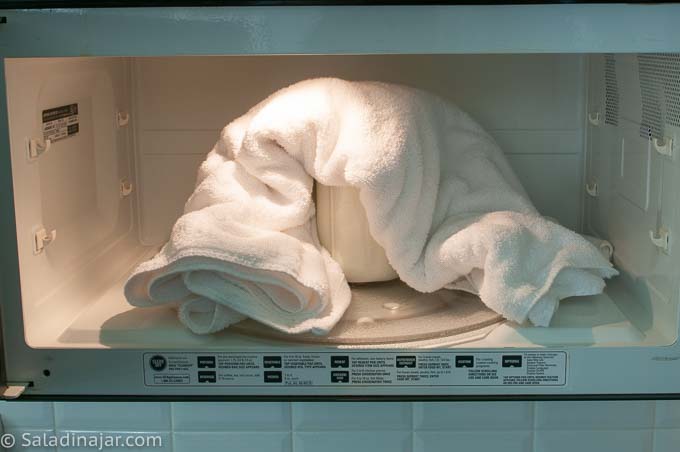
Your microwave’s insulation helps maintain warmth.
- Heat a microwave-safe hot pad (or a bowl of hot water) before hand to sit alongside your yogurt.
- Wrap your yogurt container in towels and place it inside.
- Keep the door closed overnight—it acts like a mini incubator.
Reader Tip: “I use a microwavable hot pad to keep my yogurt warm. I put it in at bedtime, and by morning, it’s set perfectly!” – Tamara
5. Cooler Method
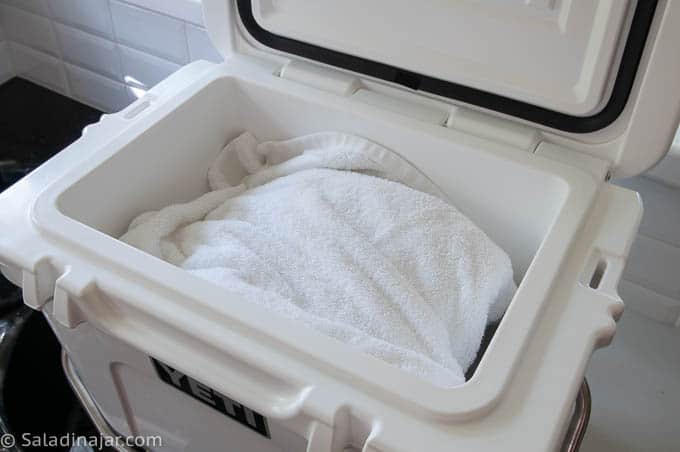
A simple ice chest or insulated cooler traps warmth for hours.
- Fill a large bottle with hot water and place it inside the cooler.
- Wrap your yogurt in towels and set it next to the bottle.
- Close the lid and leave it undisturbed for at least 6 hours.
Reader Tip: “I put my yogurt in a cooler with a bottle of hot water. It keeps the perfect temp all night!” – Yogurt Man
6. Instant Pot Method
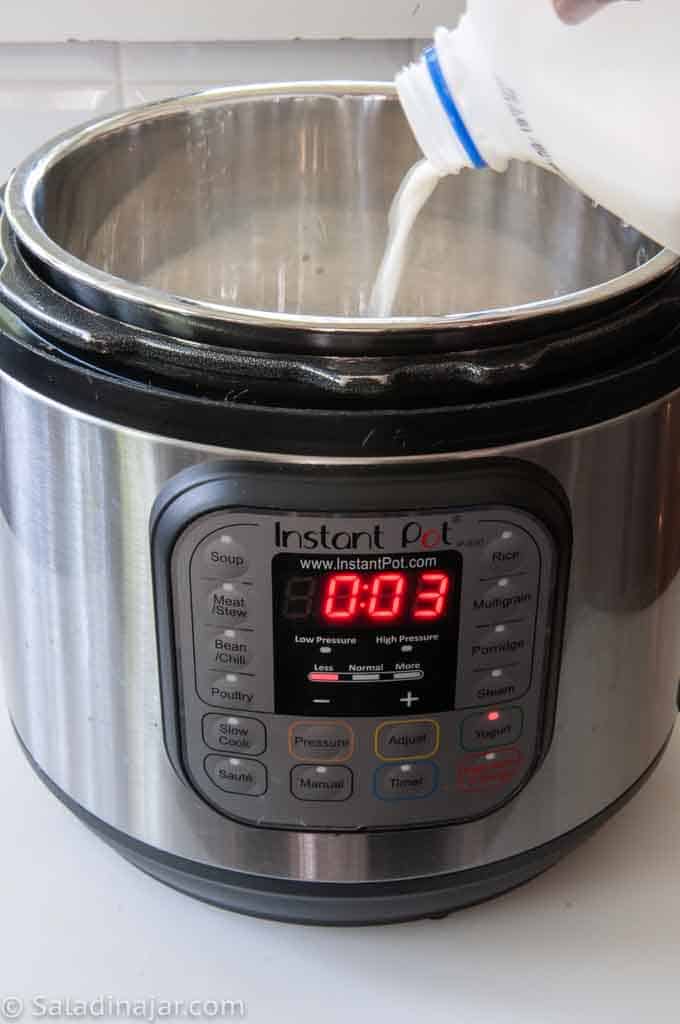
Many Instant Pots have a Yogurt function that holds the right temperature automatically.
- After adding your starter, press Yogurt and set the timer for 8-12 hours.
- If you don’t have a yogurt function, try the Keep Warm setting, but check the temperature to avoid overheating.
Note: Making yogurt with an Instant Pot can take longer since the milk heats slowly and cools slowly before you even add the starter. Fortunately, it’s mostly hands-off.
Other Creative Ideas 7-9
Still looking for a method that works for you? Try these!
- 7. Dehydrator: Set to 110°F and place your yogurt inside overnight.
- 8. Near a Radiator or Heater: Wrap in towels and set near a warm surface.
- 9.Sous Vide Water Bath: If you have a sous vide setup, maintain 110°F and let the yogurt sit for 4-12 hours.
Reader Tip: “I put my yogurt near my computer router and use a desk lamp for warmth. Works like a charm!” – Brooke

Where Is the Best Place in Your House?
Think about naturally warm spots in your home:
✔ A sunny windowsill (but not too hot)
✔ On top of a fridge or dryer
✔ Near a warm appliance
If your yogurt is struggling to set, test different spots until you find the sweet spot!
FAQs
How long does yogurt need to incubate?
Most yogurt is ready in 4-10 hours. The longer it sits, the tangier it gets.
What if my yogurt doesn’t set?
- Your temperature may have been too low or too high.
- Your yogurt might have been jostled which will crash the party.
- Your starter might have been old or inactive.
- Try a longer incubation time.
- You may be able to try again with the same milk.
Can I flavor my yogurt during incubation?
No—add sweeteners, fruit, or vanilla after incubation to avoid interfering with fermentation.
What’s the easiest method for beginners?
The oven method or cooler method are the most foolproof if you don’t have a yogurt maker.
If you have more questions about making yogurt, check this comprehensive list of FAQ’s about yogurt-making in general. Want the full step-by-step Greek Yogurt Recipe? Click here to check it out!
Final Thoughts
No yogurt maker? No problem! Whether you use your oven, slow cooker, heating pad, or even a cooler, you can make creamy, delicious yogurt at home with just a little warmth and patience.
If you have a completely different method not mentioned here, please share it in the comments. If nothing mentioned here seems feasible, reading all the comments below will give you more ideas.
— Paula, Home Economist
Homemade Food Worth Sharing
Need help troubleshooting?
Email me: Paula at saladinajar.com — photos help!

Yogurt in the oven:
Warm the oven first. Put a candy thermometer or another kind of therm. in a position inside the oven so you can read it through the oven window. Turn on the oven light and leave it on until the yogurt is done Then turn on the oven until the temp is 110, then turn off the heat. Wait a few minutes to be sure the temp is stable. If too hot, open the oven door until the temp drops to 110. Then make the yogurt and put it in the oven for 6-8 hours. Check the temp every 30-60 minutes. If the temp drops below 105-110, take the yogurt out, set it on a hotpad, reheat the oven to 110 as before, then put the yogurt back in. It will be fine. A liquid heats up quickly but cools down slowly, so it won’t lose much heat on the counter for a couple of minutes.
Hi Mel,
Thanks for sharing your method! I know the oven-light trick has worked well for many yogurt makers over the years. Your explanation about yogurt holding its heat so well is especially helpful.
I’ll admit the “check every 30–60 minutes” part lost me a little bit because I’m always looking for ways to make homemade yogurt less fussy, not more. 😄 But I appreciate you sharing such a detailed explanation for readers who enjoy the oven method.
My air dryer has a proof setting that goes down to 100. I’m going give that a try.
That should be perfect if your container fits inside.
my 7 quart crock pot keeps 110 degrees in a water bath. my first time and it worked like a charm. reused some small glass jars-salsa, cheese sauce, etc easily held 4, boiled 1/2 gallon of milk. it set in 4 hours, left in 3 more for thickness and tang. added 1 small 1/2 cup container store bought plain chobani Greek yogurt with active cultures. seems pretty easy so far! finding the right thermometer helped too.
Hello,
Sounds like you’ve found your preferred method. Congratulations! May you have many gallons of delicious homemade yogurt in your future.
I recently purchased a yoghurt/kefir maker made by a company called Lekue that is so easy to use. No electricity needed. I just made a batch using high protein milk and the yoghurt came out just as thick as Greek with a lovely silky texture.
Hi Liz,
I just checked this out. It appears that it is not available in the U.S. Maybe at some future time? Actually, it looks like you do need electricity to warm the milk via the microwave. (I always heat my milk in a microwave.) The only other disadvantage is that it makes only a small amount–which might be perfect for you. So that depends on the individual.
Thank you so much for writing. I like to hear about all the different ways people incubate their yogurt.
i use an electric yogurt maker but with an 8 cup glass measuring cup that fits in the middle i just add a heavy showerwing cap to keep the heat even. it works great
Hi Manon,
I like the idea of an 8-cup capacity container as opposed to individual serving jars. That makes it easier to strain for Greek yogurt– if you want to. Thanks for taking the time to share.
I discovered my microwave has a dedicated yoghurt proofing setting. I just tap the ‘proof’ button, press start and it runs for 5 hours. I’ve only made yoghurt twice, but both times it’s worked beautifully. The second time I added an hour to the preset time and proofed it for 6 hours and I liked the slightly stronger flavour.
So check your microwave handbook – you might be surprised to find this oh-so easy incubation option.
Hi Adam,
I’m a microwave lover, so my eyes lit up when I read your comment. What brand of microwave do you have? I suspect I could just use Level 1 and set the timer. I’ll have to play with it.
I’m using a chicken egg-incubator haha. It has the ability to stay at a constant temp of my choosing- so why not! (Cleaned very thoroughly of course)
I love this, Kiara. Good for you! and thank you for sharing.
First timer and came out perfect.
l fid mine in a Slow Cooker, the ceramic bowl keeps the temperature, wrapped in two towels overnight and wella amaxing yoghurt in morning.
Congratulations! You are lucky that it turned out perfect the first time. Keep doing what you’re doing and enjoy.Thanks for coming back to tell us about it.
I am in Nepal. I don’t know what temperature it is but it’s consistently hot. I put cow’s milk in a bowl in the cupboard for two days and had the best yoghurt ever.
Hi Lucy,
Did you put starter in your yoghurt? You didn’t say. I assume you did. If your house runs over 90˚F, I’m not surprised. When I make yogurt in the summer, I often set it outside, but usually in the shade. It can get way too hot if the sun shines on it here in Texas. Thanks for sharing.
Can I use frozen yogurt starter?
Hi Kathi,
Yes, you can. However, it will lose strength the longer it’s in the freezer. I try to use mine within a month. Yours might last longer, it’s hard to know for sure.
Until now, I’ve made many batches of yogurt by setting the jars on top of a toaster oven set to a low warm temp and covering with a towel. I always left a thermometer between the jars just to monitor it. However, I recently got a large (Gourmia brand) air fryer that has a dehydrate setting. I can’t believe how perfect this is to set the perfect temp and the timer goes up to 10 hours. EZPZ and no more monitoring or adjusting!
Hi Lonnie,
Great suggestion. Thanks for adding it to the collection.
I nestle mine in two big heavy towels overnight, no heating pad. summer and winter. Have never had a failure.
Hi Gail,
Doesn’t get any easier than that! Love the simplicity of your method.
The least painful method that works every time is leaving the yogurt in the pot that warmed it, wrap it in a towel and put it on the top shelf of the oven with the light on. Voila…works every time.
I agree, Sarah. 100%. As long as the temperature inside your oven with the light on stays between 100˚F and 110˚F.
Just for the fun of it, I put 6 pint jars in our 100ºhot tub, worked great
You are brilliant!
I have made yogurt so many times using slow cooker. Put 2 litres milk in slow cooker set it slow for 2 and half hours. Then turn to warm for 3 hours. Put in starter , half cup. Stir well and put in oven with light turn on for overnight. Stir in 1/2 cup honey. Drain the whey if you want thicker yogurt
Hi Shirley,
Thanks so much for taking the time to write and share your method. Even though it takes longer, it seems very easy. A half-cup of honey would make anything taste good. Yum!
just read all the tips and different ways. I use a 50 quart coleman cooler. preheated with a kettle of hot water for 15 min, then I place 30 16 oz pots of my prepared milk with a starter from the New England Cheesemajking company, I use UHT milk preheated to not more than 110 degrees and fill up my pots. I add clean kitchen dish clothes around the sides of the pots, pour on a bit more hot water, with 2 towells on the top, slightly damped with hot water. Tem keeps aournd 110 and later drops to 100. good enough and close up the coller till after 8 hours and VOILA great yogurt. Only had one disaster in 12 months. Reheated the milk to 110 put another new starter and left it it for 8 hours..Turned out great. I make 200 16 oz pots every month for my customers and 2 supermarkets. All fresh all natural. no sugar, preservatives or andthing added. just good ole PoBiotics. Kenneth Saba Dutch Carribean.
Hi Kenneth,
Thanks so much for joining the conversation. Maybe this will give someone else an idea. As you may know, UHT milk is not popular (or readily available on the shelf) in the US, so the heating directions you give would be different for the milk we usually use. However, your incubation system is genius for the large quantities you are making.
I’ve been using the heating pad method since reading a book called The Tightwad Gazette in the 90s. But I put mine in quart mason jars and invert a big stock pot over the jar(s). Overnight works great. It’s the easiest to set up, always works and requires the least fuss and equipment.
Hi M,
Thanks for sharing your method. I’m always amazed at the many different ways people incubate their yogurt. Your idea may be exactly what another reader needs.
You left off the best (although pricey) way to incubate yogurt and that is in a Folding Proofer which is used for making bread. After making yogurt weekly for years with a variety of methods I decided to spend the money and get the folding proofer. I will never bother with any other method. The proofer is spacious, has a thermostatically controlled heating element with digital readout, allows moisture to evaporate and folds up to a compact size when done. Without a question the best way to make a half a gallon of yogurt at a time.
Hi Phillip,
I know exactly what you’re talking about. Those folding proofers are perfect for anybody who doesn’t have a way to hold a low temperature steady for a few hours.
I had to comment about using the Instant Pot for yogurt. I agree with you about the extra moisture, although I never thought about it that way exactly. Since I always strain my yogurt, it doesn’t matter to me. But you make a good point.
How about when you incubate the yorgut for some times sourness occur what is the problem
Hi Fransisco,
Sourness can happen when you incubate too long, don’t use fresh milk, or use a bad starter. Also, it’s important to keep the incubation temperature constant between 100˚F and 108˚F.
All methods are good to use you have inspired me a lot
I make 1 gallon of yogurt every 12 to 14 days in my InstaPot. I cool the heated milk in a sink of cold (not ice) water to not more than 116°. (Stirring speeds up cooling and eliminates temperature differencials.) This takes 4-5 minutes tops. I use a freeze-dried starter which produces very reliable results. I incubate for 9 hours then refrigerate in quart containers. Prior to the InstaPot, I used a water-bath method in well-sealed cooler. It worked fine but the InstaPot is quicker, with very little intervention and produces a very consistent yogurt that gets rave reviews. I have not tried the cold start method as ultra-filtered milk is not available where I live. I am lactose intolerant and use lactose free milk.
I like your system. Glad you wrote. You never know when it will give someone else an idea.
@Mandora,
I tried making it in an instant pot but didn’t like the fact that so much water was retained, making for a thinner yogurt.
I live in an old drafty New England farm house. My oven door doesn’t seal well enough for the lightbulb trick. In winter I use a heated bed pad to warm my sheets & it seemed like my best chance for consistent warmth for yogurt making. It has 10-hr auto shut-off. The coils are densest at the foot end. On top of fresh bedsheets (!) I put a large pizza stone at the foot end. Then lay a towel on that. Stand two well-sealed 1-quart mason jars of hottest tap water on that. Lay an electronic cooking thermometer with face peaking out so I can check the temp without disturbing anything. I tuck the towel over the jars & cover all with thick quilt layers, making sure I can lift the edge to check the temp without jostling anything. At hottest setting, the temp stabilizes at about 106F. Once stable, I prepare the yogurt, sealing in 1-qt mason jars, quickly tucking among the water jars. The temp stays consistently warm until I unpack it all at 6 hrs (I don’t peak before then). The main thing is to set it up early enough so I can dismantle things before bed time!
Hmm. Googling I realize I should have said heated MATTRESS pad. It’s fitted like a bottom sheet, and fits between the bare mattress and bottom flannel bed sheet. I have an old temperpedic mattress that becomes rock-like cold in my 60F-ish winter bedroom. The mattress pad warms & normalizes the mattress way better than an electric blanket.
?? TMI?!
That explanation did help me understand better. Thanks for the clarification.
I love how creative you are Lynn. Thanks so much for sharing. Where there’s a will, there’s a way.
Replace the oven light with a 60 watt and leave on. It will maintain the oven at about 105 degrees. Simply set inoculated pot of yogurt in and leave for 4-6 hours, then strain and bottle if you want Greek. Keep the whey to drink, it is delicious.
Do we leave the oven on at 100F full night to set the yoghurt???
Yes. If you can set your oven to 100-105˚F, then you have the perfect yoghurt incubator. Leave it on until the yoghurt is done.
@Niloofer,
Replace the oven light with a 60 watt and leave on. It will maintain the oven at about 105 degrees. Simply set inoculated pot of yogurt in and leave for 4-6 hours, then strain and bottle if you want Greek. Keep the whey to drink, it is delicious.
This 9-year running thread is great!
I use an instant pot to incubate, but I start cold, with UHT milk. Since UHT milk has been pasteurized at a higher temp, I get to skip the boiling and cooling process entirely. I just add the milk and starter to the pot, hit the yogurt button, and walk away. It takes about 10 hours, at minimum, but I like to go a full 24 for extra tartness.
I know some people have texture issues using UHT, but our texture started out okay and has improved over several generations making it this way. Now we get smooth, creamy yogurt every time, with what is essentially a one-step process!
Thanks for writing Gretchen. Interesting that you are having good luck with UHT milk. I’ve heard that the extreme pasteurization process kills off so much bacteria that it can be difficult to make yogurt. Maybe your persistence has paid off. If it makes yogurt you like, keep doing it!!
Not all electric yoghurt makers are temp controlled. Some are just slow heaters and can get too hot
An electric yogurt maker that gets too hot should be returned to the manufacturer. That’s definitely counter-productive.
I use my vacuum sealed flask (a hydroflask) to incubate my yogurt. I basically heat up milk on the stove, cool it down, add my starter, pour it in my 1Liter hydroflask, screw it tight and 12 hours later, I have yogurt. Easiest thing in the world!
Hi Shiela,
I really like the simplicity of your method. And you are using equipment I assume you already had in the house. Thanks for sharing. This might give somebody else an idea.
Hi, I have a bacterial overgrowth in my upper intestine (its called SIBO, small intestinal bacterial overgrowth) that eating a specially prepared homemade yogurt will help my health. This requires me to culture my yogurt for 24 hours to completely eliminate the lactose that the bacteria thrive upon.
I have not made yogurt for 20 years and then it was with a little multi cup maker which was ok. This is more of a challenge. So if I make it at 6 pm considering all the pasteurization and filling whatever container is going to be used for culturing, then it won’t be ready to refrigerate until about 8 am the next morning.
I have an instapot but not sure if it will let me time it for 24 hours. I don’t have any kind of thermometer. Do I need one for pasteurizing? I can pasteurize the milk in the instapot then wait until it cools down, then inoculate, then choose the yogurt function.
My dilemma is: no where does it say in the tiny ridiculous recipe book for my instapot does it say if instapot has a readout of what the temperature of the pasteurization process is as it heats and cools, and no where does it say that it can be set for 24 hours. Has anyone tried making this kind of 24 hour yogurt with an instapot or any other method? I really need to make this work as I am quite ill.
Thanks for any suggestions… Cathy
Hi Cathy,
I’m so sorry about the SIBO.
Just a few comments: If you make yogurt at 6pm and want to incubate it for 24 hours, it won’t be ready for refrigeration until 6pm the next day.
I assume you are using pasteurized milk you have bought at the store. Right? The reason you need to heat the milk to 175˚F is to rearrange the protein molecules so they will form a thicker yogurt (not to pasteurize it). After you let it cool down, you can set the Instant Pot for 12 hours. When you wake up the next morning, reset your Instant Pot for 12 more hours.
You can make yogurt without a thermometer, but it’s very helpful to make sure you’ve got your temperatures right. You can buy fairly inexpensive ones on Amazon. (less than $20)
One last thing, if you intend to make more yogurt after the first batch, I would recommend you remove a small portion of yogurt from the pot at the 12 hour point and save it to use as starter for your next batch. After yogurt has incubated for 24 hours, there will most likely not be enough active yogurt bodies left (because they run out of lactose, their food) to inoculate more yogurt.
Thanks for this great website! I’ve been making yogurt with homemade almond or soy milk for awhile now. My Dash yogurt maker broke and I wasn’t about to buy a new one. THIS IS WHAT WORKS FOR ME. After heating the milk to 180, cooling to 120, and inoculating, I pour the milk into a 2 cup metal Thermos. I then lay it on a heating pad and place the rest of the heating pad over it. Set on medium it keeps a constant temperature of about 110 degrees. 8 hours later: perfect soy yogurt. What I have found is key to making a successful batch of non-dairy yogurt is to use a double boiler to heat the milk. Scalding the milk ruins it for some reason.
@Stephen Sinclair, I meant cool to 110 degrees, not 120.
@Stephen Sinclair, PAULA: I meant to tell you that in the late 1950’s in northern Wisconsin, my German mother was given yogurt starter by a another German woman in a neighboring town. No one at that time had really even heard of yogurt. Using the raw milk from our dairy cows, she would make the yogurt and then place the wrapped container in a closet pushed up next to the chimney that vented our big wood burning furnace in the basement.
I bet that was some fabulous starter that made delicious yogurt.
Hi Stephen,
I’m not a fan of soy yogurt, so haven’t messed with it much. These are great tips for other people who want to make soy yogurt. Thanks for sharing.
After adding the culture, I pour the mixture into a cylindrical container and put it into the sleeve of my winter jacket. I leave it in a corner overnight and the yogurt is ready the following morning.
I do this everytime and it always comes out perfect.
Ooooh Cynthia,
Haven’t heard this one before. But it sounds so easy and practical. Thank you for taking the time to share it with us.
Hi Paula. I tried to make yogurt in a hot pot as it’s insulated, covered it with a jumper/sweater and placed it on top of the boiler as it’s never warm in the UK. Next day morning the milk was still milk but smelled like sweet yogurt. I left it all day on the table without the jumper thinking that I might throw it away. At night when I opened it, the milk is ropy on top and like whipped yogurt at the bottom. I tasted the bottom yogurt bit, found it tasteless. Is it safe to consume? I have still left it on the table, container is sealed. Thanks.
Hi Shoaib,
This is my yogurt test: Does it smell bad? If so, throw it out. If it smells OK but the texture is not nice, it’s probably OK to eat, but you might prefer to use it in baking or smoothies. Don’t use any of it as a starter for another batch. Do you know what the temperature was inside of your hot pot? I suspect it wasn’t consistently over 100˚F so that’s why it took so long to set. The ropey milk on top could be the result of wild yeast or a starter that has been through too many generations. You can read more about the causes of stringy yogurt in this post.
Was this your first attempt at making yogurt? If so, try again. You might want to think about another way to incubate the yogurt that would be more consistent in temperature. Good luck!
I just use a big plastic thermos. The kind you use for drinks in the summer. About 2 litres, approx. 2 US quart. I got mine at a thrift store. It works perfectly well, was dead cheap, and it doesn’t require electricity or any fussing. Heat the milk then cool on the stove, transfer to thermos, then stir in the starter with a whisk. I do it at night and by morning it’s done.
Thanks for the great site. I came here because I made my usual yogurt with 1 litre of UTH milk plus 1/2 cup of milk powder. Came out stringy and slimy, but the taste is fine. Now I understand why.
KF, Now that’s ingenuity. Love it. This is something everybody could do.
I intubate my yogurt into a covered pyrex container in my conventional oven which does not allow me to set the temperature to 100F. But my oven reaches exactly 100F if I leave the oven light on.
Works great!
Thanks for adding to the conversation, Louise. That is what I used to do before I got a new oven. Just like you say, it works perfectly.
I used my Indian friend’s method. I started at night before bed. Bought a food thermometer – first heating to 180 degrees, then cooling to 115 degrees, added 1/2 cup culture from plain store-bought yogurt, then poured into a Pyrex bowl and covered it with plastic. I sat it on a thick towel on a corner kitchen counter and wrapped the bowl all around with another thick towel. I preferred the 18-24 hour fermentation for a tangy, more thorough digestion of the lactose, and it yielded a slightly firm yogurt. It thickens considerably after refrigeration! I decided not to drain the whey because whey is so nutritious. Everyday the yogurt got thicker and thicker, and within two days, the most telling result of the high bacteria content from the long fermentation was surprisingly clear skin and more pronounced, smoother bowels.
Hi Deedee,
Thank you so much for contributing to our conversation and sharing your method. It’s always interesting to hear about the way people go about making yogurt.
What will happen if I use too much starter?
Hi Cindy, Check out this post about how much starter is necessary.
Hi. I began making yogurt about three years ago and I developed the following system. It’s quite easy – no heat source is required when incubating.
First of all, if you want your yogurt to be nice and thick, heat the milk to 85 C (185 F) and keep it at that temperature for 20 minutes. That will denature all the whey proteins, which in turn helps develop a stronger matrix.
Put the milk into the incubation container and cool the milk to 42 C (108 F). Blend in the starter yogurt. The milk should be about 40 C (104 F) at the start of incubation.
Cover the incubation container and wrap it in a large towel. The towel I use is large enough to be three layers thick all around. Put it in a room-temperature cupboard and leave it undisturbed for 24 hours. Then refrigerate. (I leave mine for 24 hours because that suits my schedule. Once I tried putting it in the fridge after 12 hours and that worked fine as well. I’m not sure what the minimum necessary time might be.)
I have found that over-incubating yogurt produces an undesirable texture, kind of like cottage cheese. This method can’t over-incubate because the yogurt gradually cools to room temperature, reducing the activity of the bacteria.
If the ambient temperature in the cupboard is especially cool or warm, then the incubation starting temperature might have to be raised or lowered to suit.
Thanks for sharing Martin. I especially appreciate that you converted the Centigrade numbers to Fahrenheit for us. I’m guessing you probably have yogurt after 5-6 hours but letting it incubate longer will allow it become more tart which many people like.
That is interesting that you could incubate yogurt by using a camping cooler. Maybe it would be good to get something like this for chilling purposes as well. Sometimes I am going to have to look for a chilling incubator of some sort.
I’ve never tried it myself. But some of my readers swear by it.
I have the Cuisinart Electric Yogurt Maker w/Automatic Cooling, and it works almost perfect! All you do is set the number of hours that you want to hold your temp. at, after that time is up, it automatically switches to cooling the yogurt. I don’t always wait until it switches to “cool”. I’m usually too impatient and just take out the yogurt and stick it in the fridge to cool. If I decide I want to strain it to make Greek, I will do this before refrigerating it.
Can i laminate a robber container with aluminium foil and use as an incubator?
Do you mean just wrapping the container with foil? Haven’t tried that. Let me know if it works.
I’m just getting started with this yogurt making thing, but mine came out great using a slightly different method. I take a thick comforter and put it on my kitchen floor. Then I take my round 4 qt crockpot crock and halfway fill it with HOT (our hot water heater is set to 140*) water from the tap.. I do a gallon of milk at a time in a stainless steel dutch oven. After cooling it and adding the yogurt (and instant milk powder), I put the lid on it, Then I set it in the crockpot halfway with hot water, on the blanket. It sits on top while mostly sealing it…. I scrounged around in my kitchen for awhile to find two containers that worked well together. Then I fill up two hot water bottles (like the pharmacy ones) with HOT water. I sort of position them on the top of the Dutch oven lid, while wrapping everything in the comforter. It’s sort of a balancing act, but I end up with a nice little mound on my kitchen floor that has no problem staying warm for 12 hours.
I have also done it by putting the hot milk into large canning jars and surrounding them with hot water bottles, wrapping it all in a comforter. They make half gallons, btw. This means it can’t spill, which I run a risk of with the Dutch oven. But the Dutch oven means less dirty dishes, and less waste of heat by moving things around, so I prefer that way.
Hi Robin,
Thanks so much for sharing your technique. I could write a book about the ingenious people who make yogurt and how they make it work to fit their situation. Good job!
I put the 115 degree yogurt mixture into a one gallon RTIC metal thermos (that keeps liquids hot for 6 hours), wrap it up and put that into a insulated shopping bag. Six hours later, its yogurt.
I like your method. Sounds so easy, bikegirl.
So I’m currently using the oven method, but it only works 50% of the time. I’m working on adjusting my method to get more consistent results, but until the, what should I do if the yogurt doesn’t set up after I have incubated it for about 8 hours? Should I heat it back up to 110 and let it incubate again? Should I heat it back up to 110 and add more starter? Should I cool it first and then heat it up to 110 and then let it incubate? Just let it sit longer? HELP!
Jessica,
I can hear the frustration you are experiencing. It sounds like your oven isn’t holding the temperature between 100 and 110 degrees F. Have you thought about trying another method?
Meanwhile, your yogurt should set after 8 hours. Only about 5 hours are required to make yogurt when conditions are ideal. You could heat the milk back up to 100 degrees, add more starter and re-incubate making sure that the temperature stays within the 100-110 zone. If you reheat the milk, make sure the yogurt is not over 115 degrees or the starter will be “killed.” It’s possible you don’t need to add more starter if your starter was fresh to begin with and the yogurt bodies weren’t killed by overheating.
I poured ready to incubate mixture into Pyrex glass baking dish with lid, put it in an insulated food carrying bag and set in warm oven for 10hours. Turned out great!!
Sherry,
I thought I had heard it all but this is a new one. Great idea to use the insulated food carrying bag! Thanks for taking the time to write.
I tried the desk top method, and it was really the easiest thing in the world!
I heated the milk until it was just above body temperature (just stick your finger in, if it feels ‘warm’ but not hot, it’s fine). I then added two tablespoons of standard yoghurt to a jar, added the lukewarm milk, and left it out for the day. Our average air temperature in Singapore is 30-33 degrees C (I think just under 90F) , and that is just perfect. I have tried several batches with different brands of supermarket yoghurt and/ or milk, they all turned out great. So anyone living in a hot climate, don’t worry about keeping it warm, the air is enough! On a cold rainy day I left it out a bit longer as the air was cooler.
My mother says she just made it on the countertop.
The benefits of living in a hot climate 😉 It is usually 30-35 C here in the tropics. She added 50% boiling milk to 50% cold, and then a few spoons of shop bought yoghurt, and left it out for 8 hours.
Apparently when we moved to the Middle East she struggled as it was too hot (over 40C). And when we moved to Europe, she just put the bowl on top of the radiator of the central heating. She says all the fiddling with thermometers is nonsense, as yoghurt is quite forgiving. I’ll give it a go and let you know!
Hi Karien,
Hope you had success with your yogurt. I had to laugh at your mom’s comments about thermometers. Of course, when you have as much experience as she does, thermometers are superfluous. But they can be quite helpful for beginners.
I took the whole milk and greek yogurt starter out of the frig, mixed them in a quart jar. No heating of any kind.
Then wrapped a heating pad around the jar like a jacket. Don’t know the temperature, but not very hot.
Took awhile, 24 hours, but produced nice thick yogurt. I am eating it as is, no straining.
If it suits your tastes and preferences, then thumbs up!! Happy yogurt eating.
I make my own yogurt in my frying pan lined on the bottom with cardboard, heated to the correct temperature. The yogurt is prepared and poured into small mason jars to incubate individual yogurts. Mason jar lids are used and stored in the fridge to enjoy.
Thank you, Paula, for sharing so much valuable information about yogurt making. I haven’t even gotten to the rest of your blog yet, but look forward to the exploration.
I use a slow cooker with a thermometer probe inserted near the edge of the liquid (milk/yogurt) which is hooked up to a STC1000 which has the slow cooker plugged in. Its basically a thermostat which turns the slow cooker on when temp drops below the set temp and once its back up it switches off. flawless yogurt every time.
You’re a genius!!
Great tips on this site – thanks very much. I thought I’d share my method of incubation: a hot-water bottle in a microwave oven. After putting the heated milk and yoghurt together in a thermos-style pot (that keeps the heat in), I put a (already prepared) hot-water bottle next to it (in a cover, just like you’d use on a cold night), wrapped the two of them in a couple of towels and then shoved the lot in the microwave (turned off, obviously) – there was just enough space! Eight hours later and it’s the best yoghurt I have ever made (OK, so this is only my third attempt, but it looks very good indeed even if I do say so myself).
The easiest way is to use Mason jars for the yogurt. Place the Mason jars in a camping cooler and full with 110°-115° water. With that much water and the insulation of the cooler, you’ll only loose about 5° in the 4 hours it takes to get great yogurt. Then strain if you want “Greek” yogurt. This is super easy and the temperature stays fairly consistent. If you want tarter yogurt, leave in the cooler longer, up to 10 hours.
Hi Tyler,
Thanks for sharing your method. Would work well if you aren’t making much yogurt at one time. However, I would not like to make Greek yogurt with this method as I would have to empty several jars to strain and then refill. Of course, you only get about half as much yogurt as the amount of milk you started with so there will be jars you don’t need to refill–just wash. I would rather use the 2 qt. Pyrex bowls/pitchers for large amounts. That being said, if it works for you, FANTASTIC! Keep doing it…and maybe your comment will give someone else a good idea.
Hi. I’m kinda new to making Greek yogurt, and after visiting this one website, I decided to use a crock-pot. However, I don’t think that method has been doing well for me. My method of making Greek yogurt is heating a gallon of milk to about 180 F, then turning it off to let it cool down to between 110 – 115 F. Afterwards, I would add about 1 cup of starter yogurt to the milk and stir it, before wrapping it up in a blanket and storing it in a bottom cabinet for about 12 hrs.
But like I said, that doesn’t seem to be working for me, so I was hoping your website could give me some pointers. However, your website seems- or at least to me- kind of vague on how to make Greek yogurt when using a full gallon of milk. What setting should I set my crock-pot to, HIGH or WARM? Should I heat it up and cool it down to, more or less, the same as I would with two quartz of milk? How many teaspoons of starter yogurt should I use, four?
Thanks!
Hi Todd,
My directions for making yogurt do not include using a crock-pot. I don’t prefer to do it that way. Takes too long. You can read more about the amount of starter required here.
I have to say I’ve tried almost every way of yogurt making mentioned, and I really prefer the sous vide method. It’s straight up exact temperature-wise. I do sous vide cooking almost primarily so I have things set up already in a semi-professional way. (cambro insulated tray carrier, 800w submersible heater bar, inkbird brand digital temperature controller to control power based on temperature, and submersible pump with small radiator/fan for when temperature goes too high)
I use a gallon mason jar, and fill the carrier to the lid of the gallon mason jar with water, then removing the mason jar. After setting temp on the controller and heating up (and prepping milk in that time), it’s as easy as dropping a closed gallon mason jar in with lid tight and closing the lid of the carrier. 10-12 hours later, presto.
Many jars could be done at the same time, I’ve just never have done more than two at a time.
Thanks for sharing your method, Norman.
I’ve been making yogurt for a few weeks now following a method I read about somewhere on the web. I pour the started milk into wide-mouth quart jars, cover with plastic lids, set them in warm water in my roaster, and incubate in the oven. I heat the oven on the “hold” setting, which is about 165 degrees, then let it cool down to about 110. The temp holds between there and 100. I check every so often to make sure the temp is still at least 100. Sometimes I turn the oven on to heat briefly then turn it off again. My yogurt usually sets within four hours. So far, this method has produced great yogurt each time. I do have to remove from the jars to strain, and this method does tie up the oven. Am thinking of trying the cooler method, but worry about regulating temperature that way.
So I usually use the cooler method and it works. This time, I tried the crock pot on warm and it was a dismal failure. Too hot, killed the bacteria. Unfortunately I have to start over, will go back to the cooler method. Sad way to start my day….waking up to 4 quarts I have to toss.
Leah, I know this is too late for your recent batch. Next time, you might try to save it. See this post for instructions.
Thanks for sharing this post about making yogurt without a machine! I just wrote a post about reasons to make your own yogurt, and at the end I referred to your blog! Hope you like it 🙂
http://healtholution.ca/2016/01/02/5-reasons-why-should-make-your-own-yogurt/
I feel like I’m coming late to the party, but I’m here now! I’m about to make my third batch of yogurt, just waiting for the gallon of milk to thaw. What I’ve been doing is put the milk (yes the whole gallon) into the crock pot on low and patiently (not) wait for the temp to get to 180. Then patiently (not) wait for the temp to drop to 110 and temper the half cup or so of yogurt and mix in. I then put it all in either pint or quart jars and put in a cooler (or 2, I don’t have a big one) and add hot (100 degree +/-) up to the neck of the jars. I close the cooler(s) and wrap with two thick towels, folded. I leave that over night. Next morning, I start draining. I use several coffee filters in a strainer on a bowl. (I need to find a restaurant supply place and get the big coffee filters.) If it’s a work day, I put it in the fridge and by the time I get home 10-12 hours later, I have wonderfully thick Greek-style yogurt. This time around, I want to take the hand mixer to it and see how much creamier I can get it and also puree (and heat) some frozen fruit to put in the bottom of half pint jars, then the yogurt. These are straight side jars so I can put them in the freezer. It’s just me eating the yogurt, and I might not get all those half pints eaten in a time span I’m comfortable with. I’ve read in lots of places that the good bacteria in the yogurt hibernates (goes dormant) in the cold but will wake up when the temp goes back up. That gallon of milk better hurry and thaw, I’m dyin’ to get started!
I’m making this yogurt nearly every day now for my family of 10 — thanks to your great instructions. I own some plastic Ball brand freezer jam containers with twist on lids. I layer homemade blueberry sauce and greek yogurt in the cups and send them off to school with my kids. Also, I am so glad you suggested buying that strainer because it makes the whole process so easy to use.
Glad to hear from you Cassandra. I use the small glass Ball jars for my yogurt with plastic lids, but plastic containers would definitely be better for school kids.
If you want to make, say, a fruit yogurt, and you blend the milk with fruit and honey before heating the milk and adding the culture, will it affect the ability of the milk to incubate and turn into yogurt (with it having some bits of fruit and some honey blended in)?
Amy,
Honestly, I’ve never tried this myself. But it doesn’t seem like a good idea for the fruit to sit at 100 degrees for 5-15 hours or however long you incubate the yogurt. I recommend adding the fruit and sweetener you prefer AFTER the yogurt is done incubating.
I use a coffee carafe. After much success with a regular sized one (the kind restaurants will leave at your table for coffee refills) my hubby gave me a commercial sized one (like you find at Starbucks). Works brilliantly! I heat my milk, cool to 115, add my starter and pour it into the carafe. I remove the pump insert first and plug the spout opening with a little piece of paper towel. I can do about a half gallon at a time. We like ours extra tangy so I generally leave it for 12 hours or more, but I have drained it after 8 and had wonderful yogurt.
Two more ways to incubate yogurt:
If you live in a cold climate, put the yogurt on or near a heating register and cover with a sheet.
If you live in a warm climate, cover it with a dark sheet and put it in a sunny window sill.
These methods aren’t quite so exact — but neither are lactobacillus. I’ve done both many times and never had a problem.
Thanks for the ideas Ethan. You are so right about lactobacillus being inexact. 🙂
One thing that I do not see covered here is high altitude. I never have had a problem having yogurt set previously—until living @6,900 feet where it is definitely a different world with even boiling water, not to mention following high altitude recipes for baking and foods still not turning out the say they should. Even leaving the yogurt mixture set overnight, it has not been getting thick so I end up drinking it. Very disappointed and wonder if you have any high altitude tips for yogurt???
Thanks.
@Janet, We live in Oaxaca, Mexico, which is about the same altitude as Denver. I heat the milk in the microwave in 2 8-cup Pyrex measuring cups (about 13 minutes on HIGH each), cool to about 115 degrees, stir in 2 T yogurt starter (1 T for each quart of milk). Then, after I have lined a large cooler with a blanket and placed a large tamale pot (very vertical aluminum pot with lid) in the middle of the bottom, I put the 2 Pyrex cups w/lids on either side. Pull the blanket up and over the whole thing and close the cooler. I leave for about 18 hours (when I take it out of the cooler I take out about 1/4 cup for starter), then refrigerate the yogurt overnight. Then strain in the refrigerator for a day. Delicious Greek yogurt. I let the frozen starter come to room temperature when I start heating the milk for the new batch; I read somewhere that yogurt doesn’t like drastic changes in temperature, so you don’t want to thaw your starter in the microwave.
Having a heating pad that turns off automatically is no problem! You can still make yogurt. Put the bowl on top of the heating pad, inside a cardboard box. Turn on the heating pad, close the lid and keep it closed (with a weight, a bit of tape). The box traps the heat even after the heating pad turns off. I’ve used this method successfully.
Thanks for the tip, Superwoman.
I wondered if it’s possible to cool the milk too much before adding the starter and incubating?
I heated it up and then put it in the freezer (and forgot about it for 8 hours). It had just started to freeze a little, it’s not back at room temperature.
Would you know if this still ok to use (if i add the starter now)?
Thanks!
Paula it worked quite nicely. I left it for 6 hours instead of the 4 hours I originally planned. I did notice though my oven timed out after about 3 hours and I had to turn it off and back on. But was ok again after I restarted it.
I’m trying mine in the oven today. My oven isn’t ment to be set so low but I figured out that although the temperature markings don’t go low enough, I can still turn it down lower than the markings. It seems to be keeping the yoghurt at the right temp (I have a thermometer sitting in the yoghurt and the casseroles dish lid sitting on top) and it’s been in for about 3 hours so far 🙂
Hope it worked for you Libby.
My mum has always made her own yogurt and in the UK most homes have an airing cupboard which keeps the temperature perfect for culturing yogurt. Another option I have seen is to pour it into a thermos and leave it to set in there. I haven’t tried but can’t wait to try your recipe for Greek yoghurt thanks 🙂
Sorry I meant a thermal food container (not a flask)
What temperature do you use for heating the soy milk in the beginning of making yogurt? Is it the same as for normal milk?
I have an old gas oven which has pilot lights at the burner. I is small flame, however it makes temperature inside turned off oven around 110F all the time. So I use it to make yogurt. Another thing – as a starter I use creamy center of Camembert or Brie soft cheeses (one tea spoon). It comes out very delicious. Just make sure the cheese has expiration date at least in 3 weeks. Hope this would help=)
No one has posted here for a while, but I’d like to add a first-time success story + a question.
I made a wonderful batch of yogurt — my first — the other day. I used the crockpot insert, put it in an ice chest on top of a heating pad, with a very thick towel on top. It seemed to set up after only 5-6 hours, but I left it in there for 8. I started with the heating pad on low, and checked the temperature of the yogurt periodically since I was home anyway. After a couple of hours the temp was about 103, so I set heating pad to medium heat. That got it closer to 115 or so, so after a couple of hours of that I put it back to low. The yogurt was awesome, and I’m happy to use this method.
But, it would be nice to use the crockpot if I could. I’m unclear on the directions. Did you have a bowl or pyrex container with the milk, inside the crockpot insert? (I guess I could do this but I’d have to make a batch every day or 2, since I go through a LOT.) OR, did you have the milk directly in the crockpot insert, and then wrap the insert before ‘inserting’ it? (I’m not sure that would work.)
One of my crockpots has a ‘keep warm’ setting, that’s lower than ‘low’. I might try that with milk directly in the insert, but I have a feeling it will be too warm. I think I’ll fill it all the way up with 115 degree water, and put it on ‘keep warm’ for a couple of hours and see what the water does with it….
Thanks for your post! I’m so happy to be able to make my own yogurt, and really happy that it didn’t take several botched batches to have a good one come out.
I really wanted to find a no-energy method to incubate (besides using my oven set to 100 degrees). So after I added the starter to 115 degree milk, I poured it into a very inexpensive 2-quart, wide-mouth water cooler (the kind with the screw cap and pull-up pouring spout on top). I put this in a thermal hot/cold grocery bag. Then it was placed into a vinyl, soft-sided, 48- can cooler I had. I covered it well with a thick blanket, and zipped up the top. All of this only took a minute or two. I ended up with beautiful, super-creamy, thick yogurt with no whey on top! The yogurt still registered 100 degrees 7 hours later! So easy… no hot water poured in a cooler, mason jars of hot water, changing out of water, electricity, gas, heating pads, light bulbs, etc! It works just as great with only the 2-quart container and the thermal grocery bag! I just took extra precautions.
Hi Paula,
I can’t wait to try this. My toaster oven’s lowest temperature is 120. Is that too warm to incubate the yogurt?
When I had my old oven that wouldn’t go below 250 degrees I put a trouble light with a 100 watt incandescent light bulb in the oven and it kept the oven at 110 degrees all night. Now I have an oven that I just use the proofing feature over night and my yogurts is perfect. I usually make 2 to 3 gallons at a time. I have 3 sons who also love yogurt.
Wow! Guess you also have a big oven. 🙂
I heat the milk in 2 quart pyrex measuring cups in the microwave then I incubate it in 2 calphalon stock pots with 1-1/2 gallons in each pot. Works wonderful!
I feel like I am coming late to the party but this is how I make my yogurt. I use a recipe that I developed about 18 years ago and I use powdered milk, store bought plain yogurt, and a small bit of gelatin. After I mix it all up, I put it in glass jars and place them in a plastic container with warm water coming about 2/3 of the way up the side. This I place on a heating pad set on medium. I wrap two thick towels around it and put it where it won’t be disturbed and in 4 to 4 1/2 hours it has yogged beautifully. I have never had a failure! I have strained it for yogurt cheese, and if I want flavored drink, I mix it with fruit jam. I live in Costa Rica where a good variety of yogurt products wasn’t available 18 years ago. They are now, but I still prefer my own.
Hi Yvonne,
You aren’t too late. This party is still going strong. 🙂
Fun to read how you do your yogurt. Perhaps it will give somebody else an idea. Appreciate you sharing with us.
I also wanted to mention that Torani syrups make wonderful flavoring for yogurt drinks. I love your website. I’m 74 and still so much to learn.
Hi Yvonne,
Agreed about the Torani syrups. I speak about them multiple times on this blog. Trying to wean myself off them at the moment, however. Too much of a good thing. 🙂
Well, I have a little old husband who doesn’t feel like eating anymore so my mission is to get some nutrition into him. One of my foods that he likes is home made yogurt made with half and half and honey. He will eat this. I have an old electric range that has a front burner that goes down to about 115 degrees so I just put the bottles in a pan of water there and it works fine.
In the past I have used the blanket on the container in a closet next to the water heater and that worked fine too. lol
When one batch didn’t quite set before I went to work (i don’t like leaving the oven on, even on the dough setting, when I’m out), so i drove it to work and left it in the car for the day. Set beautifully. It was a mild spring day, and there was shade from a tree.
Hi, do you need a starter to make yoghurt or would it be OK to for instance use probiotics? Can you use ordinary store bought milk to do this?
Yes, you can use ordinary store-bought milk. No problem. And yes, you do need a starter–e.g. yogurt from the grocery store with live cultures but no other additives. I don’t know much about probiotics so can’t answer that question.
I’m trying to make my own yogurt for the first time. I tried the slow cooker method. After 8 hours I checked it and I had some yogurt floating in some warm milk. Panicked I stirred it all up to the same consistency, turned the slow cooker back on to “warm.” Did I just not wait long enough? But I’m wondering, if it does turn to yogurt, will it be good or will we get sick eating it? My husband is skeptical as it is so I guess I’m looking for some reassurance. Is there the possibility of over-cooking yogurt? What does happen if the milk-mixture becomes too cold during the yogurt-making process but then you bring it back up to the correct temperature?
Hi Katina,
Hmmm. Several possibilities here. For one thing, once you stir your yogurt, it is done. It does not like to be disturbed during the incubation period. 8 hours should be plenty of time so that is not the problem. Yes! There is a huge possibility to “over-cook” the yogurt. The “warm” setting on a slow cooker will definitely kill yogurt bacteria if it reaches the full “warm” temperature. Your yogurt must not go above 115-120 nor below 90-100 F. I’m not sure how you used your slow cooker–I’ve seen some crazy directions on the web but you must be careful to keep your temperatures in range. As far as the safety of the “yogurt” you just made, if it smells alright, refrigerate and use like buttermilk if you want or put in smoothies. If you or your husband have any qualms about it, throw it out and make smaller batches until your get your method down pat.
Don’t be tempted to give up if you really like yogurt. It’s worth it and so easy once you figure out what works for you at your house and with your tools.
I love these suggestions. I am including a link on my webpage to these options. They are great! Thank for the information.
I didn’t see this idea, but maybe I missed it… we make yogurt in a big thermos. We pour the milk in the thermos first to see how much we need, then put it in a pan on the stove. After it’s 110, we pour it back into the thermos and mix in the starter yogurt. It’s a perfect little yogurt maker for us!
Hi Paula,
Since I’ve read your blog I’ve started making the most delicious yogurt I’ve ever tasted. Your yogurt instructions and recipe is the easiest and best! For all of the readers who have ovens that only set to 170 or 200 degrees, you might like this tip. My oven only sets at 200 degrees also. You can turn the dial before 200 and find 100 degrees if you have an oven thermometer. I did so with my oven and I marked the dial. The oven stayed at 100 degrees and the yogurt comes out great!
Brooke’s going to kill that router, which will likely cost more to replace than just buying a yogurt maker would have cost. Routers have a tendency to get pretty warm, which is why it would work well for this, but they need to be able to dissipate that heat or they’ll slowly cook.
Oh yes I forgot to mention since I use gelitin I there was no straining. the yogurt came out very thick. I might even use less gelitin to get a less thick yogurt.
Thank you every one I now have a new skill and can save my family a bunch of money.
I did it.
LOL yes it’s not as exciting as hatching chicken eggs but WOW what perfect yogurt.
I used
2 qts smilk
2/3 c dry milk
4 tsp organic gelitin
1 c sugar
2 tbsp homemade vanilla < if any oen wants to make that just email me its easier than yogurt :=)
1 6 oz cup of organic vanilla yogurt.
The yogurt came out like amazing vanilla pudding. I made a half gallon and my kids ate all if it in 2 days.
LOL guess I will have to make it again. total cost was $3.25
The incubator was set at 103 for 8 hours
If any one comes across a used incubator, buy it
Ps this is my first time reading this site and I already love it.
Thanks
Michelle irby
mirbymom@gmail.com
"Irby family 6 and growing strong"
Thanks for sharing Michelle. Glad to hear the incubator works!
I am making this post from my phone and I am blind so if there are spelling errors sorry I can’t believe that no one has ever tried a chicken egg incubator I have one with a thermostat that keeps a constant temperature and I hatched chicken eggs as well I have not tried it yet but I’m going to try today I will let you know how it works out I can’t believe it won’t work though I can set the temperature as high as 115 and as low as 98 I can even moderate the humidity since I have a hygrometer I’m so excited I can’t wait to try it I just know it will work perfectly
Well Michelle, that sounds like the perfect environment for making yogurt. Not as exciting as hatching chickens though. 🙂 Hope it works.
Oops–forgot to mention I turn the skillet on low. :{
I have an older rectangular electric skillet with a high lid that holds six 32-oz. plastic yogurt containers (Brown Cow, Stonyfield Farm, Horizon, etc.) I put a small amount of water in the skillet, cover it, and leave it overnight. Nothing else to do except refrigerate next morning.
If you don’t plan to strain your yogurt, this is a great idea. Thanks so much for sharing.
I made my own for the first time following the instructions to use a heating pad, which I have but could not find. but I did find my old electric blanket.. I put the pot covered on the blanket and folded it over completely like a cocoon, it came out great..
After straining my yogurt, I never throw out the whey. I give some to my dog every morning, mixed into his food. Animals need probiotics too, and he loves it.
Hi Paula,
I just found your blog and made your yogurt recipe today and have to say, wow! It is so creamy and thick, I’ll never go back to store bought again. I also have an incubation method to share. I have a new stove that has a proofing setting but, I bake cakes out of my home so I can’t tie up the use of my oven for 8+ hours so I devised a different system that worked like a charm. I created a water bath in my microwave by heating some water in a ceramic casserole dish. I then placed my bowl of milk mixture into the water bath, placed a plate on top for a lid and then wrapped the whole deal in a big beach towel, closed the door and left it for 8 hours. The airtight environment worked like a charm and I have beautiful, thick creamy yogurt. I have a very small kitchen and my microwave oven is the only place that’s draft-free. Thanks for the recipe and all the helpful tips.
Hi Sue,
This is an awesome idea!! I have often used my microwave to proof bread, but never to incubate yogurt. But, why not? Thanks so much for sharing and giving us just one more way to do it.
Dear Paula,
I have a leave in thermometer which only alarms when something heats up to a set temp.
I see a picture of your leave in thermometer which you described that alarms when the yogurt cools down to the proper temp. I can’t tell from the picture which brand it is. Can you advise me?
Thank you for your great blog.
I have just made my second batch of yogurt, it’s perfect!!
You don’t need a fancy sieve to make strained yogurt….just buy 1/2 yard of unbleached muslin, cut about an 18 inch circle, hem it if you can sew, it will last longer. Place the muslin in your sieve and the sieve in a bowl with a couple of inches of space underneath it to catch the whey. Let it sit about an hour, depending how you like it. Gather the sides of the muslin and plop it into a bowl for whipping. Practically all of it comes off the muslin. Then you can give it a quick wash for next time.
Hi Jean,
You are right. You don’t have to have a fancy strainer. But if you make as much yogurt as I do, it is a wonderful thing to have. The muslin as you described works great, as does a clean t-shirt or a simple cotton tea towel. Thanks for writing. Happy yogurt eating.
Hello again Paula,
Well after following your expert instructions, I made two successfull batches in a row. (I use the proof setting on my oven). Said batches were made with 2qts of milk each time,
incubation time 8 hrs. Soo I decided to make a gallon in one go, doubling the amount of yogurt starter…..not so good, I incubated it 10 hrs but its too runny and has a stronger fermented flavor. Do you think it’s ..just one of those things…or is it advisable just to make 2 qts at the most at one
time.
I have enjoyed reading your website and all the comments, thank you!!
Jean
Hi Jean,
I make a gallon of yogurt every week but I use 2 4-quart containers. I would think heating a gallon in one container would make it difficult and more challenging to heat and cool down with the temperatures staying where they should be throughout all of the milk. Thank-you for your kind word about my website.
I tried making my first batch of SCD yogurt yesterday in the oven. I put it in the oven, after heating it up first, then wrapped the pyrex of milk in towels and left it. It was still soup 10 hours later. This morning it was starting to thicken but not yogurt. So I left it when I went to work today. Is it going to thicken more? Is it still safe to eat? I put the oven back on for a few minutes to heat it up again..?
I loved your post!!
Just wanted to share, I use my steam cooker to incubate my yogurt (in covered containers, so no water will get into the yogurt), works like a charm.
Hi Pam
I use regular jar lids on the jars, and the water is up to the shoulder of the jar. I have a nice large pan so everything fits nicely, then I put the probe from the digital thermometer into the water set it to sound an alarm if the water temperature goes over 110 degrees, cover the pan and let it do it’s thing. Sometimes there are minor adjustments to make but temperature changes happen very gradually so if you keep an eye on it you won’t have any problems.
I have a glass top electric stove with a 5th burner called a warming burner. I put a large pan of warm water on top of this burner in which I have placed 5 quart jars of milk for incubation. Set to low temperature the warming burner keeps the incubating yogurt at the ideal temperature.
Hi Jane,
Another great way to incubate! Thanks for adding your method to the list.
Thanks, I was wondering if that would work. Did you cover the jars with anything? How high was the water on the jars?
How much starter should I use for each quart of milk. I do have a setting for bread proofing and I want to do separate quart containers.
Thanks.
My chicken incubator works perfectly. Apparently, the temp for chicks is also great for yogurt. Only took four hours!
Hi Kristina,
Thanks for offering one more idea for how to incubate your yogurt.
I used the cooler technique and it worked perfectly! After 3 hours I opened the lid and the termometer read 113. I put in another hot kettle for another 3 hours and the yogurt came out great. What an amazing tip.
Thank you, Paula .. you’ve provided just the encouragement I’ve needed w/the multiple ways and means you’ve shared for making yogurt! I recently bought a yogurt maker which is great for making little jars of the yummy stuff. My 4 year old grand-daughter is delighted to make it w/me .. and then eat w/fresh fruit 🙂
Now, you’ve given me the way to get the quantity needed to make Greek yogurt – and she can help make that too!
Wow, this article and its comments are chock-full of ideas — thanks! The whole site looks awesome.
I’m going to try a combination of things. Our (poorly insulated Canadian) house is freezing. My sister-in-law gave us some of those homemade hot/cold beanbags as a gift years ago, and they’ve been in the freezer ever since, taking up space. (Duh. First winter in a new house.) Other than for keeping groceries cold in the car in the summer, I haven’t known what to do with them because I don’t do microwaves either.
I’m going to warm them up on the top of the woodstove and try putting yogurt on top of that, at around bedtime or a bit before.
We’ll see! Thanks again for the great tips!
Ohh! I am so glad that someone else has discovered large Adams Peanut butter jars for this. They hold a touch over 1qt and have straight sides unlike canning jars. I love to “scald” ( 180 degrees) a whole gallon of milk at once, divy it up into 4 super-clean jars and then pop them in the refridge. ( no waiting for cooling or worry about plastic. ) Whenever I want to make my next batch I grab one, heat it a little in the microwave or a pan of water and plunk in the starter. I have an older 1 quart maker that the jars fit perfectly in. Thanks for the light bulb in the oven idea! I was hoping for some idea that any friend could use that woudn’t involve buying equipment or boiling lots of water.
Thank you so much for this! None of these methods would work for me, but it made me think “outside the box”! I put my yogurt-to-be in 1 qt mason jars, wrapped them in two beach towels and popped them in my cold oven (the light bulb blew a while back and hasn’t been replaced, and the coolest heat setting is 175 degrees F). I used a method that I use when making bread to get it to rise, as our house is pretty cool when it isn’t summer. I placed a pan on the rack below my jar and filled it with water from my tea kettle. In the morning, the jars were still nice and toasty, though the oven had cooled by the time I got to it, and I’ve got beautiful yogurt.
Thanks so much for sharing that method. I wonder if I turned my oven to ‘warm’ (probably about 175 degrees) for a minute and then turned it off before placing the yogurt to be in the oven w/the hot water under as you’ve described, if it might help?
I have a yogurt maker with matching jars also, but instead of using the matching jars, I put a large container with a lit that fits into the maker. It still works great and it makes it easy to stain for greek yogurt, without all those individual portions. After I strain, I use the matching jars just to make easy individual servings 😉
no rush – have found a mason jar that can replace the missing jar. I’ll just have to use a different incubator for it. (I’m mostly disappointed ’cause I thought the yogurt maker with its matching, fitting jars and its matching, fitting lids was so sweet!)
There is a silver lining to this mishap: I will incubate the 5 jars as usual, but I will “think outside the box” for the gosling jar, the ugly duckling. This will make me more comfortable with abandoning strict measurements and instead making larger batches – to be incubated in random places!
Back again! I’m in the midst of heating my milk (for my second batch) and one of the 6 perfect 6-oz-jars-with-matching-lids from my yogurt maker fell and BROKE!
Have gone to the cupboard and found another glass that will fit in the yogurt maker. However, the lid fits over it but doesn’t fit tight.
Thus, my Current question:
Does the lid need to fit tight (and make a seal) or does it just have to be a cover?
Update: it is now 7 hrs and 45 minutes since the start of incubation. (I followed some advice (from one of the many How To sites) that suggested using seven hours the first time – then modifying to taste.)
At seven hours I jumped up an checked it – I had SET YOGURT!
** I ** have created the crème caramel of yogurt!
I have now eaten half a batch of the most exquisite, thick, lovely *warm* yogurt!
I realized that the chilling is merely to arrest the incubation process – and I love warm textures – so I tried on right away. Aaahhhh… It cleaves on the spoon like crème caramel!
3 warm cups later… I am sated!
In the process of making my first ever yogurt. (I’m someone who is known for my ability to the kitchen on fire if I try to boil water.) Bought a yogurt maker in a rummage sale last weekend and today bought a thermometer and a smoke detector. Now realize that the yogurt incubator is not doing the job. I’m house-sitting – just packed my heating pad, water-bottle, etc and put into storage a week ago. Thought there was a crock pot (I’ve never used a crock pot) but got suspicious when the liner wasn’t ceramic (like I’d read in other posts). It isn’t a crock pot. It’s a rice cooker.
After reading more posts (and many many blogs and websites ) I decided it is more dangerous to kill the yogurt with too much heat than to bore the yogurt to tears with too little heat. Thus have put the rice cooker away. Contemplated putting it outside like the Texans, but realized I’d sooner make popsicles than yogurt here in Canada. Meanwhile, have been nudging the yogurt maker by putting a tea towel on it and resting a pot of hot (but not killer hot) water on that. It’s working! I can’t finagle my thermometer in there, but I know that 100 F must feel close to body temp – like a baby’s bottle – so I’m touching the lids and am pleasantly surprised!
Have just dug a microwave aches-and-pains-bag out of the couch. (I remember having that bean-bag sensation when I sat there.) It is being heated and will replace the tepid pot of water while I endeavour to sleep. I shall rest, resting assured that the worst that will happen is that it will take more tomorrow hours if it isn’t warm enough. Thank you all for putting my mind at ease about that. Sleep well. ~Deborah
I warm up a wide mouth stainless steel thermos and put the mix in there. Leave for 5 hours to overnight on the counter and then put in the fridge. Works like a charm!
My son spent time in Jordan. He taught us to incubate yogurt like his host family did it: using a 2 qt. plastic thermos, overnight, sitting on kitchen counter. Next morning he strains it using a muslin pillowcase suspended over a bowl. Delicious, smooth, creamy.
We enjoy a homemade Jordanian breakfast with his yogurt (drizzled with olive oil), hummus, black bean purée, chopped tomatoes drizzled with olive oil, eggs (hard-fried in olive oil), and flatbread. Filling, and yummy!
Wow Monica! That is some breakfast. What fun to have your son bring home a wonderful tradition from another culture. Thanks for sharing.
Would a heat plate with a temperture control placed in a camping cooler work for my yogurt?
Klyon,
If it goes as low as 100 degrees, it would probably work. You might try just wrapping the bowel of warm milk with heavy towels and putting it in the cooler. If the cooler is a good one and in a warm house, it should stay warm long enough to do the job.
What is the best temparature to heat on the soy milk when starting the yogurt? Do you use the same temperature as for normal milk?
Homemade yoghurt is the best. I heat the oven on 200 degrees the whole time I am prepping. Place it in the oven in mason jars, wrapped in towels in a large stainless bowl. Then turn the oven off. leave it over night and it’s good in the morning.
Good morning! My son has developed food allergies to raw fruit and veggies and is NOW lactose intolerant! Poor boy feels like everything is off limits! I’d read you can incubate the yogurt for 24 hours to remove lactose. But buying a yogurt maker just to experiment seemed expensive, plus my small house has no storage and the little jars seemed like a PITA. Then I found your website.
However:
my oven doesn’t have 100
my heating pad turned off
no warm radiators in summer
outside not quite hot enough
Tried the crock pot method, yogurt didn’t set because it was too hot 🙁
I killed the little yogurt babies!
So… I tried leaving the lid off the crockpot and ta-da, it worked! He can eat it but so sour we have to add sugar 🙁 Next I’m going to try using lactose-free milk.
FYI: I am also lactose I tolerate and only use lactose free milk for making my yogurt and you can also make cream cheese if you can find a starter. Good luck. Sorry to hear of all of your sins food allergies. Also, lactaid makes a lactose free cottage cheese, ice creams and green valley makes sour cream, cream cheese and yogurt. I find them at various stores, HEB, KROGER, and Whole Foods. Brutes also makes lactose free vanilla and chocolate ice. Teams.
Here in Phoenix, incubating yogurt in the summer time is a snap. I set the covered bowl on my porch as soon as the temperature outside is at least 100 and leave it for a few hours. I just let the desert climate do the job.
Sarah, any temperature above 125F and you will kill the culture. Yogurt will keep on working at temperatures as low as 70F and below – it just takes much, much longer.
I keep the milk (with a cup of 50-50 sugar/Splenda in it plus 1/2 tsp salt) at 180F for at least 5 minutes and then cool it to 120F. I use a blender to mix the culture with part of the cooled milk (I make a gallon at a time) and then mix the blended culture into the rest of the cooled milk. I strain it into 4 quart jars and pop it into my yogurt maker and in 3 – 8 hours it is ready. Perfect every time!!! I have made over 100 gallons of yogurt in the past 2 years… a gallon a week.
Good luck,
Bill
mryogurt.info
You say you use this method because is healthy. Well, if you warm your milk (or anything for that matter) in the microwave, much of the “healthy” part will be lost due to the creation of free radicals (those nasty little buggers you try to combat with anti-oxidants.Knowing this, I do use my microwave, but in a very restricted way, when I absolutely cannot employ any other heating method. If you do use the microwave as you say so frequently, and are concerned about health issues, I personally switch to heat in a double boiler, or some other method that does not involve microwaving
I had an old Wolf range at my last home with a pilot that kept the oven at a perfect 100*. I used the stainless bowl from my Kitchenaid mixer to make a gallon batch at a time. Our new Viking is awesome, but its electric starter doesn’t warm the oven. Voila: http://www.amazon.com/dp/B000Q7GUJ2/ref=pe_175190_21431760_B1_cs_sce_dp_1
I also use it to rise pizza and bread dough and dry fresh basil and oregano. My wife dries fruit with it (go figure).
I was on here the other night after I made a batch of yogurt and then realized I had no way to keep it warm. In the past I used the oven light method, but I realized too late that my oven light bulb was broken. So I spent the night getting up to put the oven on for a few minutes and then turn it off.
The next morning I had to go out for the day and I had an epiphany – I screwed a regular 60 watt lightbulb in the oven socket and put my yogurt close to it and laid the thermometer on the oven rack. It kept the yogurt perfectly warm at 100 F for the rest of the 24 hours (I make SCD yogurt). I took the light bulb out immediately after so that I wouldn’t forget the next time I use the oven – that would probably shatter the bulb.
I used a large one liter glass peanut butter jar (sterilized with hot water) and it worked perfectly. I would not recommend ever putting anything hot into plastic – you kind of ruin the benefits of making your own yogurt because then plastic is going to leach into your beautiful yogurt.
I hope this helps people out there. It really is a simple thing to do. I also bought myself a candy thermometer with a clip so I don’t have to stand over the pot and hold the thermometer. I could see the dial from across the room so I could babysit the heating and cooling milk without having to get up all the time.
The other incubation method I just thought of was using something like a trouble light (if anyone has a mechanic husband out there or is a mechanic herself you’ll know what a trouble light is) and put it and the yogurt into a relatively large cooler. You could use a towel to seal the edge if there is a gap. I’ve also read about someone placing large pitchers of hot water into the cooler surrounding the yogurt and then replacing the hot water periodically.
Marilyn,
You are my kind of girl. Resourceful! Thanks for taking the time to share your tricks. pr
I use my electric wok with the thermostat set to barely-above just on.
I tested a few different things (e.g. crock pot, warming tray) by filling it with water or placing a Pyrex measuring cup of water on it, turning the thermostat to its lowest setting, and testing the temperature over a few hours. The wok gives the best results.
I found your site while searching for a way to make buttermilk from the yogurt whey. I haven’t found what I’d call a recipe, so I’m still looking. Any ideas?
Jenifer,
Thanks for sharing about the wok. I do not have know about making buttermilk from whey, but whey by itself will substitute for buttermilk all by itself in most recipes. Check out my biscuits made with whey.. Pr
For buttermilk, I just put about 1 cup of buttermilk into a gallon (well a little less than a gallon so the starter will fit) of whole milk, shake well, and set it on the counter until it thickens (about 24 hours). When I only have about 1 cup left, I dump it in on top of a new gallon and start the process all over again. For your very first batch, however, you’ll need to use purchased buttermilk. I make 2 quarts of whey a week and it’s never enough! I rinse my hair with it, use it as an antacid, tenderize my meat, soak my grains, etc. LOVE whey!!!
Hi! Thanks so much for your info. I purchased the bullion strainer you recommended, it works wonderfully. I make at least a gallon a week. I used the crock pot method first, it was too watery. I used the oven and it didn’t stay warm enough. Finally I decided to use the heating blanket my in laws gave my husband and I for Christmas. It works wonderfully. It keeps the yogurt at a perfect temperature every time. I always add a little homemade jam. I usually only let about 3 cups of whey strain out and its perfect. So wonderful and tasty.Your video was very helpful– thanks!!
Thanks for writing Brittany, Love hearing that you bought and like the boullion strainer. I don’t think I’ve convinced many people that you really don’t have to use a cheesecloth if you buy the right strainer and it is SO much easier. pr
HI, Thanks so much for your incredible website. You have so many good ideas and I haven’t even seen all of them yet. I want to make yogurt in the oven. My oven with the light on only gets to 80F. Do you think that will work? Should I get it really hot first, like 300F or so and then wrap my ceramic bowl in towels? I am assuming I should cover the ceramic bowl with foil. I also have a rice bag that I could zap in the micro and put it in there as well; it does hold a lot of heat. Thanks so much!! My last batch in the yogurt maker was creamy and delicious, thanks to you!!
I think my yogurt is too watery. I used a digital thermometer. When the milk reached 178, I added the starter and popped it in the over at 100 degrees but my over fan kept blowing so I turned the over off and the light on. Still this morning 16 hours later it’s getting there but doesn’t look like yours. How long do you keep the milk at 180 degrees? Do you put the starter in at 180 or 120 degrees? Lastly do you strain in or out of the refrigerator? Also, you are very right about cheesecloth etc. Very messy.I’m investing in the strainer today.
I love your web-site. Once I perfect the yogurt I’m moving on to lemon curd.
Thanks,
Sarah
Sarah,
First, when the milk is at 178 it needs to cool to 110-113 before you add the starter or it kills it immediately. Let it cool to 110 then mix the starter in then incubate.
Any straining can be done outside of the refrigerator.
I used to use thick wool sweaters to wrap around standard plastic jars (750ml) to keep the yogurt warm during incubation. The problem with this method, I find, is that the milk cools down too much after 10-12 hours, and the yogurt sometimes requires extra heating to finish the incubation.
Recently, I started using a camping cooler for this purpose. I fill it up with warm water (104F) to about 3/4 of its size. Then I carefully put the plastic jars (three 750ml-size to do 2 liters of milk), filled up to about an inch below the rim with milk and a teaspoon of starter, into the water bath. This way the plastic jars are just floating on top of the water, without toppling, just like an iceberg: only the non-filled part of the jar and the cap are above the water. Because of the large amount of water (6-7 gal) and the insulating properties of the cooler, the temperature stays fairly constant: I measured about 101F after 8 hours. The result is an outstanding yogurt in shorter time.
As a starter I use a teaspoon of yogurt per jar from my previous batch. If the previous batch is gone I use a plain yogurt from the store.
Here is a link to a website that gives a more scientific perspective to the commercial methods for making yogurt.
http://www.foodscience.uoguelph.ca/dairyedu/yogurt.html
I live in the Philippines and make yogurt from powdered whole milk. I heat the water in a pan to very warm, add enough milk powder so it is a higher than normal concentration (thicker yogurt), add the starter, whisk, and pour into 1 liter jars with tight lids. I put these in my picnic cooler and pour in hot water to the top of the jars. I put on the lid and have lovely, thick, smooth yogurt 8-10 hours later, depending how tart we want it. I have tried other systems, but this has been the easiest.
I just started making home-made yogurt this summer. The oven light method worked okay. I wound up having to incubate for a long time: about 16 hours. I live in Montana, and now that Fall is on the move, the house temperature has dropped and now the oven light is not warm enough to incubate. Sadly, I do not have a oven with a thermostat that can maintain 100 degrees F.
The heating pad method would work for my situation, but, alas, I also have a auto-off pad. As I am too cheap to go buy something, unless absolutely necessary, I tried to repurpose something I already had: a 17W seed germination mat! It works well.
After heating the milk in double-boiler, I cool to 110 degrees, pour into a warmed crock-pot crock, pitch the starter, place the lid, swaddle in a towel, and place it on the mat for 8 hours. I ferment some fantastic yogurt every time, even if the house is cold.
While the mat is not powerful enough to maintain 100 degrees, it can stave off cooling enough with the combination help of the towel and starting the yogurt at 110. I do not put a towel layer between the mat and the crock. I think the power is low enough and the crock is thick enough to prevent any problems there.
Finally, I am not certain on the Wattage of heating pads on low – it seems typical high settings are 65W – but the 17W seed mat certainly uses less energy than those 25-40W appliance light bulbs, so that is another advantage for the miser.
Thanks for the article.
I have been making yogurt for 40 years. I heat the milk to about 100°; I see no reason to heat pasteurized milk any higher. I use plastic containers and an electric frying pan for the heat source. Here is my list of ingredients; you can double them.
1 quart of milk (I use nonfat)
1/2 cup of yogurt
3/4 cup of dry milk powder
Hi Joan, I always love to hear how different people make their yogurt as it is most certainly not an exact science. If it works for you, keep doing it.
In side by side experiments, I found that heating the milk to 175 made thicker yogurt for me. I’ve heard it unravels the proteins. But either way, I had yogurt after a few hours of incubation. Regarding the amount of yogurt starter, I’ve found the fresher my starter the less I need. In fact, I have simply scraped out an empty yogurt jar and the amount (less than a teaspoon) made beautiful, thick yogurt out of 2 quarts of milk. It seemed to be a miracle. And you may have read I no longer use powdered milk but that is strictly a matter of personal taste in my experience.
Do you strain yours to make Greek yogurt? If so, I would love to know what you do with the whey. ( See post on my home page.)
My husband, born in Bulgaria, taught me how to make yogurt like his mother did. Just like you, but to incubate, simply use blankets or a sleeping bag. I make a set of three mixing bowls per week. I cover them in an old plastic tablecloth that I can wipe clean if needed, then wrap in an old sleeping bag. Let sit overnight (8-10 hours) – perfect yogurt every time!
Thanks for sharing Doris. Sounds like a great use for an old sleeping bag that doesn’t cost anything.
I live in Texas, and when I make yogurt in the summertime, I put milk + starter in a pyrex container with a glass lid and put it in the sunshine. Keeps it toasty, and I have yogurt in a few hours.
Hi Ruth (fellow-Texan) Yep, I’ve been putting mine outside too. Crazy temps we’re having don’t ya think?
Hi Paula, i am going to make yogurt tonight and I was wondering where did you get your lid for your 2 quart measurin cup? I ama also going to make salad in a jar. It took me all morning to find Food Saver jar sealer. Good grief. I knew I had them. Thanks for a fabulous blog.
For the benefit of future readers, you can purchase a cover for a two-quart (1/2-gal) Pyrex measuring cup on Amazon.
This is so interesting. It would never occur to me to make my own yogurt. I think I need to master my bread machine first!
I love making homemade yogurt. I use my oven and turn the light on. I wish I had a dough proofing cycle!
I saw your comment @SweetBasilKitchen on her Kefir post you can buy kefir grains here, thats where I got mine. They have a bunch of different cultures http://www.culturesforhealth.com/milk-kefir-grains.html
Flour on my Face, I just ordered some Kefir starter. Have to try everything at least once. thanks so much.
I make mine in a coffee carafe. Keeps nice and warm for the entire night!
Megan, A coffee carafe? Inspired. But is it hard to clean out? I guess it would depend on the model you own.
With as much yogurt as I buy, I really need to try this. With all of these different techniques you’ve shared, I have no excuse not to!
glad i could contribute to your incubation story. yes, what a sweet miracle from God our little Kent is! and i still have yet to try this tasty yogurt on my own.
Wow, Paula, there is no excuse to not make our own yogurt now (except maybe laziness 🙂 ) Thanks for all these great techniques and the sweet story about the first audible heartbeat of your grandbaby to be, how exciting! We truly have a magnificent Creator!
Popped in to say hi! That’s such a cool idea. I never even thought of making my own yogurt!
Blond Duck, Thanks for stopping by. Don’t recommend you start making your own yogurt unless you’re prepared to be addicted to the stuff. 🙂
Great post with so many tips and suggestions. As Leslie said, I made yogurt in the late 70’s and early 80’s (mostly for my babies and toddlers). You do such intense research for your posts and I appreciate every one of them!
OK, I just read your original post and I answered my own question. 🙂
I had a yogurt maker in the 80s and loved making my own, but it fell out of favor. Now I find your post and am so excited to try making Greek yogurt on the bread proof cycle in my oven. It looks like you have a cover on your container. If I just use a Pyrex 2 quart measuring cup, should I just cover it with plastic wrap or is it OK to leave it uncovered?
I put my boiled milk in a large ceramic bowl, cool to Luke warm, and add the starter. Let it sit on kitchen counter with a cover on it…next day….delicious yogurt. Learned the method from a refugee friend. They had no way to keep it the perfect temp. And their yogurt was the best I ever had. Plus they give me some starter:) greg
Greg, You are right, but also lucky to some extent. A large ceramic bowl would hold the heat much better than the bowls most of us have in our kitchens. Also, I wonder what the temperature is in your kitchen. Do you have A/C? The ambient temperature can make a huge difference. But lucky for you, it all worked out perfect. And getting fresh starter from a friend…doesn’t get any better than that. Thanks for writing.
Wow, so many different ways to make yogurt! We have amazing yogurt here in Austria (no pectin or other grossness added to it), so I’m a bit spoiled and have never tried making my own. But you’ve peeked my curiosity, Paula! Thanks for sharing all these great tips.
Hi Karen, Someday, I hope to try your yogurt for myself. Sounds wonderful!
After kefir, heating yogurt is like switching tv channels without a remote – I’ll never go back voluntarily ^_^
Hi Shreela, Sounds like I need to investigate further. Thanks for the tip.
A heating pad? A crock pot? You are amazing! Like yeast, yogurt is a living culture, so I think I’m afraid. But yours looks great!
I always make my yogurt at night in my heavy crock pot insert.I put it in my 150 degree preheated oven , turn off the heat ,turn on the oven light . It has never taken more than 10 hours. Make sure the starter is fresh.I strain it thru a collander lined with fine mesh polyster screen wire lined with cheese cloth. It only takes about 1 hour to strain.It has never failed.I love it ,I love it Carolyn
Carolyn, I have never thought about using the crock pot insert. But of course, why not? The heavy ceramic would hold the heat in nicely. And I couldn’t agree more about fresh starter. It’s key. Also thanks for writing about your straining method. I’m planning to do a post dedicated to that topic soon.