Dense Bread Explained (For Bread Machine Users)
Sneak Peek: Dense bread usually comes down to dough issues—too much flour, weak gluten, poor fermentation, or skipped mid-cycle checks. This guide explains why bread turns out heavy and what bread machine users can do differently for lighter, better-structured loaves.
This post contains affiliate links. As an Amazon Associate, I earn from qualifying purchases at no extra cost to you.
Dense, heavy, or squat loaves can be a real letdown—especially when you’re following the recipe to the letter. As a Home Economist who’s seen plenty of dough disasters, I can tell you this: you’re not alone, and it’s almost always fixable.
Although these issues apply to any yeast bread, bread machine bakers are more likely to end up with dense loaves because the machine can’t see or feel the dough.
I’ll walk you through them—along with practical tips for bread machine (often called bread makers outside the U.S.) users, plus guidance for bakers who mix dough by hand or with a stand mixer.
Ingredient Choices That Affect Texture
Too much whole-grain flour
- Whole wheat, rye, or spelt flours don’t develop gluten as easily. Start by replacing just 1 cup of white flour, then go from there. Add 1 tablespoon of vital wheat gluten (paid link) per 2–3 cups of flour to help.
Too much non-gluten flour
- Beware of using too much oatmeal, buckwheat, potato flour, or cornflour. They add flavor and texture but they don’t pull their weight when it comes to structure. Gluten = structure.
Too many add-ins
- Heavy ingredients like nuts, seeds, or dried fruit can weigh down the dough. Add them after kneading, or reduce the quantity.
Missing or too much salt
- Salt slows yeast down. No salt = yeast runs wild and burns out early. Too much = barely rises.
- Use salt unless the recipe is specifically low-sodium, like this salt-free focaccia.
Inactive or expired yeast
- Check the expiration date.
- If you’re not sure, dissolve a pinch in warm water with a little sugar. It should bubble within 10–15 minutes.
Mismeasured flour
- Scoop-and-dump can pack in too much flour.
- Use a digital scale(paid link) or spoon and level. Even 1 extra tablespoon per cup adds up fast.
You might think Grandma made great bread without weighing ingredients—and she probably did, thanks to experience and mixing by hand. Using a machine is different. Precise measurements matter.–Paula
Chlorinated water
- High chlorine levels can kill yeast.
- Use filtered or spring water, or let tap water sit out overnight if you suspect chlorine may be an issue.
Old or rancid flour
- Whole grain flours go bad quickly. Store them in the fridge or freezer. Even white flour loses rising power as it ages.
Temperature and Environment Issues
Overheated ingredients
- Anything over 120°F can kill yeast. Ideal range is 105–110°F.
- Use chopped butter instead of melting it and use cool milk or water to avoid overheating the dough.
High altitude
- Less air pressure = faster rises.
- Reduce yeast and shorten rise times. Look for altitude-tested recipes.
Hot weather
- Hot and humid? Dough may rise too quickly and collapse (overproof), resulting in “volcano bread.”
- Move machine to a cooler place or start with cold ingredients.
Cold weather
- Cold and dry? It may take longer for the dough to rise. The built-in temperature control of the bread machine isn’t always enough.
Why didn’t my bread mix and rise correctly?
Paddles not engaged
- Double-check that paddles are installed correctly.
- Loose paddles = unmixed ingredients = dense bread.
- Aging bread makers are more likely to have this issue.
Recipe too big or too small
- Used all-purpose flour instead of bread flour
- Lower protein (all-purpose flour) means weaker gluten. Bread won’t rise as much.
- Solution? Add 1 tablespoon vital wheat gluten per 2–3 cups of flour, or switch to bread flour (more protein).
Yeast activated too early
- If using a delay timer, place the yeast where it will not contact moisture. Moisture activates yeast early, causing it to fizzle out before baking.
Didn’t check dough mid-cycle
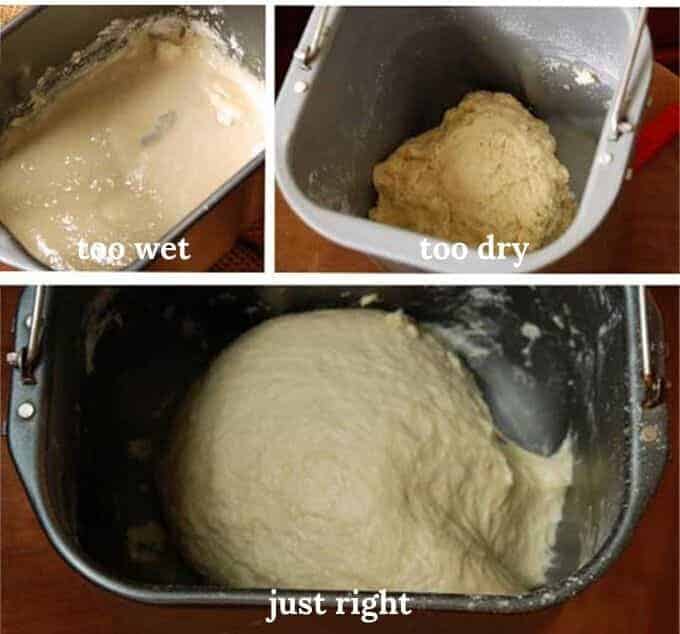
- At 15–18 minutes into the kneading phase, lift the lid and watch the dough knead. It should stick briefly to the sides, then pull away cleanly. Too wet? Add flour 1 tablespoon at a time. Too dry? Add water instead. Read more about this surprising secret.
Friction factor
- The friction caused by the paddles as they knead can heat dough higher than optimal, especially in the summer. If your house is warm, use cool liquids and cold butter (finely chopped). Sometimes, I put my empty bread pan in the freezer before I fill it when the temperatures go over 100˚F here in Texas.
Baked in the machine
- Bread makers bake at lower temperatures and don’t offer oven spring like a preheated conventional oven.
- Solution? Use the DOUGH cycle to mix the dough. Shape the dough with your hands and bake in your oven for better texture, crust, and appearance.
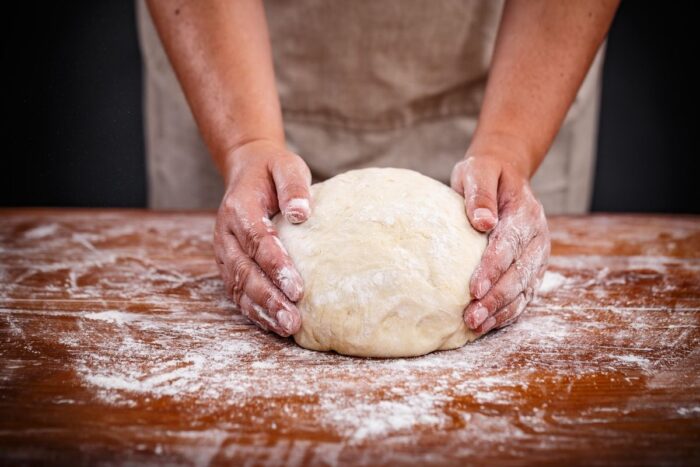
Dough Handling Mistakes
These tips are for people who use the DOUGH cycle like I do to mix the dough and then shape it by hand before baking in a conventional oven.
Under- or over-proofing
- First rise: press two floured fingers into the dough—if it springs back slowly, it’s ready.
- Second rise: If the dough fills more than half the pan when you first put it in the pan, it’s likely to overproof and collapse. Either use a larger pan or remove some of the dough and make a mini-loaf or dinner rolls with the excess.

Gluten not developed properly
- By the time your dough is finished kneading, it should be shiny and elastic—not shaggy, dry, or sticky like cookie dough. These characteristics are usually caused by too much flour or inadvisable substitutions, such as excessive whole grains or non-gluten flours.
- Solution? If adding flour or water doesn’t help, try running the kneading phase again. It’s hard to overknead with a bread machine.
Too much flour used during shaping
- Dust lightly. Too much flour keeps seams from sealing and interrupts final rise.
- Try spritzing your hands and work surface with water instead.
Slicing too early
- Let your loaf cool 1–3 hours. Otherwise, you risk a gummy interior, a dense feel, or a squashed loaf even if it was well-proofed.
- Rolls need only 10-15 minutes to set before serving.

Final Thoughts
Your bread machine can mix and knead like a champ, but it won’t notice if dough is too dry, too hot or cold, or under-risen. That’s your job. A quick peek during the kneading phase and small adjustments can make the difference between a brick and a beautiful loaf.
— Paula, Home Economist
Homemade Food Worth Sharing
Need help troubleshooting?
Email me: Paula at saladinajar.com — photos help!

Had a problem with my Sanyo sbm-15 turning out small crumb “thudbread”. Good stuff & filling/satisfying, to be sure, but sometimes you need “floofy”. tried hi-prot flours, different yeast, the whole bit. Thud & thud again. I finally hit upon using the dough cycle to make the dough, punching down once or twice while still in the machine pan, & then ***running the machine a 2nd time in the bake cycle.***** Problem solved without any undue stress on the machine. Works the dough sufficiently process the gluten for a better rise without excessive chewiness. Coulda done this quite a few loaves ago. I’ve worked in pizza joints half my life & didn’t see it for a while. (facepalm)
Hi Robert,
Making bread is not necessarily easy, as you have described. I don’t subscribe or recommend your method as I understand it because you are still at the mercy of the pre-programmed timing of a bread machine. However, if you like the bread and are pleased with it, who am I to argue? Keep doing what works for you. Have you signed up for my Free Bread Machine Email Crash Course? I think you would find it helpful.
I make 2lb loaf with my bread machine and my wife find the bread difficult to heavy tasting. Would a 1.5lb loaf be lighter tasting or just smaller?
Hi John,
Unfortunately, a 1.5 lb loaf will just be smaller. If wife wants a lighter tasting loaf, you may have to change your technique. Have you tried my amazing secret for making better bread with a bread machine?
Have you thought about gathering all your articles into a ebook? I am sure people would pay for it – I know I would. I would love to be able to print all this out and keep in a notebook
Hi Phyllis,
Thank you for your kind words. I have thought about it. Maybe in the not-too-distant future. We’ll see. ?
I’ve had two West Bend bread machines over the past thirty years. I place their performance at the very top of the class. Not everyone can afford or need the most expensive machine out there.
Thanks, Paula for this post. As always, very informative, didn’t know about cooling in the loaf pan.
Also, thanks for turning me on to Leavenly. A great sight for us living high & dry. (I did mention to Heather that you recommended her blog.)
Stay cool?
Hi PattiAnn,
I’m so glad you wrote. At the moment, living high & dry sounds very appealing. But it’s probably not the easiest place to make good bread. I will try to stay cool, but it’s hard if you want to bake sourdough in a hot, hot oven. Of course, I do it early in the morning. I’m afraid of what it’s doing to my electric bill. ?
@Paula,
Oh it is not cool hear, been in the upper 90s to 100 for weeks, but no humidity. Wild fires going nuts, garden burning up, so we stay inside with a/c going full blast. Weird weather for us. I will just remember these days when it’s 10 degrees in December. ?
Hi Paula,
Can you please tell me what Bread Machine you have? I had one years ago and ended up just using it to make the dough and then bake the bread in the oven. I gave the machine away at our last move. Am seriously considering buying a new machine and want to consider them all before I make my purchase. Thanks a million. Love all of your posts.
Hi Suzanne,
I have two Zojirushi machines. The Virtuoso Plus and the Home Bakery Supreme I have had the Home Bakery Supreme for more than 11 years. It is showing its age but still works like a charm. I absolutely love it.
I do exactly what you were doing with your old machine. They are kneading machines for me, but they’re worth the money. I like the custom cycles and timer, too. I just bought the Virtuoso Plus because I felt like I needed the latest and greatest considering what I do. I wanted to see if they bake bread better now than they used to. The answer is “yes.” The Virtuoso Plus does better because there is a heating element in the lid. What I don’t like is that the machine stops whenever you open the lid. This drives me crazy as I’m always checking on the consistency of the dough. I want to see it actually kneading. In the end, I would still prefer to shape my own bread and bake it in the oven. It’s the only way to ensure my bread turns out beautifully with a gorgeous crumb every time. There are just too many factors that go into making good bread that require a brain.
I wanted to mention that I also bought a West Bend machine when I saw online that it had two kneading blades. I was so disappointed in the machine. It only cost 100$ so I shouldn’t have been surprised. Three things: The pan was made for 3-lb. loaves. I don’t make loaves that big. Another thing? It was so cheap and lightweight compared to the Zoji. Last, the timer options were quite limited and there were no custom options where I could put the DOUGH cycle on a timer. I gave it away.