Rustic Ciabatta with Biga (Bread Machine Dough)
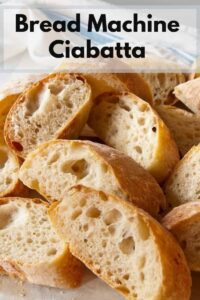
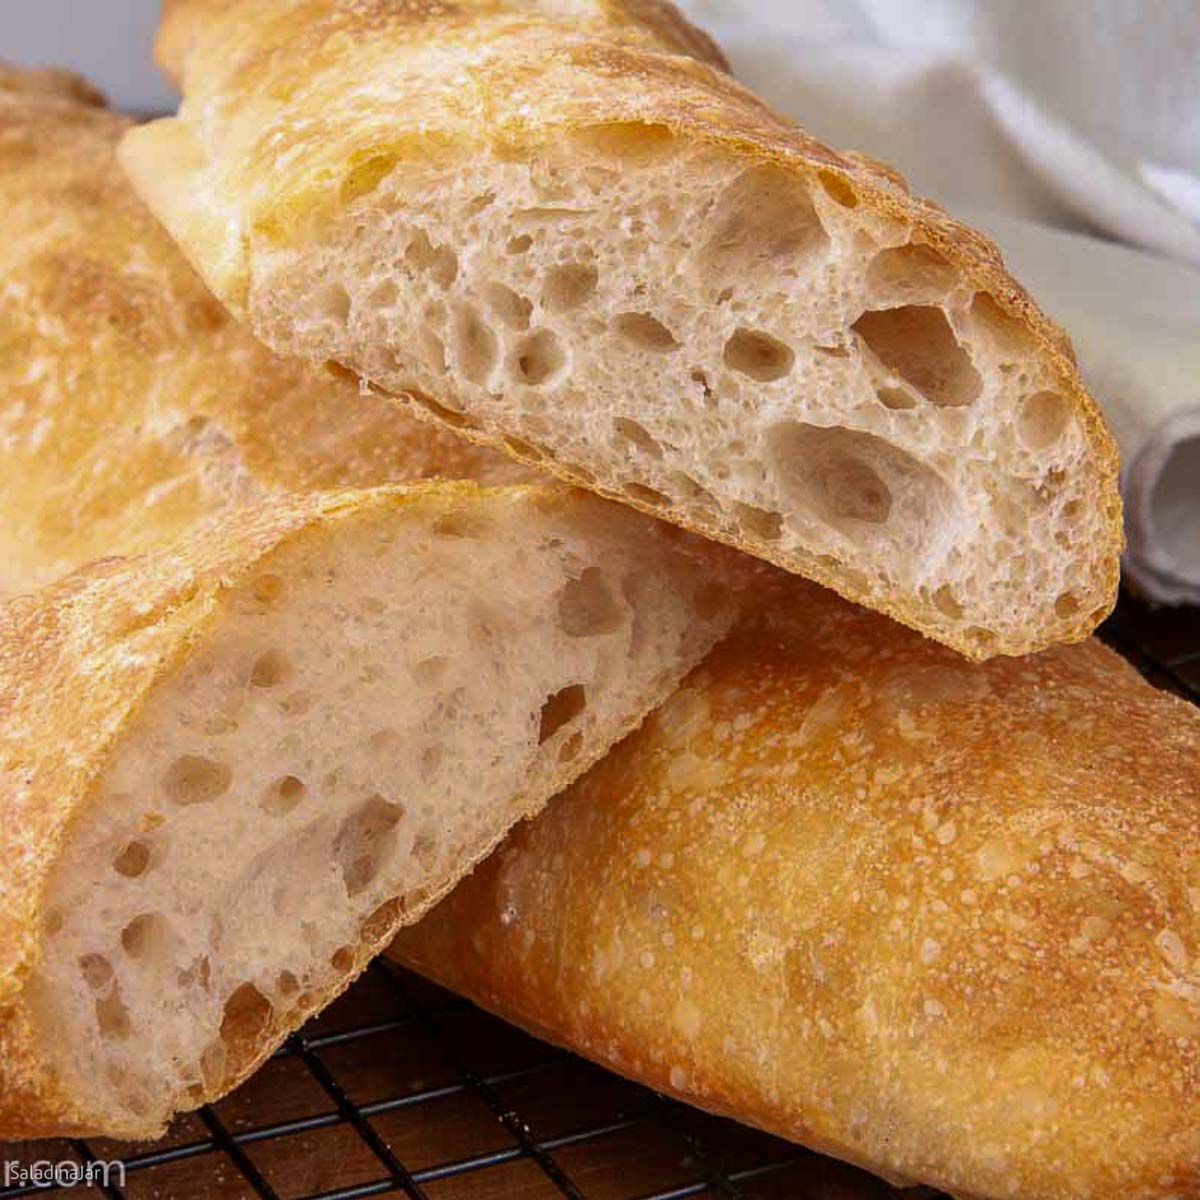
Sneak Peek: This rustic ciabatta uses a bread machine for mixing and kneading, with an overnight biga starter to develop flavor and an open crumb. Bake the dough in a conventional oven for classic ciabatta loaves.
This post contains affiliate links. As an Amazon Associate, I earn from qualifying purchases at no extra cost to you.
I adapted this recipe for traditionally challenging ciabatta to enable mixing and kneading the dough in a bread machine. Start with a simple “biga” made the night before to maximize the flavor. After mixing the dough, let it rise in a rectangular container (inspired by Paul Hollywood). After shaping by hand, give it a final rise on the counter before baking in your conventional oven.
How I Use a Bread Machine for Better Bread
I use my bread machine (this is the model I use) to mix and knead the dough using the DOUGH cycle, then shape it by hand and bake it in a conventional oven. This approach takes advantage of the machine’s consistent kneading while giving me full control over shaping, rising, and baking—especially important for rolls, pizza, and other swirled and shaped breads.
My free Bread Machine Crash Course explains this approach in more detail.
Ingredients & Substitutions
• YEAST: Instant yeast recommended; swap active dry yeast if needed.
• WATER: Cool tap water slows fermentation for better flavor and texture.
• FLOUR: I prefer a mixture of unbleached all-purpose flour and bread flour; Use 100% bread flour for a chewier texture.
• MILK: Any fat content is fine.
• SALT: Use table or sea salt.
Step-by-Step: How To Make Ciabatta Dough with a Bread Maker
⬇️ Jump to the recipe below for exact amounts and detailed instructions.


Rustic Ciabatta with Biga (Bread Machine Dough)
Video
Ingredients
Biga-make the night before
- ⅛ teaspoon instant or bread machine yeast
- ½ cup (114 g) water, cool
- 1 cup (120 g) unbleached all-purpose flour
Ciabatta Dough
- ½ cup (114 g) water, cool
- ¼ cup (57 g) milk, cool
- 1½ teaspoon table or sea salt
- 2 cups (240 g) unbleached all-purpose flour (See notes about using bread flour.)
- ½ teaspoon instant or bread machine yeast
- flour, semolina, or cornmeal for flouring the board and your hands
Instructions
- Prepare the biga: Combine ⅛ teaspoon instant or bread machine yeast, ½ cup (114 g) water, cool, and 1 cup (120 g) unbleached all-purpose flour in the bread machine pan or another container. Mix briefly using the DOUGH cycle or by hand. Scrape down the sides, cover, and let rest at room temperature for 12–24 hours. Refrigerate if holding longer; bring to room temp before continuing.
- Mix the dough: Add ½ cup (114 g) water, cool, ¼ cup (57 g) milk, cool, 1½ teaspoon table or sea salt, 2 cups (240 g) unbleached all-purpose flour and ½ teaspoon instant or bread machine yeast to the pan with the biga.Start the DOUGH cycle.
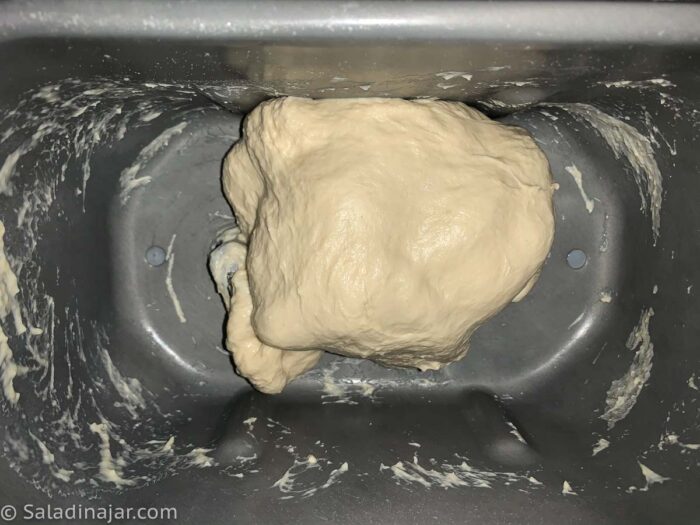
- Check dough consistency: At 15–18 minutes, open the lid and check the dough. It should be shiny, sticky, and wrapping around the paddle. Adjust with water or flour, 1 tablespoon at a time, if needed.
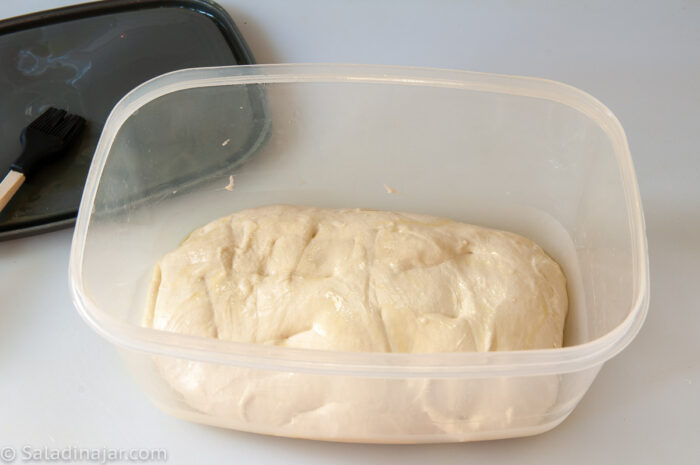
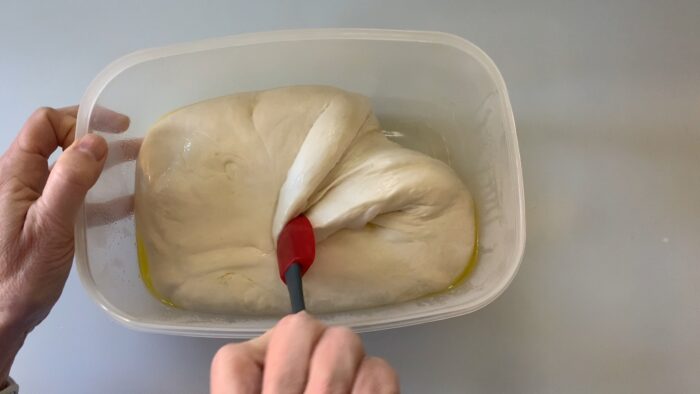
- First rise in a container: When kneading stops, interrupt the DOUGH cycle and transfer the dough to a well-oiled rectangular container (Mine holds 3 quarts). Use a spatula to flip the dough and coat it with oil. Cover and let rise until doubled or tripled.
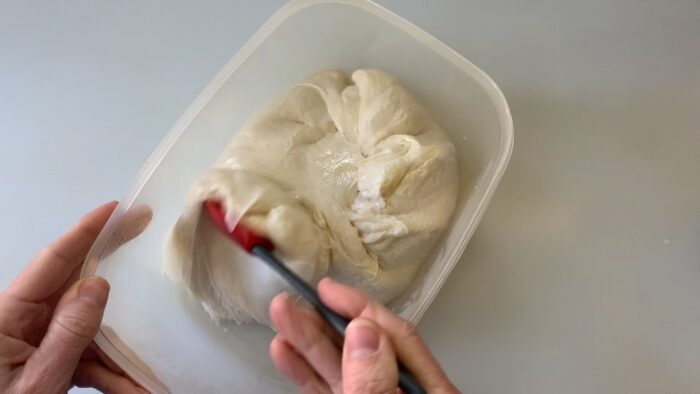
- Stretch and fold: Using a greased spatula, lift each corner of the dough inside the container toward the center. Cover and rest for 30 minutes. Repeat the folds once more, then rest another 30 minutes.
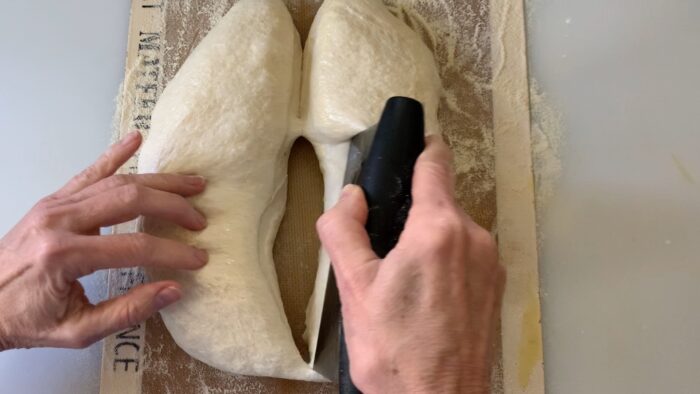
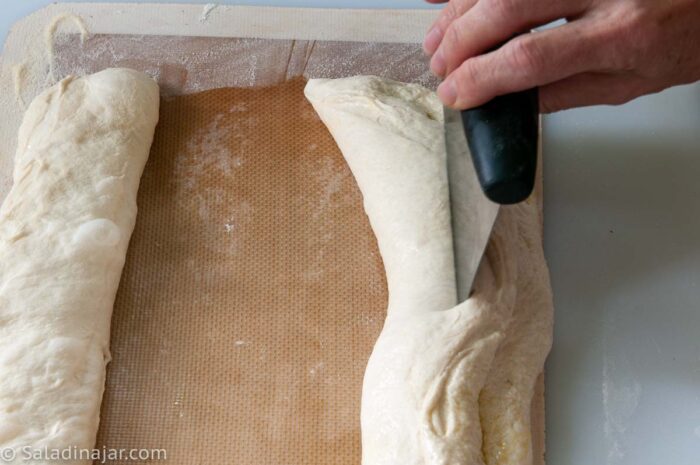
- Shape the loaves: Gently tip the dough onto a clean, flat surface like a large cutting board or a silicone baking mat. Use flour, semolina, or cornmeal for flouring the board and your hands. Stretch into a rectangle approximately 12 x 8 inches. Divide in half lengthwise with an oiled bench scraper or knife. Use floured or oiled hands and a bench scraper to fold the long inside edges of each half over the top toward the outside edge, then fold the outer edges back toward the center. Dimple the surface with your fingertips. This takes practice. Don't expect perfection the first time.
- Final rise: Place loaves on a prepared baking sheet or leave them on the silicone mat you used for shaping and shift to the baking sheet. Cover and let rise until puffy, about 30–45 minutes.
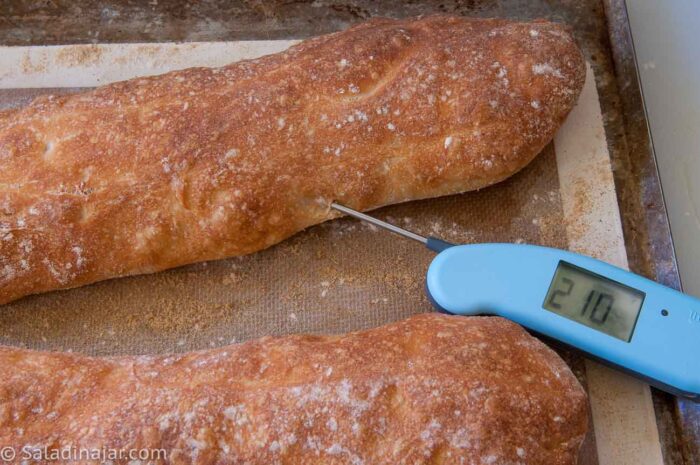
- Bake the ciabatta: Preheat oven to 450˚F (230˚C). Spritz loaves with water and bake for 18–22 minutes, respritzing during the first 5 minutes. Bread is done when golden brown and internal temp reaches 210˚F (98˚C).
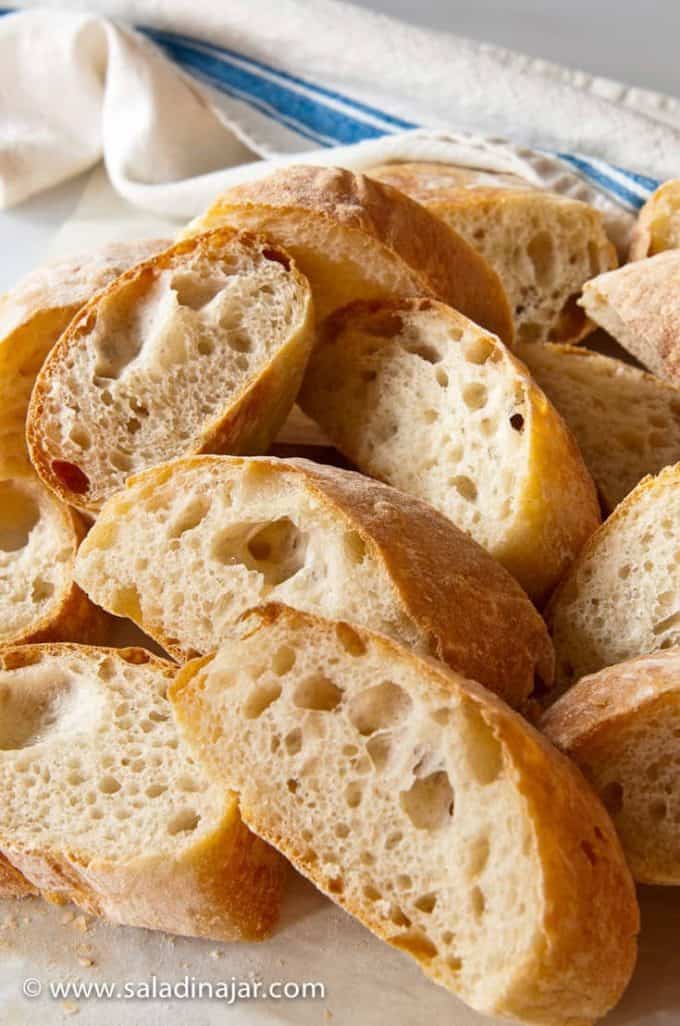
- Cool completely: Let loaves rest on a wire rack for at least 1 hour before slicing.
Notes
- Add ingredients to the bowl in the listed order.
- Mix on LOW until moistened, then knead on speed 2 or 3 with a dough hook for 5-10 minutes until smooth and elastic.
- Continue with step 4 in the recipe
Equipment
Nutrition
All images and text ©️ Paula Rhodes for Salad in a Jar.com
FAQ About Bread Machine Ciabatta
- Can I skip the biga?
- The biga is essential for flavor and texture. Skipping it may result in flat, dense bread.
- Can I bake this in my bread machine?
- I don’t recommend it. Your bread won’t have the traditional ciabatta texture or shape.
- What should I serve with ciabatta?
- Use ciabatta for sandwiches or any time you would serve a baguette. Many people pair it with pasta like this Baked Spaghetti Casserole or soup. It makes a great dipping bread for Gumbo or this Hearty Ham Stew with Beef and Bacon.
Final Thoughts
Even though ciabatta is considered an advanced bread, using a bread machine for kneading makes it approachable. With a little patience and practice, you can create an artisanal loaf that’s as rewarding to make as it is to eat.
If you enjoyed this recipe, check out my Classic Bread Machine Sourdough, Hearty Rye Bread, or Crusty Round Bread. For beginners, start with 6 Bread Machine Secrets.
— Paula, Home Economist
Homemade Food Worth Sharing
Need help troubleshooting?
Email me: Paula at saladinajar.com — photos help!

Hi Paula,
Just wondering, after adding all ingredients to the Biga and checking for consistency at the 15-18 minute mark, the next step states to interrupt the dough cycle. Does this mean that we do not complete the dough cycle but take it out once the batter is mixed?
I did this and proceeded with continuing steps but the crust turns out quite chewy and after a day the bread was quite hard. That said, it was quite tasty… wondering what I did wrong.
Hi CH,
Yes, you read the instructions correctly. Remove the dough from the bread machine pan at the end of the kneading phase, before the first rise. When left in the machine to the end of the DOUGH cycle, it usually rises too fast, unless your kitchen is very chilly. The longer it takes for your dough to rise, the better the flavor.
Ciabatta is similar to fat-free French bread. It doesn’t stay fresh for more than a day. If you don’t eat it all the day you bake it, wrap it up and freeze it.
Hi I tried your recipe and followed the instructions and measurements top the tee and after I turned off my Adblocker and found your video everything looked the same up to the final tipping out of the plastic container and folding on the silicone mat, yours looked way more runny than mine.
The last rise for 45 minutes on the mat with a towel over it didn’t rise at all.
I baked it anyway and ended up with “bread biscuits” tiny holes inside They did tasted like Ciabatta I buy from the supermarket though.
Maybe too cold room temperature, is mid Winter here and only about 18 Celcius (64F) inside the house so maybe that is why it didn’t rise?
Hi Mike,
It sounds like you have diagnosed the problem. Here in Texas, my kitchen is never that cold. The ideal temperature for bread dough is usually around 24˚C. It will take considerably longer for your dough to rise at the temperature you mentioned. The advantage is that the longer your dough takes to rise, the better it will taste because there is plenty of time for the yeasty flavors to develop, which is what makes yeast bread so wonderful. Pay no attention to the clock. You want the dough to be pillowy and jiggle a little bit when you shake the bowl it’s in before you proceed to shaping. Even in a cold kitchen like yours, it will happen, eventually.
Thanks for the prompt reply Paula, good to know what the problem was, I will try again
Please let me know how it goes. Ciabatta is an advanced bread so give yourself plenty of grace.
I love this recipe, thank you so much. I’m a bit OCD when it comes to sticky fussy dough but with the bread machine taking care of the main kneading and all the helpful tips for the stretching and shaping made this recipe a 5 ? go to recipe for me.
The texture and flavour is perfect – I use 120g 00 flour and 120g plain/all purpose. Will add olives or sun dried tomatoes to it next time ?
Thank you for sharing your experience, Yuki. I never get tired of hearing that this recipe works. Love the idea of adding olives and sun-dried tomatoes.
This ciabatta bread was DELICIOUS!!!!!!!! I had to add more water because the dough wasn’t sticking to the side of the bread machine. Throughout the process, I thought I had no idea what I was doing, but it worked out because my husband and I ate all of it in one day.
I’m pretty sure I messed up this bread. My measurements were fine, but still. Used bread flour and a little spelt instead of all-purpose. The dough ended up being less liquidy than it should be. At one point, my brother put something on top of the dough as it was resting in the fridge, and I was worried the air bubbles had been destroyed. Finally, the bread didn’t really get golden brown, except for the bottom. Took two days in total, from making the biga to slicing.
But I gotta tell you: it is exactly what I wanted, and it is delicious. This is the kind of bread that I randomly decide to eat seven slices of at 2 am. It’s the perfect texture and sourdough-y taste from resting so long. I never leave reviews on recipes, though I do want to. But I was so surprised at how well this worked, I kinda had to. Thanks so much!
I haven’t tried the ciabatta recipe yet, but I’m excited to since I always use my bread machine for making dough only. The one question I have is how to add roasted garlic or perhaps olives to it? At what point would you add them to the dough?
Hi Donna,
Those additions sound delicious. I would add them in the last five minutes of the kneading phase of the DOUGH cycle. Most machines have a beep for that. If you don’t want the olives mashed to a pulp, I would wait until the last minute of the kneading phase to add them.
Can’t wait to hear how it turns out.
Hello Paula,
The biga really imparts so much more flavour when left in the fridge for 2-3 days. I wonder would the entire ciabatta dough benefit from improved flavour by being kept in the fridge for 2-3 days as well, similar to a long fermentation for Neapolitan pizza dough, please? Thanks, cj
Hi CJ,
So nice to hear from you.
I have never tried this, so I can’t say if it would work. Let me know if you do and how it works out.
Dear Paula,
Thank you for your detailed recipe. I’ve used it many times now, always to great results. However, I would really love to watch the video you mention in this ciabatta recipe and I searched up and down and even looked through your replies to similar comments, and I have not found the video still, can’t see it at the end of the post in the recipe.. please put a link to the video at the top of the post right after the title, when you have a moment? Thank you so much. Have a good day.
If the video doesn’t show up, it is usually because there is an ad-blocker on your browser. Perhaps you could try disabling it temporarily so you can watch the video.
hi I’m in the UK, what measurements gr? You use it for milk , water etc
Thanks
I use grams for liquids so you can measure with a digital scale. It’s the most accurate.
I tried a few before, but this recipe always works.
Thank you
Hi Paula,
There are many mentions of the (see video) in the recipe, but these are not active links to the video. At the end of the recipe it goes to your comment section..no high lighted link to the video.
Jere
PS your reply link does not work.
Hi Jere,
I have no “active links” to the video within the post. I moved the video up a little higher outside of the recipe, to make it easier for you to find. I’m sorry but I don’t have a reply link. Go to your email and send any questions to my email address if you need a quick response. I don’t link directly to my email for security purposes. Let me know if you still can’t find the video.
I found your recipe for Ciabatta bread interesting but could not find the link to your video on making this bread.
Jere
Hi Jere, The video is inside the recipe at the bottom of the post. Hope you find it helpful.
I made this today and it was absolutely delicious. The instructions were very easy for me to follow. Will definitely be making this again.
Glad to hear it, Nikki. It’s not the easiest bread in the world so I say, Congratulations!!
So I tried this recipe in my $7 thrift store bread maker. The best ciabatta I have ever made and better then some store bought ones. I followed instructions to the gram. Perfect bread
Fantastic Dominick! Just proves you don’t need a fancy bread maker if you don’t try to use it for baking bread.
I want to use this recipe for ciabatta rolls, any tips? Thanks!
Hi Elli,
I have tried making rolls, but I need to practice more before I give much advice. All I can say is to handle the dough as little as possible and make sure the rolls have risen enough before you bake them. Good luck!
I’ve been making this bread recipe for about 5 months now with great results. I’ve even been adventurous, I thought the loafs are too small so I quite splitting it in two. I like the bigger size loaf, bakes up perfect every time. My last three loafs of Ciabatta have been rosemary and olive oil. I have added 2 tablespoons of fresh chopped rosemary and 2 tablespoons of olive oil into the bread machine at the start of the of the dough cycle. Great results, love every bite. Thanks for the bread machine recipes. Also love the basic white bread too.
Thanks so much, Ken. I value all feedback, but yours is especially gratifying. I love your variations and will try them myself.
I must say that this is a wonderful recipe. I’ve made it just two times so far and LOVE it. Had never used a biga before and was hoping for something similar to a sour dough flavor. I left the biga sit in oven with light on for 24 hours then popped it into the fridge for two more days. Didn’t get the tang I was hoping for but the flavor of this ciabatta is as wonderful as the chew factor. No need to search further.
THANK YOU Paula.
Hi Brenda,
Glad you liked the Ciabatta. You could try adding a little bit of sourdough discard if you want a more sour flavor. But that changes other things. Have fun experimenting.
Unde e videoclipul?
Hi may I know if this recipe needs a high protein flour? The protein content of the all purpose flour in my country is 9+% while bread flour is usually 13+% so not sure of that will work? Thanks.
Hi Martha,
The all-purpose flour I use is about 10-11% protein. Some people make ciabatta with a higher protein flour. You might try it both ways and see what works better for you.
Hi there
Any chance I can bake this in a loaf pan? I think the texture of ciabatta would be great for sandwiches.
Would I use all of the dough? And bake it for the same time? Thank you.
Hi CK,
I’ve never tried it. I hope you will, and then let me know how it goes. The general rule about loaf pans is that the dough should fill your loaf pan about halfway. The rule can be bent depending on how high you expect the bread to rise. Whether or not you can use all of the dough will depend on the size of your loaf pan. Use a quick-read thermometer to determine the time. By that I mean, check the internal temperature to know when it is done. Good luck!
@Paula,
Turned out great. I did all the rising steps in the 9×5 loaf pan. For the final rise, I used the silicone mat to flip dough, added flour to the loaf pan and slipped the dough back in. I allowed it to rise for maybe for a full hour. It rose and had a nice dome going into the oven… It did loose the dome. It was about 3/4 the height of the pan and flat/even.
I baked for 25 minutes using the quick temp to tell me when it was done. I sprayed with water per instructions.
Family ate it in hours… Thank you.
I think my next batch I may allow the final rise to be longer, but in the fridge… Maybe it will be slow and I can achieve the dome.
I’m glad your family liked it. Makes all the trouble worth it. Right? Usually, a flat top means it was overproofed. Your idea to let it rise in the fridge might be a good solution.
I am very interested in making your Ciabatta bread but I would like to ask a question first.
My understanding is that US bread flour is not the same weight (volume) as Canadian bread flour. In which case would it be better to make the bread using the weights rather than by volume, as in cups/tsp etc., which I find easier to use.
Hi Patrick,
That is a good question! I would always default to measuring by weight. But here’s the thing. The humidity can make a difference, too. But I have good news. No matter how you measure or what the weather is doing, if you will check your dough in the bread machine as it kneads, you can adjust the moisture level on the fly. This is important to the whole process of making bread but is usually ignored by bread machine owners. Read more about it here.
I have sourdough starter. Can I use that in place of making the biga and if so how much should I use in conjunction with the yeast? Starter has been nurtured for a long time and I thought might add flavor to the ciabatta. Fed it 12 hours ago and put in fridge. Anxious to try this recipe. Thank you.
Hi Laurel,
I have actually tried this myself, once, a few months ago. It didn’t work out so well. I still think it has possibilities, but I need to experiment more. So I can’t be much help. But I hope you try it and let me know how it goes. Keep notes so that if it turns out good, you can tell me how you did it. Good luck!
The bread turned out great. I followed the recipe to the letter (weighted all in the ingredients)The proving time took quite a bit longer. I waited until the dough had doubled then did step 7 and repeated step 7. I just made one big loaf because the dough was a bit hard to handle. With a bit more practice I’ll do two loaves.
Yes, the dough is challenging. But you already know the secret….practice!
A few questions. I’ve started making my first loaf and I decided it a good idea to review the recipe and text in the article.
Question 1: You state to use cool water and milk not warm yet in the recipe it states to use warm milk. Which is it?
Question 2: I dimple my Focaccia bread but wouldn’t dimpling this bread disturb the bubbles?
Question 3: I have a proof setting on my stove. Is it okay to use for this bread?
@Kathy,
Another observation – In the recipe you state to bake until it reaches a temperature of 210, but in the tips (#4) it states 190-200. Which is it?
200-210˚F is good.
That’s what I did. The loaves were 208 and 207.
It is delicious! The holes aren’t huge but my husband said it is delicious. I was afraid to manipulate it too much so maybe next time I will roll it on itself to make it a bit more rounded instead of wide. More baguette style.
1. I would use cool water and cool milk, especially in the summer. The amount of milk is so small, it really doesn’t matter if it is warm or cool.
2. Dimpling the dough helps to even out the bubbles so you don’t have just a few very large bubbles and instead, have bubbles more evenly throughout.
3. Kathy, the wonderful thing about Ciabatta is the amazing flavor. But doing anything to rush the proofing, such as a warmer ambient temperature will cut down the time required for the rise AND the flavor. I vote for flavor when it comes to Ciabatta so I can’t recommend the proof setting. (This is a wonderful feature I use all the time for bread, but not Ciabatta.)
Where did you get your 3 quart rectangular container? I have been to 3 stores and the smallest I have found is a 5+ quart. I have a 3 quart round container and just wonder if this will work if I do my folds at 90 degree increments. I’ll use the 5 quart if need be and just lay it gently on it’s side then gently turn it over so the dough can gently roll out.
I am trying my hand at this because my husband has try several different methods and hasn’t been happy with the lack of bubbles. His problem is he likes crust and air bubbles. He also wants to do the simplest method – no biga. Too much time he says. So, I’m trying this recipe to see if I can get his desired results.
Kathy, I got the rectangular container at the dollar store. I highly recommend a rectangular or square container so that you don’t have to manipulate the dough so much. That stuff is super sticky. The less you have to touch it, the better. It could be bigger than 3-quarts, then do as you suggested about turning it out.
I don’t know what to say about not making a biga. It only takes 3 minutes to throw it into your bread machine the night before and it makes ALLLLLL the difference. Ciabatta is not an easy bread for most home bakers to make. Unless you are a seasoned bread baker, I would not expect great results until you’ve made it several times. That’s why it is so satisfying to make a good loaf. It takes experience to learn to handle the slack and sticky dough without wrecking the texture. Good luck!
@Paula,
I did go back and read the whole article and saw the Dollar Store reference. I never think about the Dollar Store and there are 2 near my house. I bought 2, both are in the 5 quart range. I’ll check the Dollar Store tomorrow.
I did let it just roll out gently and it seemed to work well. My husband is one of those who doesn’t want to take the time to take the extra effort. So, when he admitted mine was delicious I was a bit taken a back. I agree, the Biga makes all the difference. Gives it an almost sour dough flavor although it hasn’t sat that long. He will continue to make it his way and I will make it using this recipe.
Fantastic news. I’m so glad it worked out for you. Thanks so much for reporting back.
My favorite ciabatta
Hi, Made a 2# loaf. 3 cups bread flour, 1cup 10 grain hot cereal mix, 1.5 cup milk @85F 4 tab butter soft cut in PCs 1/3 cup brown sugar. Used a Zoji BB-CEC20 on basic setting.
Loaf was good however it collapsed onto itself. Help!
Thank you
Hi Mike,
I’m assuming you were baking your bread in the bread machine, right? Did you add salt? No salt will cause this. Also, over proofing can cause it. Did you open the lid and check the dough as it was kneading to make sure it was the right consistency? Bread dough that is too wet will also do this.
My advice? Use the machine for what it does best: mixing and kneading. Select the DOUGH cycle. Then remove the dough from the pan, shape it, let it rise one more time, then bake it in your oven. You will have a much better chance of getting a delicious AND beautiful loaf with a lovely crust.
Should I turn off my “Pre-heat” feature on my breadmaker (Zoji) for both biga and dough? You seem to say don’t rush proofing or heating
Hi Jerry,
Here’s the deal. When you want to actually bake bread in your machine, it’s important that everything starts out at the same temperature so that the timing of the machine works right (hopefully). The “preheat” feature enables all ingredients to come to the same temperature. Since I never use my machine to bake, I don’t need it. If some ingredient isn’t quite warm enough, it will just take longer for it to rise. And that’s fine since I’m not proceeding to the next step until the dough has risen perfectly. In reality, if an ingredient is cold, I warm it before adding it to the bread machine pan. Saves time. I actually turned off the preheat feature as I was removing my machine from the box.
I watched the master class video of this with Paul Hollywood. I don’t remember Biga as part of it. Am I right?
Marian,
I didn’t borrow Paul’s recipe, only his technique for handling the dough and shaping it. I like my recipe better for a bread machine. (You are very perceptive.)
Thank you so much! I’ve tried and failed to make ciabatta so many times. First time with your recipe and I had a brilliant result.
Thank you!!
Hi, I’m sorry I cannot find a link to the video you refer to?
Hi Andy,
I’m so glad you wrote. If you are talking about the video featuring Paul Hollywood, I checked and it looks like it is no longer available for free. I have noted that in the post.
If you are talking about my video, it comes up automatically. I’m checking into a way to have it show on demand. Thanks so much for bringing this to my attention.
I am in the process of trying this (at high altitude!) and notice the recipe states to use a 2 quart container but the pictures say to use a 3 quart container! Does it matter and which is better? Thank you
Good catch, Jayne. The recipe should say 3-quart container. But it can be bigger. I like the 3-qt size because when the dough rises to the top, I know it’s ready. You could use a larger container but then dough would have some distance to fall before it hits your cookie sheet. Could be traumatic to the dough. :-).
Thanks for writing to ask.
@Paula, Ah excellent, thank you. One other question (so far). I can’t find the video mentioned. The pictures are wonderful and I am not sure I need it but the texture of the dough while kneading in the machine would be nice to see. Am I missing a link somehwere?
Hi Paula,
Nice web-site.
Just a tip about baking bread in the bread machine and having a good result.
When bread machines first came out the programmes were longer and included 2 rise then kneed slots, and no sit for an hour or so and do nothing at the beginning.
Then some dumbo, go figure, decided that it was all taking far too long and wouldn’t 1 rise/kneed slot be better.
After all you can mix and bake a cake all in one hit can’t you!
And as for sitting the ingredients together at the start so they “equalise”, well any fool will tell you when you mix things together, they pretty soon are all the same temperature.
So, after a good few year my faithful bread maker had to be replaced, and low and behold I was told that all bread makers now shared the same ‘chip’ which gave very different results to what I was used to.
So, my routine for making bread changed, and I would emphasise that this is for making just your everyday go to loaf of bread. The various styles you describe on your web-site of course must involve removing dough from machine and styling as required. Quite brilliant!
Anyway, I ramble! What I do every other day of the week is first mix the dough on the dough/pizza setting which on my current machine is 45mins. Then, (when I get back to it, can vary from on the ‘beep’ to a while later) I put it on one of the other settings, doesn’t seem to matter, sandwich, French, Italian etc, 5 or 6 hours usually.
And the result is a far nicer loaf, better size, better texture, better all round.
So, that’s my tip, for just an ordinary loaf.
I’m off to try your Ciabatta bread, which of course I will have to put some effort into.
cheers, Jeanette
Thanks for writing Jeanette. Always fun to hear about the different ways people use their bread machine. Hope your Ciabatta turned out good. It can be a challenge but the taste is worth it.
I was very skeptical about trying this recipe since I consider myself a ciabatta purist and no way could this come close to my old school method. Boy, was I wrong! Incredible crumb and flavor. I fermented biga in fridge for 3 days before continuing recipe. This is incredible bread…. Thank You!
I was very skeptical about trying this recipe since I consider myself a ciabatta purist and no way could this come close to my old school method. Boy, was I wrong! Incredible crumb and flavor. I fermented biga in fridge for 3 days before continuing recipe. This is incredible bread…. Thank You!
Hi
The first time I tried this, I weighed the flour. But I used Metric cups for the liquid and it came out very sticky. Tasted okay, though. Good thing I did not use Australian cups.
Next time I used Metric Cups for everything and it seems to be too dry.
Normally I try to use recipes that measure things out more accurately – in ml and grams.
BTW – took me a while to realise you were not middle eastern or asian or something. Thought you were Saladin Ajar.
Hi Don,
Oh my. Thank you so much for writing. I quickly corrected the link situation. Not sure how that slipped by me.
Also, I will add measurements for the liquid. As you probably know, we don’t deal with metrics in recipes much in these parts. I will have to look into that.
When you make this recipe, always look at the dough in the machine after it has been kneading for awhile. You can add liquid until it looks like the video, which is pretty darn sticky. But it should be shiny and very elastic. It will pull away from the sides to some extent.
You made me laugh about “Saladin Ajar. I wish I could change the name of this website, but I’m in way too far at this point.
Hi Paula, I was wondering if I added fresh garlic cloves to the dough, do you think I would need to make any changes in the process or the measurements? Thanks!
I haven’t tried it, Samantha. I would think you would just add it to the bread machine along with all the other ingredients. I would love to hear how it turns out if you try it.
Hi Paula! I am so glad to have found your blog because I have wanted to try Paul Hollywood’s ciabatta technique for a looong time but didnt wanted a smaller recipe to try out. I just wondered though how come your recipe uses so little yeast- just 1/8tsp for the starter and 1/2tsp for the main dough? I wanted to clarify just in case this is a typo? I would very much want to try your recipe as you also used Paul’s technique but in a proportion which i find to be just right for a home baker. I hope to hear from you thanks!
Hi Ina,
The amount of yeast is correct. You don’t need much yeast when you are allowing the dough to rise for long periods of time. If it makes you feel better, check out some other ciabatta recipes. (like the one from America’s Test Kitchen). If it’s true ciabatta, they call for similar amounts of yeast. Thanks for asking.
Hi. I’ve made your recipe before and it is delicious!!!! And so easy! It’s been a while so I got the recipe out and can’t remember if I used all purpose flour or bread flour. The ingredients say all purpose and the recommended products show bread flour what would be the difference? Thanks!!!
That definitely helps, thanks so much for taking the time to reply Paula!
I’m unclear about step 2 in making the biga. You say to combine the ingredients in the bread machine. Do you just dump them together without mixing or should the bread machine be used to mix the biga for some time? If so, how long? You say to turn the machine off so I’m guessing I was using it to mix but I don’t know if it’s just barely or should it look like the you-tube video? Thank you!
Hi Debi,
Thanks for writing. Turn the machine on just long enough to mix the flour, water and yeast. Then turn the the machine off. And yes, you can dump the flour, water, and yeast in there together. Mix 3-5 minutes. It doesn’t have to be perfectly smooth. The dough you see in the video comes later after you have added all the ingredients and the kneading cycle is in process. Hope this helps.
Will it make any difference if I use multigrain flour?
Yes, it will make a difference. Multigrain flour is going to be somewhat heavier. I have not tried it myself so can’t give you any specific guidance. In general, bread made with multi-grain flour rises slower and not as high. If you try it, let me know how it goes. Ciabatta is a tricky bread anyway. I think you are brave.
I will be using a Zojirushi Home Bakery Mini bread maker (a 1 lb. loaf machine) to mix the dough. What do you recommend for amounts of all the ingredients?
Paul,
I did a little research since I don’t own that particular machine. It appears my recipe for Ciabatta would work just fine as is in that machine. The website states it can make bread with up to 3 cups of flour so we’re good.
Thank you! I appreciate it. -Christopher Zaleski
In regards to the Biga, you say “Turn off machine (or unplug) and let sit for 12-24 hours.” Then you go on with: ”
(Note: If not using the biga within 24 hours, place the foamy mixture into the refrigerator where it will keep for 3-4 days and only get better. Allow the biga to come to room temperature before proceeding to the next step.)”
Question: Do I put in in the refrigerator after it sits out for 12-24 hours or as soon as it is mixed?
Thank you.
Hi Christopher,
It goes in the fridge after it gets foamy. I would probably refrigerate at 12 hours but whatever is convenient will work.
Thank you! I appreciate it. -Christopher Zaleski
You’re welcome, Christopher.
Hi P. I love this bread but I have made it twice one and it doesn’t rise enough. What could be the problem?
Hi Loren,
So sorry to hear your bread is not rising enough. Since I haven’t watched you make it, I can only guess. But I can think of two possibilities although there may be more. My first thought is that your kitchen is cool–at least much cooler than mine. The best solution would be to give it longer to rise. Another possibility could be your yeast. Did you use bread machine or instant yeast? Regular yeast can be used but it needs to be handled differently. I love this bread too, so I hope this will help.
Beautiful bread! Impressive, and very artisan looking. In the recipe, I assume the second amount of yeast is 1/2 teaspoon?
Yes, Julie. You are right. Thank you for prompting me to take another look at the recipe.