Fresh Strawberry Pie with Jello Glaze (No Cooked Berries)
Sneak Preview: This fresh strawberry pie uses whole strawberries, a quick microwave Jello glaze, and a simple pat-in-the-pan crust. Plan about 30 minutes of hands-on time, plus at least 2 hours chilling before serving
This post contains affiliate links. As an Amazon Associate, I earn from qualifying purchases at no extra cost to you.
Are you a fan of fresh strawberry pie—cooked or uncooked? For me, the berries must be fresh. Flavorful strawberries are getting harder to find here in Texas, but when I get my hands on sweet, medium-sized, dark red ones, this is the first dessert I make. Even slightly bland strawberries shine in this glossy glaze—without ever cooking the fruit.
This version was passed along from my Aunt Marg (the same one famous for her French Silk Pie with a Pecan Cookie Crust). She didn’t even mention a crust in her recipe because she served it in such a casual, yet delicious, way—sometimes with broken pieces of crust on individual plates, strawberries spooned over the top. Maybe not the prettiest presentation, but definitely a tasty one.
Ingredients & Substitutions
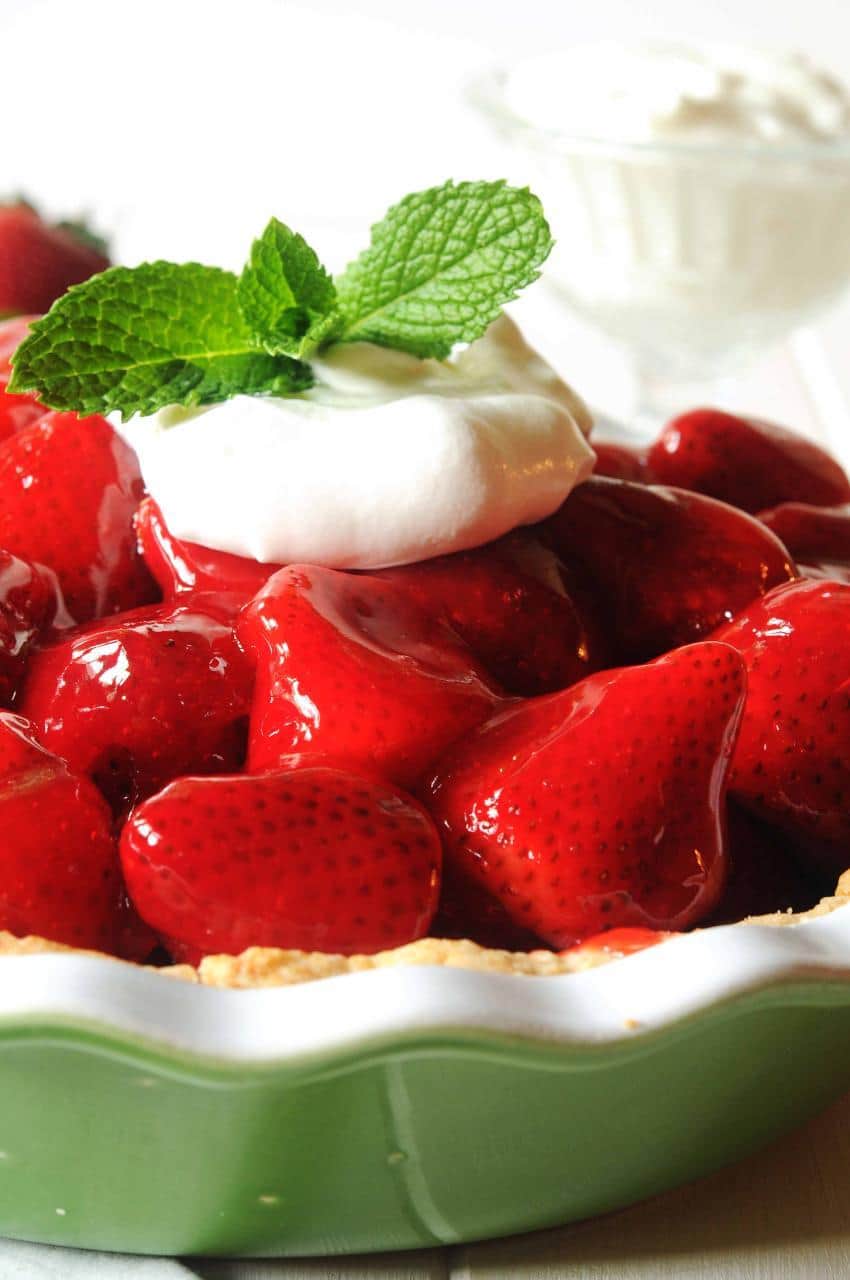
• FRESH STRAWBERRIES: Use whole berries (the redder the better, and not too big) rather than sliced; slicing releases excess juice and can make the pie runny
• POWDERED STRAWBERRY JELLO: Regular Jello recommended; sugar-free adds no benefit since the glaze is sweetened with corn syrup
• CORNSTARCH: Best for structure; arrowroot or tapioca work but are less predictable
• ALMOND EXTRACT (OPTIONAL): Use sparingly; adds subtle flavor
• RED FOOD COLORING (OPTIONAL): Helps if berries are pale
Pat-in-the-Pan Crust
• ALL-PURPOSE FLOUR: Unbleached preferred; white whole wheat makes a denser crust
• BUTTER: Frozen and grated; use sticks, not spreads
• CREAM CHEESE: Neufchâtel or dairy-free substitutes work
• VEGETABLE OIL + MILK: Use neutral oil; dairy or non-dairy milk both fine
Two Ways to Make the Crust
Option 1: By Hand (Inspired by Joy the Baker)
Grate frozen butter and mix by hand. Press into the pan—no rolling.
Option 2: Food Processor
Toss in all the dry ingredients and pulse with the fats until a shaggy dough forms. This method is quicker and more consistent.
Either way, be sure to cool the crust completely before adding the berries and glaze.
Fresh Strawberry Pie with Jello Glaze (No Cooked Berries)
Video
Ingredients
For the Glaze
- ½ cup + 2 tablespoons (142 g) cold water
- 2 tablespoons cornstarch
- 2 tablespoons powdered strawberry Jello (regular, not sugar-free)
- ¾ cup (255 g) corn syrup
- A few drops of red food coloring
- ⅛ teaspoon almond extract (optional)
- 2 quarts (1893 g) fresh strawberries, cleaned and hulled
For the Crust
- 1 ½ cups (180 g) unbleached, all-purpose flour
- ½ teaspoon salt
- 2 tablespoons sugar
- ⅛ teaspoon baking powder
- ¼ cup (57 g) frozen butter, grated
- 1 tablespoon cream cheese, room temperature
- ¼ cup (54 g) vegetable oil
- 2 tablespoons cold milk
Instructions
- Make the glaze first: In a microwave-safe bowl, whisk 1/2 cup + 2 tablespoons (142 g) cold water, 2 tablespoons cornstarch, 2 tablespoons powdered strawberry Jello (regular, not sugar-free) and 3/4 cup (255 g) corn syrup until smooth. Microwave in 1-minute bursts, stirring between each, for 4 to 7 minutes or until the mixture thickens like maple syrup and turns clear. See notes if your filling seems too thin.Stir in 1/8 teaspoon almond extract (optional) and a few drops of red food coloring, if using. Let cool to room temperature.
- Mix the crust by hand or food processor: Whisk 1 1/2 cups (180 g) unbleached, all-purpose flour, 1/2 teaspoon salt, 2 tablespoons sugar, and 1/8 teaspoon baking powder in a medium bowl. Add 1/4 cup (57 g) frozen butter, grated and 1 tablespoon cream cheese, room temperature; mix until crumbly. Combine 1/4 cup (54 g) vegetable oil and 2 tablespoons cold milk, then stir into the dry ingredients just until a shaggy dough forms.
- Press dough into a pie plate: Pat the dough evenly into a 9-inch pie plate, pressing it up the sides. Freeze for 10 minutes while the oven preheats to 375°F (190°C).
- Pre-bake the crust: Line the crust with foil or parchment and fill with pie weights or dried beans. Bake for 12 minutes. Remove weights and foil, then bake for 8 to 10 minutes more or until golden. Let cool completely.
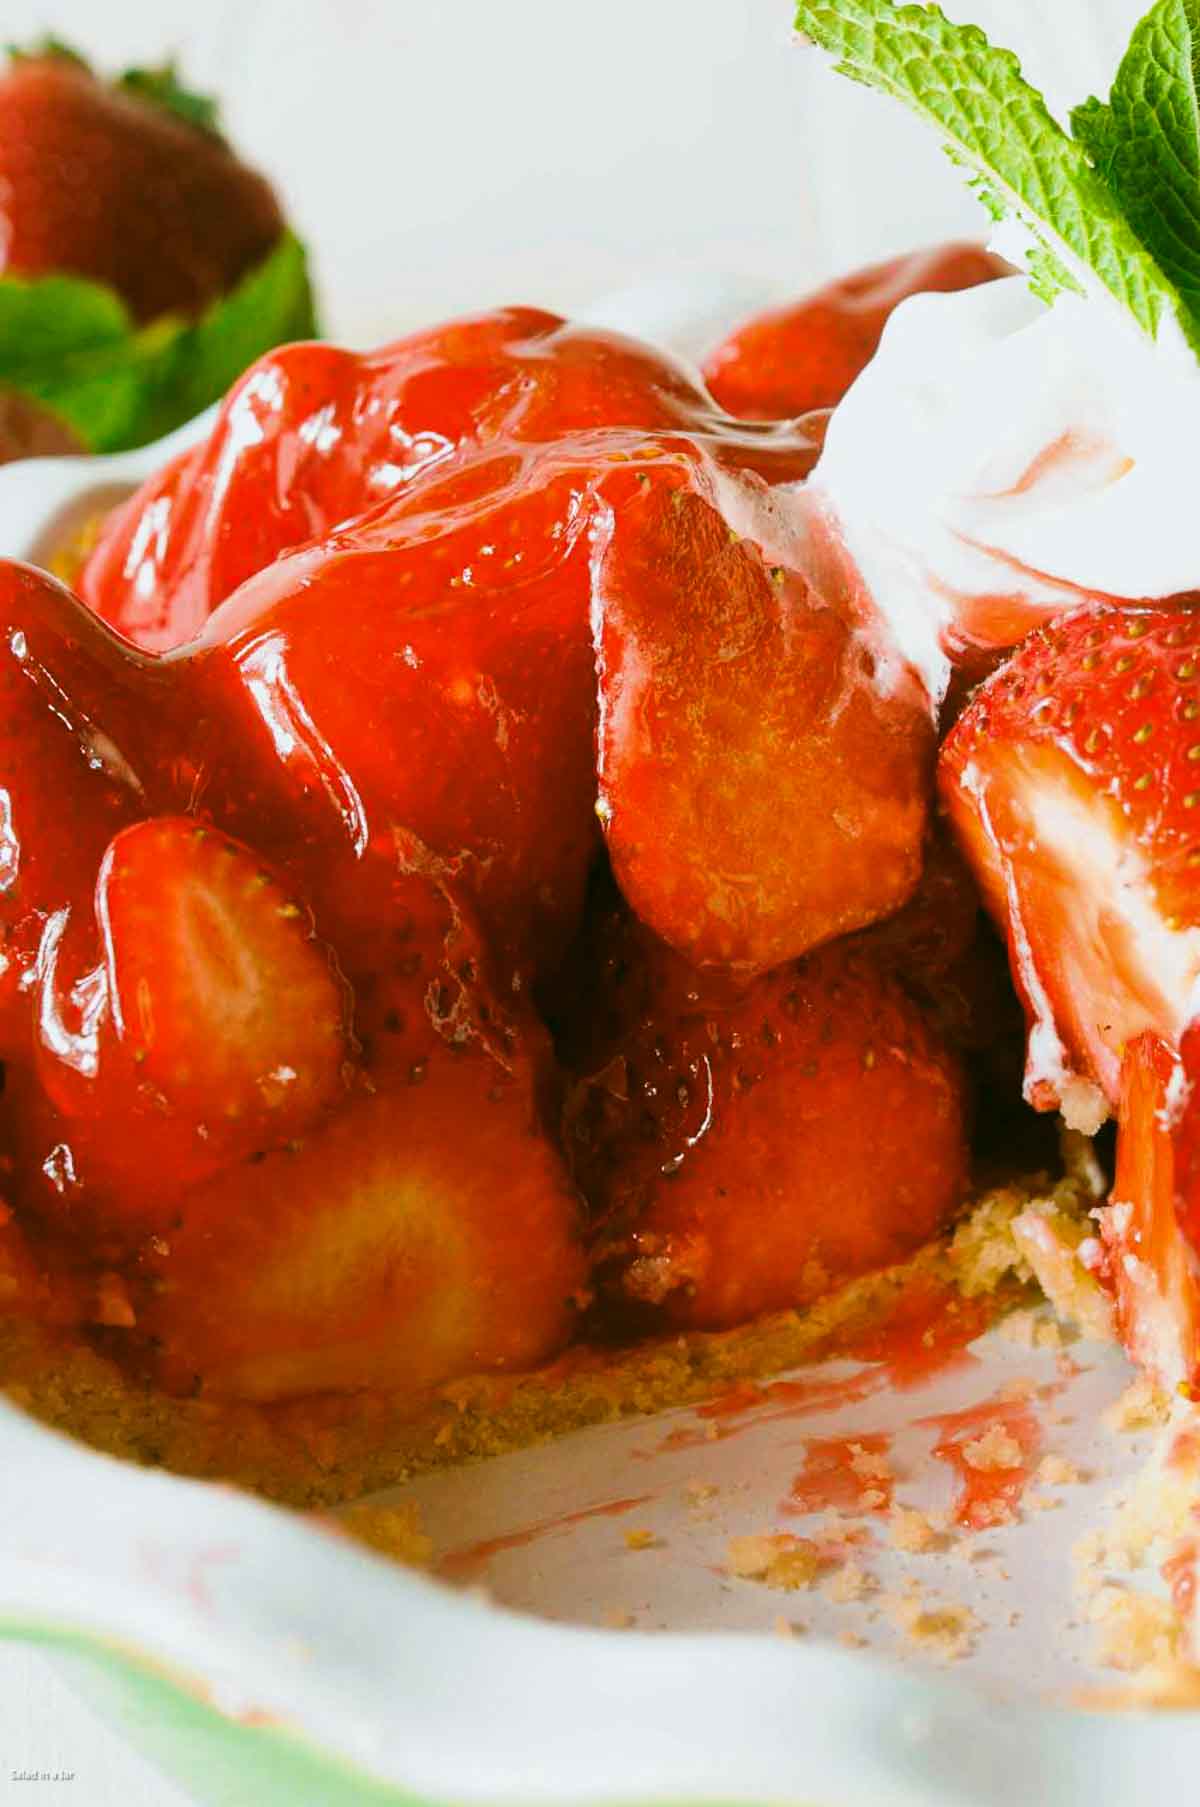
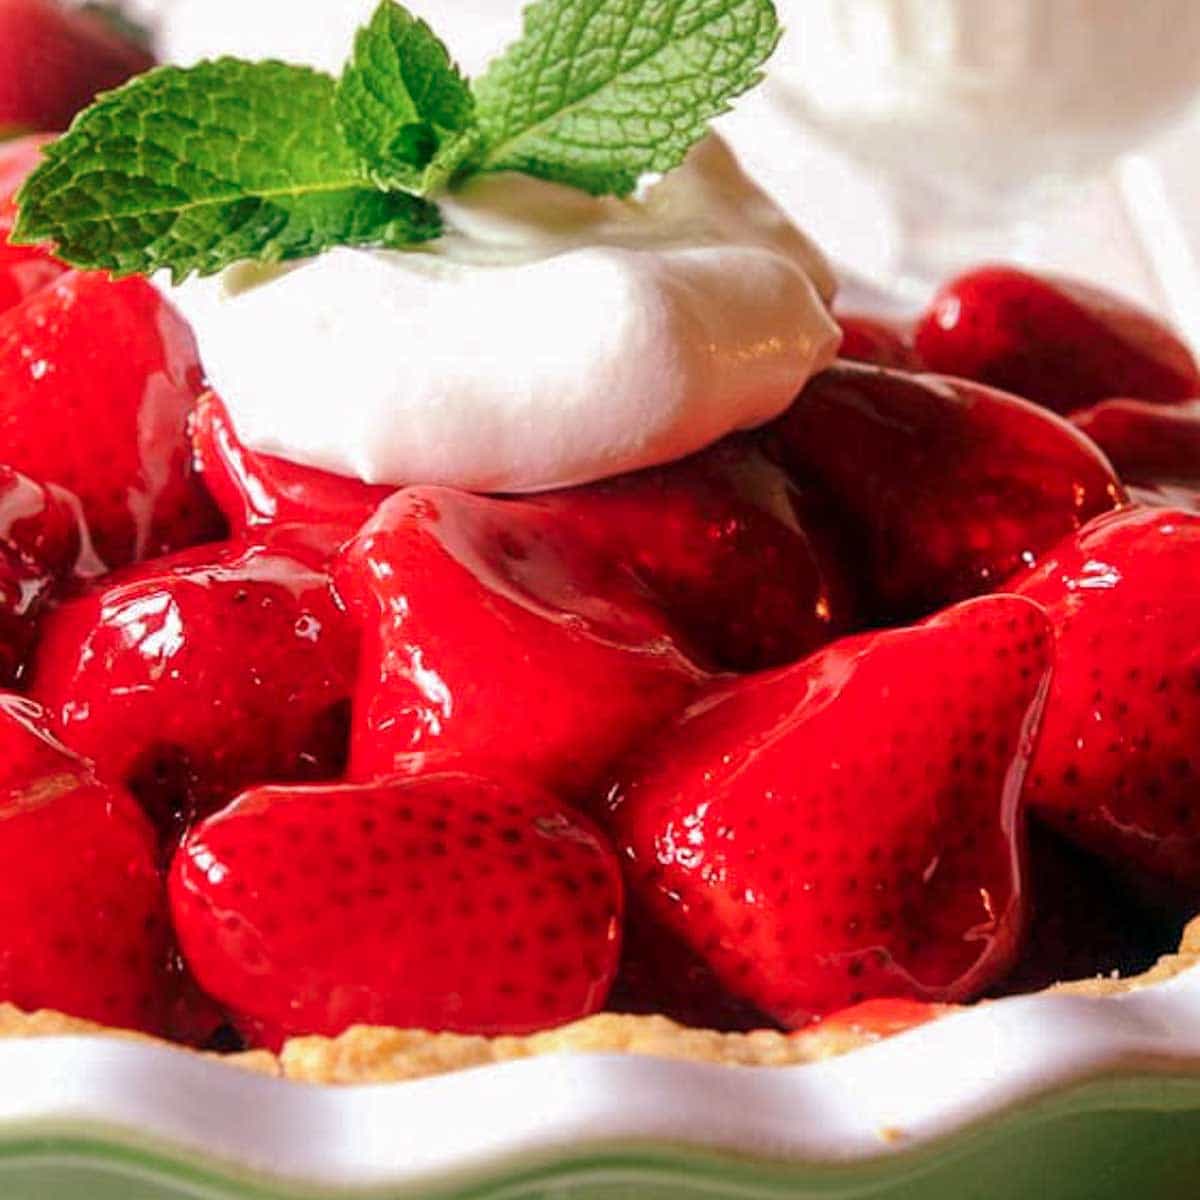
- Assemble the pie: Place 2 quarts (1893 g) fresh strawberries, cleaned and hulled into the cooled crust, pointed side up. Pour the cooled glaze evenly over the berries, coating them fully. Refrigerate at least 2 hours until set.Alternately, pour the glaze over the strawberries in a large bowl. Gently mix. Pour the strawberries/glaze mixture into the pie crust. Although not as pretty as arranging individual strawberries, I like the way the gel holds the berries together better.
- Serve cold: Slice and serve with whipped cream once the glaze is set. Best eaten the day it's made. Refrigerate leftovers.
Notes
Equipment
Nutrition
All images and text ©️ Paula Rhodes for SaladinaJar.com
Final Thoughts
If you enjoyed this fresh strawberry pie from Aunt Marg, don’t miss another longtime favorite of hers—French Silk Chocolate Pie. That pecan cookie crust is the reason it never lasts long at our house.
— Paula, Home Economist
Homemade Food Worth Sharing
Need help troubleshooting?
Email me: Paula at saladinajar.com — photos help!

It is awesome.
I was going to look for a strawberry pie recipe today, and a notice for this new blog post was at the top of my email:) This sounds delicious, Paula, and I’m going to give it a try. Hope all is well with you!
Good morning. I have strawberries in The refrigerator waiting to be used in this luscious recipe. Thanks for sharing. Miss hearing from you. Love your recipes and blog. Still make your yogurt recipe – the best recipe ever.
Thank-you Connie for your kind words. So nice to hear you are still enjoying the yogurt, too.
I love a crust recipe that doesn’t need to be rolled. 🙂 That strawberry pie looks scrumptious, and I’m sure it wouldn’t even last until the second day!
Hi Betty,
So nice to hear from you. Still teaching? Enjoying the summer? I have a feeling you could roll out a great pie crust any day of the week but the pat-in-the-pan crust is indeed a no-brainer.