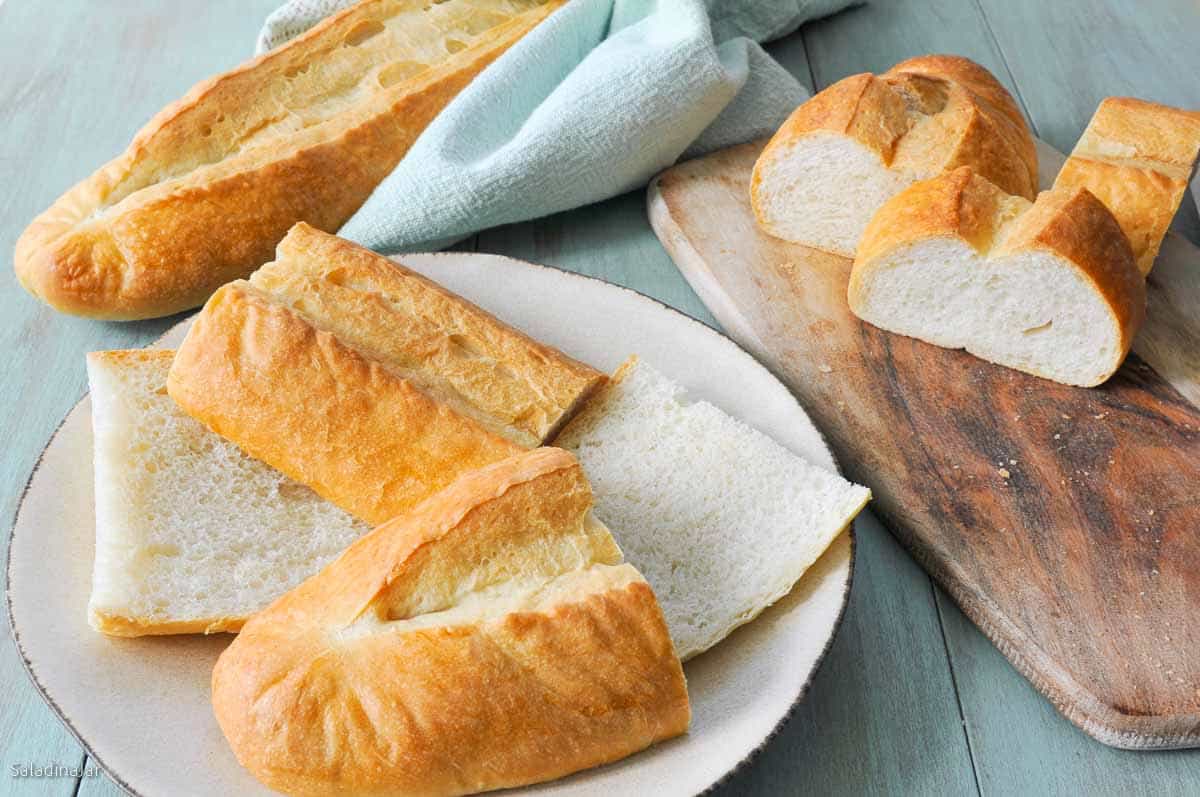
Bread Machine Cuban Bread for Sandwiches (Pan Cubano)
Sneak Peek: Make classic Cuban bread (Pan Cubano) at home using your bread machine’s DOUGH cycle, then bake it in the oven for proper crust and structure. Traditionally made with lard, this loaf is ideal for Cuban sandwiches and takes about 3½ hours (longer with the optional preferment).
This post contains affiliate links. As an Amazon Associate, I earn from qualifying purchases at no extra cost to you.
If you’ve ever gone looking for Cuban bread and come up empty-handed, you’re not alone. It’s a simple loaf, but hard to find outside a few regions. This version is designed for home bakers who want bread that slices cleanly, presses well, and holds up to fillings—especially for Cuban sandwiches. The bread machine handles the dough, and the oven finish gives you the crust and structure this bread is known for.
Traditionally made with lard for flavor and tenderness, Cuban bread is especially well-suited for pressed sandwiches.
How I Use a Bread Machine for Better Bread
I use my bread machine (my favorite) to mix and knead the dough using the DOUGH cycle, then shape the loaf and bake it in a conventional oven. This approach gives me better rise, structure, and crust — results I’m happy to share with family and friends.
If you prefer to bake bread entirely in your machine, you can—but results will vary depending on the recipe, humidity, and your bread machine model. My free Bread Machine Crash Course explains my approach in more detail.
Ingredients & Substitutions
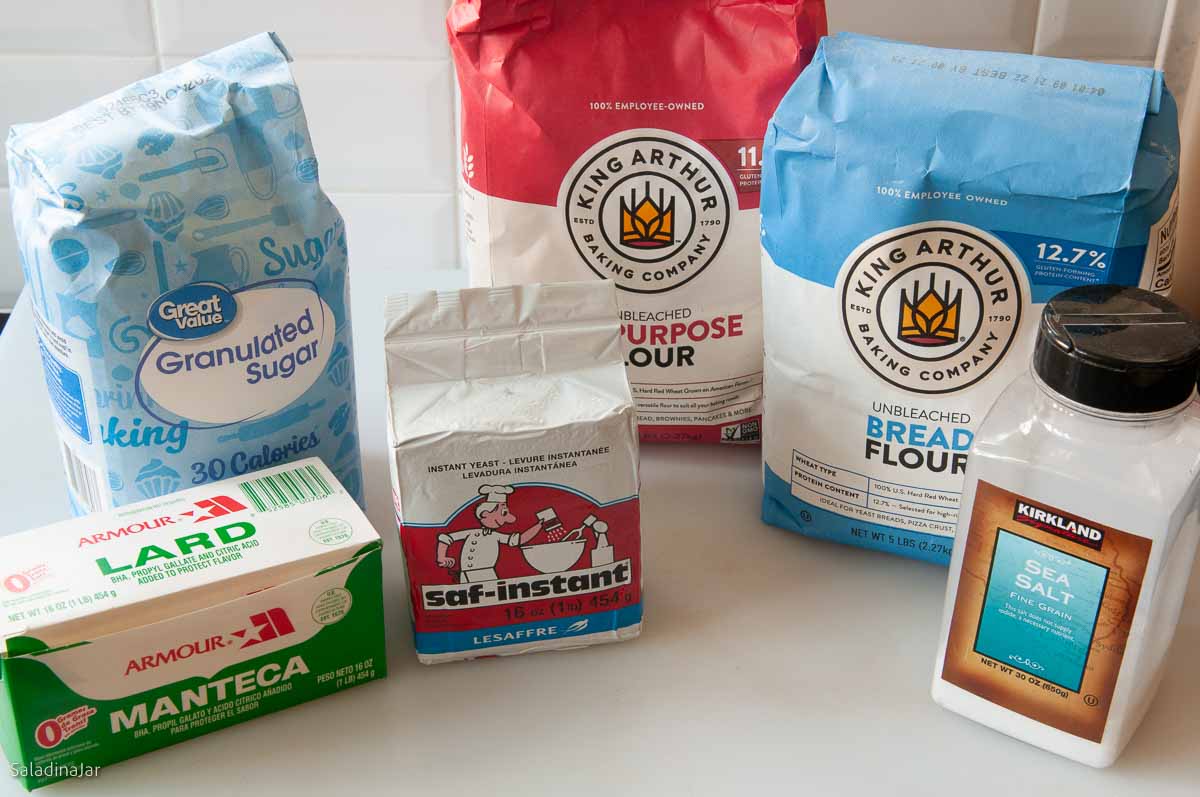
• WATER: Filtered or tap; avoid hard or mineral-heavy water.
• BREAD FLOUR: Adds chew; all-purpose can be used for a softer texture.
• SUGAR: White granulated sugar for flavor and browning.
• SALT: Use table or sea salt; add extra if using kosher salt.
• LARD: Classic in Cuban bread; substitute with shortening, butter, or olive oil.
• YEAST: Instant yeast works best in bread machines.
• EGG WHITE: Whisked with water for a shiny glaze.
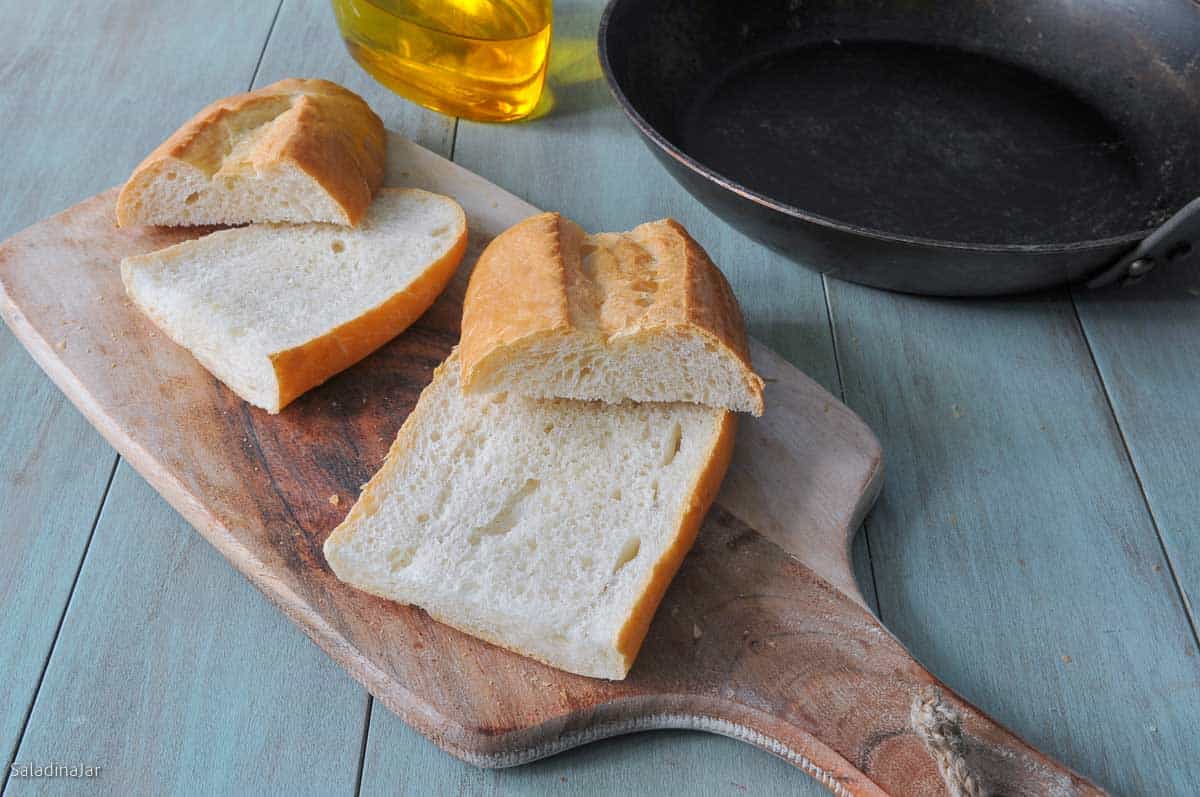
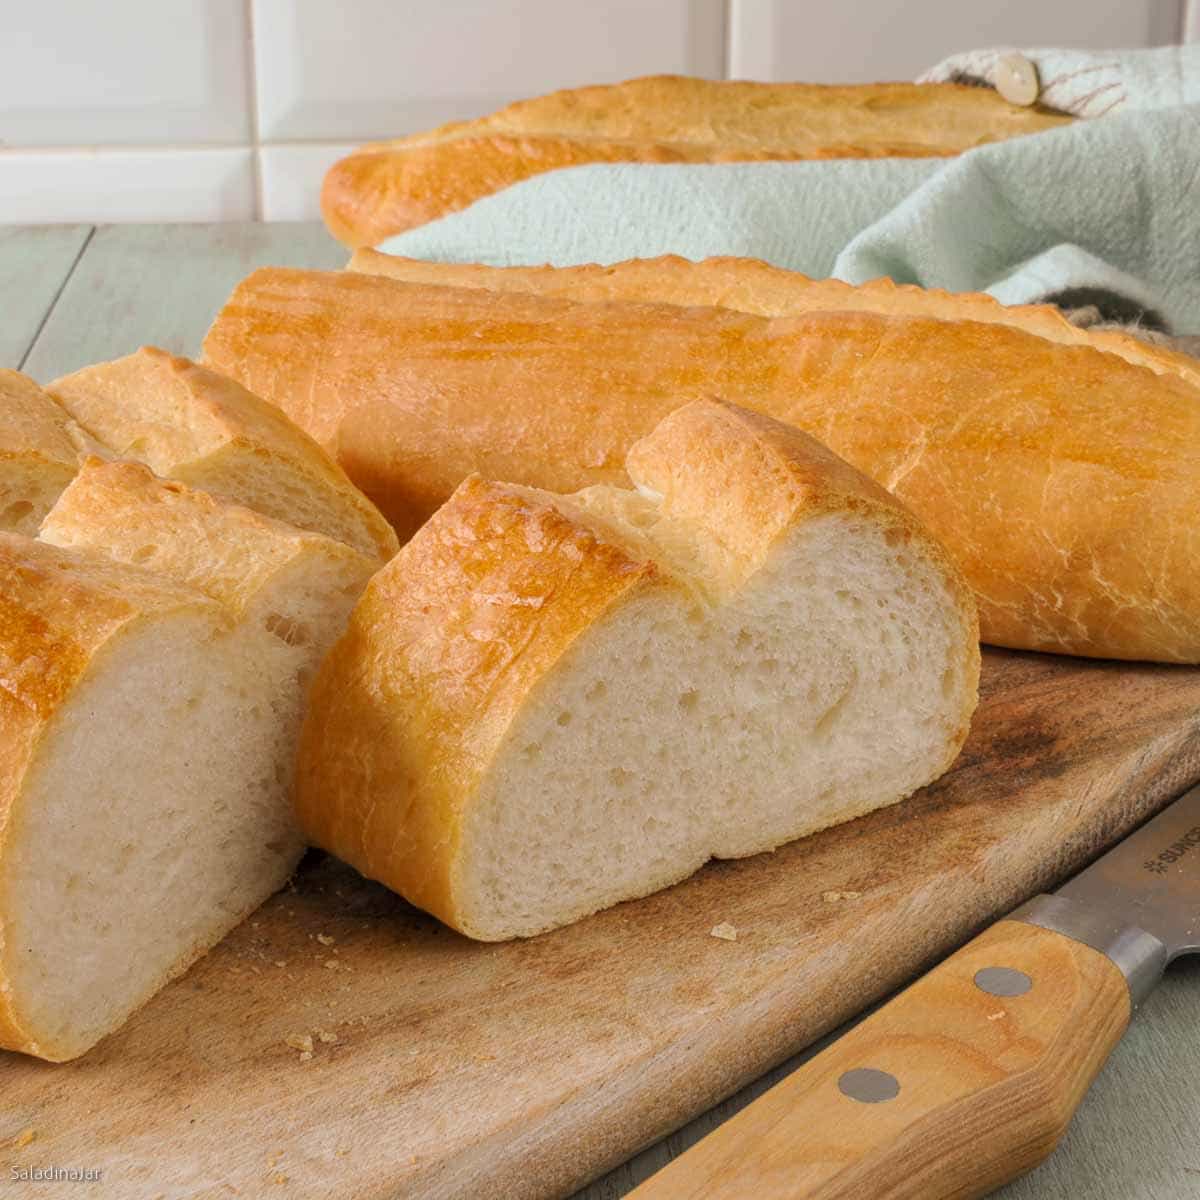
Step-by-Step Photos: Bread Machine Cuban Bread
⬇️ Jump to the recipe below for exact amounts and detailed instructions.


Bread Machine Cuban Bread for Sandwiches (Pan Cubano)
Video
Ingredients
Preferment
- ½ cup (114 g) water
- 1 cup (120 g) unbleached all-purpose flour
- ⅛ teaspoon instant yeast
Dough
- ½ cup + 1 tablespoon (128 g) water
- 2 teaspoons granulated sugar
- 1-¼ teaspoons table or sea salt
- 3 tablespoons (39 g) lard (or shortening)
- 2 cups (240 g) unbleached bread flour
- 1 teaspoon instant or bread machine yeast
Glaze:
- 1 (30 g) egg white
- 1 teaspoon water
Instructions
- Make the Preferment (Optional, but increases the flavor): Mix ingredients (½ cup (114 g) water, 1 cup (120 g) unbleached all-purpose flour, and ⅛ teaspoon instant yeast) in the bread machine pan. Start the DOUGH cycle for 3 minutes, then unplug. Cover and let sit 4–10 hours.
- Add Dough Ingredients: Place the preferment and the remaining dough ingredients ½ cup + 1 tablespoon (128 g) water, 2 teaspoons granulated sugar, 1-¼ teaspoons table or sea salt, 3 tablespoons (39 g) lard (or shortening), 2 cups (240 g) unbleached bread flour, and 1 teaspoon instant or bread machine yeast into a bread machine pan (or combine all if skipping preferment). in the order listed.
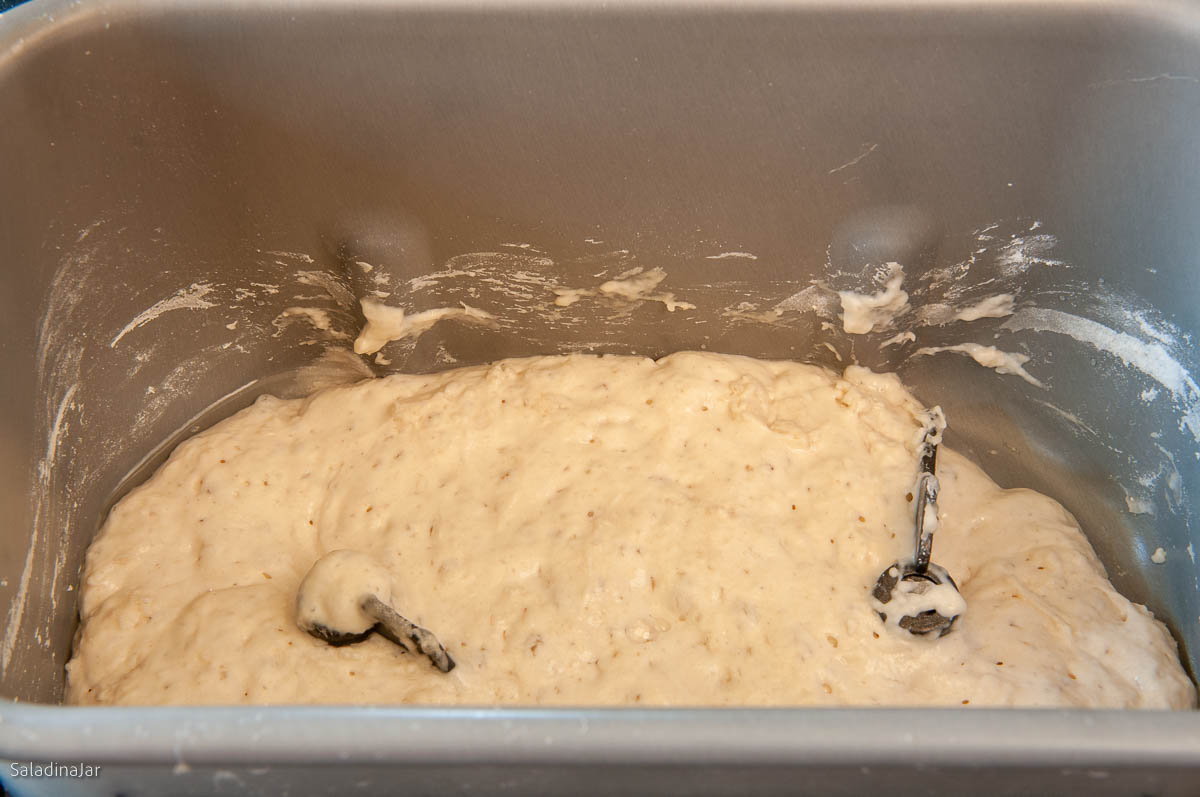
- Select the DOUGH cycle and start.First check: After a couple of minutes, check the dough to make sure it is coming together into a raggedy ball. If not, add more water 1 tablespoon at a time. If you see pancake batter instead of dough, you forgot some flour—just add it slowly until everything pulls together.Second check: Check dough again after about 15 minutes. The dough should stick to the sides of the pan, then pull away cleanly. If too wet, add flour 1 tablespoon at a time. If too dry and the dough doesn't stick at all, add more liquid. See more details–Surprising Secret for Making Better Bread with a Bread Machine.
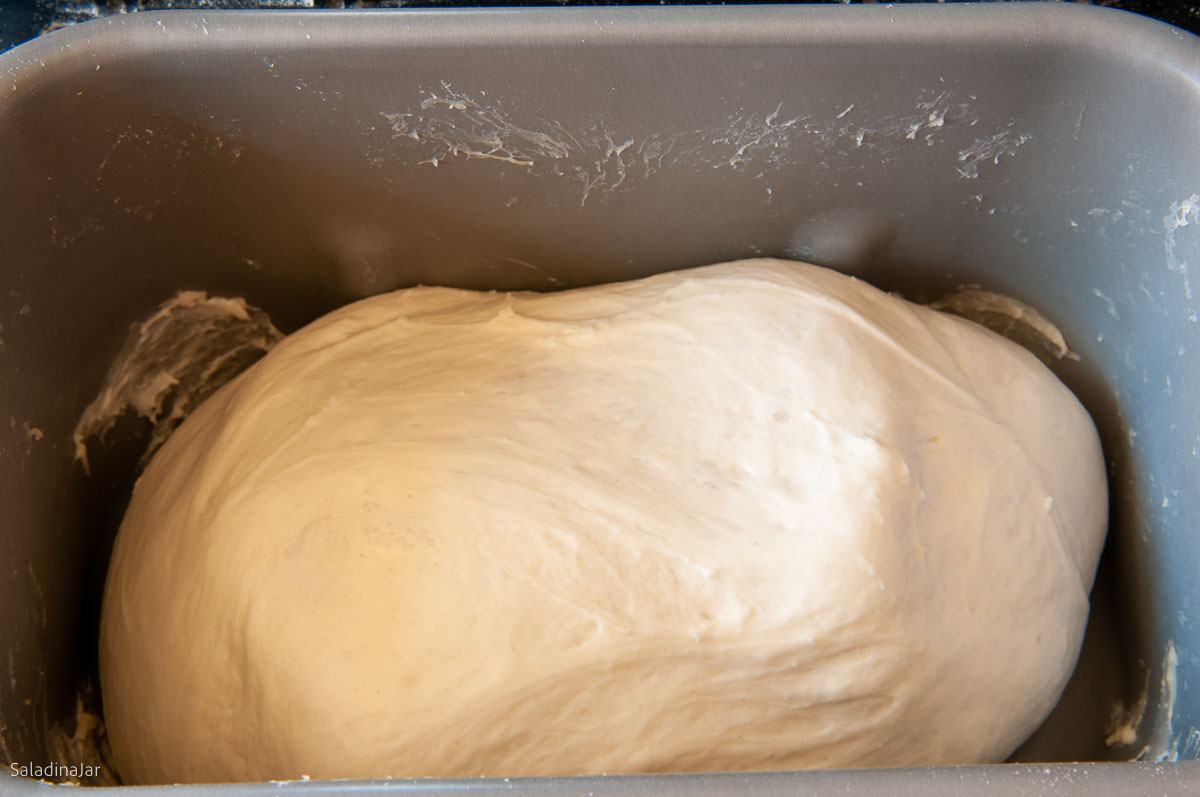
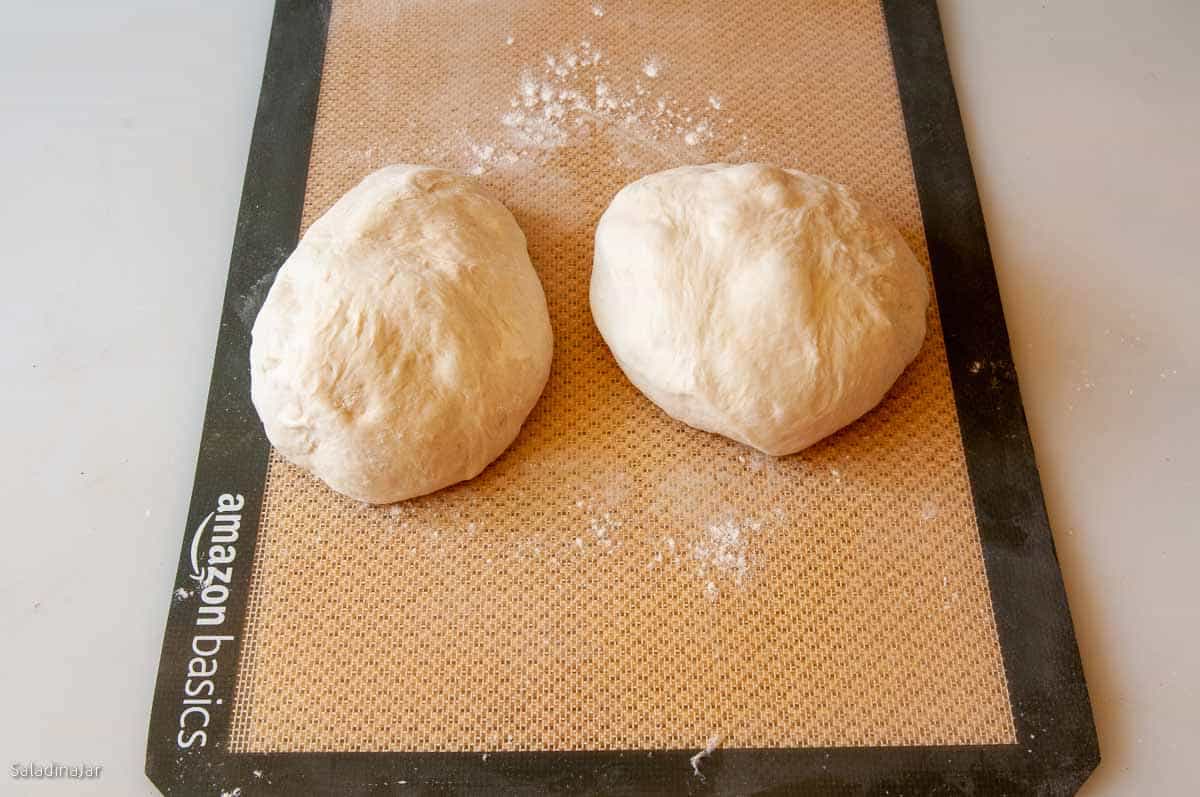
- End of DOUGH cycle: The dough should be doubled. If not, give it more rise time until it is. Restart the DOUGH cycle and knead for 5 seconds to deflate the dough. Remove dough to a lightly floured surface.
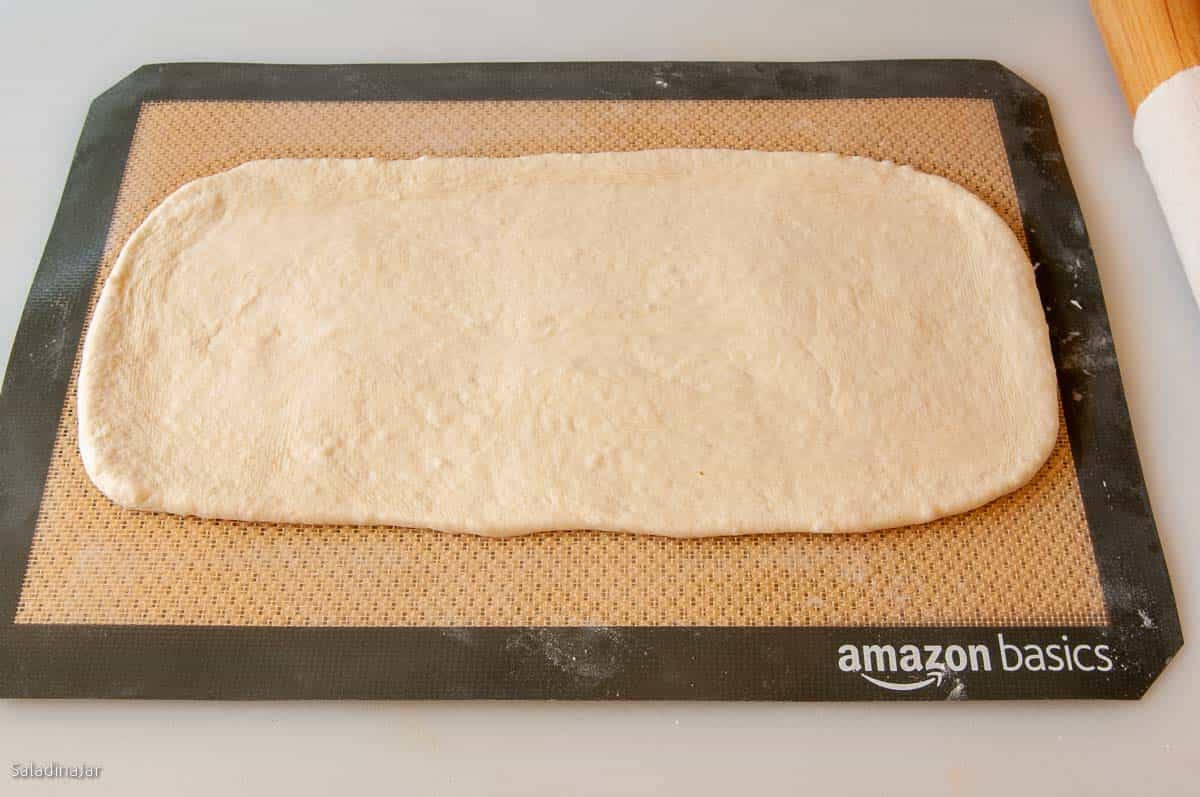
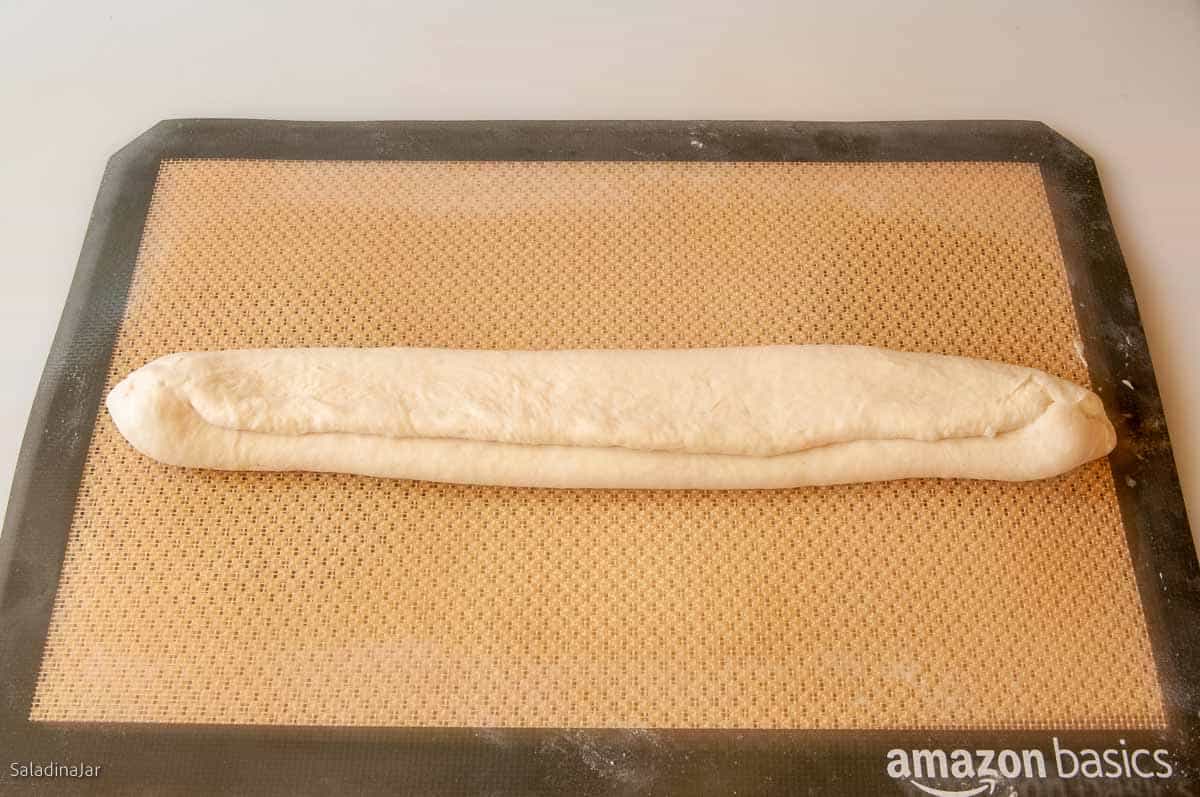
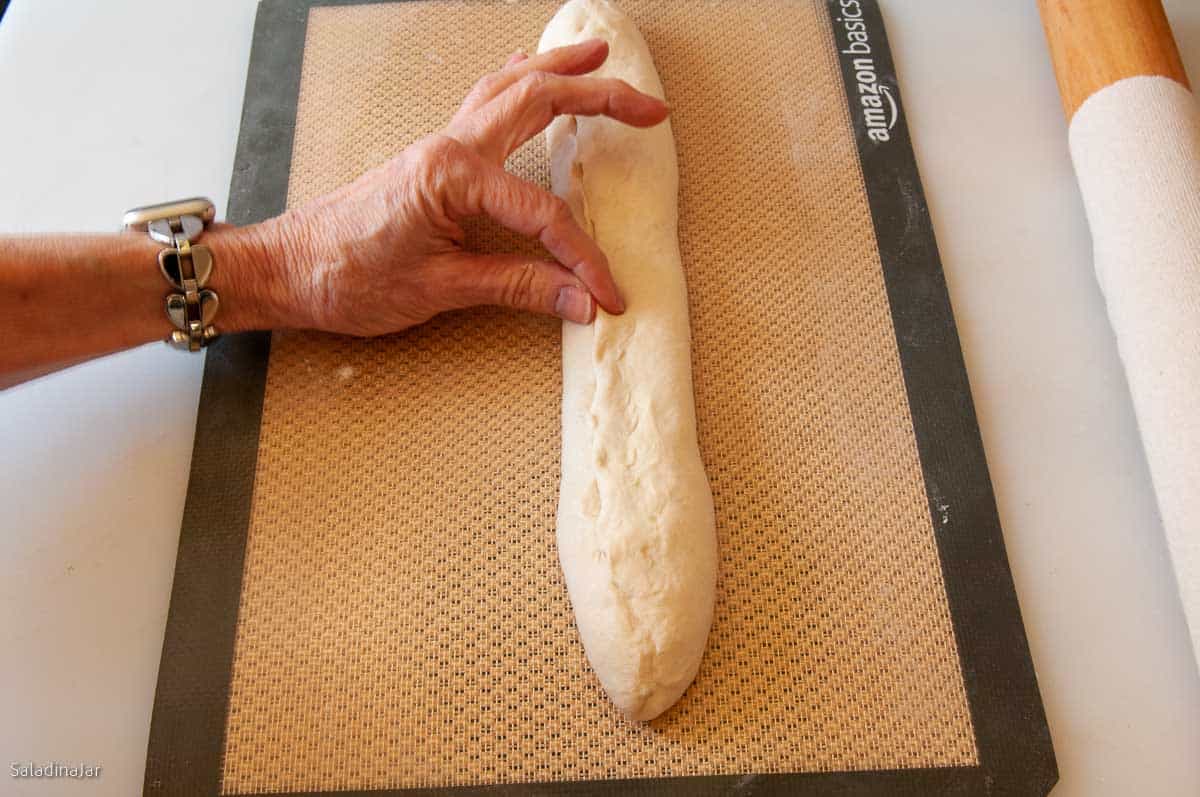
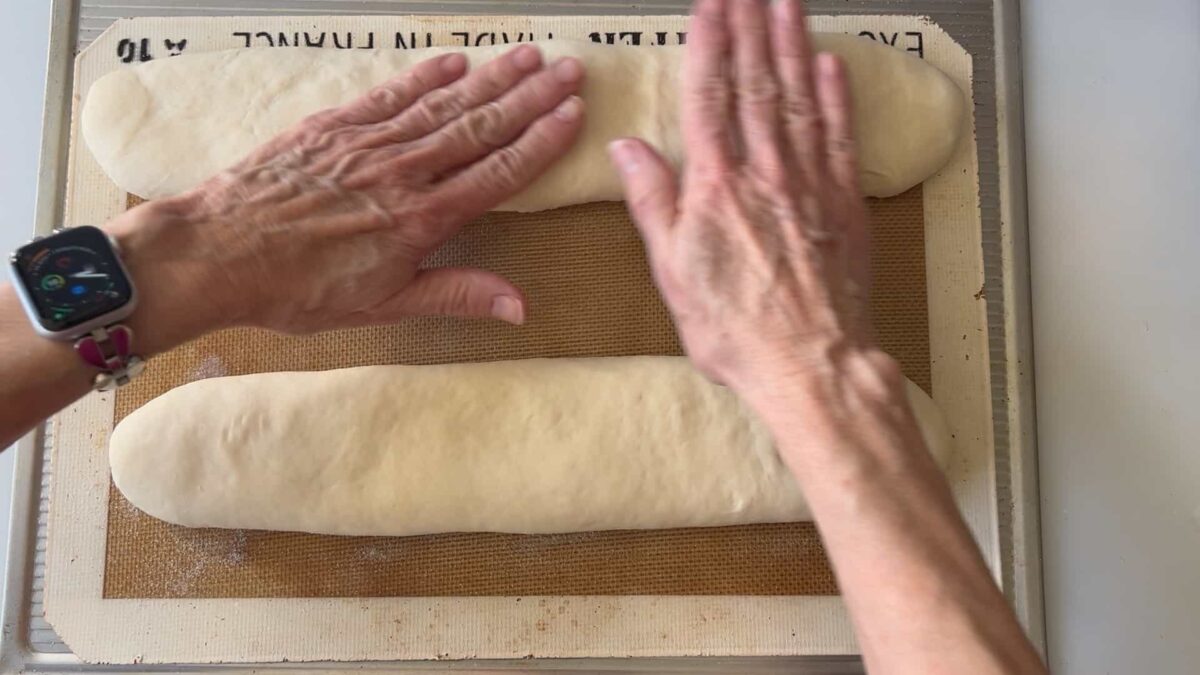
- Shape the Loaves: Divide into two portions. Let rest for 15 minutes.Shape: Roll each portion into a 9 x 13-inch oval. Fold like a business letter: Fold the bottom third up, press. Fold the top third over, press, and pinch the seams and ends. (See video.)Place Loaves: Flip seam-side down onto a greased or lined baking sheet. Flatten slightly with fingers.
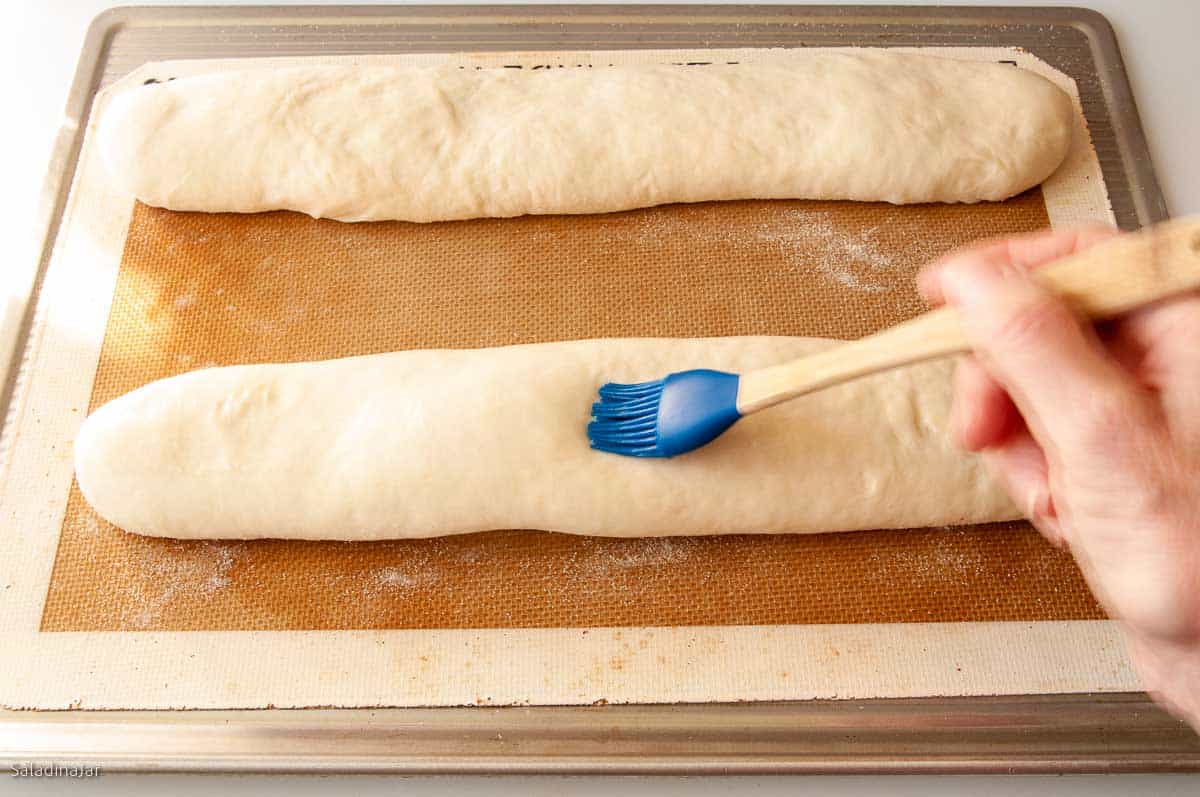
- Final Rise: Cover and let loaves rise until almost doubled.Preheat oven to 425˚F (220˚C).Again: Flatten loaves slightly with fingers–makes nicer sandwiches.
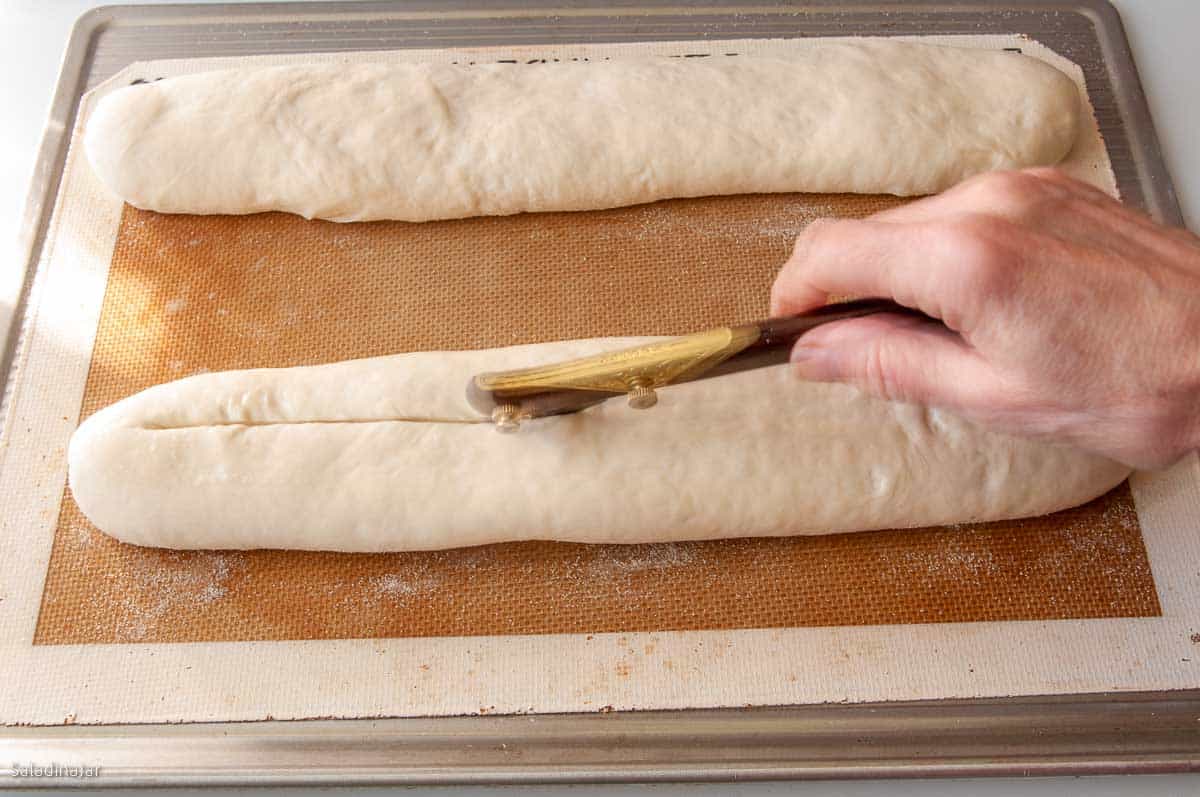
- Glaze and Slash: Whisk 1 (30 g) egg white and 1 teaspoon water together for the glaze. Brush it over the risen loaf.Use a sharp knife, a single-edge razor blade, or a lame to cut one long slash down the middle of the loaf.
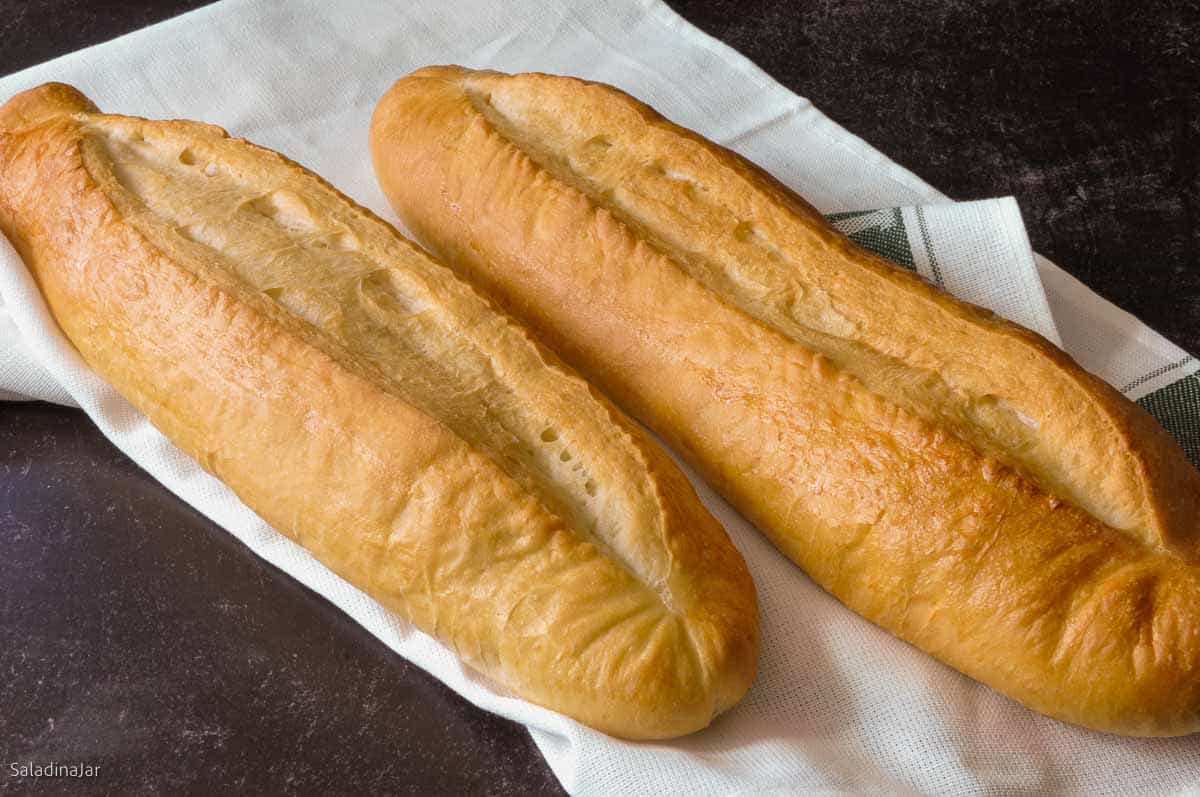
- Bake: Place a pan of boiling water on the lower oven rack. Bake for 20–25 minutes until the internal temperature is 200–205°F (93°C).
- Cool: Transfer to a rack and cool before slicing.
Notes
-
Heads-up: Avoid doubling this recipe. Most bread machines cannot adequately knead more than 4½–5 cups of flour and may overheat. More details here.
Make Ahead: Dough can be refrigerated after the DOUGH cycle or shaped first and chilled overnight. Let rise until soft and puffy before baking.
Freezing Options:
- Unbaked dough: Freeze after the DOUGH cycle or after shaping (before final rise). Defrost in the fridge overnight.
- Baked bread: Double-wrap and freeze up to one month. Reheat gently.
- Stand Mixer: Mix until moistened, then knead with a dough hook (speed 2–3) until smooth and elastic (5–10 minutes). Let rise, deflate, and shape as directed.
- By Hand: Mix to a shaggy dough, knead on a floured surface until smooth and elastic (10–20 minutes). Let rise, deflate, and shape as directed.
Equipment
Nutrition
All images and text ©️ Paula Rhodes for Salad in a Jar.com
Final Thoughts
This is the bread you want for Cuban sandwiches, pulled pork sliders, or to mop up garlicky soups. The bread machine does the heavy lifting—your job is to shape, slash, and enjoy. Let me know if you give it a try!
— Paula, Home Economist
Homemade Food Worth Sharing
Need help troubleshooting?
Email me: Paula at saladinajar.com — photos help!

Meant to suggest that I keep lard stocked in my kitchen as I make a lot of Tex-Mex foods. I heat the block of lard, pour it into ice cube trays (3 is perfect for the whole block), freeze then pop them out and store in the fridge. They are roughly 1 T so I just pull out what I need and pop it in the pan. Much easier than guess work of slicing, melting and measuring.
Kathy,
This is a genius idea. I will be doing this in the future. Thanks for taking the time to share!
Looks like another keeper! Always looking for a good sub/hoagie roll but the ones in the stores are so thick and doughy.
I had never heard of a Lame but it’s on my Amazon list now!
The preferment – Is that like Biga? Seems like it.
Can’t wait to make this!
Hi Kathy,
Yes, a biga is a specific kind of preferment. A preferment is a flour, water, and yeast mixture mixed up before the rest of the dough and allowed to sit for awhile. You can skip it but since it’s not hard, it’s totally worth the trouble to get a more flavorful bread.
hi!
new to bread making and giving this a try! how long should it be in the dough setting? my breville has the dough setting run for 90 minutes but it seems like here its for 15? hoping it comes out well@
Hi Amy,
The DOUGH cycle is usually about 1 hour and 30 minutes. For most of my recipes, you will leave the dough in the machine for the entire DOUGH cycle which will include the initial rise. The kneading phase is much shorter. That usually lasts for 15-22 minutes, but machines vary.
I hope you will have beginner’s luck. But don’t be discouraged if your bread doesn’t turn out perfect the first time. Bread baking is not like making brownies. It takes some experience to learn to read your dough. You know where to find me if you have more questions.
Hi , Paula
Would like to try this Cuban bread , my bread maker rests for a long period before mixing .
Can I make the preferment ingredients by hand then add to the machine ?
Many thanks
Jules .
Ps love your recipes , thanks for taking the time to explain everything . X
Hi Jules,
Thank you for your encouraging words. Yes, you may make the preferment in another bowl. I don’t know what kind of machine you have, but if it’s a Zojirushi, you can turn off the long rest period before mixing. Most machines will not allow it, unfortunately. Hope you love the Cuban bread.
By unplugging (Per Paula’s instructions) the machine it will just sit in the pan until ready for use.
l was born in Coral Gables, Florida but live in Kansas now where you can’t buy Cuban bread or anything Cuban food related at all. I usually bring a suitcase full back to Kansas after I visit Florida and freeze it to use when I want a taste of home. I followed this recipe exactly and it was perfect. Light and airy with a great crispy crust and wonderful flavor. I’m making Cubano sandwiches tonight for dinner.
Hi Georgie,
I am so happy to hear you loved this recipe. Thank you so much for taking the time to write and also, for the 5-star review.
Do I need to melt the lard?!
Hi George,
No, unless it is frozen. In that case, let it thaw until pliable. If it’s refrigerator-cold or room temperature, chop it into smaller pieces before adding. The friction of the paddles will warm all of the ingredients quite nicely.
I just popped two loaves out of the oven. At first I thought it would be so difficult and procrastinated. But then I watched the video and looked at the photos and it turned out to be much less difficult than I had imagined. Now I have two beautiful loaves that we’ll use with tomorrow’s dinner, unless they are eaten before then! LOL Thanks Paula.
Love it!!
I have used a bread in a machine for more than 30 years (old Hitachi home bakery), but since finding your website last year, my baking has elevated 1000%. I have used your par bake method and made small loaves with a lot of your recipes.GAME CHANGER. When I made this Cuban bread my husband said it was the best bread I have ever made. Also my poker group loved the Cuban sandwiches I made. Thank you, thank you thank you!
Hi Michelle,
I owned two different Hitachi home bakeries back in the 90’s. I loved that machine. Is that what you are still using? The belts broke on mine after so much use.
I love hearing that you are having success with the Cuban bread and sharing it is the best part. I would love to try some of your Cuban sandwiches. What a treat for your poker group! Now they know how much you care for them to take the time to make them great food.
I have made this weekly since finding it. It always turns out great and my sons want it all the time.
Hi Timothy,
I’m so happy you are enjoying this bread along with your sons! Thank you for taking the time to share your thoughts.
We made the preferment in the canister of the bread maker and left it for about 8 hours. We noticed that the preferment was very liquidy. We then added the other ingredients, but substituted Crisco for the lard. We noticed while the dough was mixing that it was too wet, so added some flour, a little at a time. We were becoming concerned that we would add too much flour, so stopped at about two tablespoons. The dough was incredibly wet and we had to add flour to the work surface. Even then it was difficult to roll and we ended up stretching the dough by hand. It turned out fine and the finished product was delicious! We followed the directions as stated but dough was really hard to work with. Any suggestions? Otherwise, a great recipe.
Sounds like it all worked out in the end. Glad your bread was delicious.
We tried once again this weekend and the bread turned out great. I think the first time we made this bread we didn’t follow the recipe or at least we did something wrong. The dough this time wasn’t too wet at all. We made the preferment about 18 hours in advance, just leaving it in the pan. We also used Crisco instead of lard. It’s a great recipe and a very tasty bread to have with stew or a thick soup. Thanks for the help Paula.
I’m so glad to hear this, Stephen. Thanks for the update.
I’m in the process making this recipe. I noticed two inconsistencies in the instructions: weight of water in the dough (128 gr versus 227 gr) and quantity of salt (1 1/4 t. versus 1 1/2 t.). The different salt quantities wouldn’t make a lot of difference, but the difference in the weight of the water required could make or break success with this recipe. Fortunately I caught the discrepancies and adjusted. Looking forward to the bake. It’s a beautiful dough.
Thank you, Paula. I appreciate you taking the time to write. The corrections are made. Hope your bread turns out great!