Savory Spinach Parmesan Bread (Bread Machine Dough + Oven-Baked)

Sneak Peek: This Savory Spinach Parmesan Bread starts with your bread machine’s DOUGH cycle and finishes in the oven for a crisp, golden crust. It’s packed with Parmesan, caramelized onion flavor, and just enough fresh spinach to make it interesting—without turning your loaf green.

A market loaf caught my eye, and I couldn’t stop wondering if I could make it myself. That little spark is what pulls me in every time I see something tempting at a farmer’s market or fruit stand. My first thought isn’t just how good it will taste—it’s whether I can recreate it at home. There’s something deeply satisfying about taking inspiration from what you see on the shelf and shaping it with your own hands.
That’s how this spinach bread came to life. One market loaf started the idea, but plenty of kitchen testing turned it into something new: a tender bread dotted with Parmesan, elevated with a bit of whole wheat, and shaped to look like it came straight from a bakery. And yes—it all begins in the bread machine.
Ingredients and Substitutions
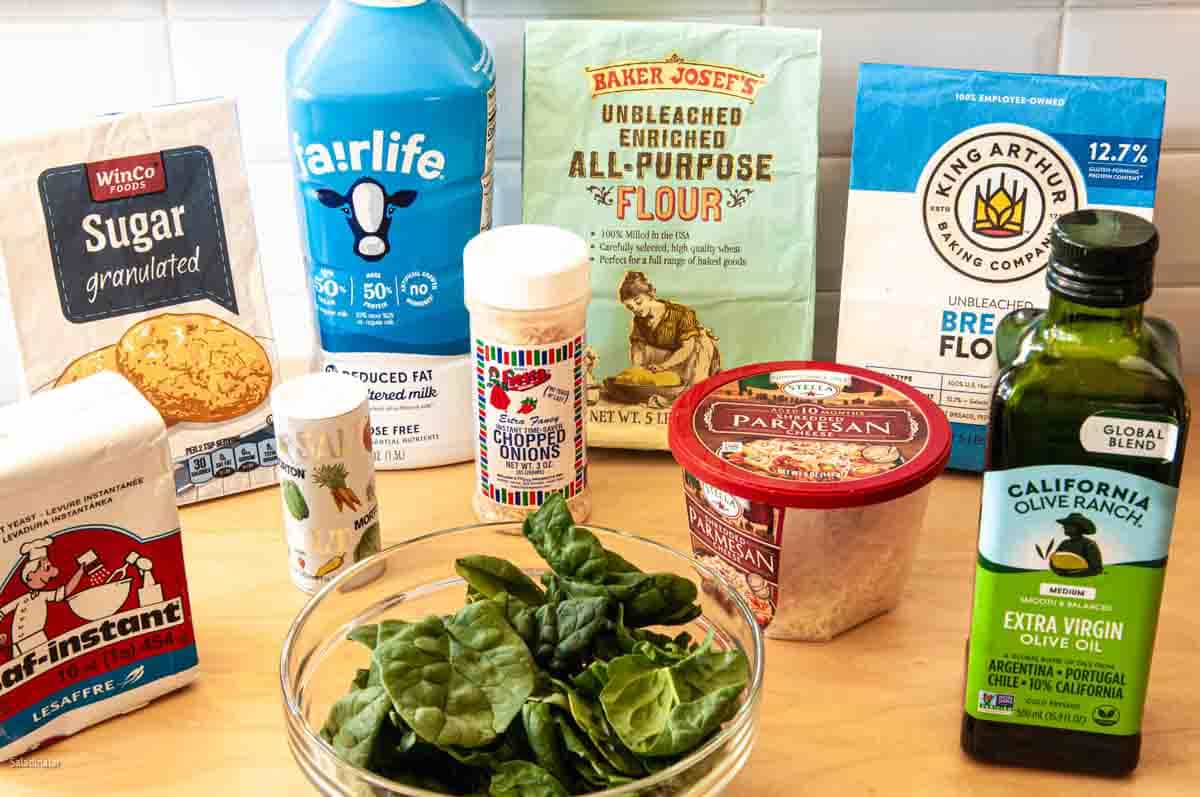
MILK: Whole milk; sub with nut milk or water + dried milk; no need to warm when using a bread machine.
BUTTER: Cold, chopped butter; sub with olive or vegetable oil.
GRANULATED SUGAR: White sugar; sub with honey (adjust moisture).
SALT: Table or sea salt; add ¼ tsp if using Kosher salt.
PARMESAN: Shredded Parmesan; sub with Romano.
CHOPPED ONION: Instant chopped onion adds bold flavor without extra moisture; avoid minced dried onions.
BREAD FLOUR: Bread flour; sub with all-purpose + vital wheat gluten.
WHOLE WHEAT FLOUR: White whole wheat; sub with regular whole wheat or spelt.
YEAST: Instant yeast; sub with active dry yeast (+¼ tsp).
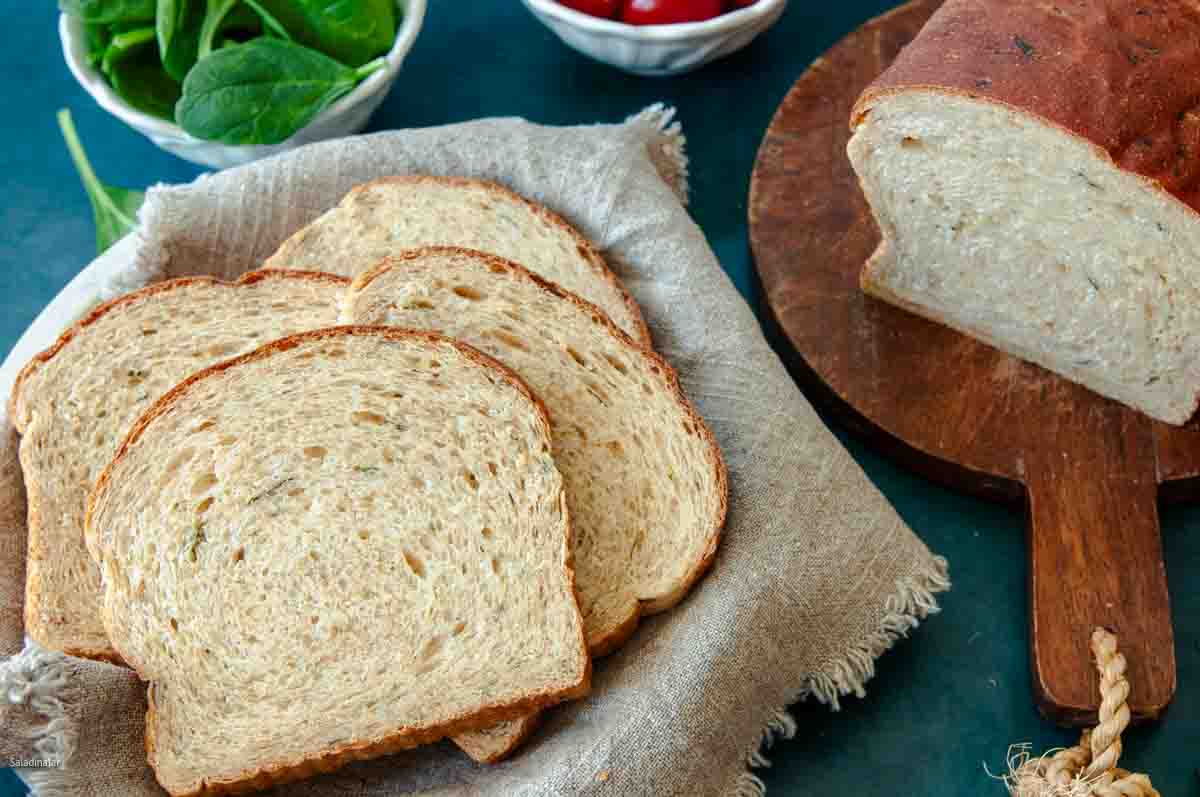
SPINACH: Fresh spinach is best; avoid frozen or cooked spinach.
Step-by-Step Photos: Making Bread Machine Spinach Bread
⬇️ Jump to the recipe below for exact amounts and detailed instructions.


?Tips That Make a Difference
- Weigh ingredients for the best outcome.
- Check doneness with a thermometer: Use a quick-read thermometer to check the internal temperature after baking.
- Cool before slicing: Let bread rest at least 1 hour for cleaner cuts and better texture.
- Use leftovers for croutons: Cube, spray with butter, and bake at 350°F for 10–15 minutes.
Savory Spinach Parmesan Bread (Bread Machine Dough + Oven-Baked)
Video
Ingredients
- ½ cup (114 g) milk
- ½ cup (114 g) water
- 1½ tablespoons (21 g) butter
- 2 teaspoons granulated sugar
- 1 teaspoon salt
- ¼ cup (27 g) grated Parmesan cheese
- 1½ tablespoon (10 g) instant minced onion
- 2 cups (240 g) bread flour
- 1 cup (113 g) whole wheat flour
- 1½ teaspoons instant yeast
- ¼ cup (15 g) finely chopped fresh spinach leaves
Instructions
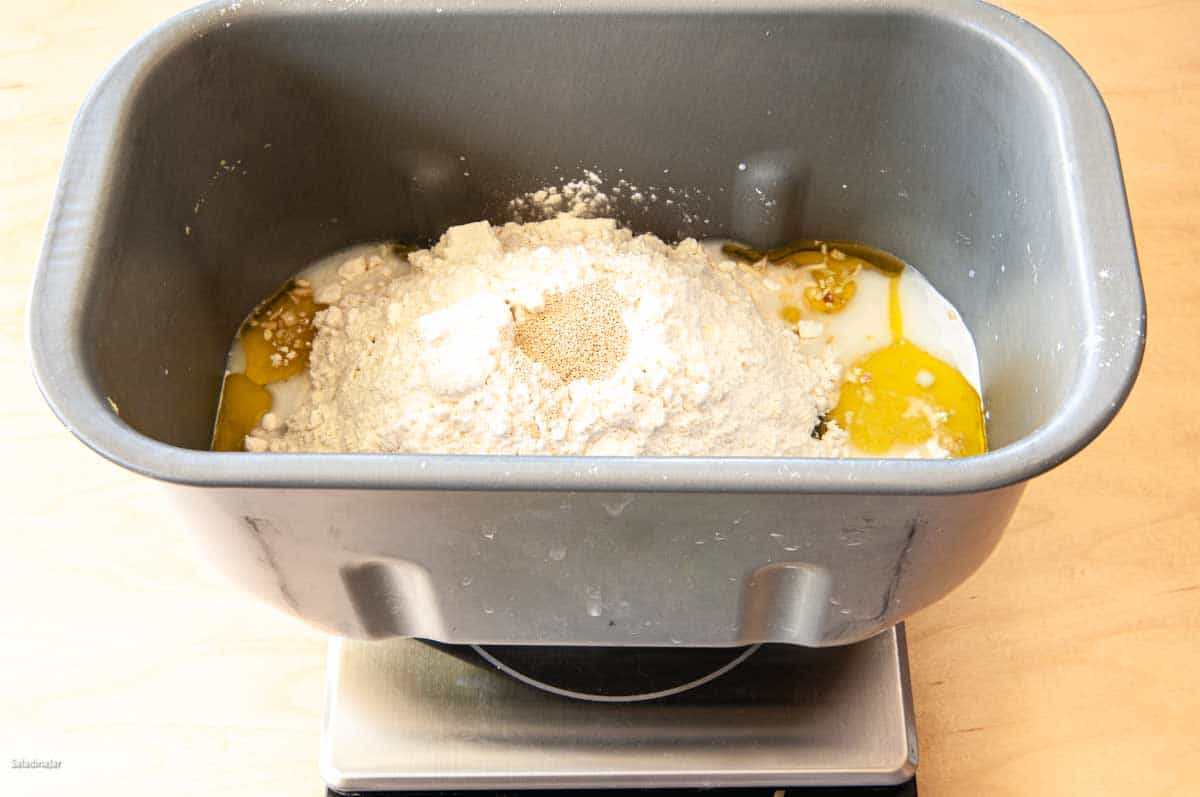
Add ingredients to the bread machine
- Place ½ cup (114 g) milk, ½ cup (114 g) water, 1½ tablespoons (21 g) butter, 2 teaspoons granulated sugar, 1 teaspoon salt, ¼ cup (27 g) grated Parmesan cheese, 1½ tablespoon (10 g) instant minced onions, 2 cups (240 g) bread flour,1 cup (113 g) whole wheat flour, and 1½ teaspoons instant yeast into the bread machine pan. If possible, weigh the flour.
- Select the DOUGH cycle and press START.
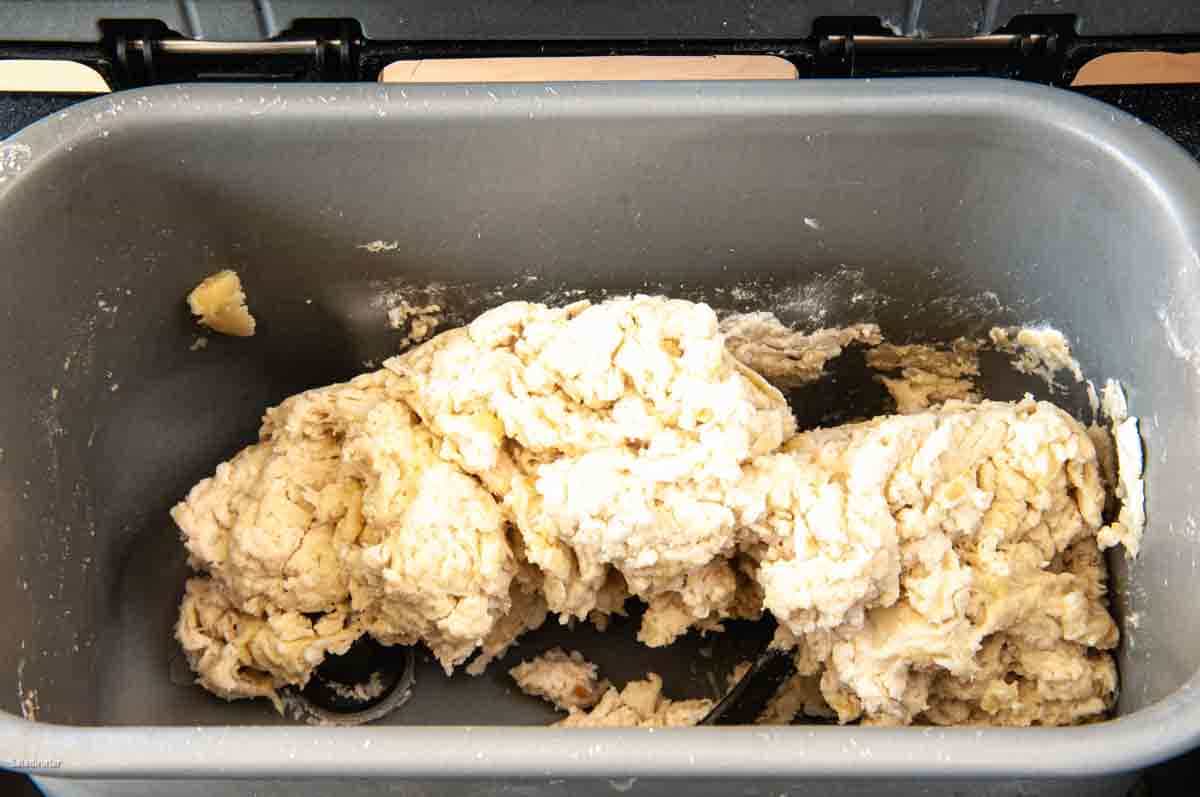
Check the dough
- First time: Open the lid and check the dough after it has mixed for 1-2 minutes. Ensure the paddle(s) is engaged, and the dough is starting to clump into a ball.
- Second time: After 15-18 minutes, open the lid again and check the moisture level of the dough. It should be sticky enough to stick to the sides, then pull away cleanly. If the dough is bouncing off the pan walls or riding on top of the paddle like a top, add more water one tablespoon at a time until the dough is slightly tacky.
- If the dough is too wet, and doesn't pull away from the sides cleanly, add flour one tablespoon at a time. Read more about this surprising trick for making good bread in a bread machine.
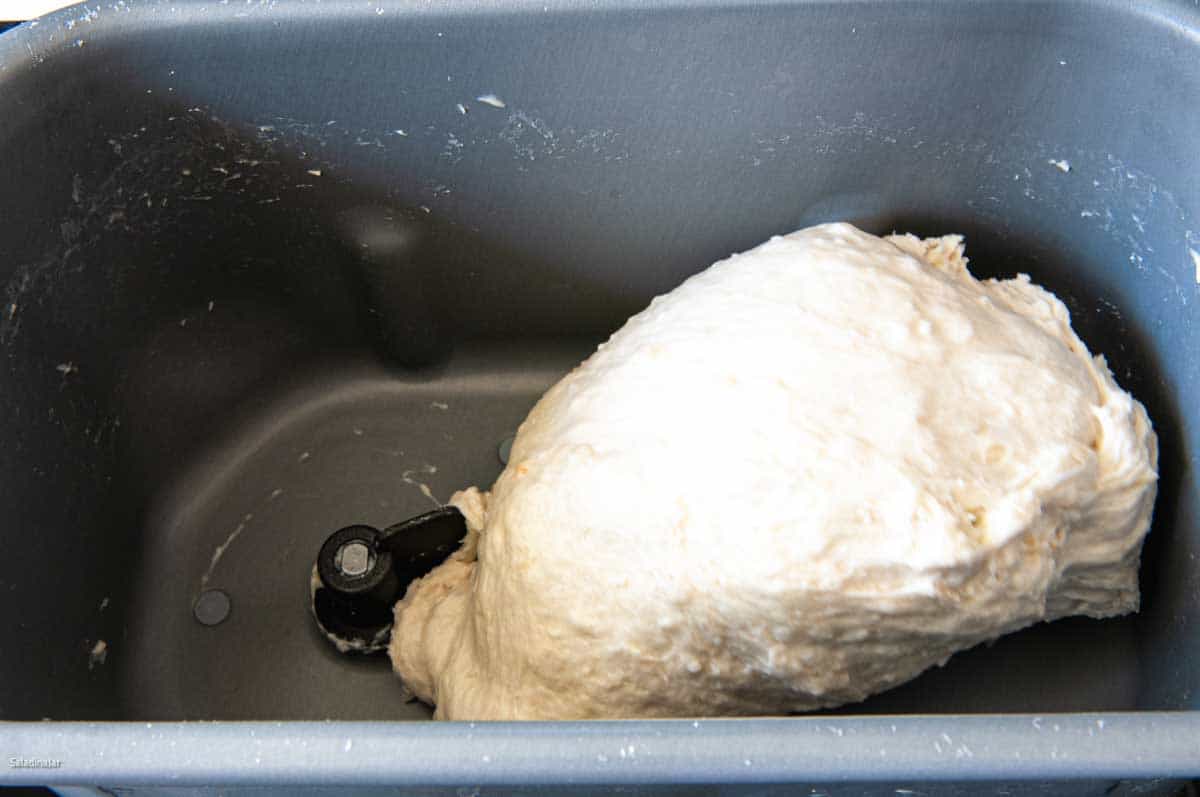
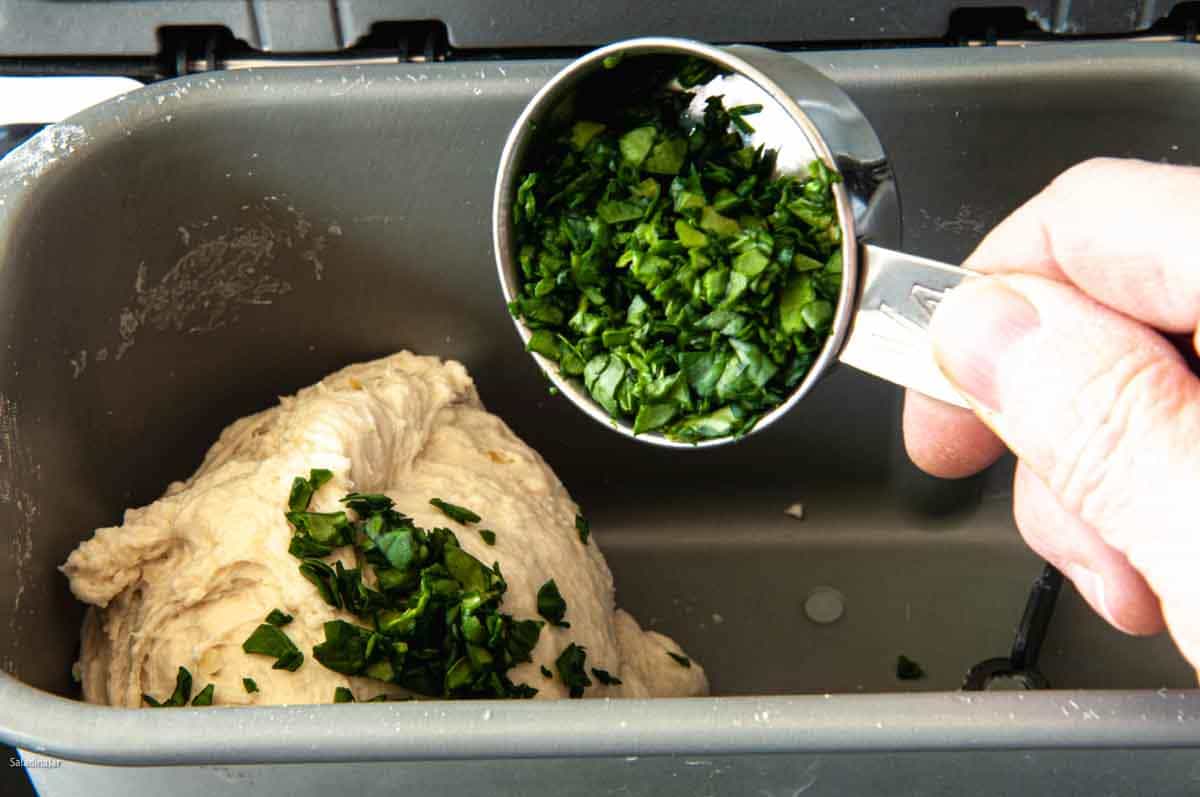
- When the machine beeps that it's time for add-ins, add ¼ cup (15 g) finely chopped fresh spinach leaves to the dough. If your machine doesn't have a beep, add it in the last 3-4 minutes of the kneading phase.
Let the machine complete the cycle.
- The dough cycle will mix, knead, and allow the dough to rise. This usually takes about 1.5 hours, depending on your machine.
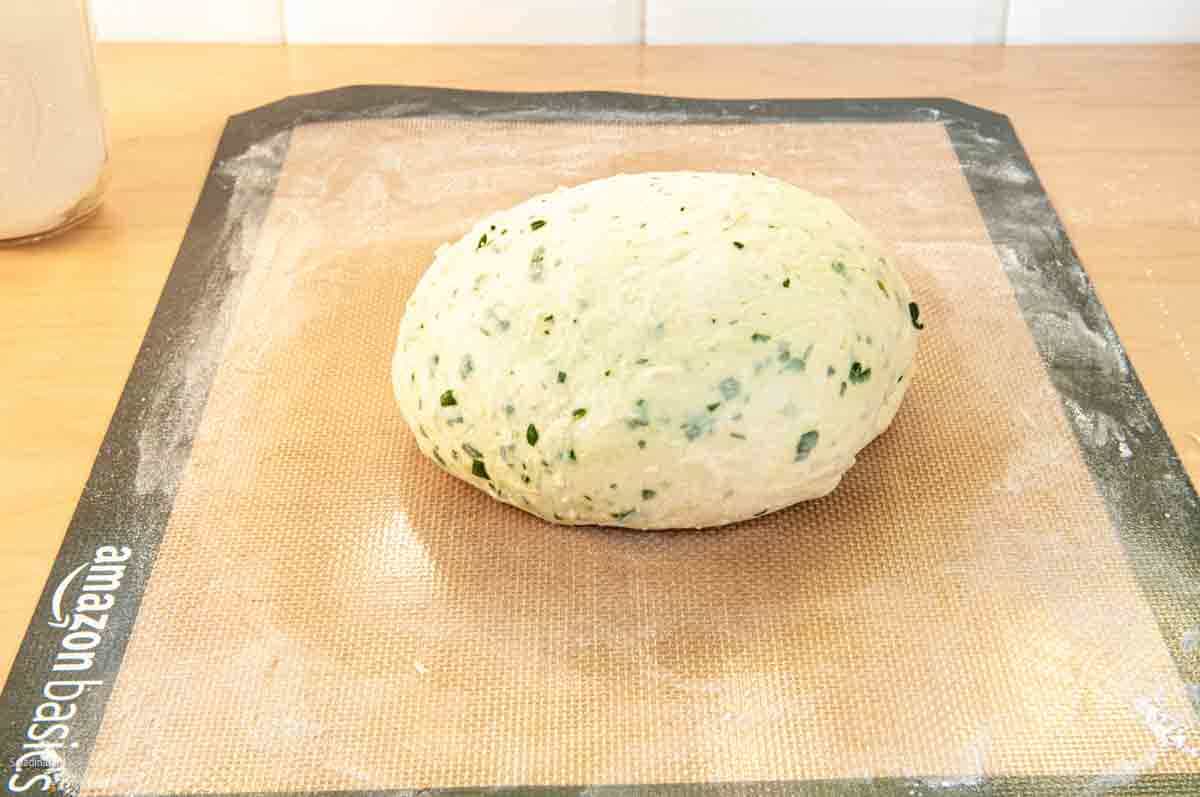
- When the DOUGH cycle completes, check to ensure the dough has doubled in size. If not, leave it in the machine to rise until it does. When doubled, remove the dough to a lightly floured surface. (I use a floured silicone mat for easy cleanup.)
Shaping
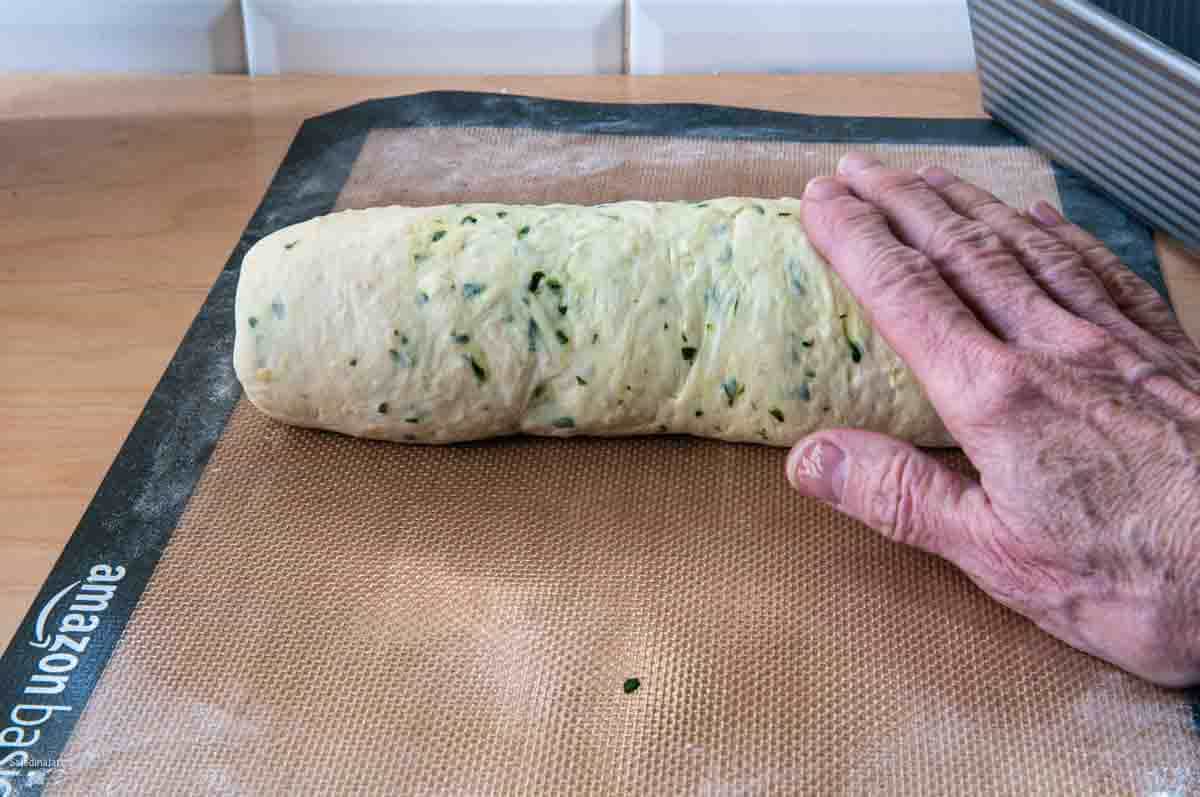
- Remove the dough from the bread machine onto a lightly floured surface. Knead lightly and shape into a smooth round ball.
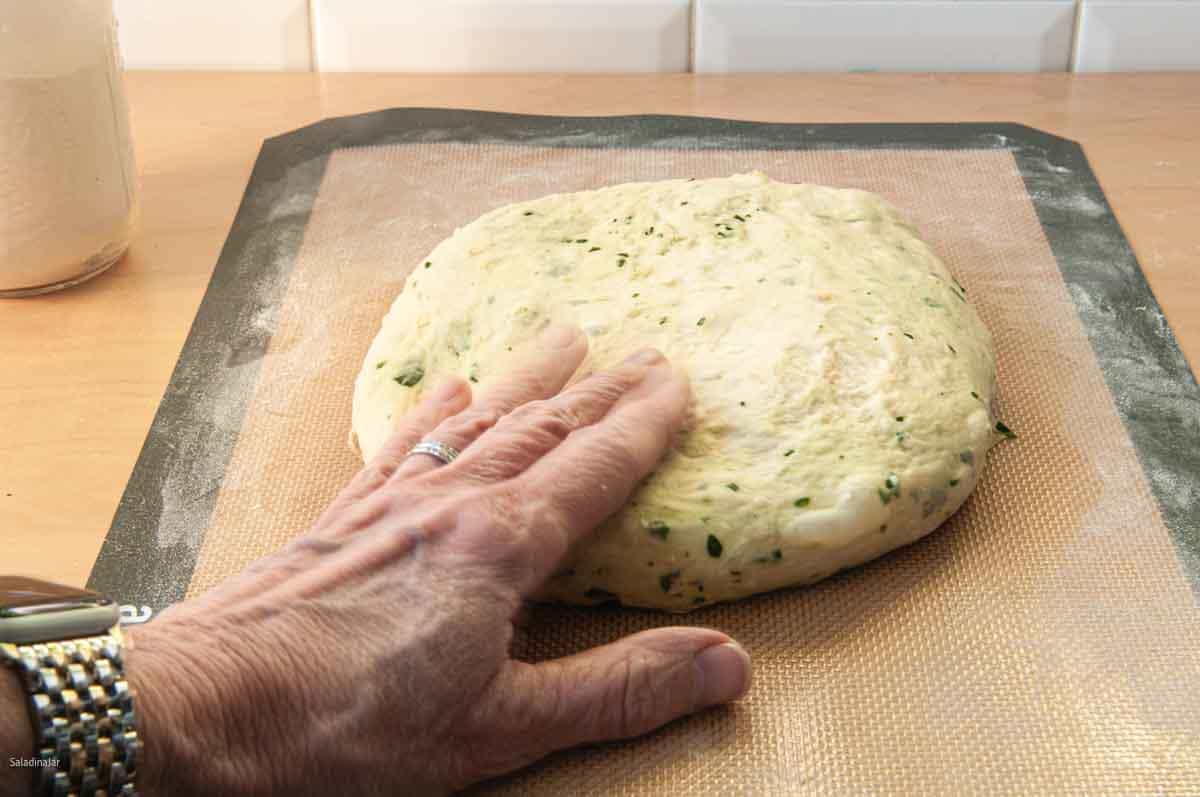
- Use your hands and a rolling pin to roll into a rectangle approximately 9×11 inches. Make sure any large, visible bubbles are pressed out.
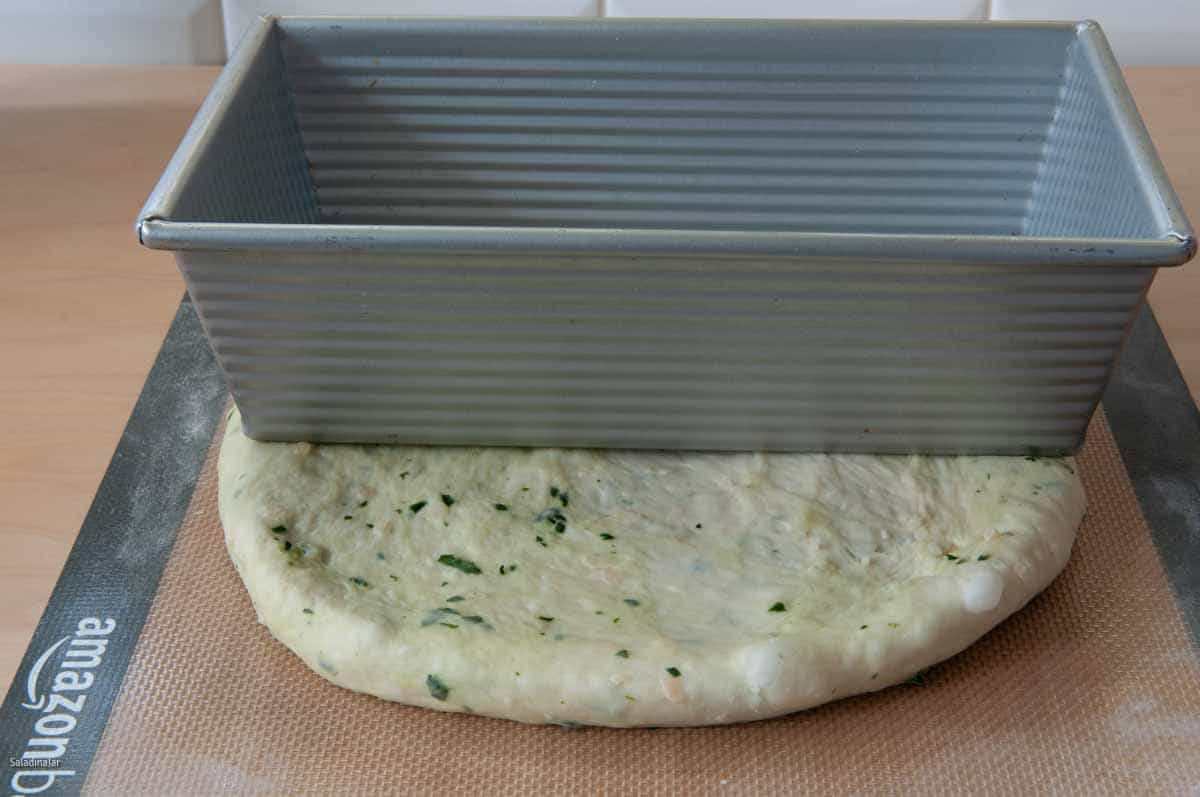
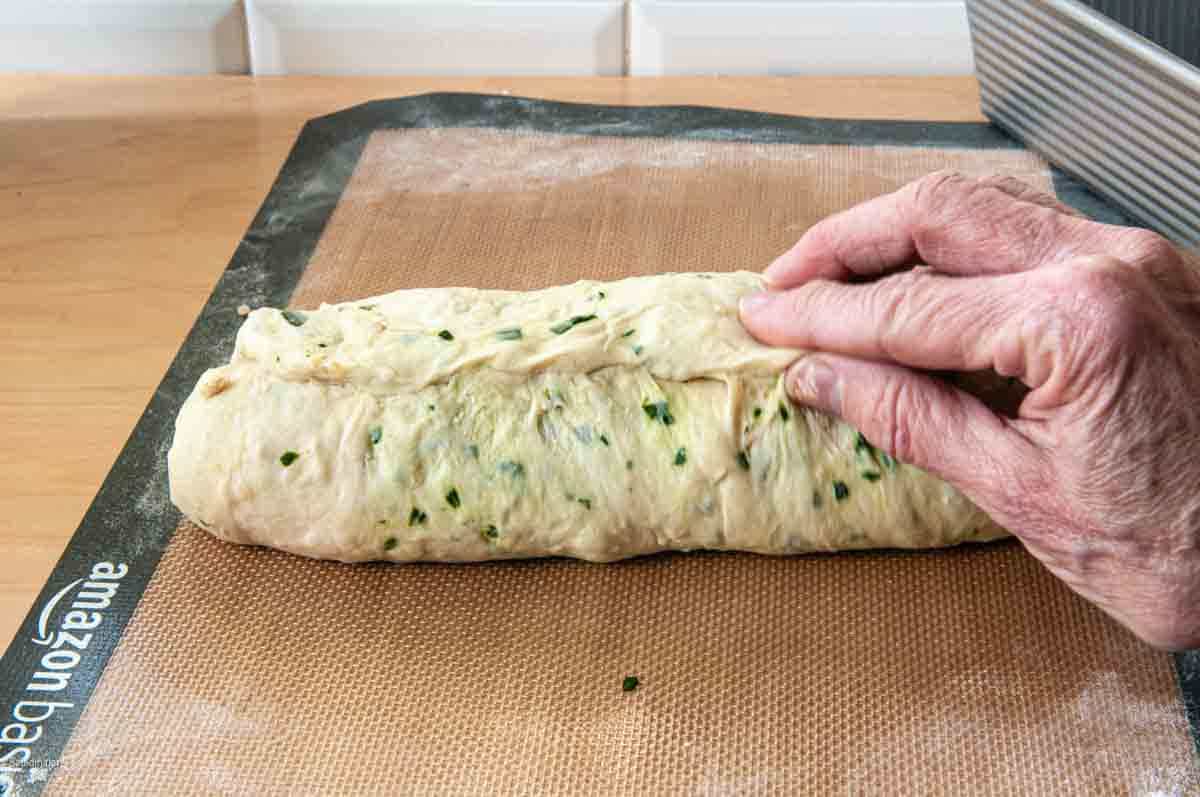
- Starting with the short end closest to you, begin rolling the dough to make a loaf. Don't stretch the dough or leave spaces between the layers. Pinch the seam shut. Then, pinch the ends shut and pull them towards the seam. If you are confused, watch the video.
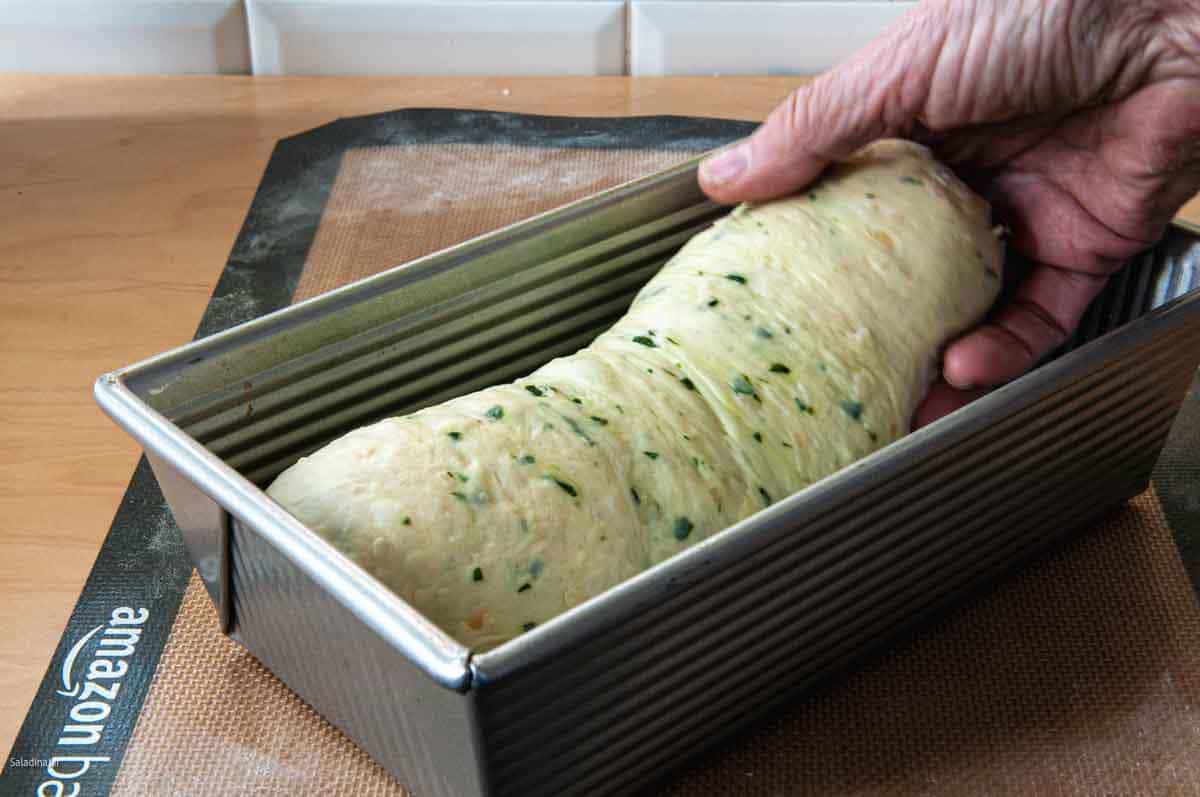
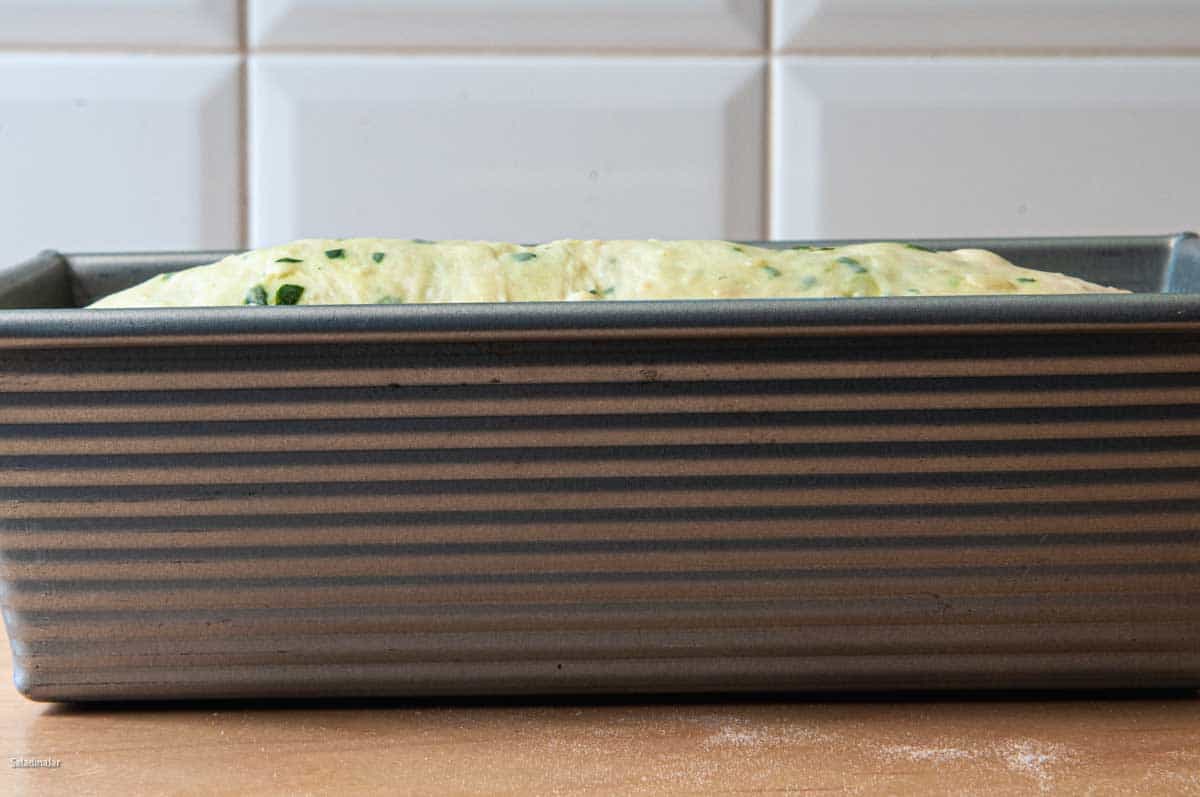
- Grease the pan beforehand unless otherwise instructed by the manufacturer. Place the dough into a 10 x 5-inch loaf pan (paid link) (or use two 8½ x 4⅓-inch pans) with the seam side down. Use your flat palms to gently but firmly press the dough into the pan as evenly as you can.
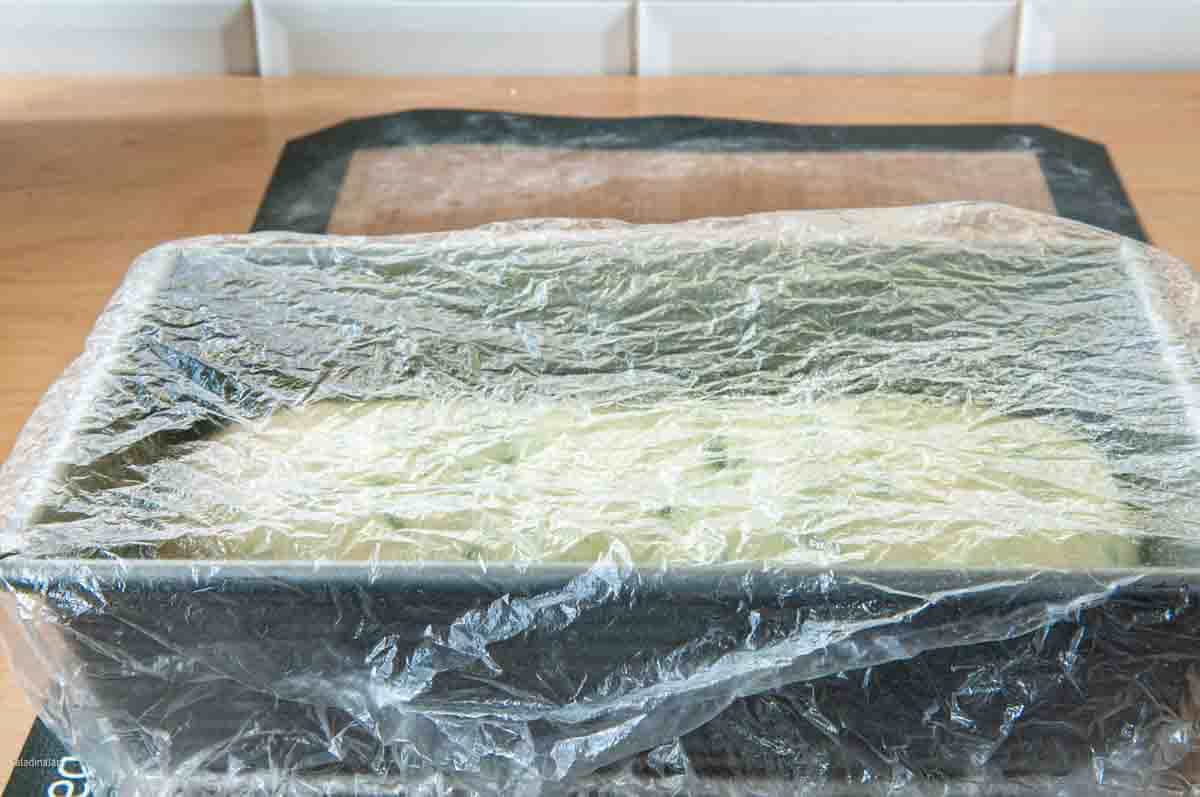
Final Rise
- Cover pan with a cheap shower cap or tea towel and let the dough rise in a warm place (75-78˚F) until the dough peeks over the edge of the pan no more than 1 inch. Preheat your oven to 350˚F about 15 minutes before you think the bread will be ready to bake.
Bake
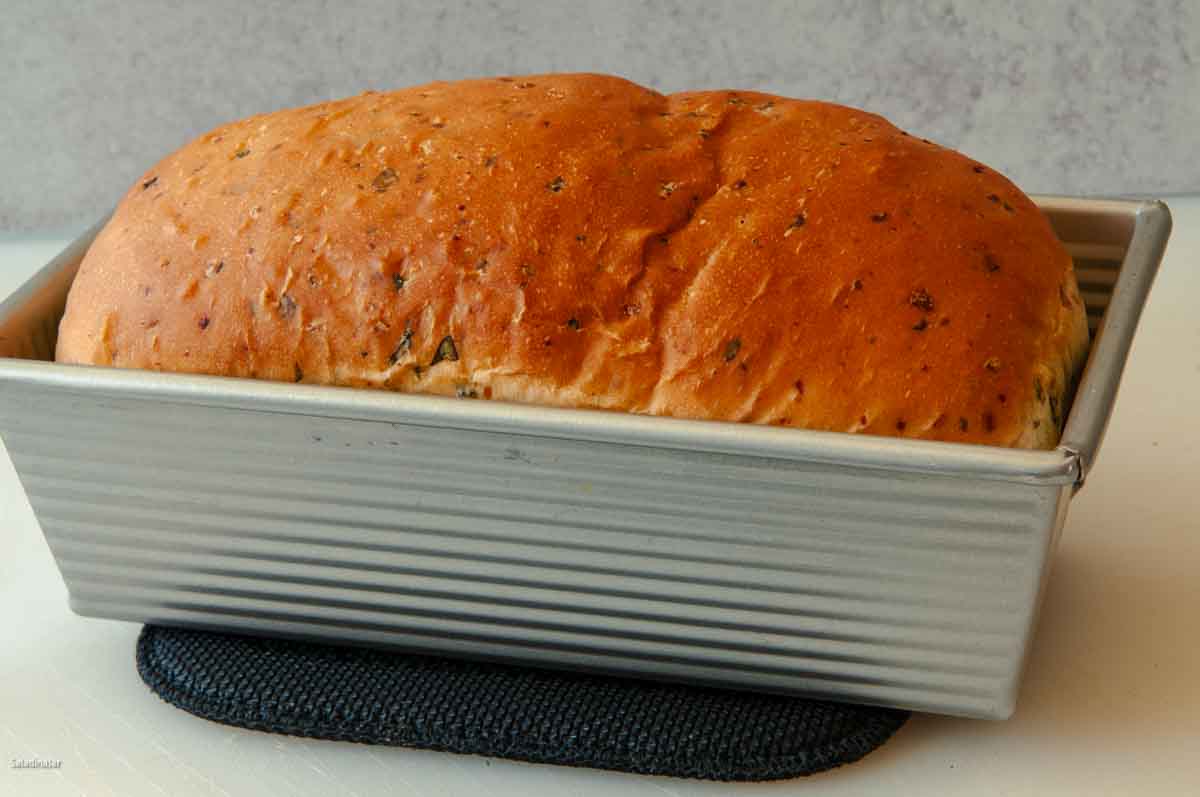
- Bake at 350˚F for 35 minutes or until the internal temperature reaches 200˚F.
Cool before slicing
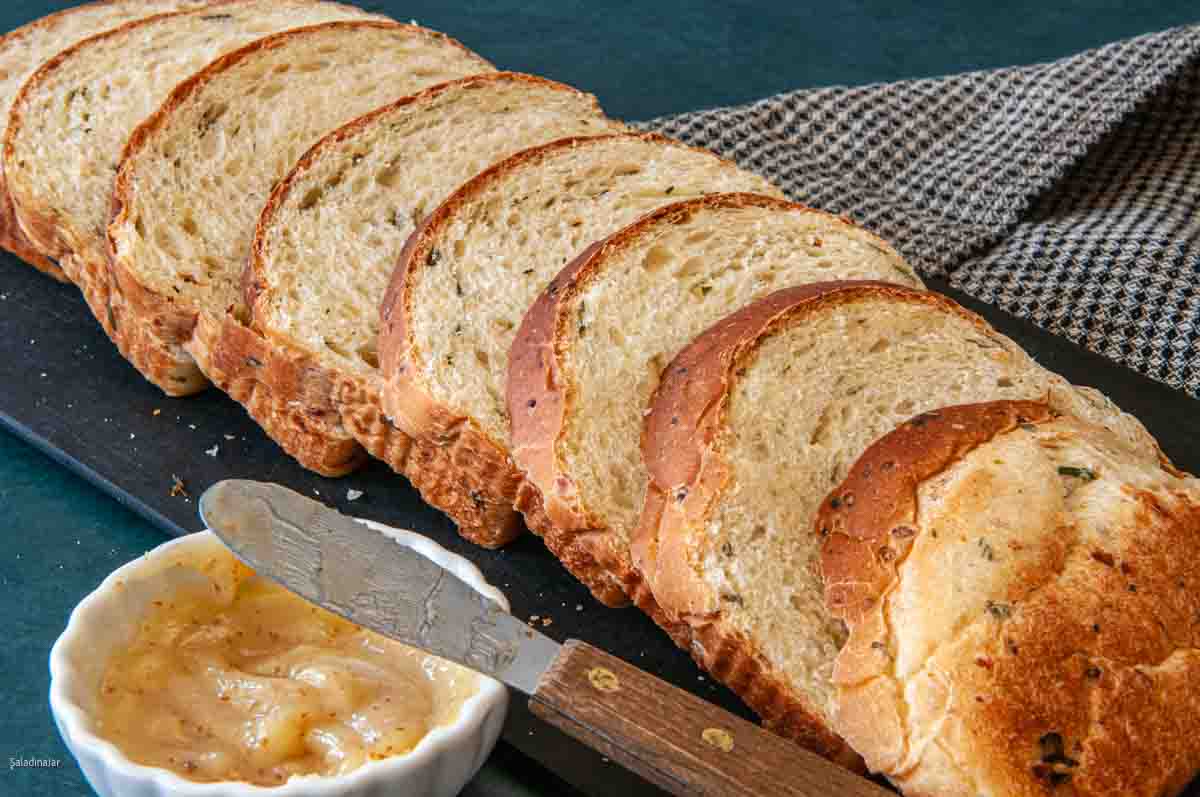
- Allow the loaf to cool for 15 minutes before turning the bread onto a cooling rack. Let the loaf cool for at least an hour before slicing.
Serve and enjoy!
- Slice and serve warm, toasted, or however you like. Store leftovers in an airtight container at room temperature for up to 3 days.
Notes
- Use a quick-read thermometer to check the dough’s internal temperature after baking.
- Let the bread cool for at least 1 hour before slicing for clean cuts.
- Leftover bread makes amazing croutons: cube, spray with butter, and bake at 350˚F for 10-15 minutes.
- In a heavy-duty stand mixer, add the ingredients to the bowl in the specified order.
- Begin mixing on low speed until all the ingredients are moistened.
- Switch to a dough hook attachment and increase the speed to 2 or 3.
- Continue beating/kneading until the dough becomes smooth and elastic, typically about 5-10 minutes.
- Cover the dough and let it rise in a warm place.
- Once risen, gently deflate the dough and shape it as directed in the recipe.
- Combine all the ingredients in a large bowl until they form a shaggy ball.
- Turn the dough out onto a floured surface.
- Knead the dough with your hands until it becomes smooth and elastic, which may take around 10-20 minutes, depending on your experience.
- Place the dough ball in a greased bowl.
- Cover the bowl and allow the dough to double in size.
- After rising, gently deflate the dough and shape it according to the recipe’s instructions.
Equipment
Nutrition
All images and text ©️ Paula Rhodes for Salad in a Jar.com
Final Thoughts
It’s one thing to spot a beautiful loaf at the farmer’s market—it’s another to bake one yourself that’s just as memorable. This spinach bread starts life in a bread machine, but the oven-baked finish gives it real character: a golden crust, bold flavor, and soft, cheesy crumb. If you’ve ever thought, “I could make that,” here’s your chance to prove it—with a little Parmesan, a touch of whole wheat, and a smart tip for adding spinach without going green. It’s the kind of loaf that makes a simple sandwich feel special.
Need help troubleshooting? Please email me: Paula at saladinajar.com–photos welcome!

Hi Paula-
You call out (and provide a link) in the recipe for a “10 x 5″ loaf pan” but in the “equipment” list at the bottom of the recipe you have a link for a “9 x 5-inch USA loaf pan.” I have the 9 x 5″ USA pan, but not the 10 x 5″ pan. Will this recipe work in the 9″ x 5″ USA pan?
Thank you!
Hi Deby,
That’s a good question. I originally used a 9×5 pan but the last couple of times I’ve made that recipe, the sides collapsed a little which I attributed to the pan being a bit too small. When I tried the 10 x 5 pan, there was no problem. This is not a large recipe, but the bread is light and fluffy and will rise quickly and easily. When you make it, if the dough fills more than half the pan, I would go the bigger size or make a couple of dinner rolls and use the 9×5 pan for the rest of the dough.
Please let me know how it turns out for you.
Paula
Hi, I am wanting to make this bread. However, you say 1 cup of whole wheat flour and yet do not mention it when adding ingredients to the machine. I am assuming you just add it with all the rest. However, I was wondering, since I do not have whole wheat flour, can I substitute white bread flour instead. Thank you Paula. Your bread recipes always turn out wonderful!!
Hi Lynda,
I recently updated that recipe and it looks like I didn’t get the whole wheat into the directions (even though it was in the ingredient list). My mistake. I have fixed it now. Thank you so much for writing and letting me know.
Yes, you can substitute bread flour for whole wheat flour. It should turn out just fine. I can’t wait to hear what you think.
Hi Paula, I have great success with most of your bread machine recipes but this spinach bread is not always successful. The loaf will often collapse after cooling. Any tips? Thanks, Mike
Hi Mike,
Three things to try:
1. Use a larger pan to bake it.
2. Are you using a quick read digital thermometer to make sure the loaf is cooked through? You might try leaving it in the oven (turned off) with the door open for a few minutes after it’s baked to strengthen the crust.
3. Make sure the dough is not overproofed on the final rise.
I hope this helps.
Hope that helps.
p.s. I’m adding a follow-up comment I received from Mike:
Hi Paula,
Tried your tips but was still getting caving in on the sides and ends. Tried some experiments of my own and came up with a couple of changes that always seem to work. I first tried changing out a half cup of flour for whole wheat and then upped that to a full cup to have better control of the rising. That helped but the final adjustment was to increase the temperature to 375 for 35 minutes. Now it come out perfect every time. I do use a larger pan.
Other loaves that I bake are your Tomato Basil, Honey Wheat, Sunflower Seed and your French Bread. They always come out perfect using your recipes. There are just two of use so when I bake the French Bread I form four small loaves, bake them and then freeze them. We can them use them one at a time either as a French loaf for two or as a bun for sandwiches. We take them out of the freezer, wrap them in foil, put them in a toaster oven at 425 for 12 minutes, take the foil off and bake for another three minutes. Your Herb and Garlic yeast rolls are another staple in our house. I bake them, break them apart, freeze them in a ziplock bag so we can take two out when we want to accompany a meal. I have done a lot of your recipes but these are the most frequent. Keep up the great work! Thanks.
Mike
Thank you again, Mike.
I made the spinach bread this week. It was very good. The loaf was gone in one day. The family has been asking me to make this again.
Hi Christine,
I’m so glad you wrote. This is a fairly new recipe on my site, so I’m glad your family likes it. I hope your comment encourages lots of people to give it a try.
Thank you for taking the time to come back and write about it.
I was blown away by how well this bread came out! I usually let the bread in the machine to bake, except for pizza dough and things like that. But I never felt comfortable with how long to let them rise, how do you know it’s ready, etc. But your great instructions were easy to follow.
I had originally bought spinach with this recipe in mind, but had actually used it up before I made it! But it was just was tasty without it.
By making it in the oven, the bread was beautiful. I couldn’t find my everything topping to put on it before it went into the oven, so I lightly sprinkled a Roasted Garlic and Herb Seasoning on top before baking it.
Thanks for the great recipes.
Hi Cookie,
That topping sounds wonderful! Thanks for adding to the conversation and the 5-star review.
I generally take the dough out of the bread machine immediately after the kneading rather than letting it proof in the pan. Is there any problem with doing it this way? I’m asking both in general, and specifically for the spinach bread.
Thanks
Hi Al,
Good question. There is absolutely nothing wrong with removing the dough after the kneading is done. I leave it in there for convenience most of the time, but your kitchen may be too cold or hot, and you don’t want to move your bread machine, so it’s easier to remove the dough and put it into a different bowl.
Another good time to remove the dough after kneading is when you want to start a second batch. I often do this.
I can’t think of any recipes that would be an exception to this rule.