Steakhouse-Style Brown Bread (Bread Machine Dough, No Rye)
Sneak Peek: This steakhouse-style brown bread skips the rye but keeps the flavor, using whole wheat flour, bread flour, honey, and cocoa. The bread machine handles the mixing and kneading; you shape and bake it in the oven. Expect about 3 hours from start to finish—and yes, it makes great dinner rolls, too.
This post contains affiliate links. As an Amazon Associate, I earn from qualifying purchases at no extra cost to you.
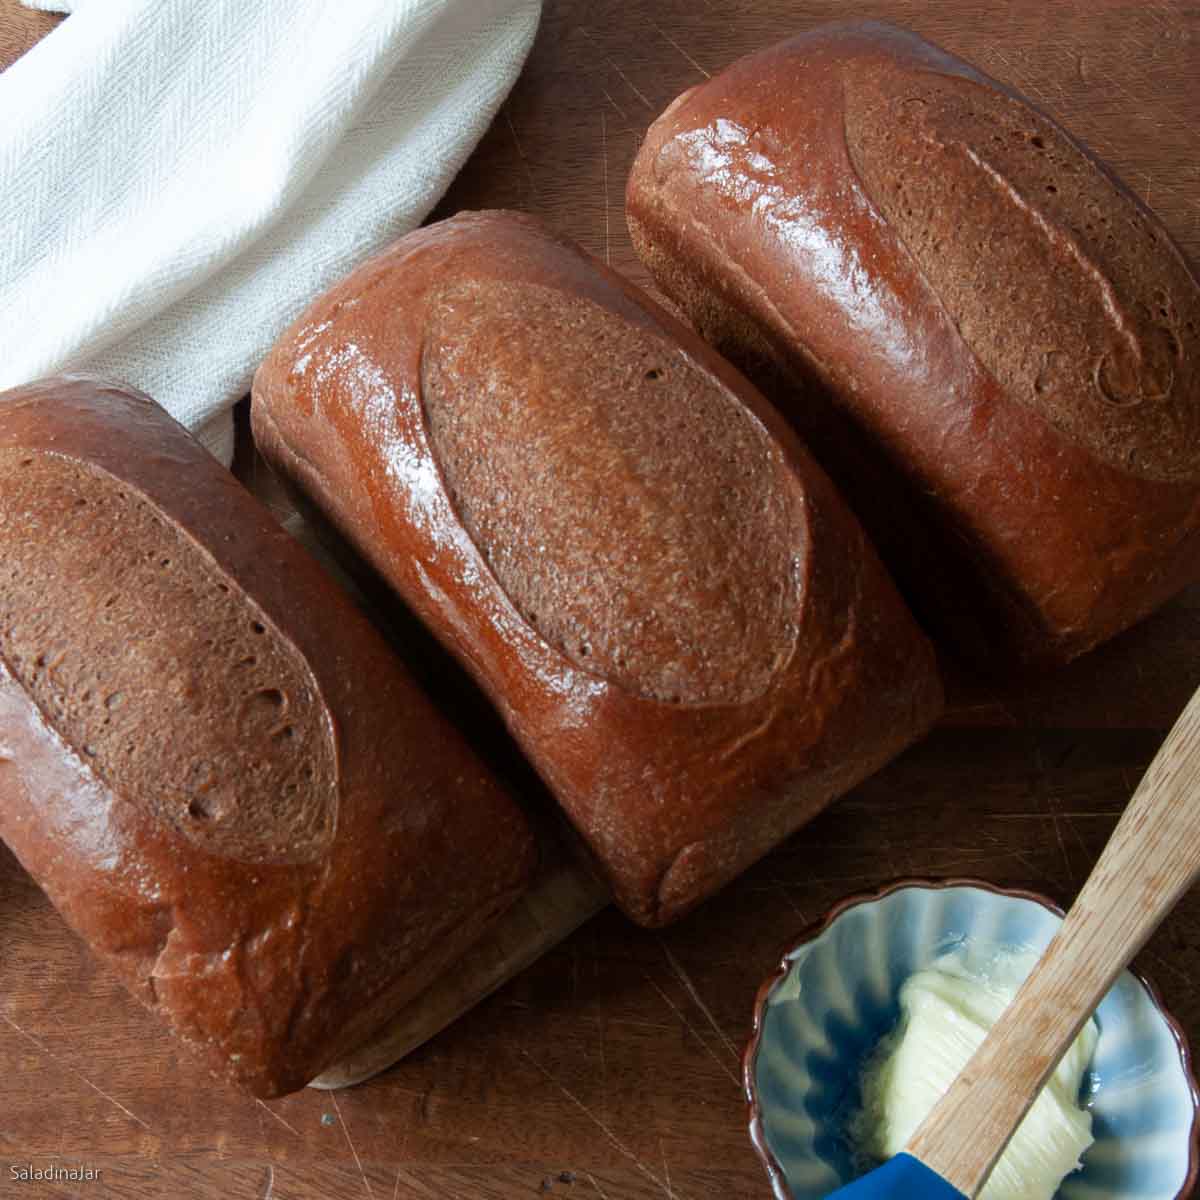
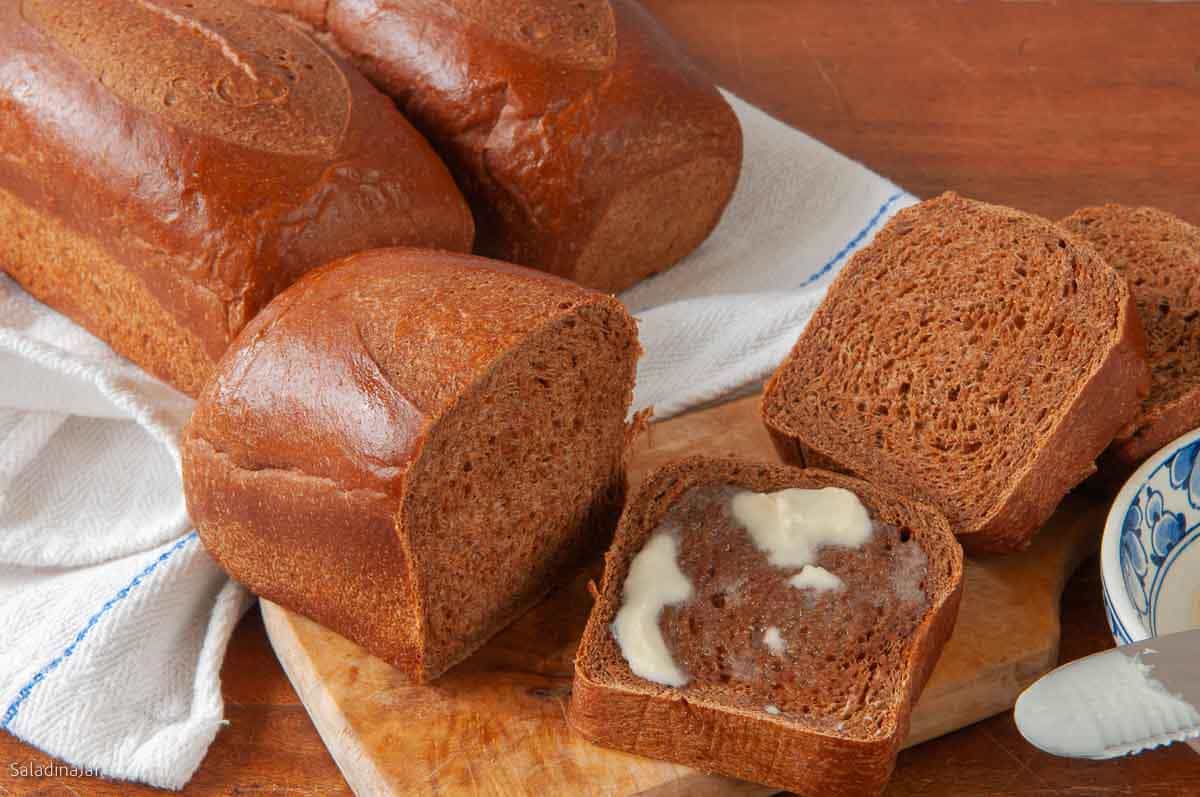
This bread machine recipe brings back memories of the dark brown mini-loaves served at Steak and Ale—delivered on a wooden board with whipped butter, setting the tone for a special meal.
Decades later, it’s still the bread that stands out more than the steak! Serve this at your next dinner, and don’t be surprised if it becomes the most memorable part of the evening for your guests, too.
How I Use a Bread Machine for Better Bread
I use my bread machine (my favorite) to mix and knead the dough using the DOUGH cycle, then shape the loaf and bake it in a conventional oven. This approach gives me better rise, structure, and crust — results I’m happy to share with family and friends.
If you prefer to bake bread entirely in your machine, you can—but results will vary depending on the recipe, humidity, and your bread machine model. My free Bread Machine Crash Course explains my approach in more detail.
Ingredients & Substitutions

WATER: Tap water is good. Substitute spring water if your water has high mineral content. No need to use warm water—the friction from kneading will heat the dough quickly.
ORANGE JUICE: Substitute water for the juice if desired.
BUTTER: Use unsalted butter. Swap with margarine or vegan butter if needed.
HONEY: Complements the orange juice. Substitute with maple syrup, molasses, or date syrup.
FLOUR: Use equal amounts of bread flour and whole wheat flour. Avoid all-purpose or only whole wheat flour—they make dense rolls.
SALT: Use table salt or sea salt. Add ¼ teaspoon extra for Kosher salt.
COCOA: Use Dutch-processed or regular baking cocoa. Dutch-processed cocoa makes a darker bread.
YEAST: Use instant or bread machine yeast. See recipe notes for substituting active dry yeast.
How To Make This Steakhouse-Style Bread with a Bread Maker and Bake in an Oven
⬇️ Jump to the recipe below for exact amounts and detailed instructions.


Steakhouse-Style Brown Bread (Bread Machine Dough, No Rye)
Video
Ingredients
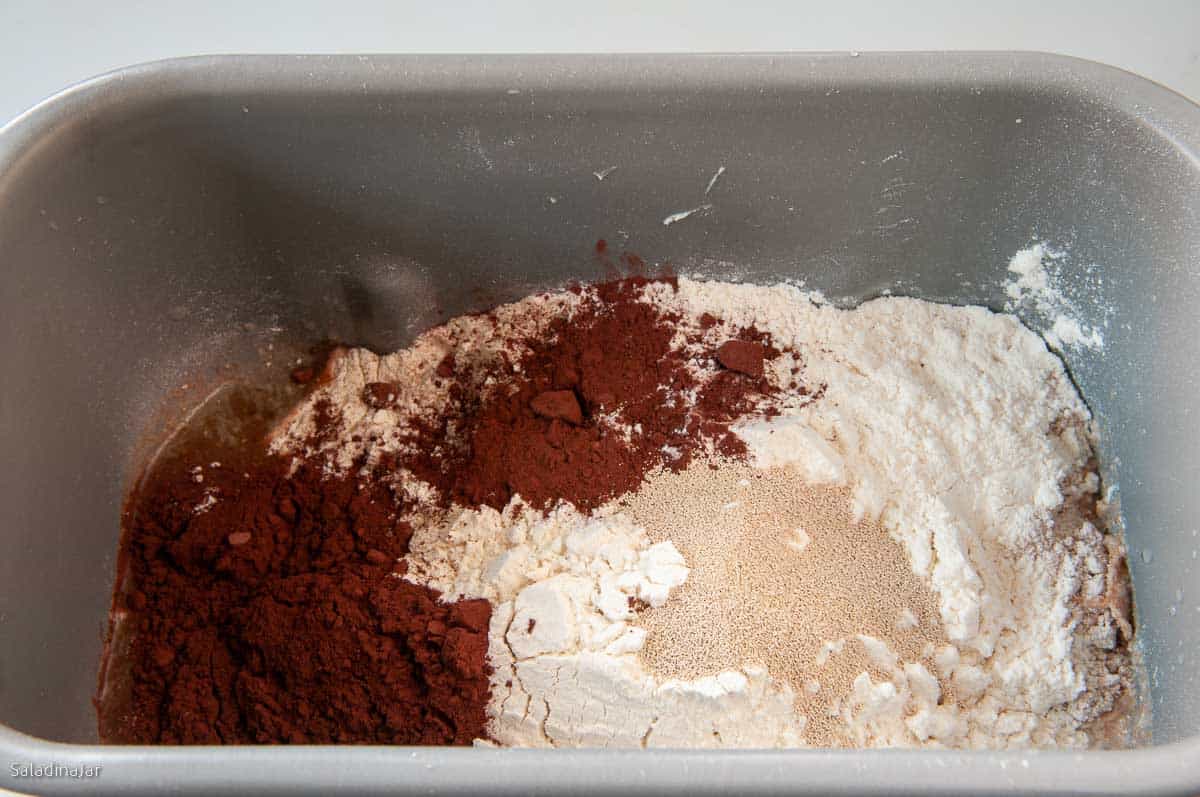
- ⅞ cup + 1 tablespoon (212 g) water
- ¼ cup (57 g) orange juice
- ¼ cup (84 g) honey
- 1 ¼ teaspoon salt
- 2 tablespoons Dutch-process cocoa
- 3 tablespoons (42 g) unsalted butter (chopped)
- 1 ⅔ cup (200 g) whole wheat flour
- 1 ⅔ cup (200 g) unbleached bread flour
- 2 teaspoons instant yeast
Instructions
- Add ingredients to a bread machine pan: ⅞ cup + 1 tablespoon (212 g) water, ¼ cup (57 g) orange juice, ¼ cup (84 g) honey, 1 ¼ teaspoon salt, 2 tablespoons Dutch-process cocoa, 3 tablespoons (42 g) unsalted butter (chopped), 1 ⅔ cup (200 g) whole wheat flour, 1 ⅔ cup (200 g) unbleached bread flour, and 2 teaspoons instant yeast. Select the DOUGH cycle and press START.
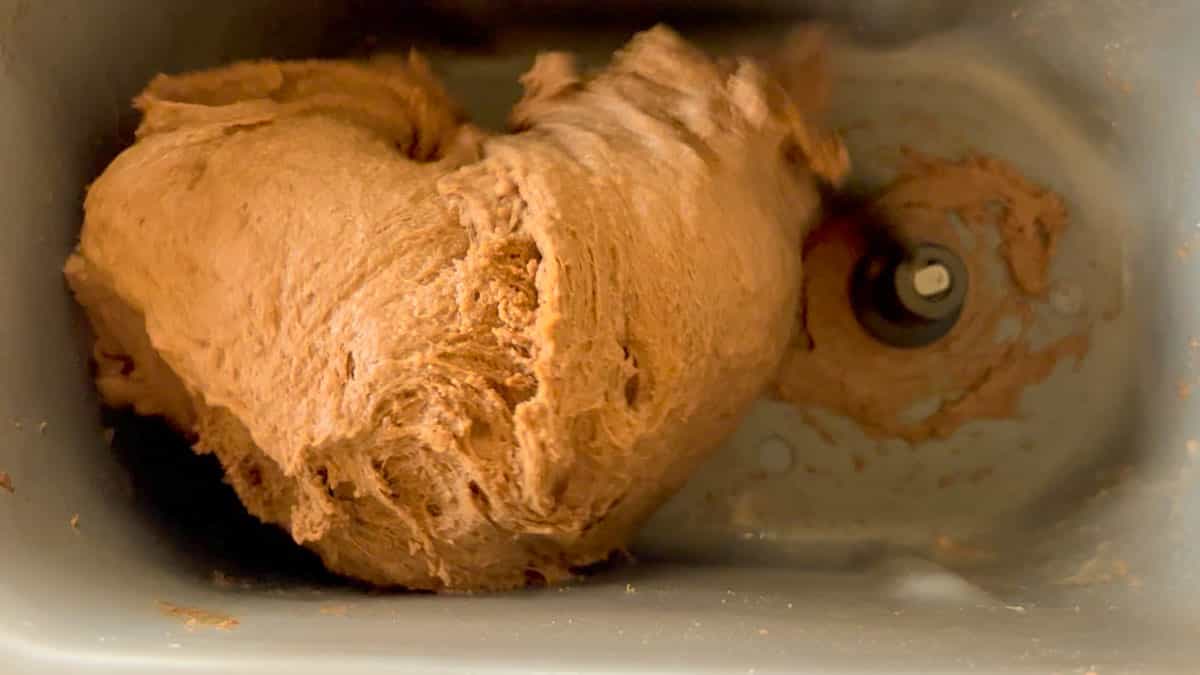
- Check paddle engagement: Open the lid in the first minute to make sure the paddles are engaged and the dough is starting to clump together.
- Check dough consistency: Recheck the dough after 15-18 minutes. If it's too sticky, add flour 1 tablespoon at a time. If it's slapping loudly or too dry, add water 1 tablespoon at a time. The ideal texture sticks to the sides, then pulls away cleanly.
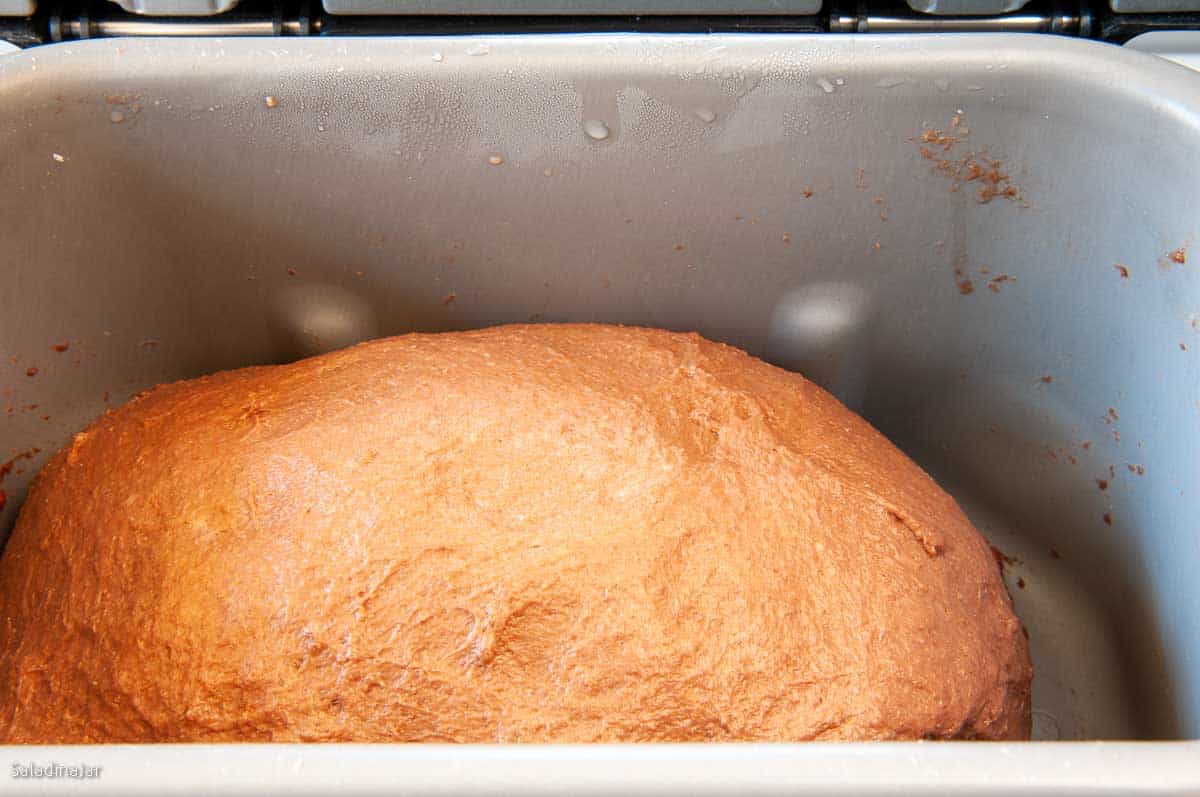
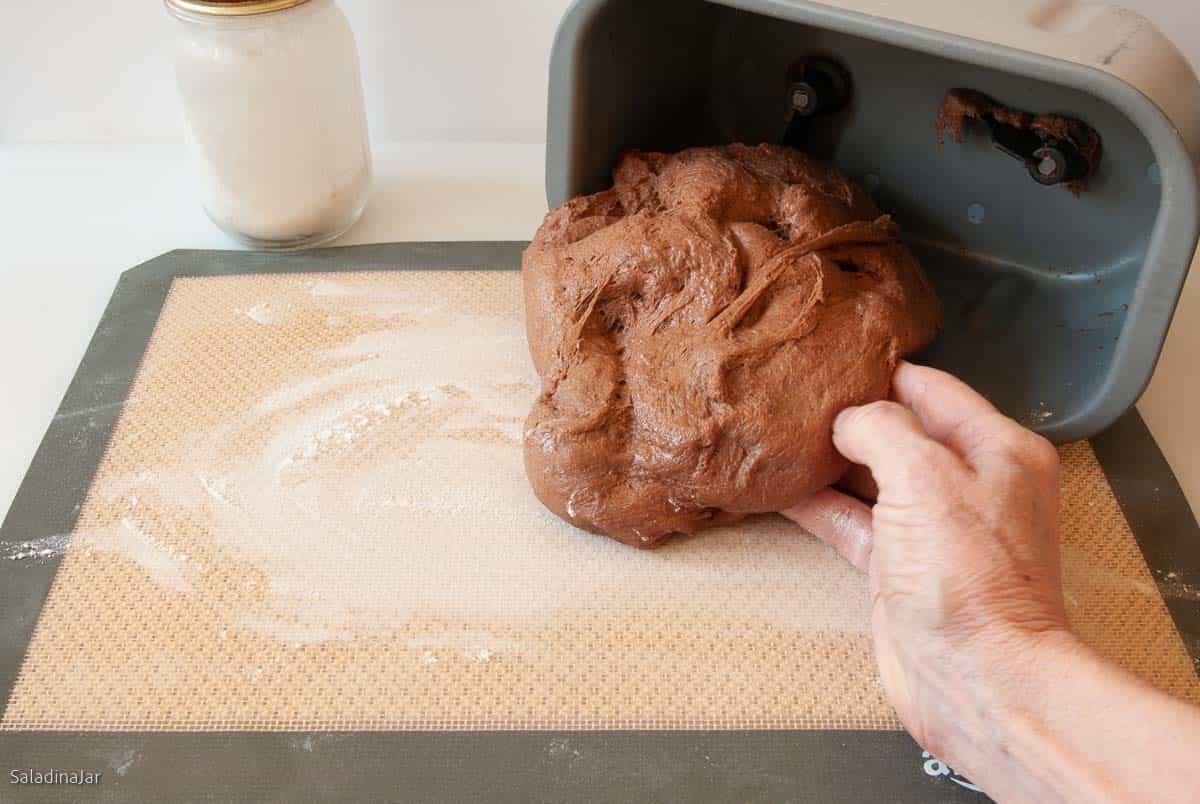
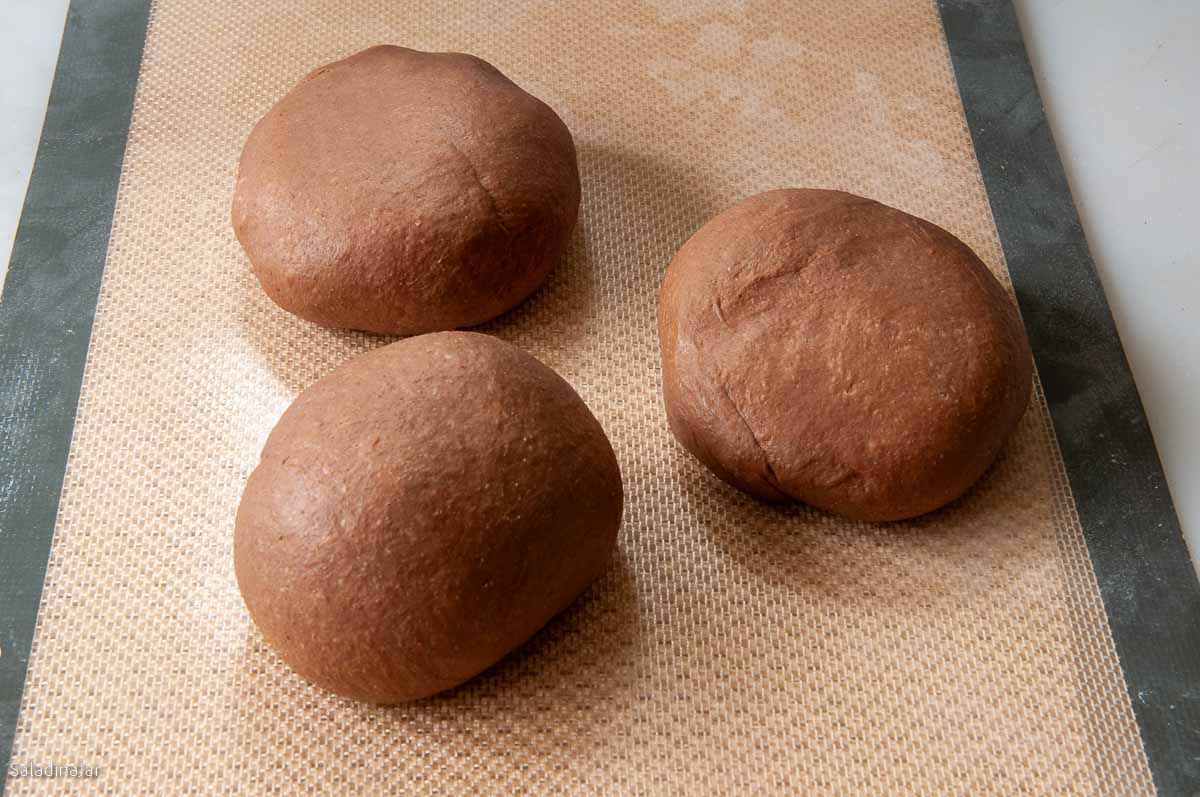
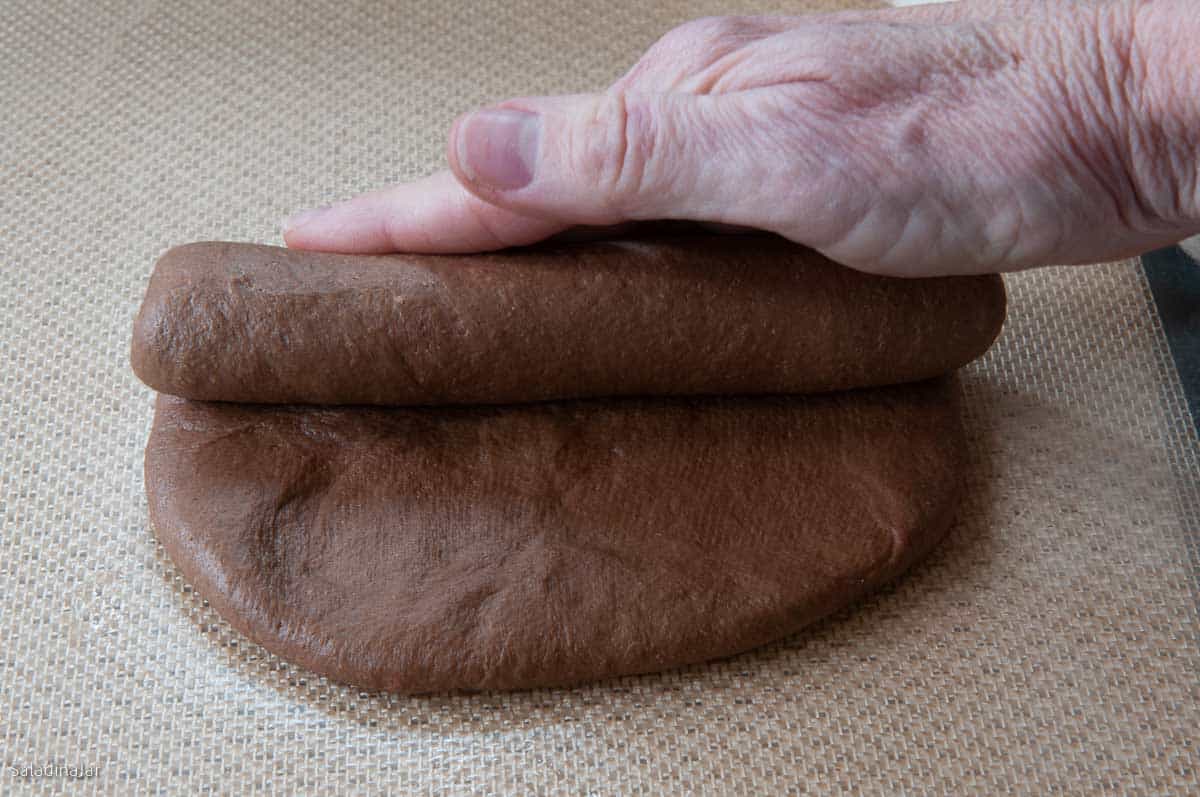
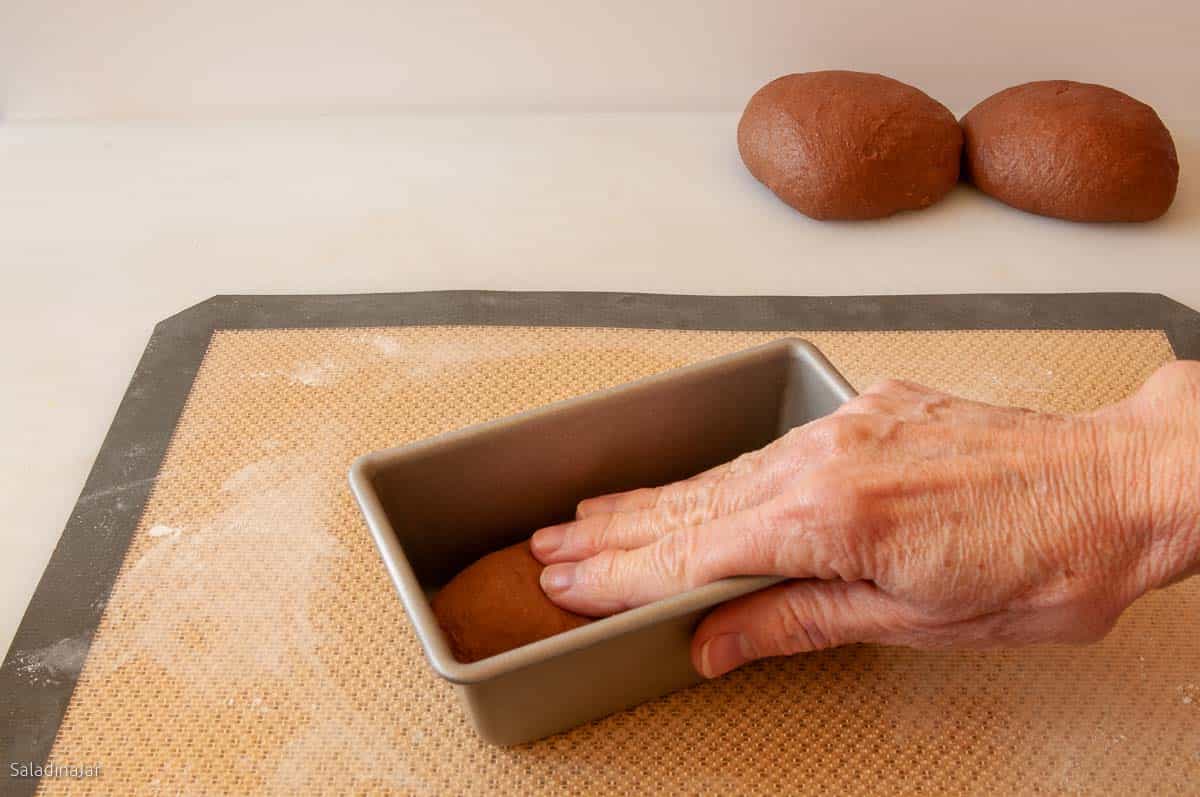
- Remove and divide the dough: When the dough has doubled and the cycle ends, transfer it to a floured board or a silicone mat (easy cleanup–just throw it in the dishwasher).Divide into three equal parts and shape each into a ball.
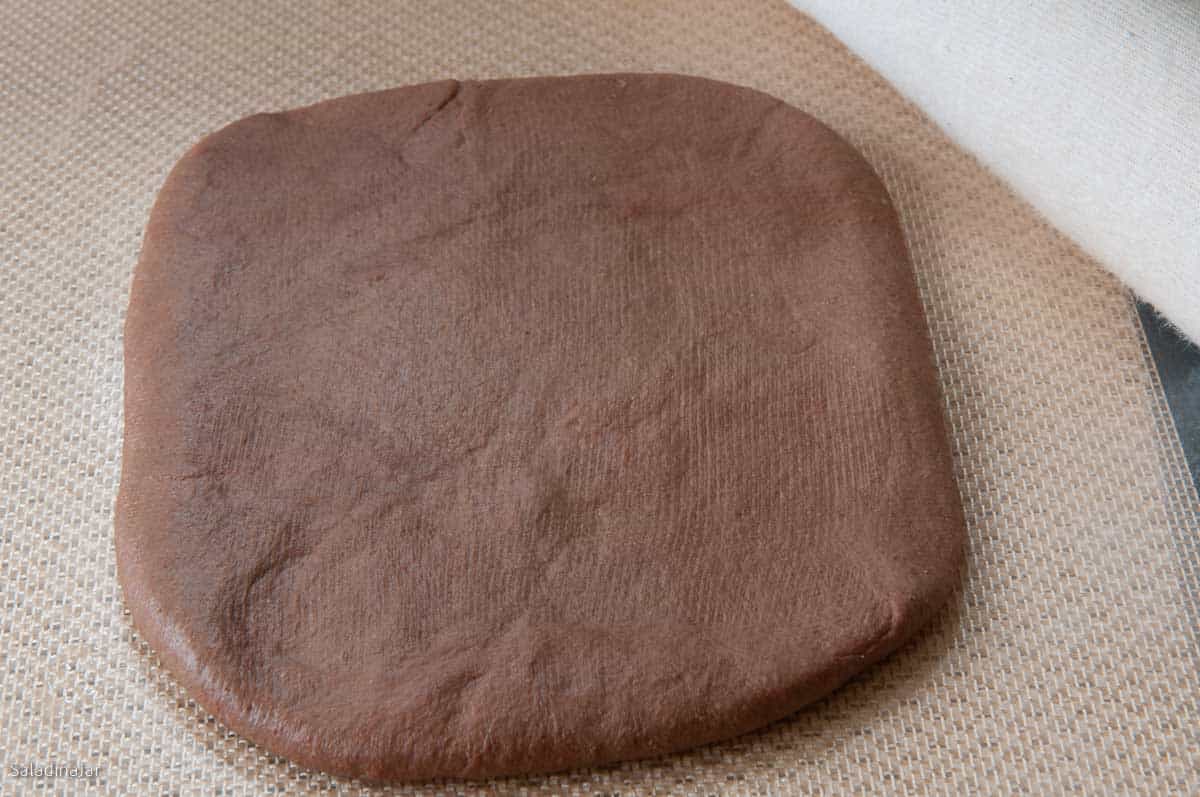
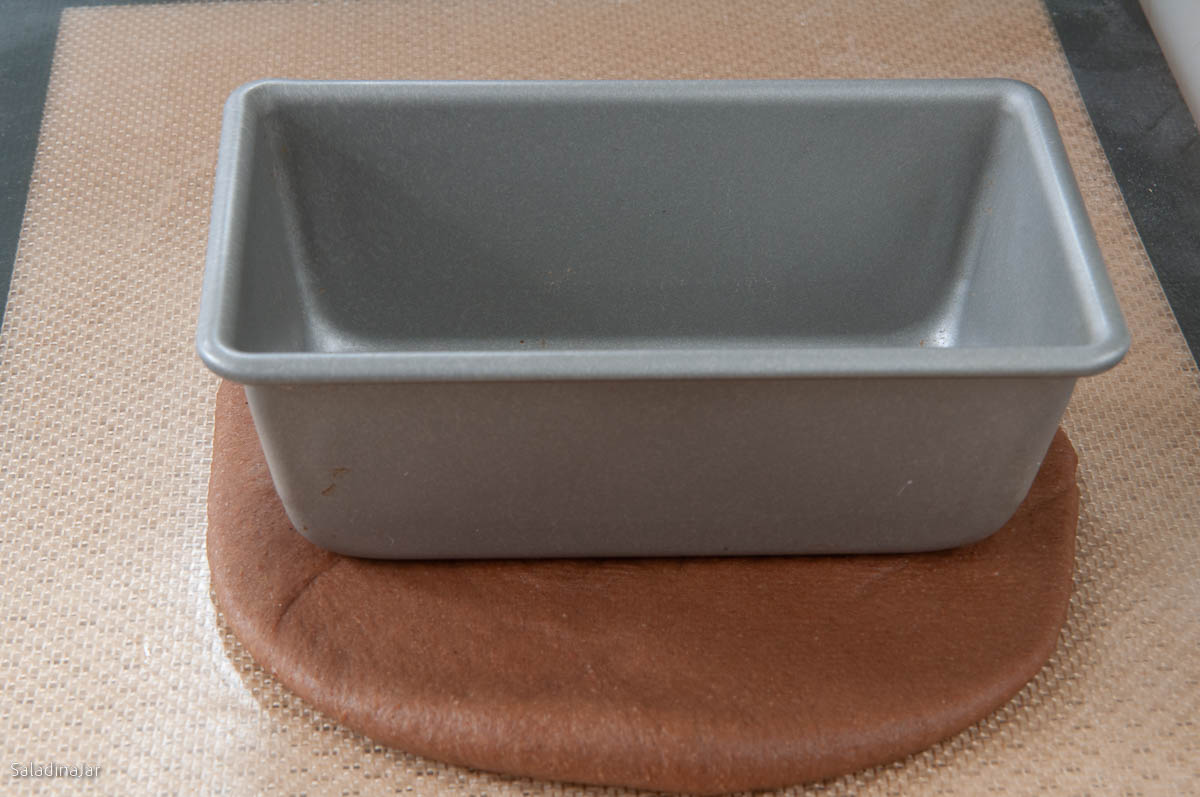
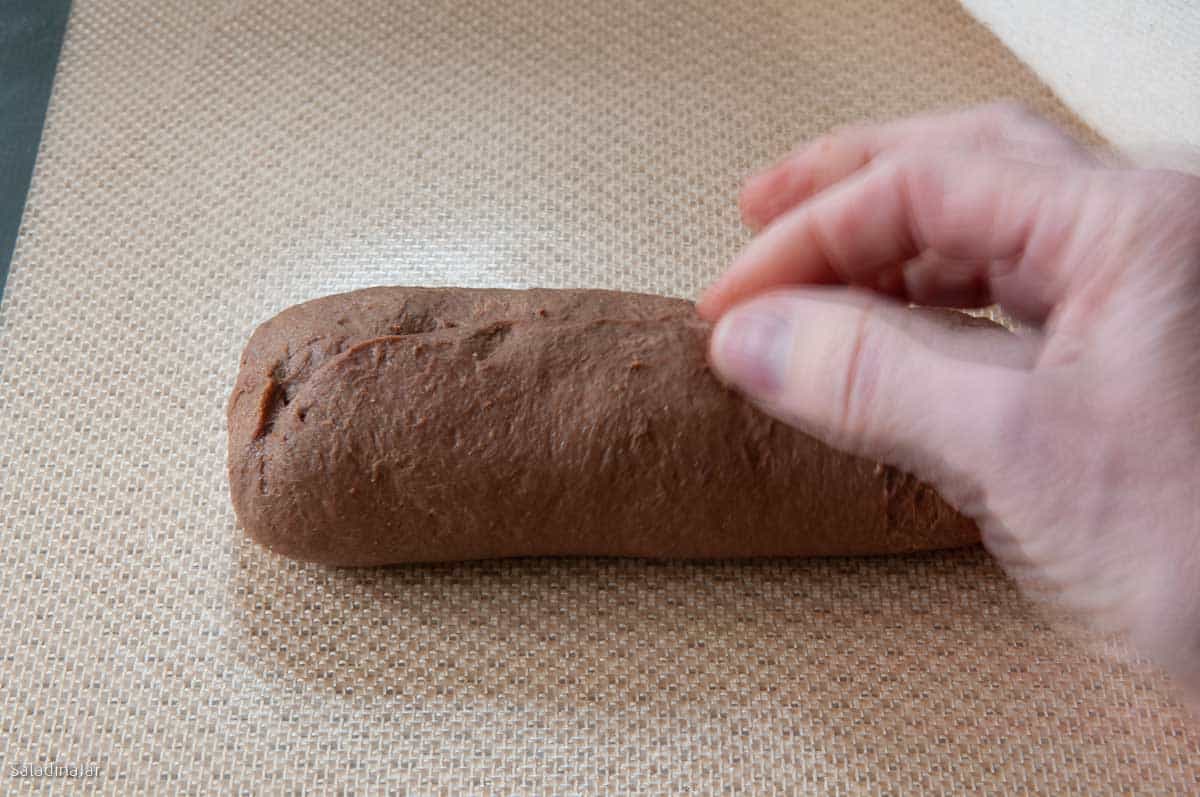
- Shape the dough: Roll each ball into a 7×9-inch rectangle. Roll tightly into a log, pinch the seams and ends shut, and place seam-side down into a mini loaf pan. Repeat with remaining dough.Note: Fill pans ⅓ to ½ full after shaping. If the pans are too large, the loaves may look squat. Too small, and the dough might rise too high and tear during baking.
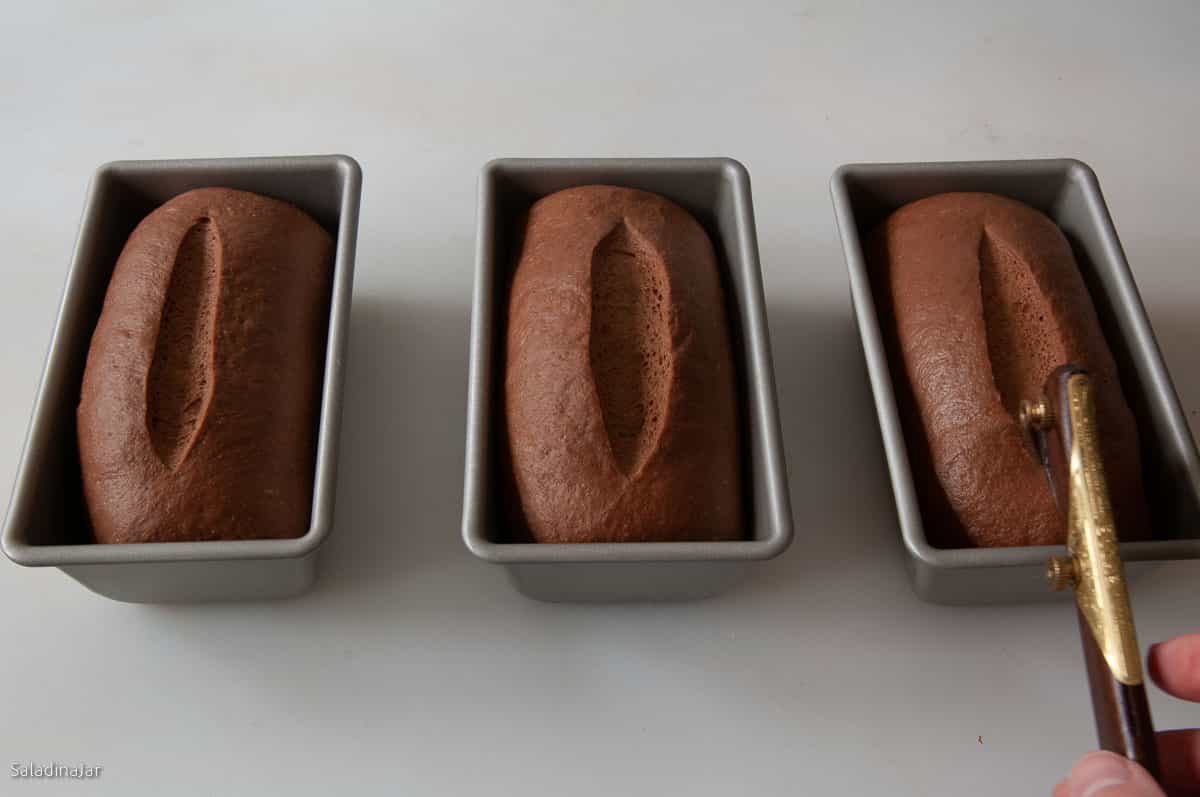
- Let rise again: Cover loaves with a tea towel and let rise until puffy and nearly doubled.
- Preheat your oven to 350˚F (180˚C) while the loaves are rising.
- Bake until done: Bake mini loaves for 20–25 minutes. For a single large loaf, bake 30–35 minutes. Look for browning on the bottom or use a thermometer to ensure the internal temperature reaches 190–195˚F (88˚C).
- Cool and serve: After 5 minutes, remove loaves from pans and cool on a rack. Enjoy warm with butter.
Notes
- Unbaked dough: Freeze after the DOUGH cycle or after shaping (before final rise). Defrost in the fridge overnight.
- Baked: Double-wrap and freeze up to one month. Reheat gently.
- Stand Mixer: Mix until moistened, then knead with a dough hook (speed 2–3) until smooth and elastic (5–10 minutes). Let rise, deflate, and shape as directed.
- By Hand: Mix to a shaggy dough, knead on a floured surface until smooth and elastic (10–20 minutes). Let rise, deflate, and shape as directed.
Equipment
Nutrition
All images and text ©️ Paula Rhodes for Salad in a Jar.com

Final Thoughts
I first published this recipe 12 years ago. Since then, I have revised the recipe and tested some substitutions. Originally, I made dinner rolls, but we like the mini-loaves better. They are more authentic. Speaking of authenticity, try these loaves with softened butter, just like in restaurants. It is the absolute best way to eat this bread.
And one more thing…if you should have any of this bread long enough to grow stale, try making this Bread Crumb Pudding.
— Paula, Home Economist
Homemade Food Worth Sharing
Need help troubleshooting?
Email me: Paula at saladinajar.com — photos help!

Just made this exactly as written. I got worried when the dough did not rise as I expected, but I soldiered on and finished them. I tried one loaf just after cooling and one the next day. my family liked the same day one whereas I really liked the next day one. The flavors just the seemed more apparent.
Hi Patricia,
Is it possible your kitchen was a little chilly when you made the bread? Interesting observation about more flavor the next day for this bread. Good to know.
which setting should I choose on the bread machine in terms of size, or does it matter? Mine defaults to 1.5 lb. I didn’t know if this would change rise time. Thanks!
Hi Carla,
I assume you’re using the DOUGH cycle if you’re following my recipe, so you won’t have a choice on any bread machine I know about. Doesn’t matter. What does matter is the ambient temperature where your bread machine is located. If it is drafty or chilly, it could take longer for your dough to rise. (See #7 in this post). If the room is warmer than normal, it will take less time. The amount of dough doesn’t matter when talking about a bread machine. There are times when the amount does matter, but you would need to be making way more dough than could ever fit in a bread machine. Hope that answers your question.
Paula, these were so soft and delicious. An absolute hit with a hearty wild rice soup.
I didn’t have any orange juice but I knew it would add something special to the taste. As a substitute for the OJ I added about 1/8 teaspoon of orange extract. I could smell the orange essence just a bit as the dough began mixing.
I used a USA strapped mini loaf pan (4 loaves) and it made the perfect sized individual loaves. Another winner!
Hi Elizabeth,
Orange essence is a creative substitute for OJ. Good job. Aren’t those USA mini loaf pans the best? Thank you so much for writing.
I made the dough the day before. With the cold dough the next day I formed 3-round balls, around 270g each and gently flatten the top. (thanks for the idea). It took about 2-hours for the balls to double in size. I baked them for about 20 mins. on one baking sheet. I was able to slice them in inch slices for my bread bowl and they were a success! I made sure the butter wasn’t cold and easy to spread. I always use unsalted butter for cooking and my guest appreciated the salted Costco grass fed butter. Delicious and easy to reheat.
What a fantastic idea! I’m so glad the dough worked well for your bread bowls—it sounds like you perfected the process! Thanks for sharing your tips and experience; I’m sure others will find them helpful. ??
Merry Christmas!
I was wondering if this could be par-baked like the french bread? I don’t have mini loaf pans could I just shape them into a small loaf?
Hi Terry,
Yes, you can par-bake these. I’ve never tried shaping them into a small loaf but it’s worth a go. Let me know how it works.
I also have another idea. Use your regular loaf pan and shape the loaf into 3 or 4 large balls that you put next to each other inside a larger loaf pan. You can see what I mean in the picture on this post.
I hope that helps.
I left this to bake in the bread machine, didn’t take it out to follow the oven instructions. Mixed it up exactly as written and used my “wheat bread” setting for a 1 lb loaf with a medium color crust. I was using it for Thanksgiving dressing, so was going to be slicing and drying it anyway. Turned out really well and I’ll be using the recipe again.
Hi Winnie,
Even though I don’t normally advocate baking bread in the machine, it’s good to know when it turns out OK for someone. Considering your purpose for the bread, this seems like a viable choice.
I have never made brown bread but I love it! Ready to go here!
What are the time/oven temp adjustments for making one loaf? Thanks for sharing 🙂
Hello,
I added the answer to your question to the recipe directions. For one loaf use the same temperature but bake for 30-35 minutes. Check the internal temperature for baking perfection. A quick-read digital thermometer should read between 190-195˚F in the middle of the loaf.
I added the answer to your question to the recipe directions. For one loaf, use the same temperature but bake for 30-35 minutes. Check the internal temperature for baking perfection. A quick-read digital thermometer should read between 190-195˚F in the middle of the loaf.
Have a good evening and enjoy your bread.
Cannot wait to try this recipe! Could you leave the dough in the bread machine for one big loaf? If so, what settings would you suggest? Thank you!
Hi Meg,
I never bake bread of any kind in my bread machine unless it’s to illustrate why I don’t like it. You can easily put this bread into one big loaf pan and bake it in your oven for a wonderful loaf. I will spare you my rant about baking bread in bread machines, but you can read all about it on my website. Sign up for my FREE bread machine email course if you want to know more or read more here.
Oh Paula, this is without a doubt the very best bread recipe that I have come upon – well almost. Easy to make (thanks to your tips about bread machine usage). Tastes great and looks fabulous. I really liked that I could make small loaves which I shared with some neighbours and could freeze another loaf. Your recipes and tips are tops. Thanks so much.
Thank you for your kind words, Stephen. I agree about the small loaves. So much nicer to share with friends, especially if they live alone or with one person.
Hi Paula,
Baked these rolls up last evening, served with beef vegetable soup. Hello October!
Great recipe. I did sub out the honey (didn’t have any) with maple syrup & molasses. And used white whole wheat flour and regular Hershey cocoa
( ’cause that’s what I had). Baked up nice and are great for dunking in soup.
Here is a Tip… since we don’t drink much oj, I now just keep a can of oj concentrate in the freezer to use in recipes. 1 tab oj concentrate to 3 tabs water makes 1/4 cup.
Thanks for your post. Happy Fall ??
Hi PattieAnn,
I love your substitutions and tips. Thanks for writing–your ideas are sure to help other readers.
My husband has been asking me to make steakhouse bread for months, so I found your recipe using a Google search. The problem I have is that my actual oven broke and is now just storage for pots and pans. Aside from expecting a weird shape and probably being a little dry, would this work in the bread machine from start to finish?
Hi Kelly,
I’m sorry to hear about your oven. Yes, you can try making this in your bread machine. Your bread doesn’t have to be dry if you will use my Surprising secret for making better bread in a bread machine.. This can help the weird shape, too. You can also pull the dough out after the second rise and reshape it by hand and put it back in the machine. Do it quick.
What I can’t help you with is the holes in the bottom (however, remove the paddles when you pull the dough out to reshape to minimize the damage) or the cardboard crust. I hope you will let me know how it turns out for you. Occasionally, I get this question from other people who can’t or won’t use their oven.
May I know if I can sub the orange juice with vinegar? Thanks.
I have not tried that Ju. The orange juice adds sweetness in addition to the acid.
Do these rolls taste like chocolate?
Not at all. They’re similar to the rolls you’d get at Outback Steakhouse.
Hi,
I love your tips for successful bread making!
I’m dying to try this recipe, but here in Brasil we don’t have “unbleached flour”. I’m in Rio de Janeiro and I can’t find this kind of flour in supermarkets, it’s so disappointing…
Is there any replacement?
Thanks a lot!
Clarissa
Clarissa,
You can used bleached flour. That is all I used for years. Some recipes may require a tablespoon or more of bleached flour when substituted for the unbleached.
OH!!! These look fantastic.
This is how I do a lot of my breads. Machine work. Oven bake.
Wow. Those look awesome. I’m surprised by the orange juice! Can’t wait to try these!
Beautiful!
Enjoy!
Interesting recipe, I guess we could call them cocoa rolls. I’ve gotten rid of my bread machine. Between my Cuisinart and KA HD stand mixer, I found I really don’t need it.
Judy, I love my Cuisinart and KA too. But I can’t set a timer with them. Really handy to throw all ingredients for pizza dough or rolls in bread machine in the morning and walk in the door with dough ready to roll out. Also, the bread machine provides the perfect environment for proofing. Especially handy in the winter. Guess I just find the dough needs less handling than with my other appliances. In fact, I have two bread machines–for use when cooking for a crowd.
When you say “instant yeast”, do you mean the dried yeast in the small package that says “instant”. or is does it mean just regular dried yeast in a package?
When I say “instant” I’m referring to the little package called instant or bread machine yeast which often comes in jars. Neither instant or bread machine yeast need to be dissolved in warm liquid first as does regular yeast.
They turned out beautifully!!
i’m sure these rolls look beautiful. unfortunately, my work computer is filtering out all pictures on your website. so it’s not as fun to look at. i don’t think there is much you can do to modify this from your end. gotta love corporate computers!