The No-Mess Way to Strain Yogurt (Without Cheesecloth!)
Sneak Preview: Skip the cheesecloth! With a fine-mesh strainer, you can turn regular yogurt into thick, delicious Greek yogurt—without the cleanup hassle. Here’s how.

This post contains affiliate links. As an Amazon Associate, I earn from qualifying purchases at no extra cost to you.
The best way to transform regular yogurt into Greek yogurt is to strain it. Most people advocate cheesecloth for the process, but I have a different solution. Keep reading.
No problem if you don’t make your own yogurt at home. This same method will work with store-bought regular yogurt.
Why I Skip the Cheesecloth
Cheesecloth sounds like a great idea—until you use it. Here’s why I ditched it:
- Too messy—yogurt sticks to the fabric.
- Requires rinsing, washing, drying, and storing (hello, mildew!).
- Still have to clean the strainer afterward.
A Smarter Solution–Fine-Mesh Strainers
- A fine-mesh bouillon strainer (paid link), does all the work with none of the hassle. (Read more about why I love my Matfer strainer.)
- No more soggy, sticky cheesecloth.
- Dishwasher-safe for easy cleanup.
- Works for straining yogurt without losing too much solid.

What To Look for in a Strainer

1. Fine Mesh-– Prevents yogurt from seeping through, leaving you with thick, creamy results. Purchase at a restaurant supply store or online. (They can be pricey but should last a last a life-time.)
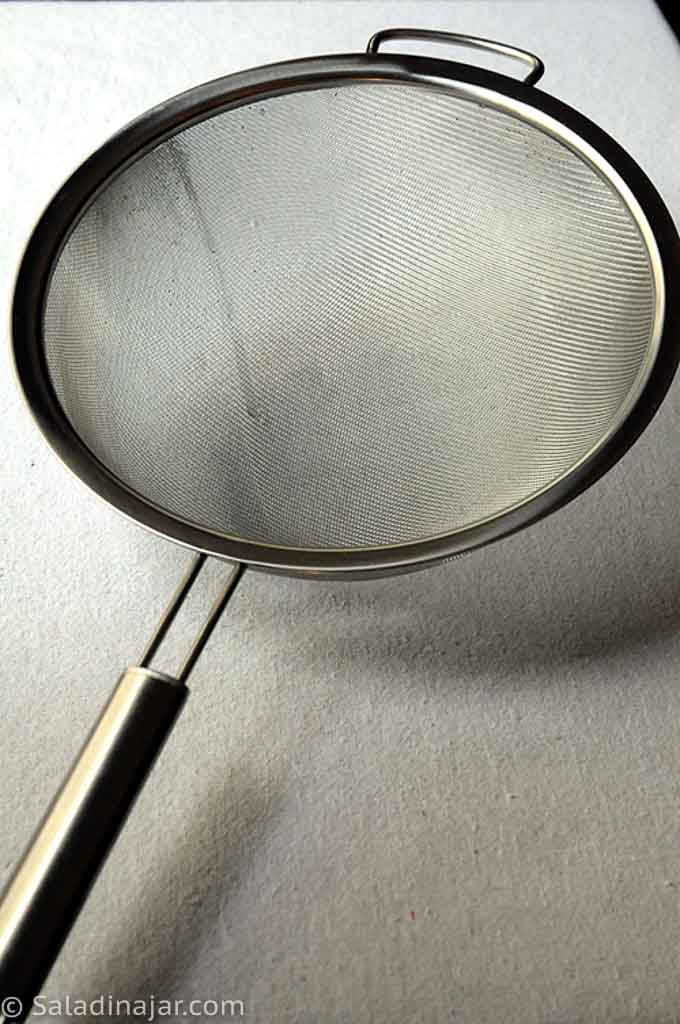
2. Conical Shape – Drains faster than shallow-bowl strainers.
3. Large Capacity – The bigger, the better! Straining in small batches is time-consuming.
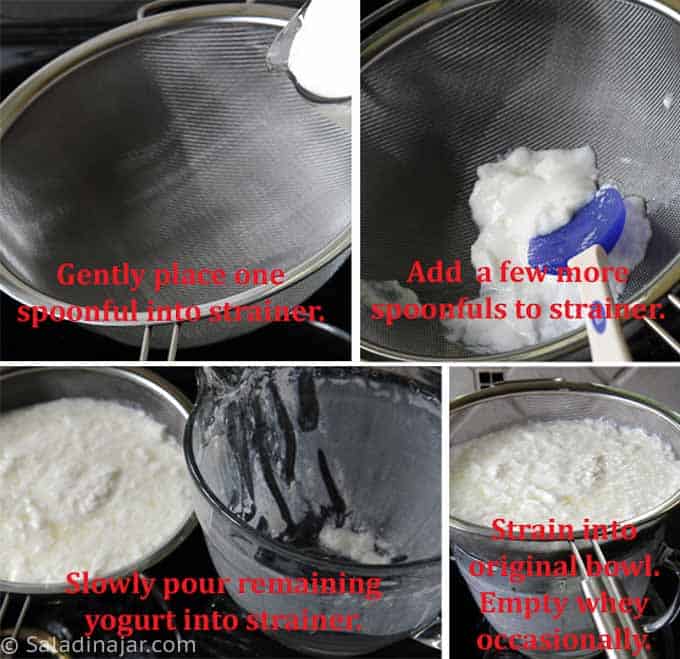
Yogurt Straining Tips
- Cold Yogurt Strains Slower – Fresh from the fridge? Expect a longer drain time.
- Pre-Wet the Strainer – A little water helps reduce solid loss.
- Stirring is Unnecessary – Let gravity do the work! Stirring can push solids through the mesh.
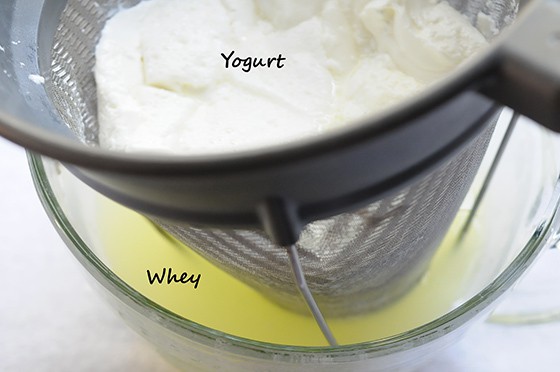
Depending on how much whey is drained, the strained yogurt will look something like ricotta cheese or even thicker. Whisk it well. If it is too thick, add some whey or milk back in until the consistency is perfect for you.

What If My Yogurt Runs Through the Strainer?
If your yogurt doesn’t hold together, it likely didn’t set properly. Options:
- Try adding fresh starter and re-incubating (hit or miss!).
- Layer paper towels inside the strainer before you fill it.
- Use it as a drinkable yogurt or buttermilk substitute.
- Turn it into ricotta cheese!
If your yogurt immediately runs through the strainer, it didn’t set properly. Unfortunately, you can’t just place that batch back in your incubator. Once you stir or disturb the yogurt in a major way, you must add a new starter. These are some options if that happens:
With this simple method, you’ll get rich, thick Greek yogurt—minus the cheesecloth headache!
FAQ
Strain 1–2 hours for Greek-style yogurt, or overnight for labneh (yogurt cheese). Adjust based on your texture preference.
Use whey in smoothies, bread, pancakes, or salad dressings. See What To Do with Whey for ideas and storage tips.
Not necessarily. Yogurt is acidic enough to sit out safely for several hours while straining. However, if your kitchen is very warm or you plan to strain it overnight, refrigerating it is a good option to maintain a milder flavor and firmer texture.
Stir in some reserved whey or milk to loosen it. Or go crazy and add a little cream if you’re feeling extragant. No harm done.
Other Methods for Straining Yogurt (No Cheesecloth Needed)
If this strainer idea doesn’t appeal to you, check out these ideas for straining yogurt that don’t require cheesecloth.
- A Yogurt Bag as a Cheesecloth Alternative for Making Greek Yogurt
- How To Strain Yogurt with Paper Coffee Filters–Not Cheesecloth
— Paula, Home Economist
Homemade Food Worth Sharing
Need help troubleshooting?
Email me: Paula at saladinajar.com — photos help!

Think I’ll stick with $180 worth of cheese cloth.
Hi Mick,
A much cheaper way to strain yogurt without cheese cloth is to use coffee filters.
I make my yogurt in a 1 liter stainless steel milk can. 1 gallon of milk heated to 200°, cooled to 118°, add starter, pour into the milk can then place the can in a large stock pot with my sous vide for 9 hours at 115°. Strain it for 2 1/2 hours through cheesecloth in a wire strainer. I thoroughly wet the cloth first to reduce sticking. I wash and reuse the cheesecloth several times.
Hi Ken,
Thank you for taking the time to share your method. Sounds like you have a system that works well for you–that’s the most important thing.
Hello Paula
I did yogurt in the slow cooker follow all the instructions correctly. However my was slightly very slighly thick then I strained it in a yogurt strainer and placed it in the fridge. The whey was white colour at the bottom and only 1 milimetre of whey. It was in the fridge for about 5 hours but the yogurt did not turn into greek thick yogurt just thin and only a 3/4 left of yogurt left after straining it where am I going WRONG. need help
Hi Ashwina,
Thanks for your message! I know how frustrating it can be when yogurt doesn’t turn out the way you hoped—especially when you feel like you did everything right.
Without seeing exactly which recipe or method you followed, it’s a little tricky to pinpoint the issue. But here are a few things that commonly affect yogurt thickness:
Incubation time or temperature: If the yogurt didn’t incubate long enough or didn’t stay warm enough, it may not have set fully.
Milk type: Ultra-pasteurized milk, low-fat milk, or milk with additives can sometimes produce thinner results.
Starter culture: If the bacteria in your starter wasn’t strong or fresh, it may not have fermented properly.
Straining expectations: Some batches just don’t release much whey, especially if the yogurt itself was still quite thin to begin with.
Feel free to send me more details about the exact method you used, and I’ll be happy to help troubleshoot more specifically!
Please email me at the address given in this post with more details about how you did it, the temperatures you used (were they verified with a thermometer?), the type of milk you used, and the kind of starter you used. I’ll be happy to help troubleshoot more specifically!
Maybe yogurt is different, or you have an extremely fine strainer, but I strongly recommend against both a strainer/chinois and coffee filters for straining whey from kefir. I bought a WinCo Chinois, and the curds and whey went through with equal ardor.
the coffee filter was both too small to fit more than a quart despite being a commercial filter, and was too fine, draining the whey very slowly. there are conical filters that seem like a good size, but that still means a very slow fine filtering process, which forces you to need a ton of fridge space or risk fermenting at ambient temperatures (potentially hot or cold) for several hours.
while a little messy, the cheesecloth/nut milk bag seems like the best route. I want to do one gallon batches of milk/kefir and keep things simple. the strainers and filters just fail to strain whey simply and effectively.
Hi Asher,
It sounds like you are straining kefir which is a different game from making Greek yogurt. I don’t have much experience with kefir since I don’t care for it.
Let me say that properly set yogurt will strain quite easily with an extremely fine strainer, which I have. However, using the extremely large coffee filters that hold a gallon of yogurt (see my Amazon store in the side bar of my website) along with the colander from the inside of an OXO salad spinner will allow you to strain a gallon at one time. If you use coffee filters and compare them to using cheesecloth, you’ll find you lose hardly any solids compared to what you lose with cheese cloth.
I repeat, this applies only to traditional yogurt, not kefir. I cannot speak authoritatively about kefir.
My family’s from Istanbul so I know a little bit about yogurt. I have a “way” of making yogurt that doesn’t require a strainer, muslin or anything. It’s a method I developed whereby I heat the yogurt at three different intervals using glass canning jars. I then leave the jars alone in a warming drawer for several hours and finally place them in the fridge. The next day all the yogurt will be sitting on the top and the whey sinks to the bottom–you’d be surprised how much whey. I then scoop out the yogurt, leaving a bit behind to mix with the whey and enjoy as a very tasty drink–it’s the best of both worlds with all the nutritional benefits from both the whey and the yogurt, and nothing goes to waste; not a drop.
Hi John,
Thank you for sharing your experience. Always fun to read about different methods.
I have made yogurt starter from chile stems and it seems to work fine. I don’t know anything about the probotics content.Is this as good as using existing yogurt as a starter?
“First, wet the strainer?” I am dumbfounded by this comment as when things have gone wrong in the past with my yogurts…. it was as I was told because the environment was not sterilized enough. I am always afraid to even wash a utensil and not wipe it completely dry in case a drop of water contaminates the entire batch. How are you wetting the strainer? In tap water? How is this ok, when washing and drying yogurt jars is not enough … but they must be completely sterilized.
Hi Tess,
So good to hear from you. I’m glad you wrote. I do not completely sterilize everything as you described. The dishwasher works good enough for me. The tap water is clean and safe here. I’m not sure where you live, but things may be different where you are so I can’t speak for you.
Since people have been making yogurt for centuries, I’m pretty sure most people were not sterilizing their dishes all these years. I’ve been making yogurt for over 10 years and I’ve never gotten sick or had a “bad” batch of yogurt. If I had to sterilize everything and worry about every drop of water, I would not be making yogurt. It would be far too much trouble.
This is just my opinion and what I’m comfortable with. Each person has to work it out for himself and his own situation.
I’m trying yogurt for the first time. Wish me luck. Never posted this before.
Hi Elaine,
How did it go? I hope you had beginner’s luck. If not, perhaps we can troubleshoot together. Sometimes it takes a little bit of experimenting to see what works best in your kitchen.
Necessity being the mother of invention, when I needed to strain some rather broken yogurt I looked around to see what I had that I could use…. Turns out I had the perfect thing in the form of an Evercare laundry mesh sweater bag from Walmart (sold in a box of two, one large one small). This brand has a VERY fine weave, and it worked beautifully. It’s also reusable.. I just lay it closed over a strainer/plastic colander so I have double thickness. I also have tried the large paper coffee filters, and really like those as well. They get the whey a little bit clearer, but not that much. The mesh bag works quite well… and can also be used to wash my sweaters!
Thanks heaps for all your amazing advice. I’m new to this but have just made my second batch in a slow cooker on yogurt setting, the first set OK but not great in 8 hours but the second batch I put on for 10, then ended up completely forgetting about it. All up it was in the slow cooker for 18 hours, will it still be OK? I’m a bit nervous. Sorry if this is a dumb question or if you have answered this before. I used store bought as a starter. Thanks for any help!
Hi Mary,
Anybody who has been making yogurt very long has forgotten about it. If it smells good, it should be fine. Although I prefer a 4-6 hour incubation period, some people actually incubate yogurt 24 hours on purpose for alleged health reasons. Longer incubation will make your yogurt more tart or sour. Good luck. Paula
Hi Paula
I posted before n it didn’t appear!but I tried with the vacuum flask method n it worked wonders! After adding the starter I put it into a wide mouth Thomas flask n there were left over milk! So I used a normal flask for that. I kept for 10hours (because came home late!) next time I might strain bit longer. Thank you for your blog
Hi Rukni,
Sorry for the delay in answering. I’m not even sure what a Thomas flask is but I’m glad it worked for you. I strain my yogurt for at least 2-3 hours because I like it really thick. Happy Yogurt Eating. paula
Just wanted to thank you for all the information and help to those of us like you who prefer to make our own foods instead of buying store-bought with tons of additives.
This is the first series of videos/information I’ve watched that took something seeming so complex, and broke it down for me to understand, and then (soon) do myself!
Your education and help has benefited tons of people, many of which don’t post comments, and thanks again.
Buying my strainer tonight, yay!
Hi Gwen, Thank-you for your kind words. Be sure to check out this post for a cheap and super easy way to strain yogurt.
Thanks so much about the posts about yogurt. I read most of them just to be sure even before I started and also talked to my mum who actually did this a few times at home when I was a small child. I just tried today and mine came out a bit runny and is straining now but hey not bad for a first time (it actually was firm but with a lot of whey that would mix in whenever disturbed and make it runny). Also one thing my mother said was that about the texture she had no idea what influences everything since she always did the same and sometimes would get a firmer result and others a runnier one.
And for the straining I’m using a paper coffee strainer (this way is so much easier to clean).
oh and my starter was a store bought 8 days old yogurt (so maybe that could influence on it being a bit runny)
Ok Paula, now you’re just teasing me! What kind of milk are you using now?
Things really do live forever on the internet!
Paula, if you’re still out there making yogurt, perhaps you can help me with a question. Have you ever tried thickening your yogurt with pectin? If there is a trick to it, I’d love to know!
Thanks for the great video — it really helped me a lot. My yogurt is just not as thick as yours (after straining through cheesecloth) so I ordered the strainer. Hopefully, once I have it I won’t need the pectin!
Hi Robin,
I have never tried the pectin. Haven’t felt the need. The strainer is/was good, but, I have an even better method now. Check out this post. With the commercial size coffee filter, it pretty much doesn’t matter how thin your yogurt turns out, it will still strain it without losing any solids. I still use my strainer but the kind of milk I use makes pretty thick yogurt. Not all milk is equal when it comes to yogurt.
I just found your website. I read a lot of the comments, I found a great way to make a large batch 2-3 qts at a time. I use a crock pot. Place the milk any type you like or a combo of 2. Into the crock pot I tried the kind that is in the shape of an oval and not very tall 1st. It was okay but the 2nd time I used the round kind that is taller it worked great. Milk heated to 180 degrees, turn off crock pot check for milk to be at 120 degrees. Then I added store bought Dannon plain yogurt. 1/3 cup mixed into the milk (I use a stainless whisk) until blended. I covered the crock with a towel and left it there for 8 hrs. When I came back to it I found it worked great. Look up How to make yogurt in a crock pot for the times. Enjoy………….
How interesting Dorothy! I love to read how others make yogurt. This may give somebody else a good idea for their own use. I don’t think it’s for me because I am a Greek yogurt fan and always strain my yogurt. Seems like I would have more dirty dishes than my current method which reuses the 2 quart glass bowls for the straining process. I’m curious how long it takes your milk to cool from 180 back to 120.
here’s another idea. google 10″ x 12″ muslin bag. i tried to find something like this before i thought of the commercial coffee filters but i was using ineffective search words.
while these will require washing, they may be the better choice in some instances such as the ability to squeeze excess moisture, drain with a weight, etc.
i’m very interesting in trying this.
Good idea Nan, especially if you are going for yogurt cheese.
I use commercial coffee filters to drain large quantities of yogurt. I bought a box of 3 gal. filter papers and cut them (fold into wedge, measure ‘point’ from center to rim of whatever strainer/colendar you’re using and cut accordingly). You can get them in smaller sizes, too, but I liked the flexibility of the larger size and they cost pretty much the same.
I tried cheesecloth, Walmart dish towels, and reusable/disposable cloths I bought at the dollar store and a coffee filter. I wanted to try a bouillon strainer but couldn’t find one large enough to strain at least a gallon at a time. I even bought a colendar with really small holes but . . . The coffee filter was great (can’t beat disposable) but too small.
Don’t know what in the world made me think of commercial coffee filters. Don’t know why I didn’t think of them sooner, either! Something made me say to myself, “What do restaurants use in those industrial sized coffee makers??”
Note: The really large filters might be just a tiny bit thicker than the usual ‘large home size.’ Sometimes I slowly/gently lift the draining yogurt away from the sides of the filter with a large rubber spoon. Just lift it enough to let the still liquid yogurt slide next to the filter paper.
Best of all, when I’m finished, I just carefully slide my hand down the ‘rope’ of the large wet filter to get the last bit of yogurt into the storage container and through away the filter. And that’s it!
Nan,
You are an absolute genius! You must have a HUGE strainer or colander to hold a gallon. Did you get the filters at a restaurant supply? Thanks so much for writing.
Hi Paula,
You are so welcome.
I have a big colander – not huge. The ‘standard’ big ones will hold pretty close to a gallon. They’re pretty common in thrift shops.
Another strainer I like to use is a flat bottomed steamer insert. You can’t strain as much at a time but I like the way it drains. I still make a gallon but, with the ease of the paper filters, it’s no big deal to set up two strainers.
My local restaurant supply didn’t carry the large filters (!). Google ‘3 gal. commercial coffee filters.’ You’ll see everything from 1.5 gal. to 10 gal. filters advertized. Nose around, price-blink for comparison pricing and wait for a big box. Amazon is my go-to for reviews and their prices are as good as anywhere, really.
I look forward to hearing how this works out for you.
Have fun!
I found the perfect way to strain the yogurt! I put it in a half gallon Ball canning jar, put a coffee filter or two over the top, screw on the collar over the filter, and put it upside down in my strainer in the sink or a bowl… WAY less mess and I don’t have to transfer it around as much since I also make and store it in my jar.
Julie,
Novel idea. I’m trying it. But I’m wondering…do you heat your milk initially on top of the stove? I do it in my microwave and the half gallon jar is too tall. Normally, I heat, cool, incubate and strain–all in one 2-quart (half gallon) Pyrex measuring cup. Also curious how long it takes to strain. I guess we’ll see. I’m thinking it will take a lot longer since there is less surface area. Thanks for writing. It seems like a great idea.
The heating of the milk I do on the stove, sorry, I actually do that in another pot, pour it in my jar to cool. Then I put a small rack in my slow cooker to sit the jar on, pour some water in the slow cooker not touching the jar, put a foil tent over the whole thing with a peep hole for my thermometer. I keep it on warm or low over night. The straining takes longer, but that also depends how thick you want. I don’t have an exact time, but it goes faster if you use a piece of t-shirt instead, and I don’t pull it completely tight either.
Hope it works! The coffee filter I did in the fridge while I was at work, it was a bit too thick so I just added some of the whey back in. Since I work full time, only initial prep speed is important, after that, slower actually works a bit better for me since I’m not there.
Thanks for your informative article. I love making my own yoghurt, but sometimes find “clumping” of the proteins a problem. My tip for using the whey is to use it in my bread making, the acidity helps the yeast work.
First thank you for this blog.
I founds it yesterday when I Googled strain yogurt. While I read many of the posts I didn’t get down to MelissaT’s entry (until this morning reading from the bottom up). None the less I too came up with an idea similar to hers. I was looking for a way to strain with the items I already had in the kitchen.
Stopped by JoAnn’s yesterday and selected a very tight weave, very light fabric. I found a 36 inch wide bolt and bought a yard $1.99 – $1.28 after coupon with tax. (Side note here, I’m probably one of the very few bikers that has the JoAnns SmartPhone app installed on his phone, but I shop there for stuff like this 3 or 4 times a year and always get the 40% off coupon on my phone.)
So I cut the yard in half, then cut those in half too to leave me with 4 18” squares – which is just the right size to fit into my 9” stainless steel colander and cover the bottom and sides when filled. This then sits in my 3.5 qt stovetop pan (elevated by the handles on the colander), but the top no longer works, so I cover the whole top with plastic wrap to the sides of the pan. This drains off a lot of whey and leaves me with thick consistency, thicker than sour cream and as MelissaT pointed out the strained product pretty much lifts off the fabric.
I’ve been experimenting with sous vide cooking lately and it’s perfect for yogurt making, I can set the pasteurization temp to 185 and leave it for hours, then lower the temp to 110 for the incubation period. I can hold this temp +/- 1 degree practically forever. On my second 1 gallon batch I poured the mixture (pasteurized milk with cultures added) into 1 qt containers, removed one after 12 hours, one after 24 hours, one after 2 days and the last after 5 days. The 12 hour and 1 day were a bit too mild for my taste, 2 days was better and 5 days was still acceptable. I’ve since let it go a week where it gets a bit strong.
For me the longer incubation period also serves the purpose of further breaking down the sugars. I use whole milk and usually starter from the last batch.
Hi Gary,
Wow! I have never considered incubating yogurt for 2 days, much less 5. Can’t imagine. Since I like my yogurt to be mild, guess your method is not for me but perhaps it will give others an idea. Thanks so much for taking the time to write.
Also, thanks for sharing how you strain your yogurt. I much prefer my extremely fine mesh strainer but not everybody wants to invest that much so it’s good to have options.
For me it wasn’t so much the investment (it does matter though) but cupboard storage space. My colander is big enough to store a bunch of mixing bowls in so it takes up almost no extra space.
Keep up the good work.
Paula, which brand of strainer do you use? I want to purchase one and am not sure which to buy. I want to be able to make up a quart of yogurt at a time. Thank you for your suggestions.
Lisa, this is the one I love and use. http://www.amazon.com/gp/offer-listing/B00069ZUXW/ref=dp_olp_new?ie=UTF8&condition=new
You have saved us so much money. We had just discovered store bought Greek yogurt when I found your site. Since then, I have made at LEAST a gallon of yogurt a week, barely keeping enough to use for starter for the NEXT batch. My family loves it so much. We have it breakfast, lunch, snack or dessert! I don’t have the fancy strainer, but am going to get one soon. I just pour off the excess whey and enjoy. No complaints so far. For what I used to pay for one QUART of store bought Greek yogurt, I can make 2 GALLONS of homemade! We can spend all the money I am saving on fresh berries to go in my home made yogurt and still have money left over! Thank you so much for sharing your easy to follow, money saving recipe!
I have 2 coffee filters and just invert one and stack the other on top of it, in a bowl, to drain 2c at a time. Comes off with a spatula and the filters wash in the dishwasher. Perfect!
Now all that smancy-pancy WAY-OVERpriced Greek yogurt can stay in the cooler and not in my grocery cart. AND i get all that wonderful whey to use in my kitchen!
WIN WIN WIN 🙂
A very important thing to add to the instructions is do not disturb the yogurt after you start the slow cooking process. Do not stir or move it around.
I stumbled upon your website a few months ago and have been making my own yogurt a couple times a week since. Love love love your site! Didn’t want to splurge on the strainer and cheesecloth made the yogurt taste gross. I found very very fine mesh fabric at the fabric store on sale for $5/yd. It was 60″ wide on the roll, but was folded so it was actually 120″. I cut off 14-16″ squares to line my strainer. The yogurt falls off it after being strained. No mess. And it was cheap so I toss them after each use. Plus, you can pick it up by the four corners during straining to speed up the process (if you’re impatient like myself) and tip the whey off the surface.
I, too, think the probiotics in homemade yogurt have kept me healthy. Everyone around me at home and at work has had multiple colds and coughs this season. I have to limit myself otherwise I’d eat it for every meal. My family thinks I’m crazy. I’m just addicted.
Hi Melissa,
Love your idea here and so glad you added it to this post. I especially like the idea of picking it up from the four corners to speed the straining process because I am impatient like you. Happy yogurt eating…from one yogurt addict to another.
There are 10 inch strainers and 12 inch ones. Which one holds 2 quarts?
Gail, My cone-shaped strainer is only 8 inches across but quite deep. The bowl-shaped strainer is 10-inches across. They both hold two quarts. If you are really into making your own yogurt, I highly recommmend my favorite cone-shaped strainer. Here is the link.http://www.amazon.com/gp/offer-listing/B00069ZUXW/ref=dp_olp_new?ie=UTF8&condition=new
I started making my own yogurt about 6 months ago when I found an incubator on clearance for less than $20, including extra jars and a second tier. After 2 batches I was hooked. Every morning I eat vanilla yogurt sweetened with pure maple syrup over a cut-up banana and 10 almonds. It’s like starting my day with dessert. I now make at least a gallon per week as my daughter is hooked too. We can’t bring ourselves to eat store bought anymore.
I found a recipe for a chip dip using Greek yogurt so I decided to make a quart of plain Greek yogurt to use in this recipe. It is straining now. I’ve also come across a recipe to make nitrite free corned beef using Greek yogurt. Hmmm
BTW – I haven’t had so much as a sniffle since I started my homemade yogurt adventures. Everyone around me has been sick with coughs and colds. I attribute my good health to my yummy yogurt which I eat several times per day. What do you think? Am I just lucky or is yogurt magical?
The Zil,
I like the way you start the day.
I’m not sure yogurt is magical, but it might be. Sounds like we are both addicted. 🙂
A few more ideas that might be helpful, …
I use the glass bowl from my KitchenAid stand mixer, when I microwave the milk. It’s microwave safe, and it’s a nice big size. Don’t forget to remove the plastic ring on the bottom of the bowl before microwaving.
I use a Yogourmet Yogurt maker. It’s a nice large size – holds 2 quarts. One thing that is important is that you really need to use a dimmer switch. There are several types that are available. I monitored the first batch of yogurt using the dimmer, along with a thermometer, to check so that I could adjust the temperature so that it doesn’t get above about 110 degrees. I then put a little mark on the dimmer switch with a sharpie pen, so that I always know that that is the correct place. I ferment my yogurt for 24 hours, which is the recommended fermented time for people on the Specific Carbohydrate Diet. It sounds complicated at first, but it really isn’t. I find that if you don’t put a dimmer switch on the yogurt maker, and fermenting that long, the yogurt temperature gets too high, and kills the good bacteria that is so beneficial with yogurt.
Thank you, Paula, for this great video on making Greek style yogurt. I’ve been making my own yogurt for years, but have always heated the milk on the stove, and after seeing your video, you’ve enlightened me about doing it in the microwave. It’s so simple, and so brilliant of you. It never occurred to me to do it that way. I must be on another planet – lol. After using other methods of straining, I bit the bullet and bought the strainer that you suggested, from Amazon. You’re right, it is pricey, but it is worth every penny to me. I eat a lot of yogurt these days, and your time saver methods and tips are really appreciated by me. Thank you very much for sharing your knowledge, and wisdom.
Thanks for your kind words and great ideas, Jack. Never heard of the “Specific Carbohydrate Diet.” Interesting.
Paula,
i just want to say thank you!! i found your blog through my sister who started making yogurt a while back. I love Greek yogurt and so do my four kids. Four to eight half cup servings every day is extremely expensive, so when i found out that i can make it from skim milk so easily with NO extra expensivepurchases i was hooked! I just finished batch number two about an hour ago and it will be cold and ready for breakfast when the kids get up. I use a large plastic bowl to heat and incubate the milk, a $2 candy thermometer from Wally World, and a never worn “free with purchase” t shirt that was hanging in my closet to strain it. It has worked perfect both times and i don’t plan to buy Greek yogurt again!!
Hi Kelly Jo,
Sounds like you’ve got your system figured out. Enjoy all that money you are saving. 🙂
Hi,
I purchased a double layer fine mesh strainer at a local kitchen store for $35. I tried straining my yogurt with it and all the yogurt went through, not just the whey. I am making my yogurt with whole raw goats milk and it is not quite as thick as yours, though will still heap some in a spoon. I spooned it in and everything. I don’t want to pay $70 more and still have it not work. Do you have any idea if the goats milk is enough different that it wont work in a strainer? I drain it through cheese cloth all the time, but it is very slow and a pain, I thought this would be the perfect solution! But so far am disappointed.
Thanks!
Brenda
Hi Brenda,
Oh how frustrating!! I am so sorry. I have never worked with goats milk so can’t really advise you on it. I assume you are heating the raw milk to 175 or 180, then allowing it to cool down. This rearranges the protein to make thicker yogurt. You could try chilling your yogurt before straining it and see if that will work. It may also have something to do with the milk being raw to begin with. I’m just not sure.
Is your strainer a recognized brand? Just curious. I agree that cheesecloth is a pain despite what some people claim. That’s why I was so happy to find a better way. Good luck.
I make my yogurt in 1-gallon batches, meaning I just pour a gallon of milk into my stainless steel dutch oven and heat to the right stage on the stovetop while washing dishes (yes, by hand). I incubate in the oven with just the oven light on for maintaining the right temp. It goes into the oven when the milk reaches 105 to 110 degrees and the light holds it just right. For straining, I use a sterilized old ‘work hankie’ that was never near a nose. I like the big square that allows me to pick up the thickened batch to set into the strainer. It’s just a large kitchen strainer that I then set atop a soup pot and refrigerate this all overnight as it drips. The whey is saved and usually used to soak chicken in, ala ‘buttermilk chicken’ and works wonderfully for that…so juicy, great flavor. The strained yogurt is the consistency of room temp Neufchatel cheese. From there, you can do most anything with it that you’d use sour cream, cream cheese, or Neufchatel for. Our favorite thing is adding thick, wild elderberry syrup (a batch of jelly that didn’t quite jell!), stir till creamy. Yum. A gallon of milk yields half a gallon of this versatile and very thick yogurt.
Paula, thanks for your site, which has been a wealth of info about straining yogurt. I am diet-controlled diabetic and use yogurt at bedtime to prevent nighttime fluctuations in blood sugar. I don’t particularly like plain yogurt, and finding sugar-free flavored yogurt was a problem. I strain non-fat, plain, super-market yogurt a quart at a time and sweeten a small helping with Splenda. Does the trick. Will now try the whey in bread-making, I have had good success using two (NOT torn apart) “select-a-size” paper towels in a regular wire-mesh kitchen strainer over a 2-quart measuring cup. Don”t let the towels tear apart solids will leak. But still not a big deal. Do you have any info against using paper towels for this?
Hi Squirrelly,
Haven’t done any research but I don’t know of any problem with using paper towels. However, there seems to always be someone with a dire warning about nearly everything one can do in the kitchen so I wouldn’t be surprised to hear that it could cause all your toes to turn purple and orange, and your kids to turn into Martians. 🙂
Hi Paula and Squirrelly! Love this site and have learned lots. I am now an official gallon-a-week greek yogurt maker! Just wanted to mention that I also struggled with an effective way to strain….just couldn’t bring myself to spend the money of expensive strainers, and cheesecloth was just too messy. I now use paper towels. I just dampen three paper towels and spread them inside a colander, then place the yogurt inside. Works fantastic. The yogurt just slides right out (I tend to over strain, then add some milk or whey back in to desired consistency, only because I usually go to work while it’s straining). I do use plain white paper towels, and wondered too about “chemicals”, but realized not much surface area of the yogurt comes in contact with it, even if there is something in there. I guess I’ll continue to do it this way until someone warns me otherwise!
Thanks Paula! I use full-fat non-homogenized milk. After my whey sits overnight, the milky solids rise to the top, but the bulk of the liquid is still really cloudy! I was worried I was doing something wrong, and I also don’t want to lose so much milk solids. Probably means my whey won’t keep very long? I may just try stirring the whey into the yogurt, so I don’t have to worry about using it up. I also kind of like the extra tang it gives, just not so keen on the loose texture. Thanks again for sharing your experience and tips. Its wonderful having fresh yogurt at hand 🙂
Hello Paula, your yogurt looks lovely! My whey isn’t as clear as yours though – it came out quite milky and cloudy… I have been using an old t-shirt to strain – do you think I should go for something with finer weave? Or is it the yogurt-making process itself that needs to be tweaked? Would love your advice, thanks!
Isabel,
What kind of milk are you using? Milk with higher fat content seems to produce more cloudy whey. Also, the whey you see in my pictures was probably sitting there for a little while so any solids would have settled to the bottom. The weave of your t-shirt is likely tighter than my strainer so doubt if that is the problem. If you like the way your yogurt turns out, no reason to worry.
I got a metal ‘micro-mesh’ filter with a coffeemaker I bought a while back. I only used it a couple of time (made terrible coffee, IMO) before I went back to paper filters, but couldn’t manage to throw it out. OK, I know there’s a show about people like me.
But guess what? Turns out it’s a fabulous (and *free*!!!!!) yogurt strainer! Thank you, SiaJ.
Hotflash, I’m impressed with your ingenuity. Thanks for writing.
Paula, does it make any difference if you put in plain culture or can you use one mixed with flavorings? Also, I really can’t afford the expensive strainer but if you ever find cheaper ones, would you please post them. Must tell you this is the greatest thing that has happened to me in years. Absolutely love the yogurt and my health (70 years old) is amazing. I make 3 gallons of milk in a little over a week!! Thank you for your wonderful site. I have told so many people. Absolutely loved your coconut shortbread cookies. I still work!!! and people here just raved!!! Thanks again. Dee
I use yogurt mixed with flavorings as a starter all the time. I do not use yogurt mixed with any kind of fruit. Works great for me. Since you only need a couple of teaspoons, you can’t really taste it in the new batch of yogurt.
Regarding the strainer, keep your eyes peeled. One of the strainers I talked about in this post only cost me 12$ at Tuesday Morning.
Love those shortbread cookies myself. Dangerous!
I found your website very informative, thank you. I was wondering what strainer would you highly recommend when straining yogurt?
John,
This is the one I have and absolutely love. http://www.amazon.com/gp/offer-listing/B00069ZUXW/ref=dp_olp_new?ie=UTF8&condition=new
I know it’s pricey but it’s sturdy and the finest mesh I have ever seen. I have been using it over 3 years now, several times a week, and it looks like new. The increased surface area because of the cone shape means the yogurt drains fast. pr
If you’re looking for an easy way to strain plain yogurt [no additives], google “yogurt strainers”. I bought mine from Amazon.
Hi Dana,
Yes, you are right. There is a good variety out there. A couple words of caution. Most of them are much too small for me. I make yogurt in quantity and need something that will hold 2 quarts of yogurt going in. Also, the cheaper ones often require additional liners such as a coffee filter or cheesecloth. The cheap ones can also be quick to rust. Just saying…know what you’re buying.
I made your Greek yogurt and don’t have a bouillon strainer. I have cheesecloth but that sounded like a lot of work to clean up and a lot of waste to throw away every time. So I put the yogurt in the refrigerator while I thought about what else I had and came upon my splatter screens that I use over skillets to keep grease from popping out of the pan. Perfect! I placed one over a large bowl, dumped the yogurt on the top across the top in large spoonfuls, and over not-too-long a time another quarter-cup of whey dripped out in various places across the bottom of the splatter screen. I had poured off the whey standing on top of the hot yogurt prior to putting it in the fridge. No solids went thru the splatter screen and my Greek yogurt was smooth and creamy after I took it off the screen and whipped it. Thanks!
My Chief Cook and Bottle Washer brought home some Greek Yogurt last week and I really enjoyed it so I went to the internet and found your site. Since your description sounded stupid proof I thought….never mind. First time I tried it I have to hand it to me as it is perfect. Questions: Why wrap it in a blanket when you put it in a warm oven? Since whey is nothing but skinny yogurt why can’t that be used for a starter? I put some of the finished plain yogurt in the freezer for use the next time I need starter, hope it works. Only saw one guy in your comment section so I almost did not send this, again I thought and again, never mind. I have thought up lots of flavor experiments; peanut butter yogurt, chestnut flour yogurt, garlic vodka is good but perhaps not garlic yogurt. Oh well, try anything at least once. Thanks for listening and the instructions.
Ok..I used the Red Green method of straining out an all natural yogurt I picked up today.(Ruths low fat)..
Need
1 Four legged kitchen chair with stretcher bars, intact seat a must.
2 A white muscle t shirt…redneck speak a “beater”…can also be used for buffing car, cleaning tools, wiping sweat or wrapping up a bass after you gut it just so you can get it home. Only make sure the shirt hasn’t been used for all these things before hand. You know..the one all the way at the bottom of the drawer.
3 about a yard of Parker Mccrory 533 Bayshock Single Strand Aluminum Electric Fence Wire.
4 clean bucket. I mean one you washed with soap, not just rinsed out with a hose.
5 Duct tape..optional
Instructions.
Let the yogurt stand til room temperature
Cut the yard of wire, and lay across the seat area of the chair leaving enough wire to reach to the stretcher bar in back. Make sure the wire that’s laying across the seat is flattish, but not tight, you want a little give on this. This sophisticated devices operates on tension..the weight of the yogurt in the shirt tightens the loop
on the stretcher bar and helps gravity pull out the whey. (This is the point where all the guys listening to you BS nod and act like what you just said makes sense.)
Wrap the back end of the wire around the stretcher bar and loop it shut. The weight of the hanging yogurt should provide enough counter pull to keep it from unwrapping. Put a twist of duct tape around the loop if you’re not sure. Just put duct tape on it. You have it, you might as well use it.l
Wet the T shirt and open it up. You’re going to plop the yogurt in the center inside. Scoop out any that doesn’t slide out. Oh make sure you wash your hands BEFORE scooping, or the yogurt might taste funny. Like motor oil..or something.
Once you have a nice plop in the middle just pull twist both open ends into a knot above the yogurt. Same way you would to hide that pint of Southern Comfort you took out of the truck so the rest of the guys don’t ask for some. The yogurt should be in a nice round ball in the shirt.
Loop the wire under the knot and slide the bucket underneath.
Let hang for an hour..longer if you missed the part where you let it warm up to room temperature. And if you’re a guy you probably did, cause..well..just cause.
Move the bucket..and put the whey in a mason jar in the fridge label it “Moonshine:…chances are your best buddy, brother in law or that moocher that hangs around with either will try to drink it and your fridge raiding problems will be solved. It’s alot less risky than ex lax brownies…
When you open the shirt you should have a creamy mass in it, just put it in some old tupperware..or a well rinsed out plastic bait container that you got from the service station..unless of course you like mealy worm flavored yogurt..then have at it. Stick in fridge.
Just hand rinse out the shirt in the sink. You don’t want dried yogurt on your truck when you wax it. You can leave the wire there if you put a cushion on it..won’t hurt nothing and it’s less work for next time.
Hope you got a good laugh out of this..I actually DID rig up a yogurt strainer the way I described. With a new bought shirt of course, and it worked like a beauty.
Thanks for all the tips I’ll let you know if I make yogurt from scratch, and how it turns out. Unless this post gets me booted..
Peace and brownies…Jason
Jason, I hope you have your own blog ’cause you have way too much imagination to let it go to waste. Sounds like you enjoy writing–even if it’s a little…or a lot CRAZY.
p.s. You really should try making your own yogurt. Maybe… 🙂 pr
Another person who just found your site. Three weeks ago I was eating gas station pizza and fast food. Long slide down for someone who used to be macrobiotic. Month ago, unsurprisingly the doc said I have stage 2 hypertension. That’s a month of 194/120….I refused meds and asked for 3 months to clean up my act. So..I’m eating only 1,500 mg of sodium daily, no processed sugars, no over processed flours, and absolutely no cheese. Which is a killer for this Wisconsin boy. I’ve lost 10 pounds in about two weeks, water weight, and my socks no longer leave indentations in my legs. And some of my blubber as well. I bought Fage and as soon as I pick up tahini (I’m out in the boonies, the nearest health food co op is an hour away) I’m looking forward to making hummus with greek yogurt. I like it so much, I went looking for a “how to make” site..and here you are. Wish me luck… I’ll be trying my hand at Greek yogurt soon enough.
I just got a chinoise (they called it a SS China Cap Bouillon Strainer) today from directwares.com. It is stainless steel and 8 inches across the top of the cone-shaped utensil. It works great and cost me $30 which included the shipping by FedEx. It arrived in a big box with lots of bubble wrap. I’d been using two small (1 cup capacity) yogurt strainers that teetered in mugs in the fridge – now I can strain the 2 quarts I make at a time just once and have it handy. Thanks for all of your help in the kitchen. Anything that makes it easier to eat good, healthy foods more often is a good thing.
Hi Nancy,
I have never used the stainless steel type you describe. Does it strain without using a cheesecloth? The price is certainly right and the cone-shape is also right.pr
I went to that website to find the product. The website wasn’t working, it was kind of weird. I closed it because I thought it might be a scam. I hope not, but there was nothing on the site. So I was hoping to find a specific name and website or store I can get a strainer that will work. Can anyone else give specifics?
Hi Rebecca,
I just tried the link on that post and it worked great. It is a Matfer strainer available from Ace Mart and also Amazon. Pricy–but for me, a major yogurt maker, very worth it. Also good for other things, like straining cold-brewed coffee.
Hi,
I stumbled upon your site. I get my yogurt from my MIL, she makes goat milk yogurt for me. It’s delicious! Anyway, it’s a little too runny for me and makes a big mess when I give it to my kids so I am going to start straining it. Was wondering, while it’s in strainer draining out the whey, do you leave it on the counter or in the fridge?
Thanks!
Tina
Tina,
That is a VERY good question I can’t remember answering before. If you have just taken your yogurt out of the “incubator” (oven, ice chest, crockpot, etc.) and it’s still warm, I would just strain it on the counter. What is one more hour? And it will strain much faster than when chilled. However, if you are starting with it chilled, either because you purchased the yogurt, somebody gave it to you, or you didn’t have time to strain it when first made, then I would keep it in the fridge while straining because it will take much longer–anywhere from 4-24 hrs depending on the yogurt itself, the strainer you use, whether or not you use cheesecloth, and how thick you like your yogurt. Since my refrigerator is always rather crowded, that would be a huge hassle.
So, “no way” in the fridge for me. Usually takes less than an hour to strain my own homemade yogurt–fresh out of a 100-degree oven–down to at least half the volume using a very fine strainer and no cheesecloth. Whip it, flavor it, pour in jars, then chill. Done! pr
P.s. wish I had a goat in the back yard although my neighbors probably wouldn’t like it. 🙂
Hi, I love my thick yogurt but I wonder about the nutritional value that is lost when I strain it. Can you explain ?? thank you martha
Actually, from what I’ve read, Greek Yogurt is actually more nutritious than regular yogurt. It has more protein and probiotic bacteria as well as less sugar and sodium. Some of the calcium is lost however. That is because as whey is drained away (along with some of the calcium, sodium, and sugar) the protein and bacteria is concentrated in the yogurt.
The best part for me, since I am lactose-intolerant, is that much of the sugar that is drained away with the whey is lactose. The lactose that is left in the yogurt is metabolized by the natural yogurt bacteria and causes very little trouble with my digestive system.
Hi Kristi,
Sounds like you enjoy eating Greek yogurt as much as I do. Some time ago, I wrote about the protein content of Greek yogurt here.
I had been using a grease splatter screen to strain my yogurt. It worked well besides the fact I couldn’t put a lot on there at once, or it would run off the sides. A couple of weeks ago I was at my local hardware store which happens to have a ton of canning supplies. I noticed a “jelly strainer” which came with a type of nylon cheesecloth that fits into a frame. It only cost $11 and works amazing!!!! Since the the strainer mesh is nylon it cleans right up and can be reused again and again!
As a fellow yogurt maker I can relate to the need for large quantities. My father almost lost it when I asked him if he used cheese cloth or a metal strainer. He told me to save my money and use a good white t-shirt ! I have and it works everytime.
Spread the word about yogurt straining…. the Greek style yogurt is so expensive… i buy yogurt in a large quantity when it is on special, maybe $1.50 a quart and strain it myself. i also use the whey in baked goods.
I’ve used a tee shirt to strain, it works fine, but next time I’ll wet it first as Laurie suggested.
Thanks for writing. I’ve started wetting my strainer also as the result of Laurie’s comment
Thank God I finally found your advice on making Greek Yogurt! I love that stuff, and I agree, I can be as happy with greek yogurt as I am with ice cream. I’m gonna try it this weekend!
For cheesecloth, I use the more tight-woven white cotton batiste. It works very well for mascarpone, and other hard cheeses. Whey is very good for the body…whatever you do, USE it! Microwaving anything dairy is a no-no…it kills the beneficial enzymes and bacteria, if there are any after pasteurization.
I make my gallon of yogurt with raw milk in the oven with it set at 105 degrees, after bringing it to about 185 degrees on the cooktop, blending 1/2 cup of storebought plain yogurt into about 1 cup of the heated milk and then into the rest of it, and then chilling in an ice waterbath down to 110 degrees. This will take 6-8 hours, depending on the thickness and tartness you like.
Anyone with a older oven that has a pilot light can proof their bread in that…or, some of the newer ovens have a 100 degree setting that can be used. Trouble is, you have to know when to stop proofing and turn the oven up to your bread-baking heat so, I set mine in a dish cabinet that has a fluorescent light attached to the underside of it and turn the light on and proof my breads on that lowest shelf of my dish cabinet. I’m getting far better breads now that I’m using the dough cycle of my bread machine.
Butterfat from raw milk is very good for you and will have retained the omega-3 oil and conjugated linoleic acid if the cow/s from which it came is/are fed only on grasses, no grains at all. Also, butterfat contains lauric acid which is beneficial for our bodies…mother’s milk has that in it. I usually become ill a few weeks after having to go off raw milk for lack of providers locally at times.
I use a colander lined with an old thin dish towel. Works great!! I put my milk in a stone crock in the micro for about 25 minutes ( half gallon of 2% milk), then after cooling and adding the fresh yogurt ( About 6 oz.) I put it on heating pad on low, cover with stonewear cover and wrap with a quilted material .After 5 or 6 hours, it’s usually ready and then strain for about an hour. I haven’t whisked it, but will try that today to make it creamier. Thanks!!!
Paula! You are the Greek yogurt expert! Thanks so much for all the very useful tips and tricks. I’ve been wanting to try my hand at Greek Yogurt for a while now, and you have encouraged me 🙂
You won’t believe this but you can use cheap knee high hose for the straining. I learned this from my dad 40 years ago. He used to catch fish and deep fry. He found it gave the best results in straining the oil and not absorbing it. They are pretty cheap, places like WalMart, and can be laundered or tossed away. I use a Ball jar and wrap the opening of the hose over the outside of the jar. Use a rubber band if it’s not secure enough.
Marcia,
Thanks for another alternative-especially for small amounts of yogurt. Do people still wear those? Can you still buy them? I’m just kidding. thanks for sharing.
I use the store bought strainer as shown and line it with 2 coffee filters to line it! It works perfectly for 1 qt of yogurt, I strain for 6 hrs. For really creamy I use 3 c whole milk and 1 1/2 half n half and 1/2 cup yogurt and incubate in the quart jar for 4 hrs with a tea light candle in my oven, I only do 4 hrs because I like my yogurt mellow vs tart.
No need to spring for an expensive strainer. If you wet the cheesecloth or a clean white cotton towel before you put the yogurt in, it will not stick. This works even with terrycloth toweling!
this is awesome Paula!! i have always wanted to make my own yogurt and now i can turn it into greek yogurt?? i think i’ll have to put this on my bucket list and stop paying $7 for a big container of yogurt!!
I just bought a yogurt maker, with 2 qt capacity. In reading the instructions, it tells me to add 1 cup store bought yogurt to the milk as starter. One cup?? Your recipe advises 1-2 teaspoons…so I’m not sure what to do. I bought Fago greek yogurt to use as starter. Any good ideas?
I started using your recipe a few months ago and I LOVE it! I also used cheesecloth for my first batch since I didn’t have a fine strainer. Then a friend of mine gave me a round strainer which she picked up from an asian grocery store (H-Mart) and it’s PERFECT! It was only a few dollars and holds all the yogurt from a 3Q bowl. The strainer is round with metal sides like a springform pan. The mesh isn’t super fine (like the uber-expensive chinoise), but I’ve never had a problem with any yogurt going through the mesh.
I tried this the other day with a fine mesh strainer, worked great! I do want to get a cone strainer for more capacity though. Thank you for all your help on yogurt making, never going back to store bought!
I am so glad I found your site! 🙂 I love your salad in a jar idea – great excuse to finally get a foodsaver. I’ve also been wanting to make Greek yogurt since my 18 mo. twin grandsons eat it daily. They love it plain. Silly me, but I had never used the proof feature on my oven. So I followed your instruction for Greek yogurt (microwave then proof in oven) and it came out perfect. I didn’t have any cheesecloth, but I do have a Mirro strainer that I use for my jellies and liquor. I figured I’d give it a try. It worked perfect. I made an 8 cup batch and I was able to put the full amount in the strainer. First time I made it I strained a bit to much whey, but the taste was wonderful. The strainer bag is easy to rinse out and I have additional bags which are relatively inexpensive. I’ll be able to make organic full fat for the boys, but non-fat for myself. Thanks again for sharing. Kathleen
WOW!!! Just found your site through Pinterest!!!! Love your salad in a jar idea!!!! And I am soooo making those powdered sugar donuts!!!!!!!! Thanks for sharing!!!!!
Staci, Glad you found me. I haven’t thought about those donuts in awhile but now I want some. Thanks for writing.
I admire your tenacity to produce and perfect this item. I am not that big of a yogurt fan, even though I have tasted yours and it was wonderful! You go girl!!
the fine strainer tip is great. please tell me, can i buy a store bought plain yogurt and just strain it and make the greek yogurt with that? thank you, i really enjoy your blog!
Rere, Yes, works great with store bought plain yogurt.
Love these tips! I have had trouble straining yogurt in the past, especially store-bought yogurt. And I totally agree with you about the cheesecloth – that is the biggest mess I have ever seen! You’ve re-inspired me, thanks, Chris
ps and BTW maybe you could substitute Greek yogurt for the cream cheese and butter in the Peanut Butter Pie, what do you think? 🙂
I truly admire the fact that you make your own yogurt! Your recipes for it and your straining tips are wonderful and very encouraging for one who has yet to venture forth to make their own.
Thank God you were kidding about the ironing. I was questioning your sanity. 🙂
Gorgeous pics!
Excellent idea! I’ve been using coffee filters and I was only straining a small bit at a time, much nicer to be able to strain the entire batch at once. I never did try cheesecloth. The fine mesh strainer seems like a great kitchen investment. Should be good for straining chicken stock too.
Ok, I am reinspired to try making my own yogurt again! I may have to break down and get a finer mesh strainer. Not that much $$ in the big picture if it does a better job than the grocery store style strainer I have. Thanks for the tips!
I’ve recently started making bread with the leftover whey and it’s really good! Who’d’ve thunk it! Thanks for your pioneering methods…it’s helped me enormously!
You’re welcome Maggie. I’ve tried it in bread too. It was good but I honestly couldn’t tell a difference. I guess it has more nutrients than plain water though.
You really are a serious Greek yogurt fan ~a gallon of yogurt a week. That’s more than four 1/2 cup servings a day if you don’t share or use in cooking/baking. I bet you have strong bones and teeth.
Your strainer method works perfectly! I also like the ease of cleaning by popping the strainer into the dishwasher. No ironing cheesecloth for me! 🙂
Lorraine, Just to clariify, I do make a gallon of yogurt but remember I am straining it so I end up with only 1/2 gallon of Greek yogurt. And yes, I easily eat 2 1/2 cup servings a day. I also bake with it so you can see why I need quantity.
Re: strong bones– the Dr. says I do have some bone loss. What???? Guess my body is missing some of those young-girl-hormones.
Know its an old post, but most docs *don’t* know that “rare earth minerals” are vital to preventing bone loss, especially in middle-aged & elderly. Don’t remember it all [nearly 60 myself], but but boron, silica/silicon, vanadium, & others are *necessary* for “strong bones”.
Hopefully helpful, sl0j0n.
Have a GREAT day, Neighbor!
PS
Thanks for the yogurt page; just starting w/ homemade yogurt, need the probiotics, so thanks again.
I’m saving up all of these tips and tricks for making my own yogurt. My AC is broken right now, so it’s probably the perfect time to try it- no problem keeping it warm here! I’ll have to look for one of those strainers. It looks like it would come in handy for lots of things. 🙂
Oh Betty, I’m so sorry about your AC. What a way to start your summer. Yep, I’m pretty sure you could probably make yogurt on your kitchen counter right now. For sure you could do it on your back porch.