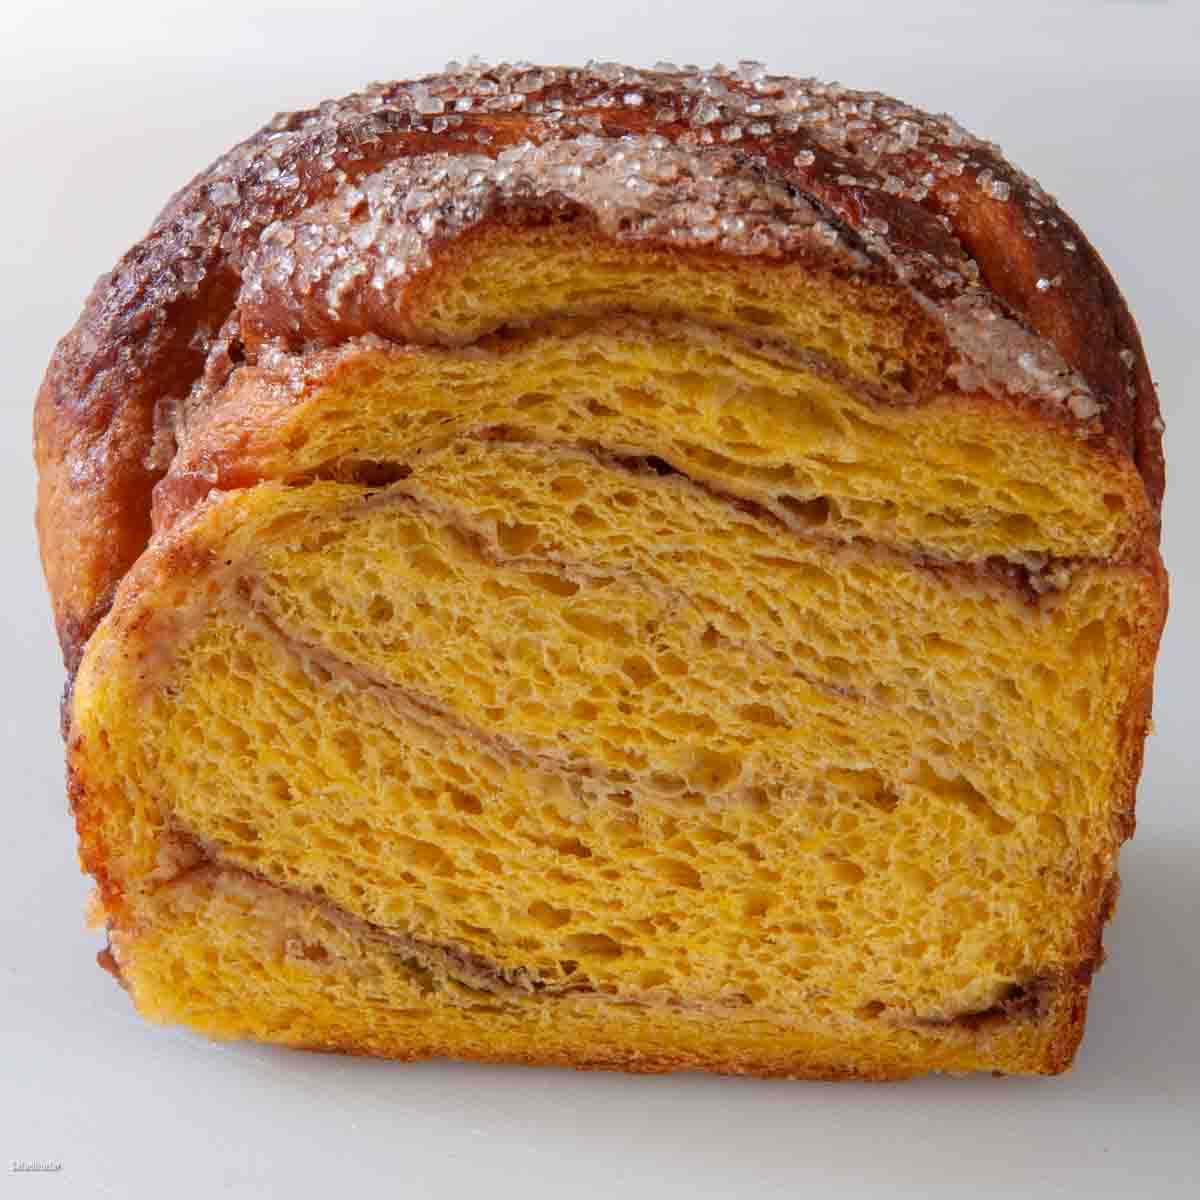
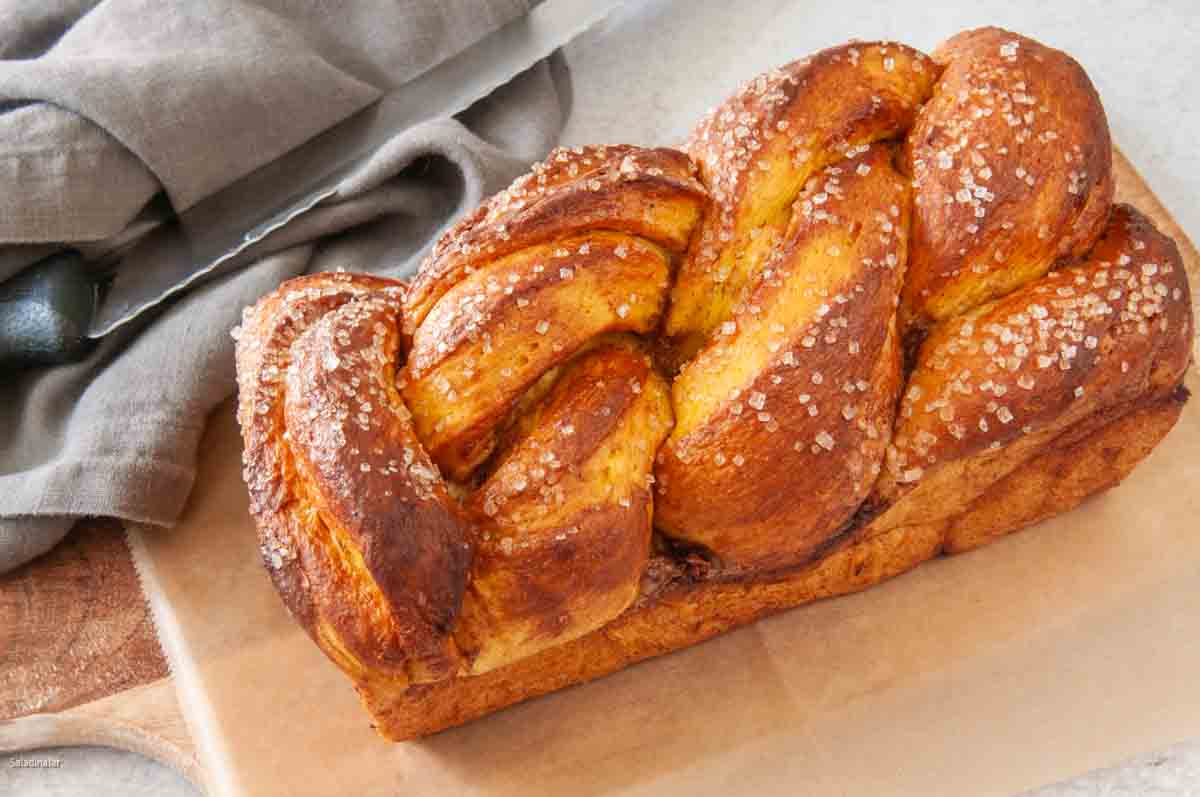
Bread Machine Pumpkin Brioche Cinnamon Twist Loaf
Sneak Preview: Impress your friends with this Pumpkin Brioche Cinnamon Twist Loaf! Make the dough in your bread machine with pumpkin puree, all-purpose flour, eggs, pumpkin pie spice, and plenty of butter. Perfect for both compact and 2-pound bread machines.

This post contains affiliate links. As an Amazon Associate, I earn from qualifying purchases at no extra cost to you.
Ever look at bakery brioche and wish you could make it at home? I felt the same—until I figured out how to make it in a bread machine.
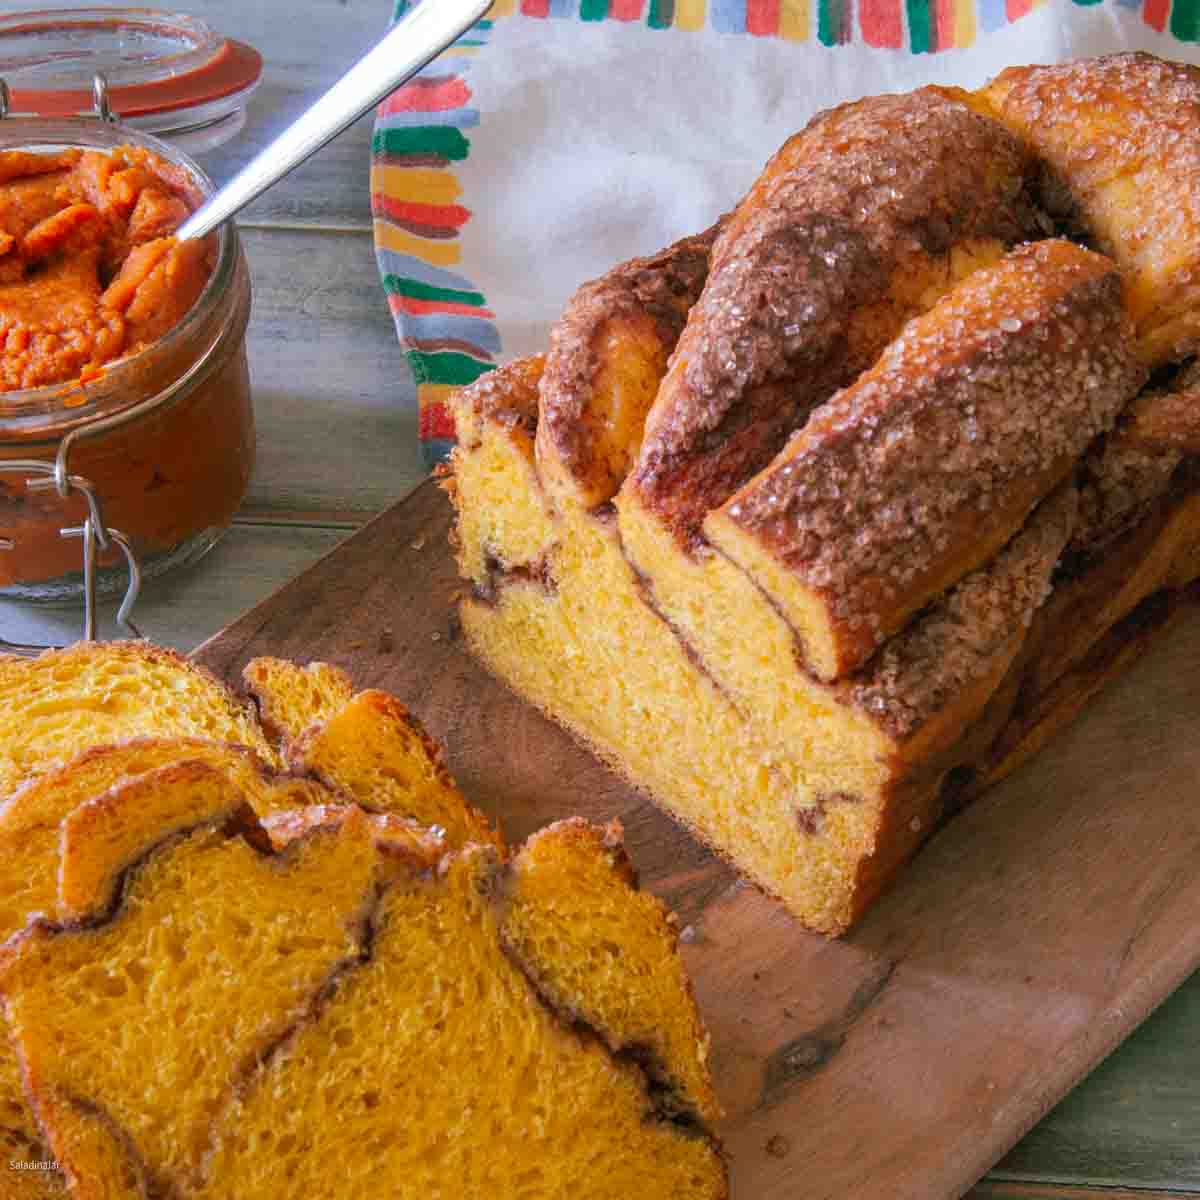
Brioche is all about richness—lots of eggs and butter for that tender, melt-in-your-mouth crumb. My version gets a seasonal twist from pumpkin and warm spices, inspired by Trader Joe’s pumpkin brioche.
It took 9–10 test batches to get the buttery layers and tender crumb just right. Your bread machine will handle the sticky dough, and an overnight chill makes shaping easier. After the final rise, bake and enjoy a loaf worth showing off.
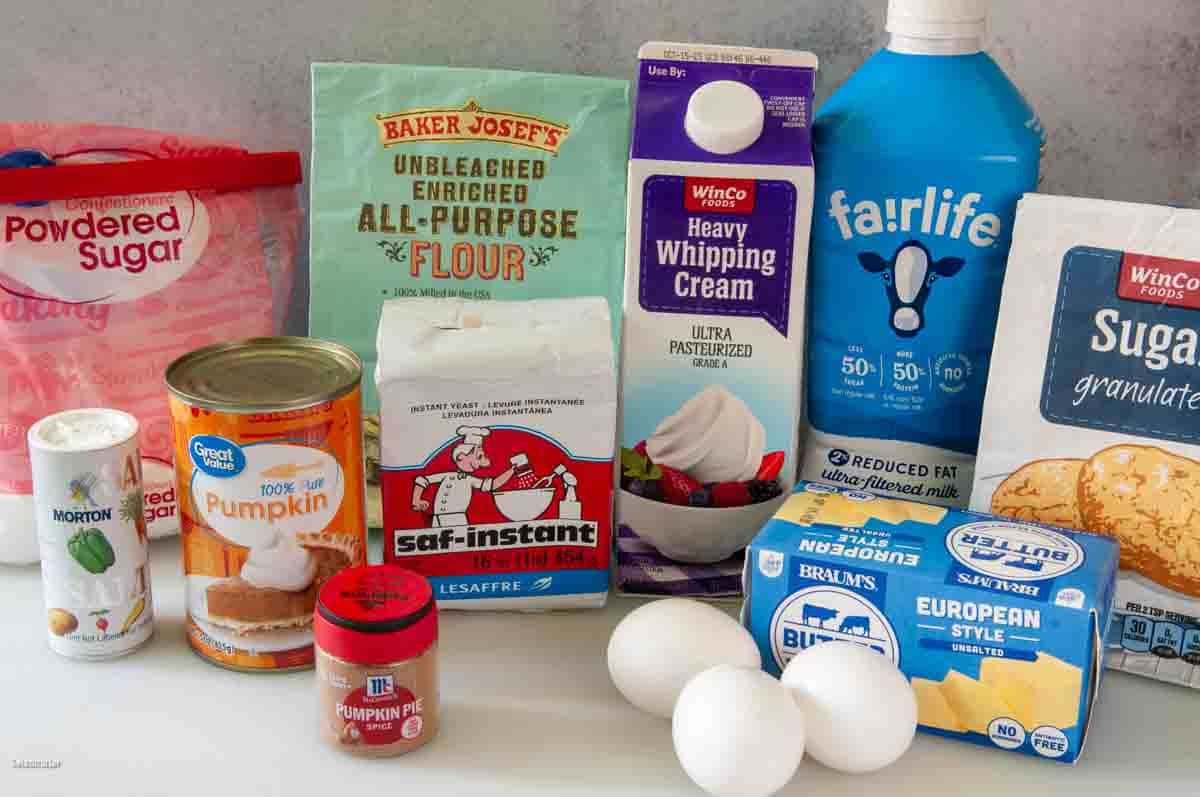
Ingredients and Substitutions

Step-by-Step Photos: Making a Bread Machine Pumpkin Brioche Cinnamon Twist
⬇️ Jump to the recipe below for exact amounts and detailed instructions.
Dough
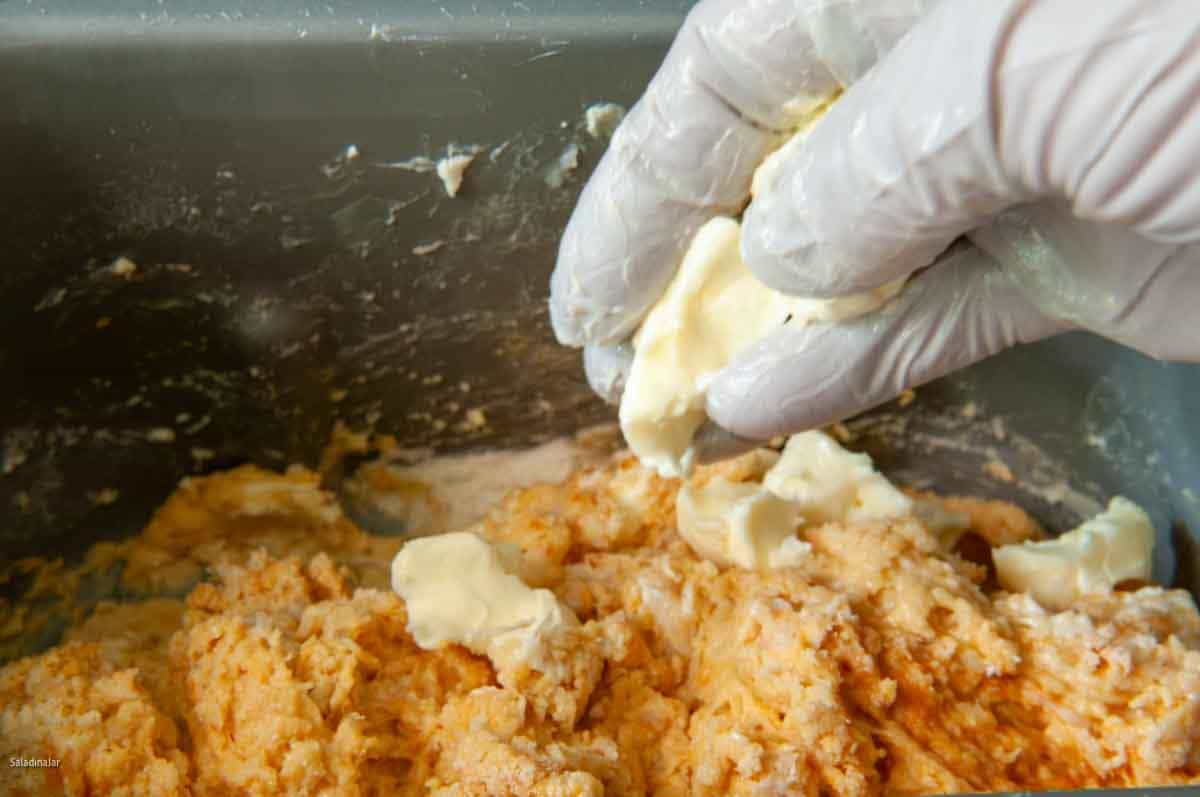
Note About Squishing the Butter
Squish the butter through your fingers, about two tablespoons at a time, to make sure it readily blends with the dough. As Grandma would say, don’t be lollygaggin’ around with this step–do it quickly, without dumping all the butter in at once. You don’t want the butter to get too soft, nor do you want to overwhelm the dough, causing the butter to leak out later. I love wearing surgical gloves for this job. They make playing with butter more fun.
Note About the Texture of Brioche
Brioche dough tends to be sticky. It doesn’t follow the rules of traditional yeast bread dough.
If you add too much flour to eliminate stickiness, your bread will not be light and airy with a texture characteristic of brioche. Conversely, if the dough doesn’t pull away from the sides at all, the dough will not knead properly, hindering gluten development needed to support the other ingredients.
Shaping the Pumpkin Brioche Twist
Note: Work quickly to shape the dough before it has a chance to warm up and get sticky.


Tips That Make a Difference
- Keep ingredients cool: Use chilled eggs, pumpkin, and butter. Stir cold pumpkin into the Tangzhong to help cool it down. If your kitchen is warm, chill the bread machine pan and even the flour.
- Dough texture: Brioche dough won’t turn smooth and shiny in the bread machine like regular dough. Don’t add more flour during the DOUGH cycle—it will change the final texture. Watch the video and follow the photo cues.
- Short on time? you can speed up the chilling process in the freezer. However, be vigilant and don’t allow the dough to freeze. Every 30 minutes, rotate the dough within the bowl until it reaches a cold, firm state, typically taking about an hour, depending on the temperature of your freezer.
Bread Machine Pumpkin Brioche Cinnamon Twist Loaf
Video
Ingredients
- ½ cup (114 g) unsalted butter (1 stick) cold but pliable
Tangzhong Paste
- ⅓ cup (76 g) milk
- 2 tablespoons all-purpose unbleached flour
- ¼ cup (57 g) pumpkin puree
Dough:
- 2 large (100 g) eggs cold
- 2 tablespoons granulated sugar
- ¾ teaspoon table or sea salt
- 2 cups (240 g) all-purpose unbleached flour
- 1¾ teaspoons instant yeast
Filling:
- 1 tablespoon water, heavy cream, or milk
- ⅓ cup (75 g) powdered sugar
- 1½ teaspoons pumpkin pie spice
Glaze:
- 1 tablespoon heavy cream or milk
- 1 tablespoon coarse sparkling sugar
Instructions
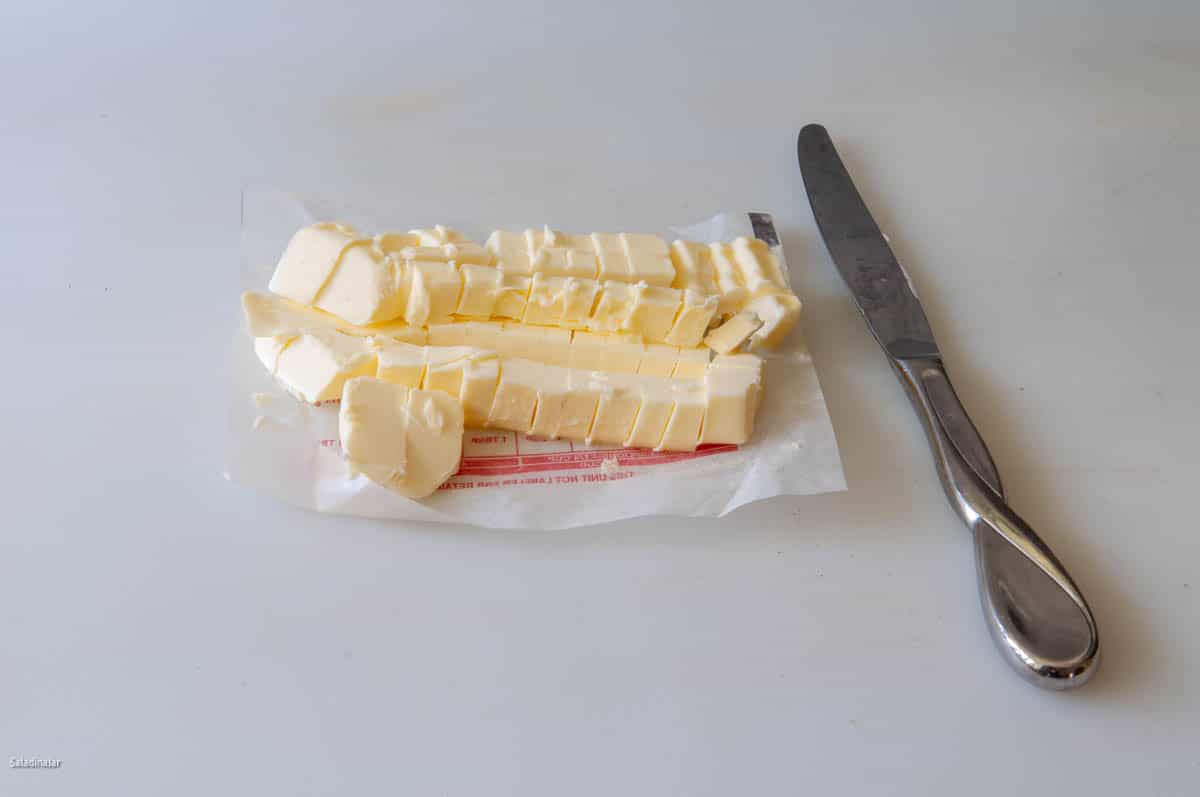
Preparing the butter:
- Chop ½ cup (114 g) unsalted butter (1 stick) from the refrigerator. Set aside to warm slightly while you make the Tangzhong paste and assemble the dough.
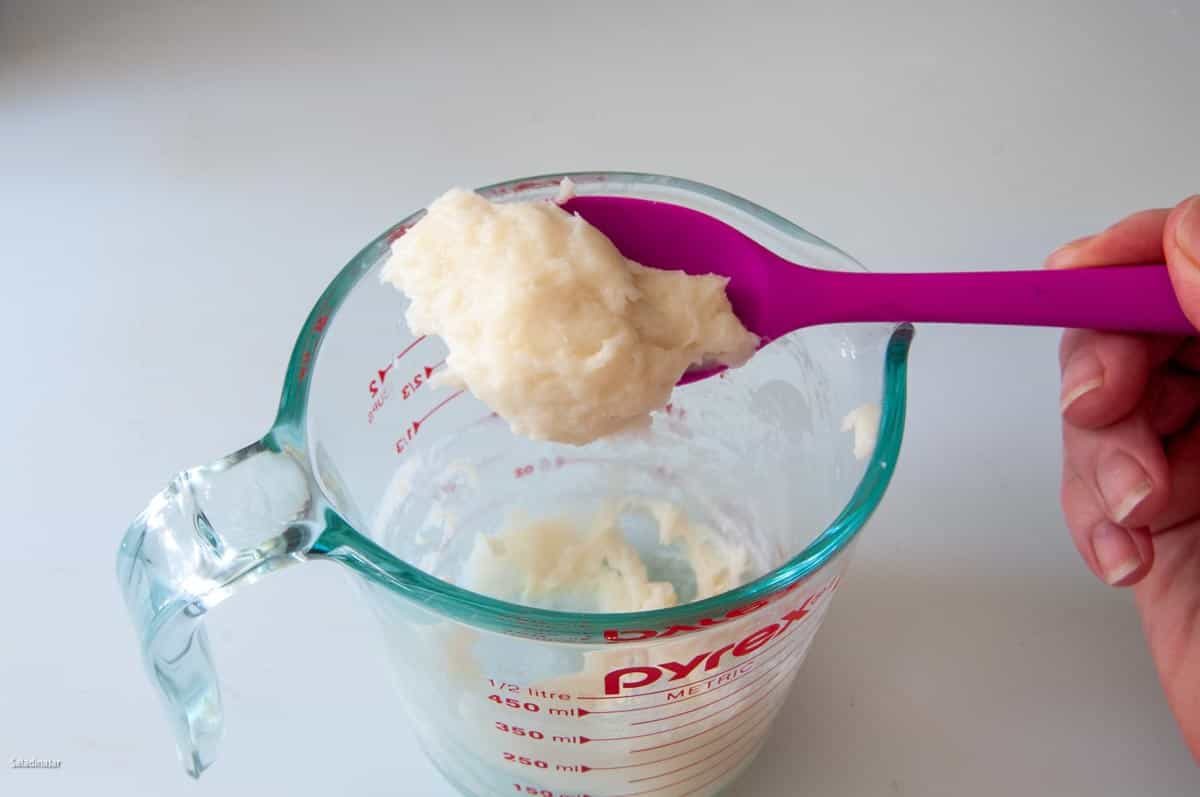
Making the Tangzhong Paste:
- Combine ⅓ cup (76 g) milk and 2 tablespoons all-purpose unbleached flour in a microwave-safe container. Whisk until smooth. Microwave this mixture for 30 seconds on HIGH, stopping at 20 seconds to whisk well. The mixture should turn into a thick "gravy" consistency. As it cools, it should look like mashed potatoes. (A few lumps are OK–they'll disappear as the dough is kneaded. If the paste is more like play dough, throw it out and try again.) Add ¼ cup (57 g) pumpkin puree to the paste and stir. This quickly cools down the paste. Add this mixture to the bread machine pan.
Completing the Dough:
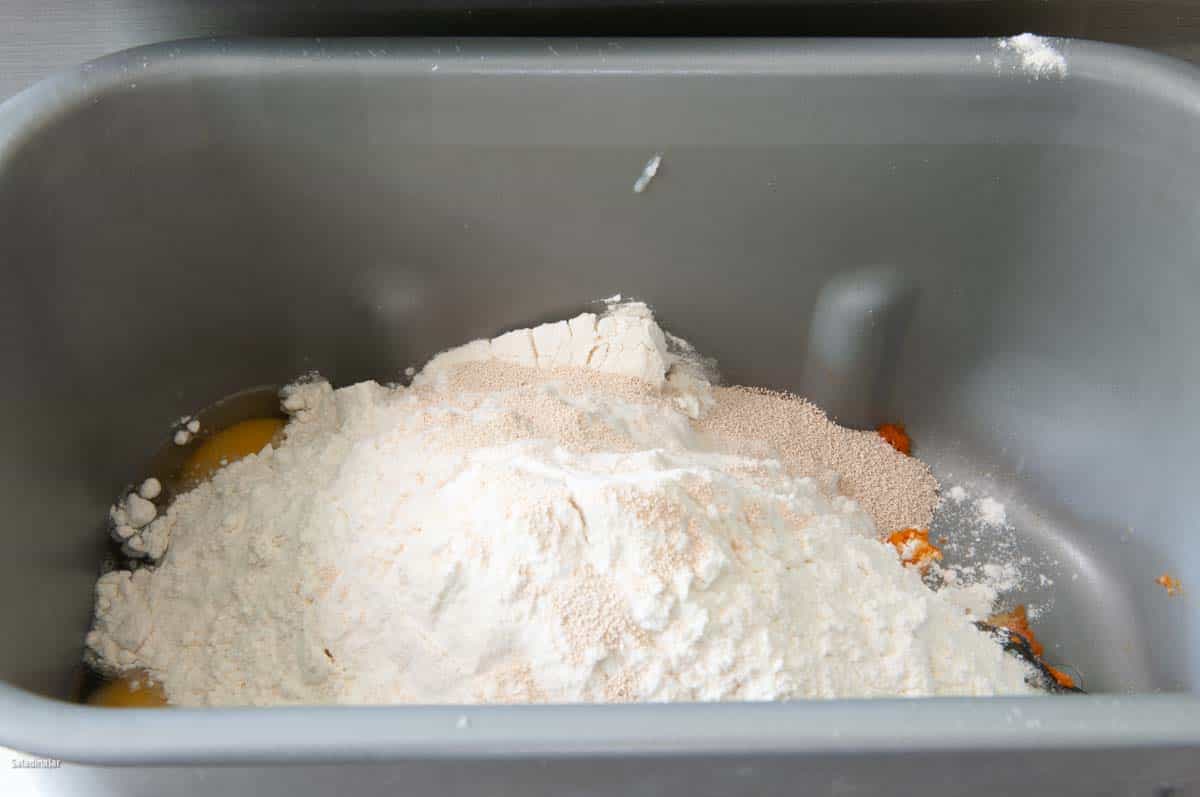
- Add 2 large (100 g) eggs, 2 tablespoons granulated sugar, ¾ teaspoon table or sea salt, 2 cups (240 g) all-purpose unbleached flour, and 1¾ teaspoons instant yeast to the bread maker pan.
- Choose the DOUGH cycle and press the "START" button. Mix and knead the dough for 2 minutes. If necessary, use a small spatula to ensure all the flour is incorporated into the dough. The dough will look sticky and wet, like crumbly cookie dough batter.
- Open the lid and quickly squish the butter through your fingers into the dough as it kneads. If necessary, use a small spatula to push the butter into the dough so it will mix in quickly. Don't answer the phone while you do this. You don't want the butter to get too warm.
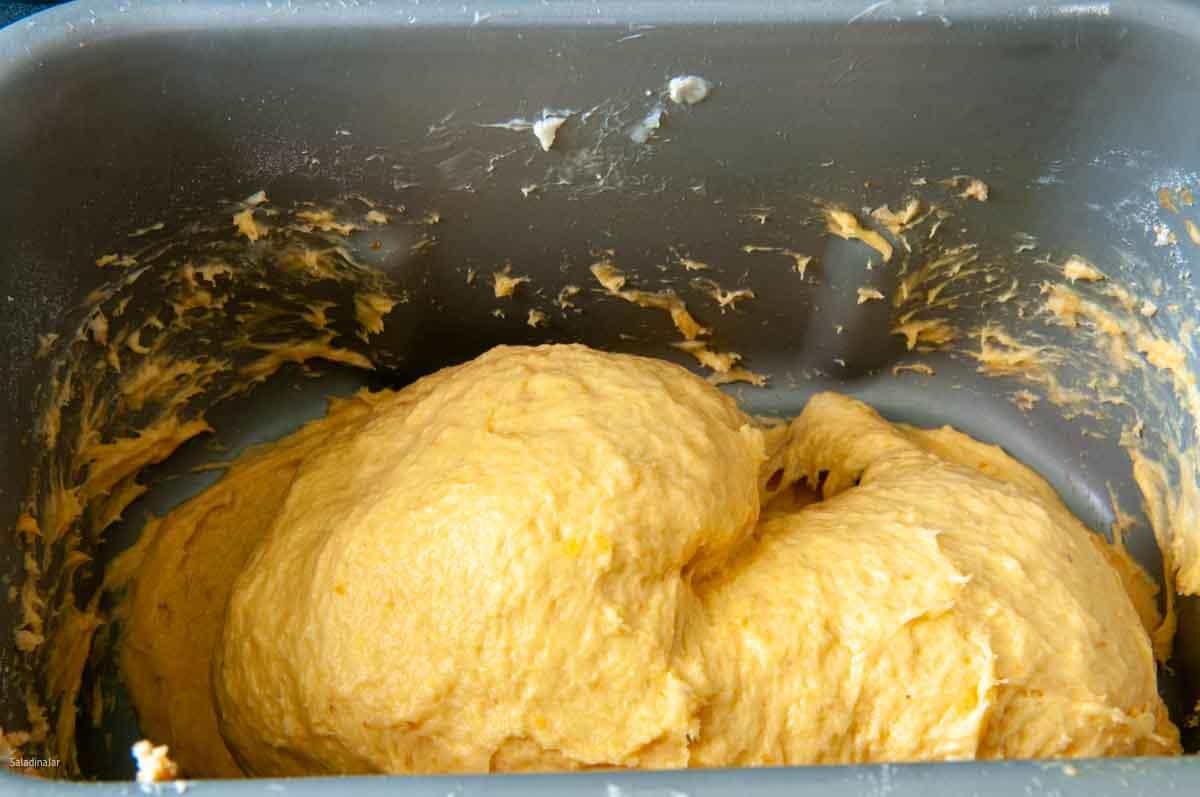
- As the dough kneads, the gluten will build strength, and the dough will begin to hold its shape. However, the dough will still stick to the sides and not pull away cleanly, wait until the last 5 minutes of kneading to add any flour. IMPORTANT: The dough will not be shiny, but it should hold its shape. The dough should pull away from the sides but not cleanly. There will be dough underneath the paddles. Only add flour if the dough will not pull away from the sides at all.
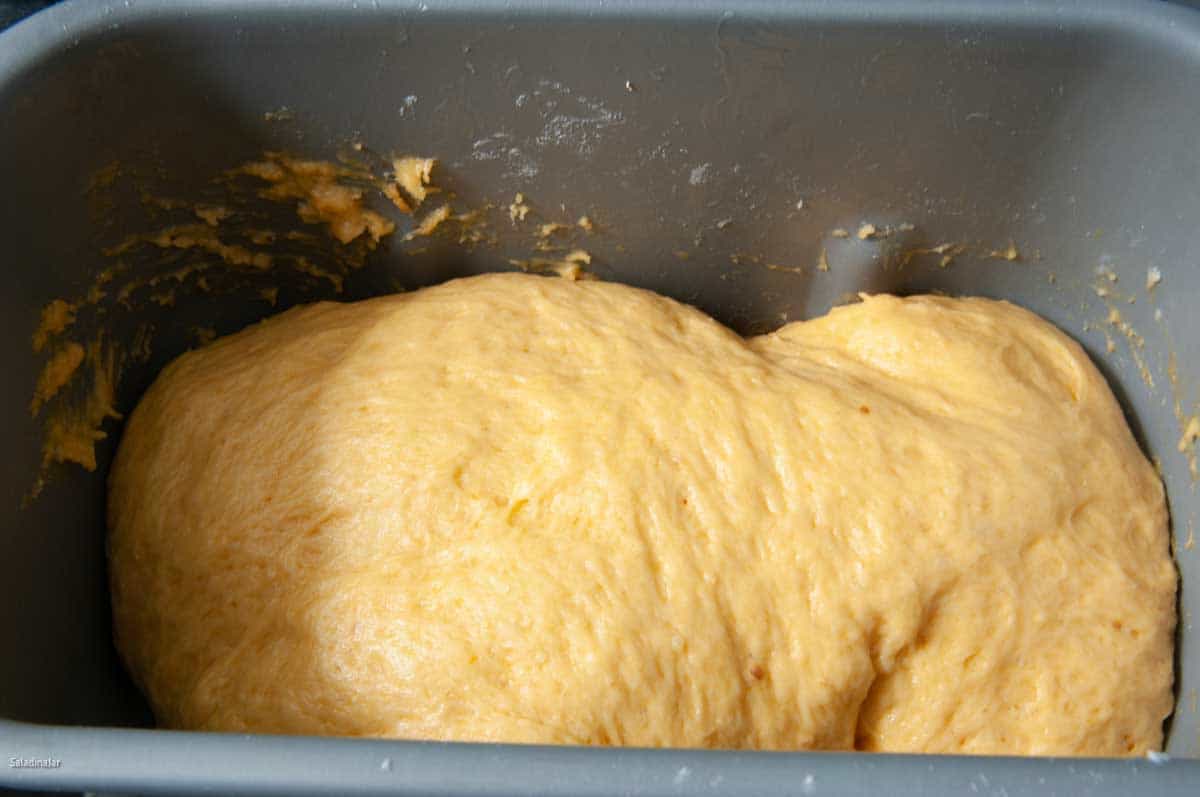
- When the kneading phase ends, leave the dough in the bread machine pan to rise. Hint: If my kitchen is warm, I prefer to remove the pan from the machine so the bread machine doesn't warm the dough and cause the butter to leak. Cover and let it rise on the counter until it doubles in size.
Chilling the Dough Before Shaping:
- Drop the dough into a large greased bowl and cover. Refrigerate at least 4 hours, up to 24 hours. Do not skip this step. If you don't have time for the chill, you might want to make a different bread recipe or see my kitchen tip in the post above about using a freezer to quick-chill the dough.
Shaping the Dough
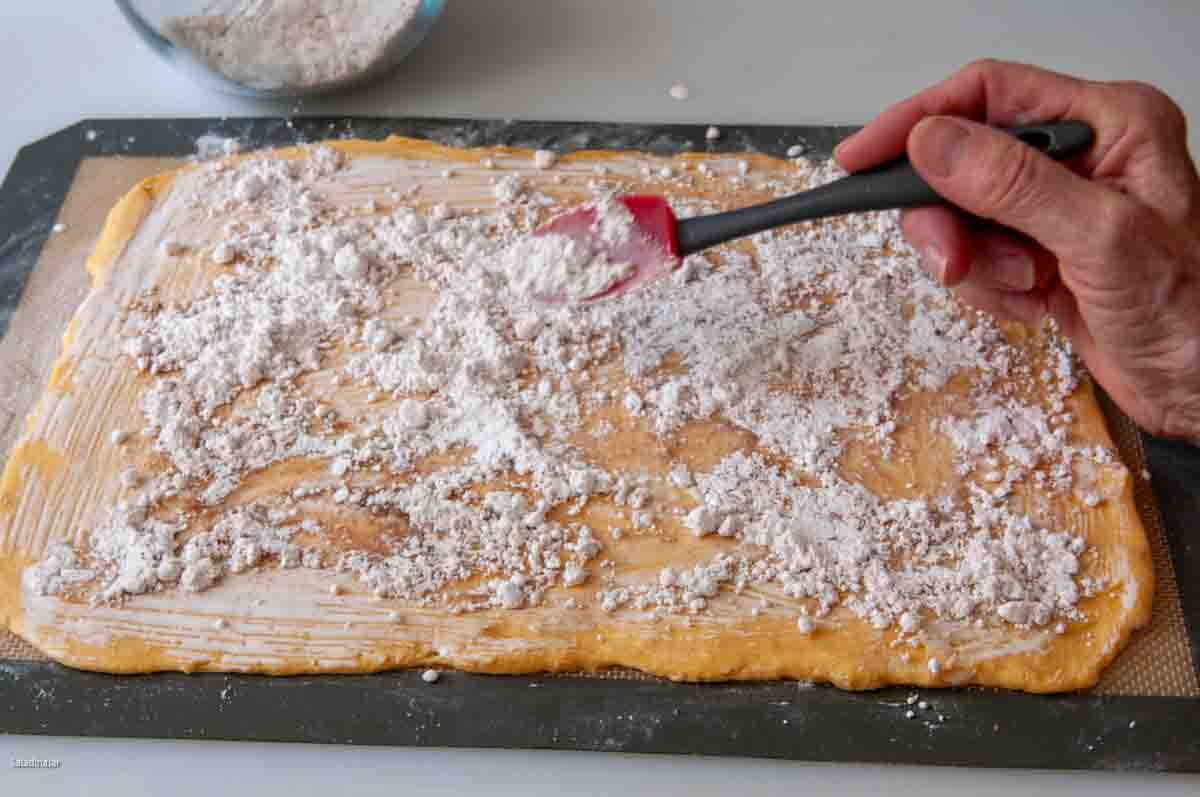
- Prepare the filling: Combine ⅓ cup (75 g) powdered sugar and 1½ teaspoons pumpkin pie spice in a small bowl.
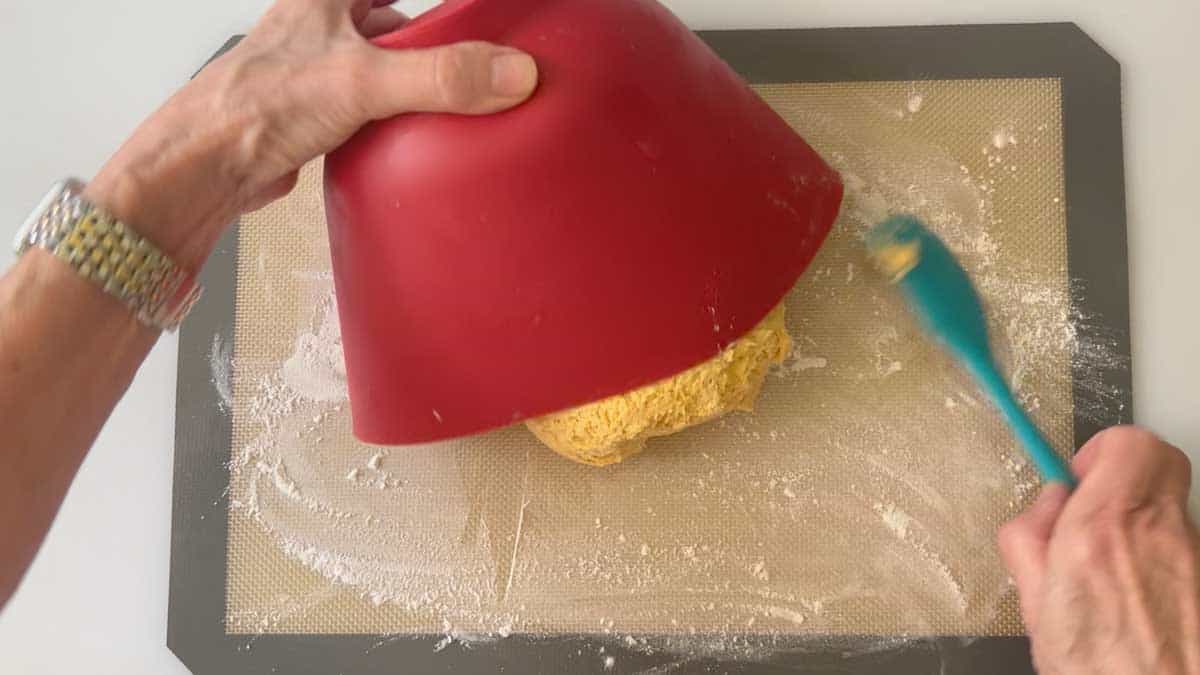
- Review the shaping instructions beforehand, as you'll need to move quickly before the dough warms and becomes too sticky to handle. Ready to begin? Remove the dough from the fridge and transfer it to a floured surface. I recommend using a silicone mat for effortless cleanup and hassle-free dough handling.
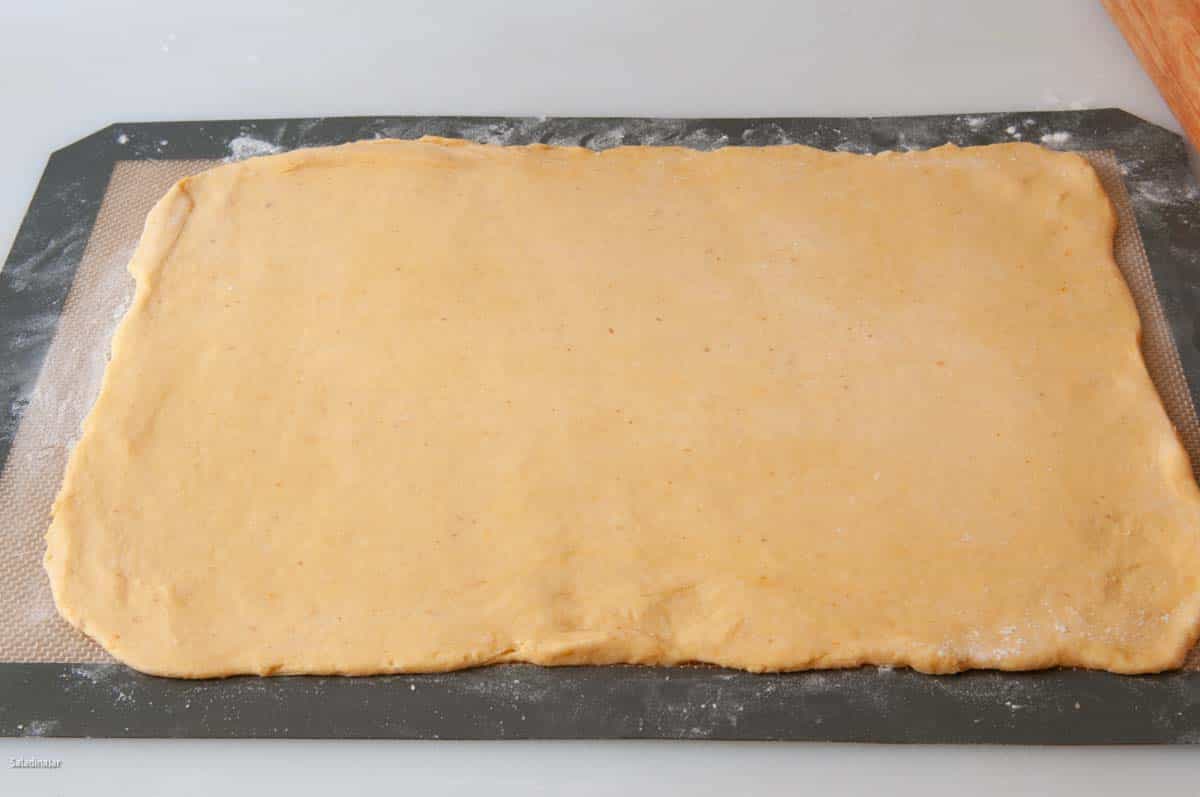
- Roll the dough ball into a rectangle approximately 12 x 18 inches. Brush with one 1 tablespoon water, heavy cream, or milk. Sprinkle half of the filling over the cream.
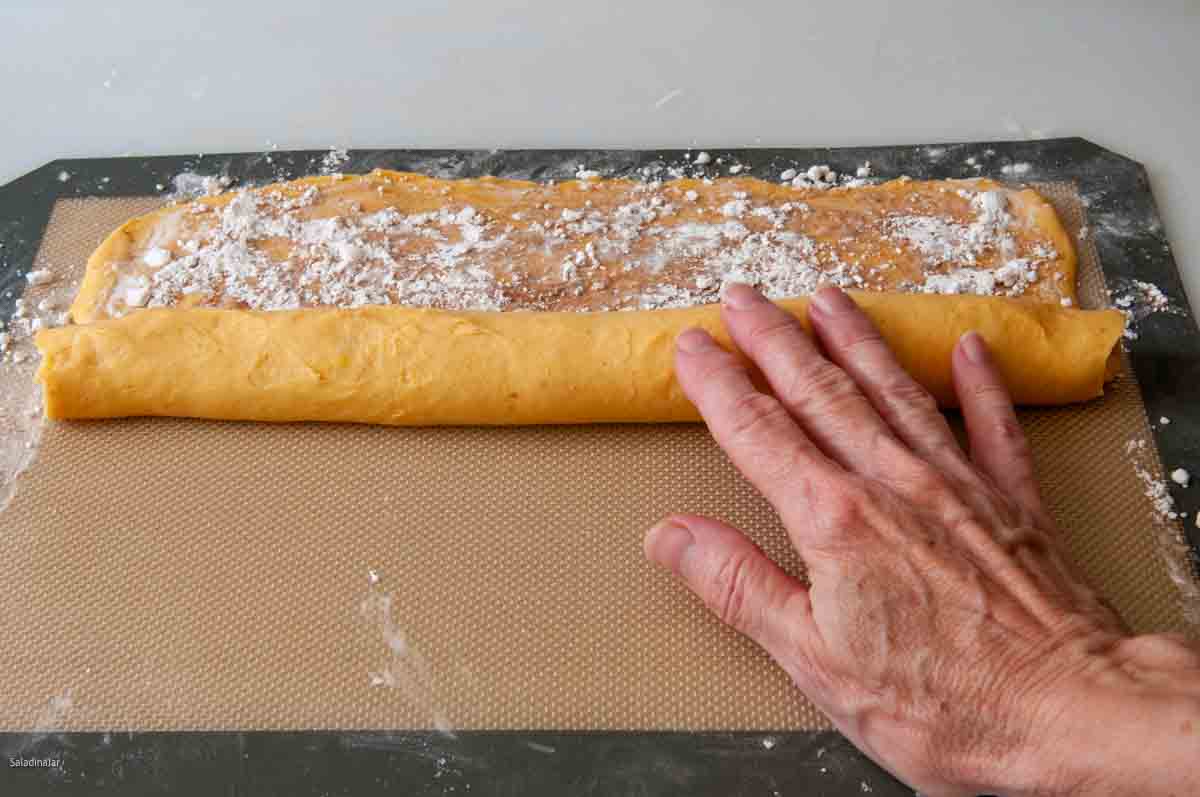
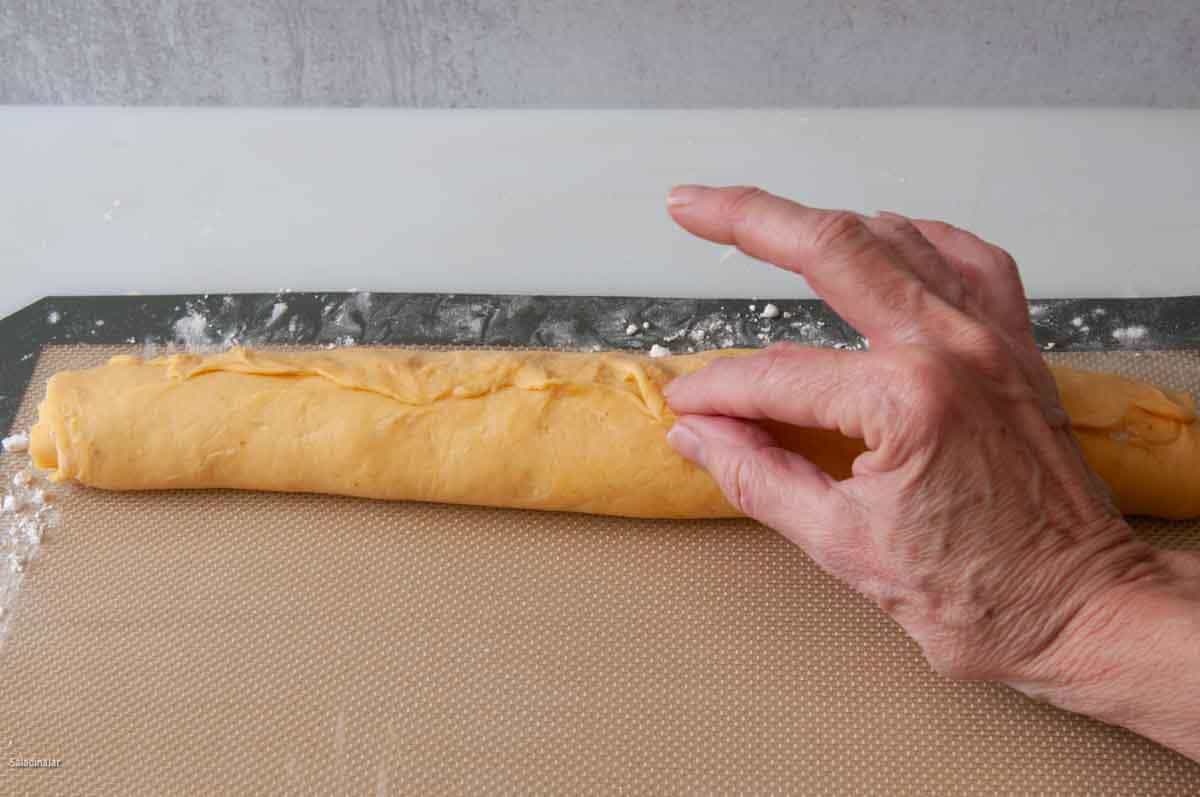
- Starting with the long side, roll the dough without stretching it but tightly enough that there is no slack. Seal the seam by pinching the edge to the dough next to it.
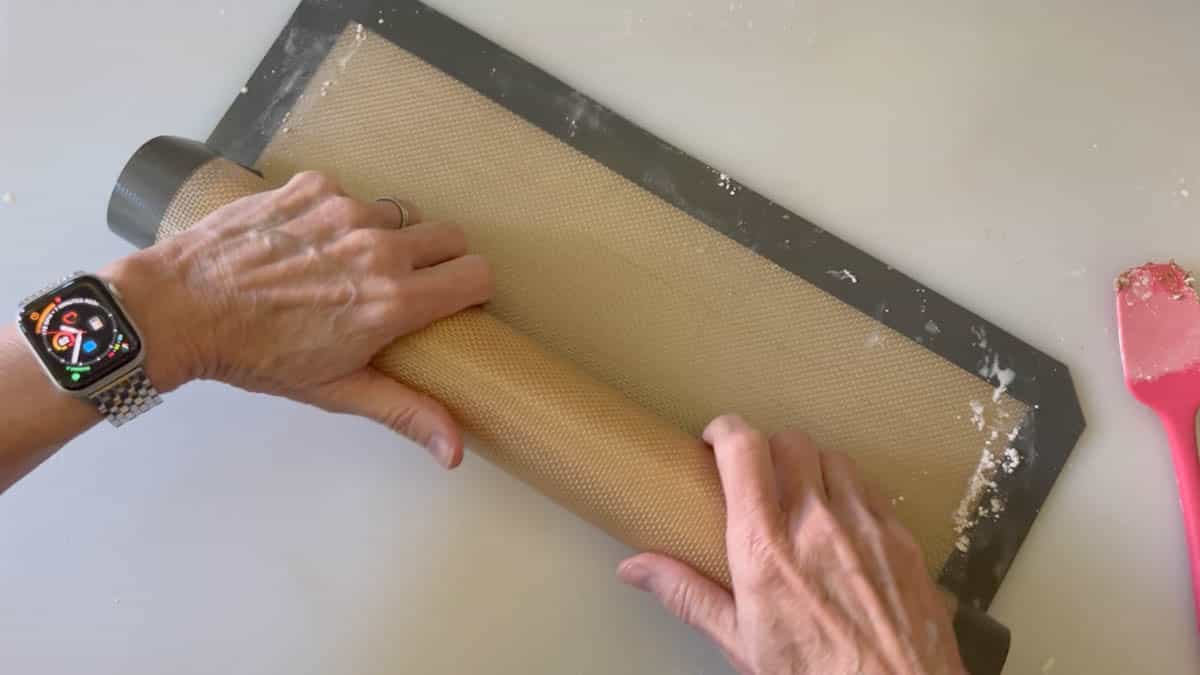
- Place this cylinder of dough into the freezer for 15 minutes. It will make the next step a lot easier. (I like to wrap the silicone mat around the dough cylinder for protection and stick it into the freezer.)
- While the dough is in the freezer, prepare your pan. Unless you will be using a USA pan or a pan that has the same superior non-stick qualities, I suggest you line the bottom of the pan with parchment paper for easier removal of the baked loaf.
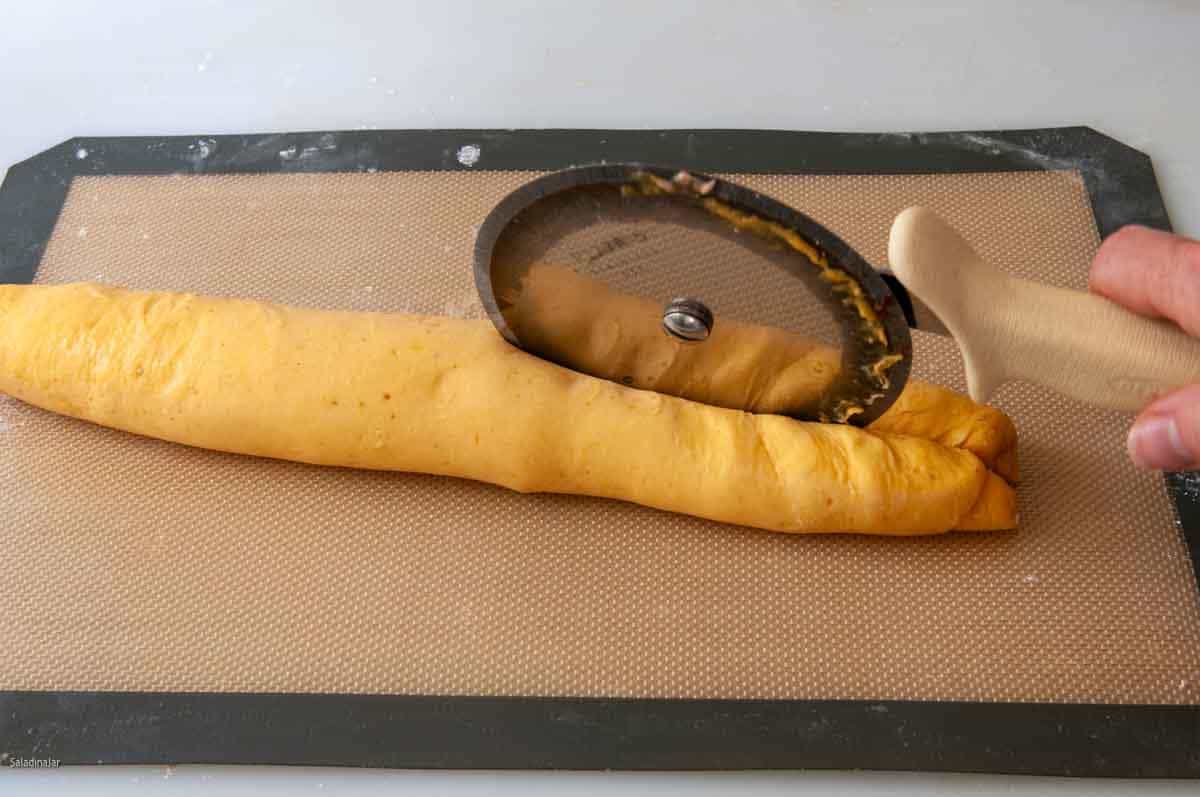
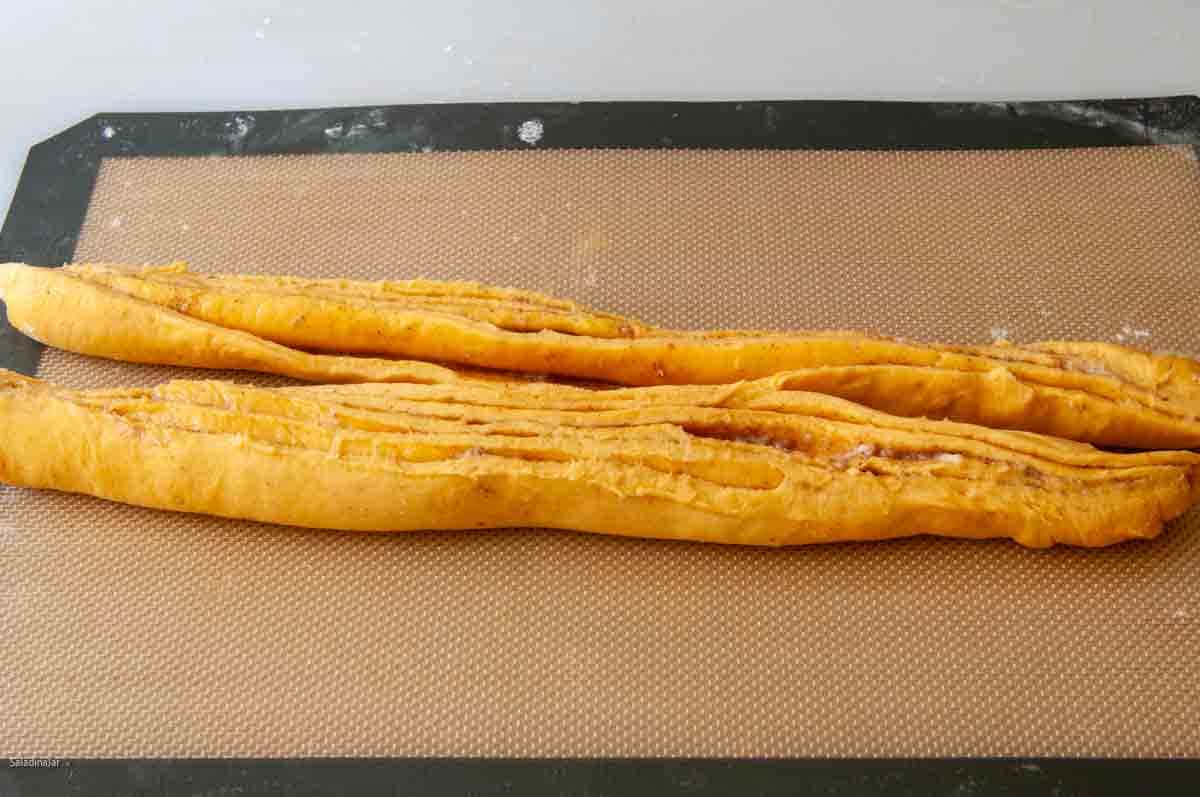
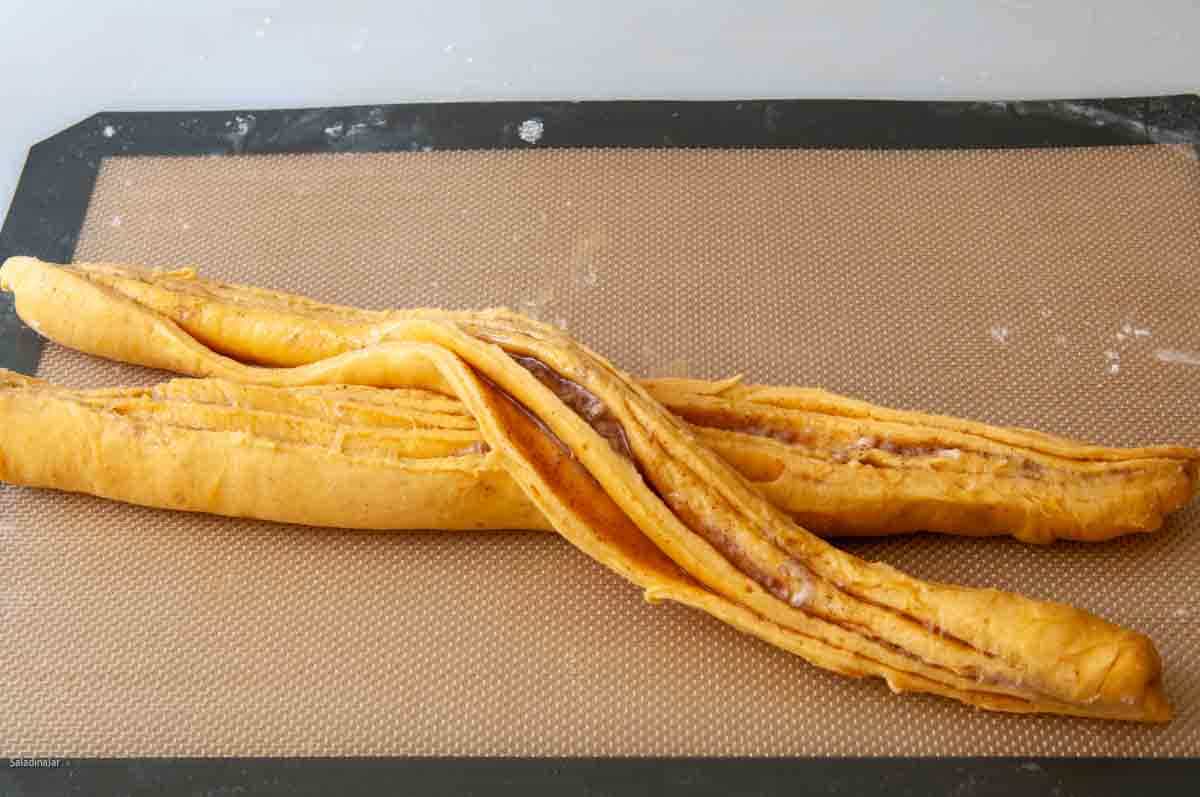
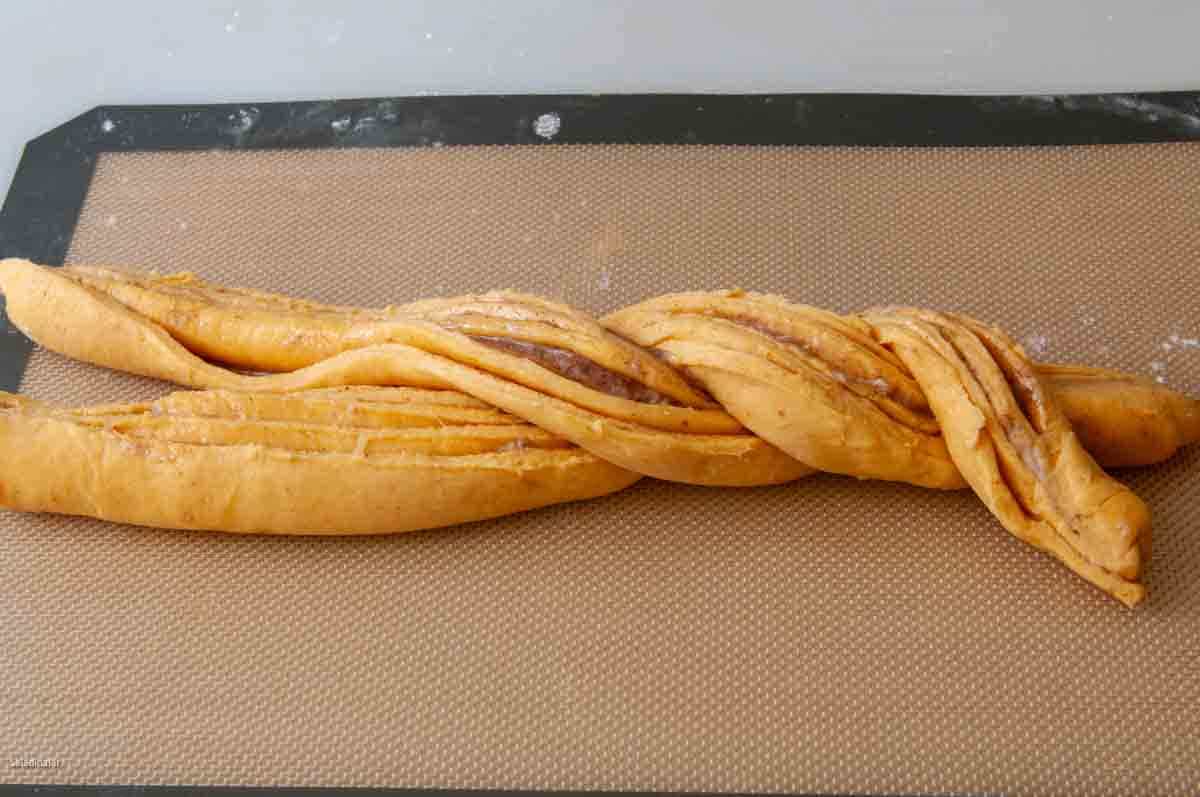
- Remove the dough from the freezer. Slice the cylinder of dough the long way with a pizza cutter (my preference) or a large knife. You should have two half-pipes. Line them up side by side with the cut edges facing up. Carefully twist the half pipes, keeping the cut side up at all times. See the video for what this looks like.
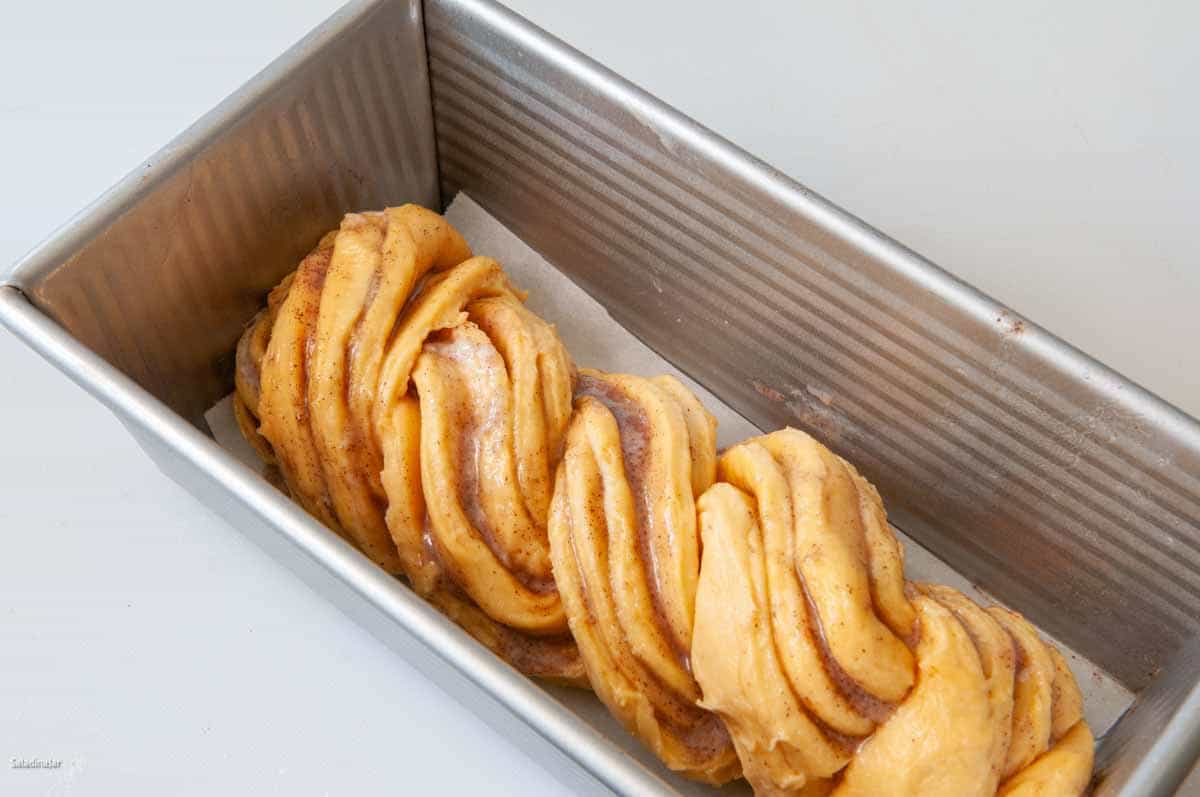
- Place into an 8½ x 4½-inch loaf pan or a 9×4-inch Pullman pan. Fold under the ends. Gently press the braid down into the pan with your fingertips to distribute the dough throughout the pan. Cover and allow to rise until it reaches the edge of the pan. Depending on the ambient temperature, this final rise may take one and a half hours to three hours.
- Preheat a conventional oven to 425 F (220 C)
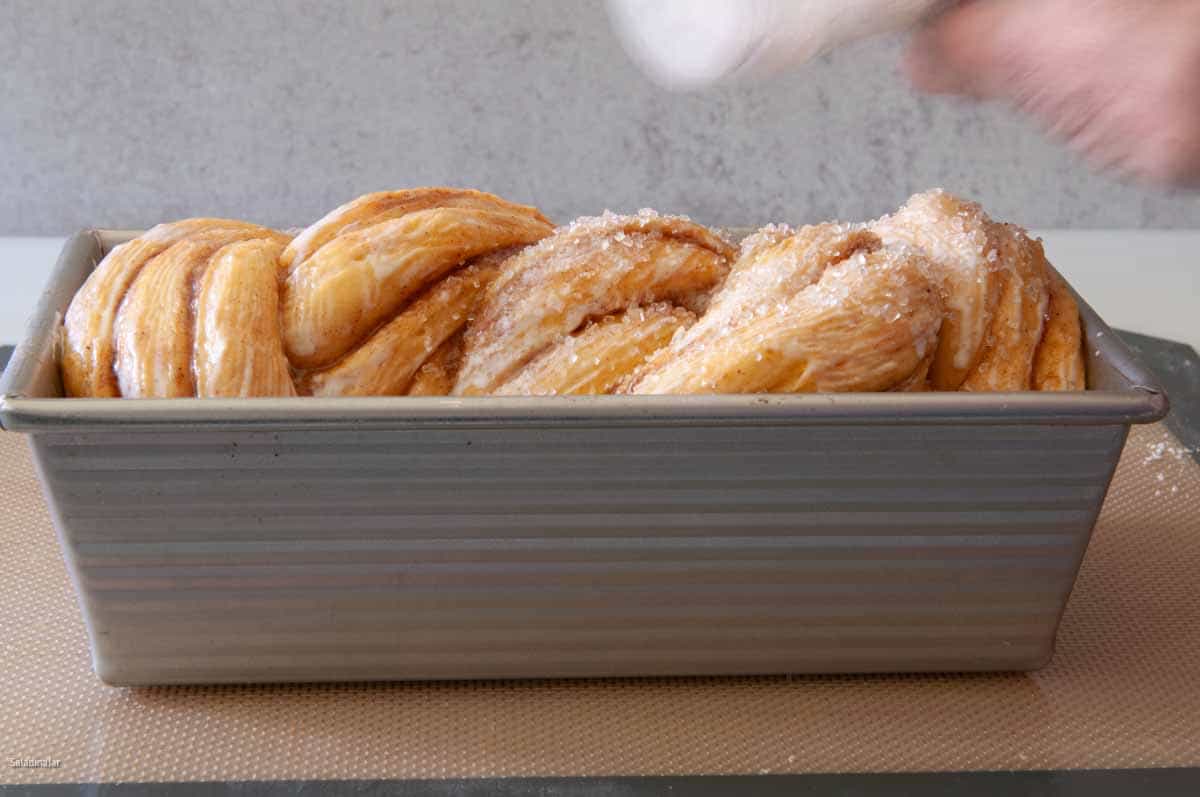
- When the twist has risen to the top of the pan, paint the top with 1 tablespoon heavy cream or milk. Sprinkle with 1 tablespoon coarse sparkling sugar. Turn oven temperature back to 375˚F (180˚C) and bake for 30-35 minutes or until the internal temperature reaches 190-195˚F (88-91˚C). If necessary, use foil to protect the top from over-browning about halfway through the bake time.
- Remove the bread from the bread pan within 5 minutes before the sugar cools. Let cool on a wire rack for at least an hour before slicing.
Notes
Equipment
Nutrition
All images and text ©️ Paula Rhodes for Salad in a Jar.com
FAQs for Pumpkin Brioche Cinnamon Twist Loaf
It remains fresh for 2-3 days. Store it in a sealed plastic bag at room temperature, not in the refrigerator. This bread makes a superb bread pudding, especially if you lightly toast the slices first.
Yes, you can, but it’s best to do so by day two or not at all. Always double-wrap the bread when storing it in the freezer.
The dough likely became too warm at some point. To prevent this, use cool or cold ingredients when assembling the dough (but avoid using frozen ones). During proofing, maintain a temperature below 80˚F (27˚C). Leaking is more common in warmer weather, especially during the summertime.
You can try adding more flour to absorb the liquid butter, but don’t expect the tender and buttery texture that brioche is famous for.
Ovens vary, so consider moving the oven rack down a notch and covering the loaf with foil halfway through the baking time to control browning.
It’s delicious on its own, but if you enjoy condiments, try spreading some apple or pumpkin butter on a slice of toasted or untoasted bread. You can also elevate it with a dollop of creme fraiche or whipped cream.
Use a quick-read thermometer to test the center of the loaf. The interior temperature should reach 190-195˚F (88-91˚C). If you insert the thermometer from the side at a straight angle, it will only affect one slice.
I don’t recommend it. The rising times can vary greatly, making it challenging for a computer to get it right, especially with this delicate dough.
I don’t generally advocate doubling recipes when using a bread machine. However, this recipe is on the smaller side. A standard 2-pound bread machine should handle a double batch without issue, but it’s advisable to divide the dough in half and make two loaves for a lighter texture.
Opt for a 9 x 4 x 4 inch Pullman pan or create mini loaves. While a 9 x 5-inch pan can be used, the resulting loaf may appear squat. Aesthetics matter, especially when sharing.
Final Thoughts
Don’t let this recipe intimidate you, even if you’re a beginner. While this unique dough may require some practice, you’re more than capable of mastering it. The sense of accomplishment from achieving something not everyone can do makes the effort worthwhile.
Alternatively, for a simpler pumpkin yeast bread, consider my Glazed Sweet Potato Dinner Rolls recipe. Swap out the mashed sweet potatoes with pumpkin and add pumpkin pie spice, shape, rise, and bake. That same dough would make amazing cinnamon rolls.
Need help troubleshooting? Please email me: Paula at saladinajar.com–photos welcome!

This is probably my very favorite recipe on this site. And probably the most delicious bread I’ve ever made.
The dough was a little tricky to work with as it warmed up. It stuck to my silicon mat but I was able to release it by sliding my bench scraper under the dough.
I sprinkled pure maple sugar over the top. Truly delicious. Thank you, Paula.
Hi Elizabeth,
Pure maple sugar over the top? Wow! That sounds like the perfect final touch for this loaf. Silicone mats are great, aren’t they? Thank you for writing and sharing your tips.