Bread Machine Sweet Potato Rolls with Honey Butter Glaze

Sneak Preview: These soft bread machine sweet potato rolls are made with real mashed sweet potato, mixed on the DOUGH cycle, shaped by hand, and baked in the oven. Ready in about 3 hours and 15 minutes, with an optional honey butter glaze.
This post contains affiliate links. As an Amazon Associate, I earn from qualifying purchases at no extra cost to you.
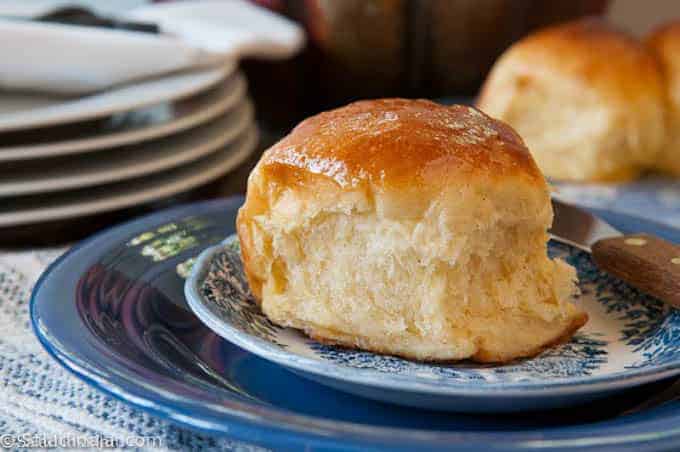
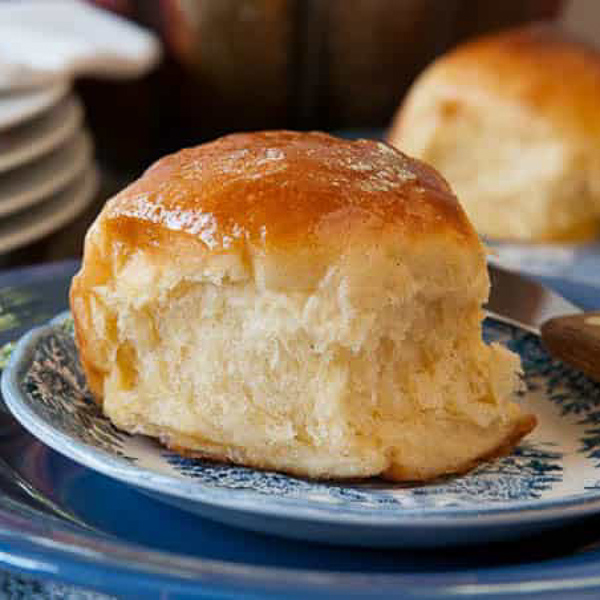
Looking for a memorable roll for your holiday table—or a delicious way to use leftover sweet potatoes? These bread machine sweet potato rolls bake up soft, golden, and lightly sweet. The sweet potatoes add moisture and help the rolls stay fresh for days, while the bread machine takes care of the mixing and kneading.
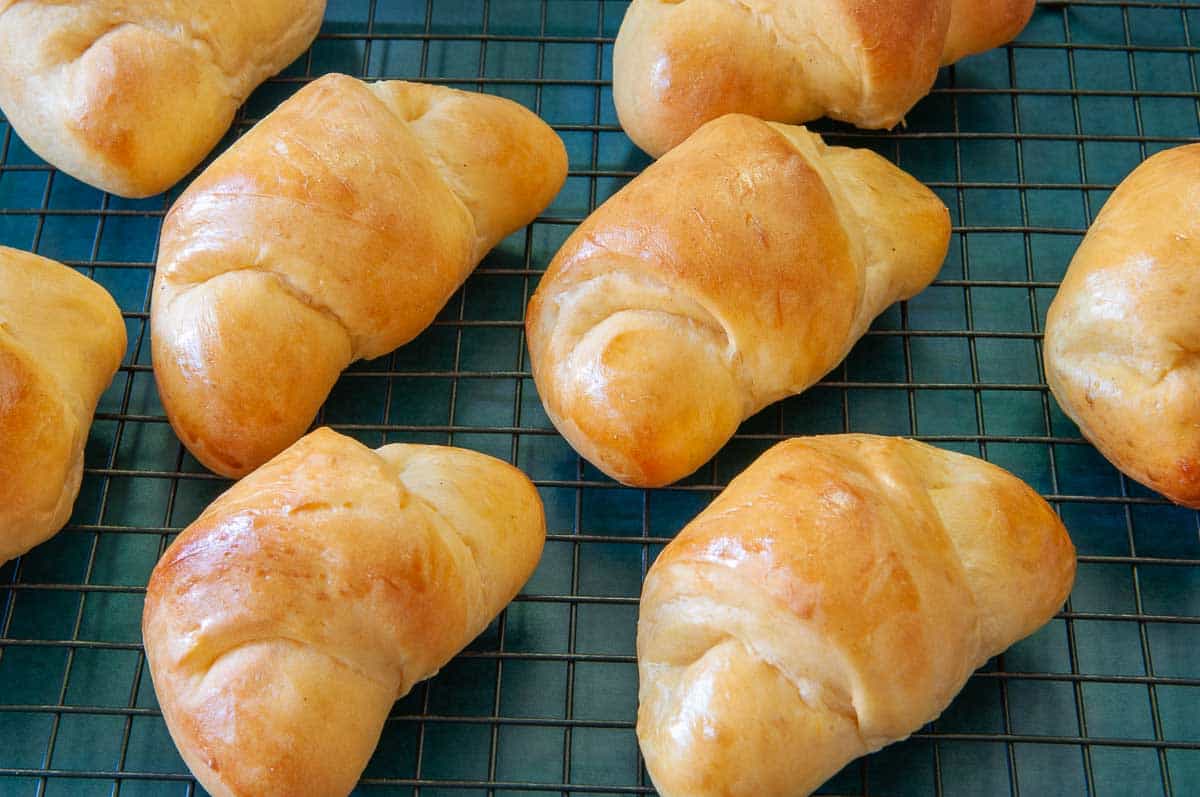
Shape them as crescents, horns, or rounds, then serve them plain or as small sandwiches filled with chicken salad, ham salad, or pimento cheese.
The Secret to Success with a Bread Maker
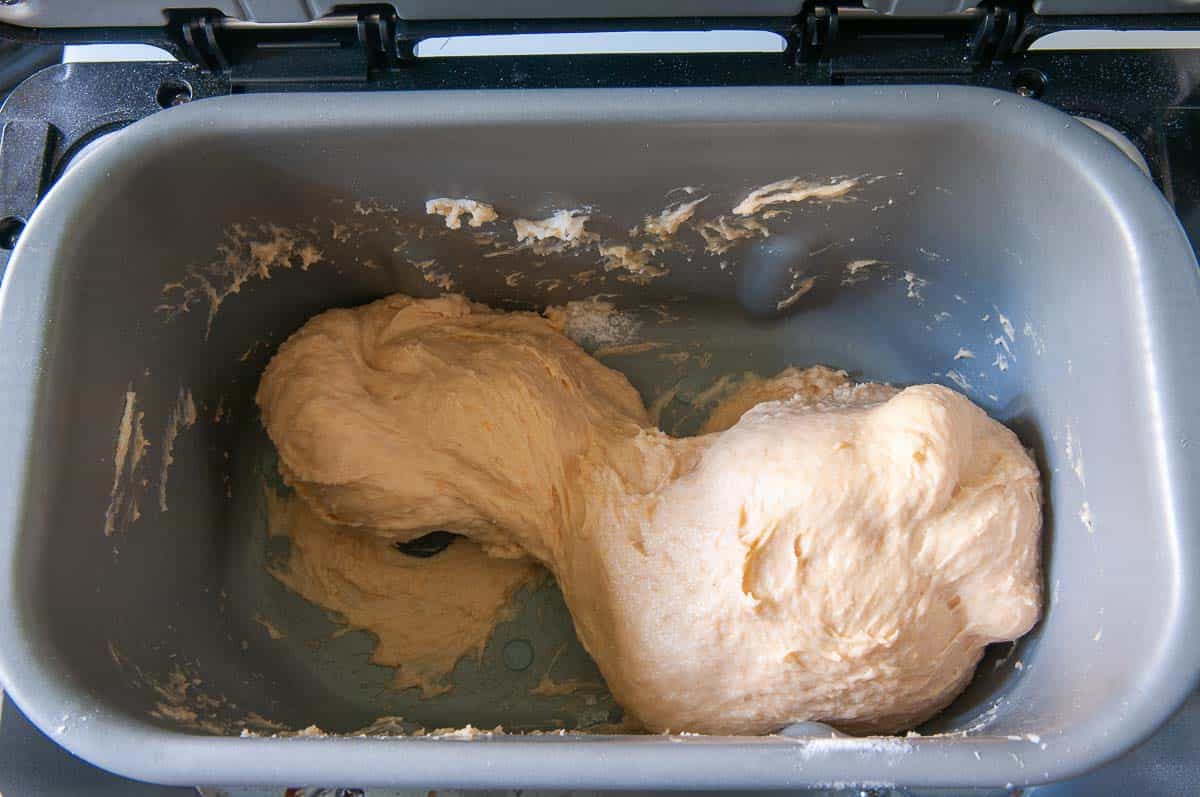
I don’t use a bread machine the traditional way. I’ve fallen in love with my bread machine because my method is all about the DOUGH cycle and checking the dough as you go. Be sure to read this article about opening the lid and watching the dough knead, so you will know how to adjust the moisture in the dough on the fly.
Ingredients & Substitutions
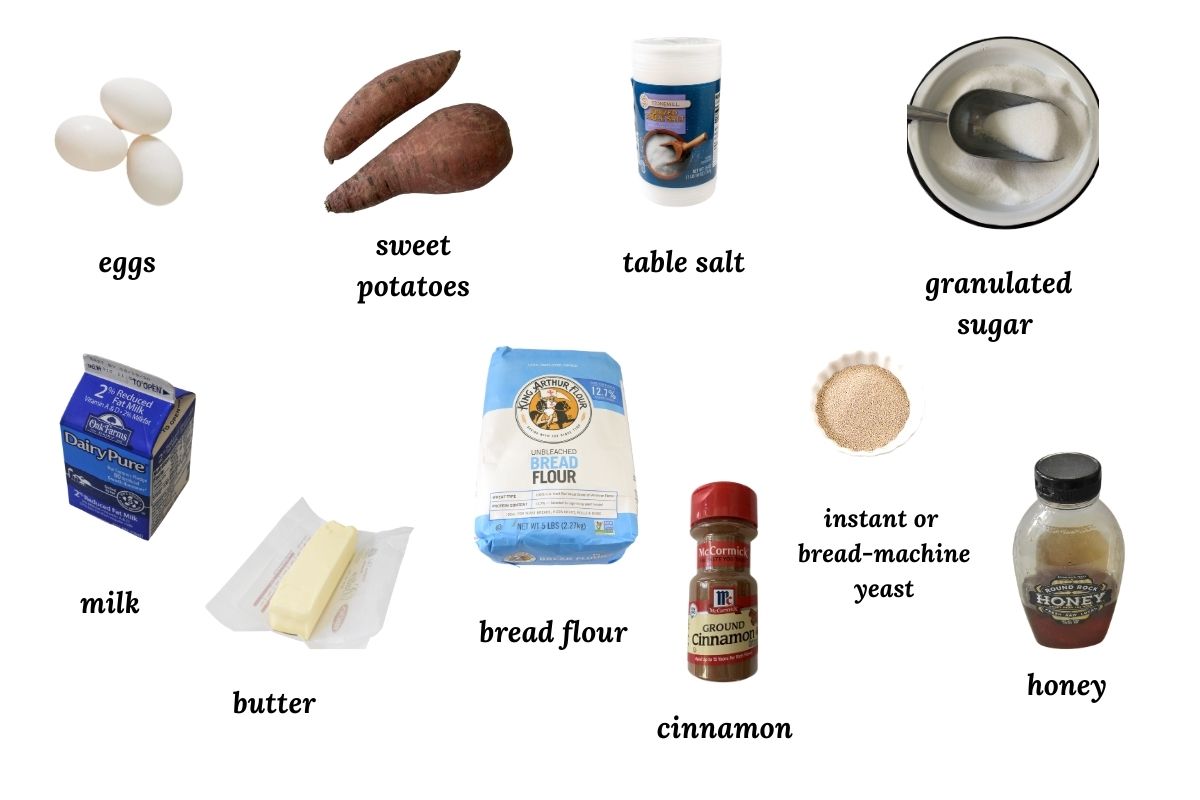
EGGS: Use large eggs (about 50 grams each). Room temperature not required.
SWEET POTATO: Microwave or bake a medium sweet potato, then peel. Canned sweet potato or baby food works too but may need a bit more flour.
SUGAR: Granulated sugar adds sweetness. Light brown sugar gives a warmer flavor.
SALT: Use table or sea salt. If using Kosher salt, add ¼ teaspoon more.
BUTTER: Use unsalted butter. Instead of melting, chop the butter finely. Can substitute shortening, margarine, or plant-based butter.
MILK: Whole milk gives the best flavor, but low-fat milk works too.
CINNAMON (optional): Adds a subtle spice undertone and is highly recommended.
BREAD FLOUR: Provides strength and a pleasant chew. All-purpose flour works if needed.
INSTANT YEAST: Best choice for this method. If using active dry yeast, add ¼ teaspoon more or allow a longer rise time.
HONEY (for glaze): Substitute maple syrup or skip the glaze entirely.
Step-by-Step: Mix and Knead the Dough
⬇️ Jump to the recipe below for exact amounts and detailed instructions.
Shaping the Dough Into Round Balls


Shaping Options: Butterhorn or Crescent Rolls
Bake
Bread Machine Sweet Potato Rolls with Honey Butter Glaze
Video
Ingredients
Dough
- ⅔ cup (151 g) milk
- 1 large (50 g) egg
- ½ cup (128 g) cooked and mashed sweet potato (see notes)
- 3 tablespoons (36 g) granulated sugar
- 1 teaspoon salt
- ¼ cup (57 g) unsalted butter, finely chopped
- dash of cinnamon (optional)
- 3 cups (360 g) bread flour
- 2 teaspoons bread machine or instant yeast
Honey Butter Glaze
- 1 (30 g) egg white
- 1 tablespoon (21 g) honey
- 1 tablespoon (14 g) melted butter
- 1 tablespoon granulated sugar
Instructions
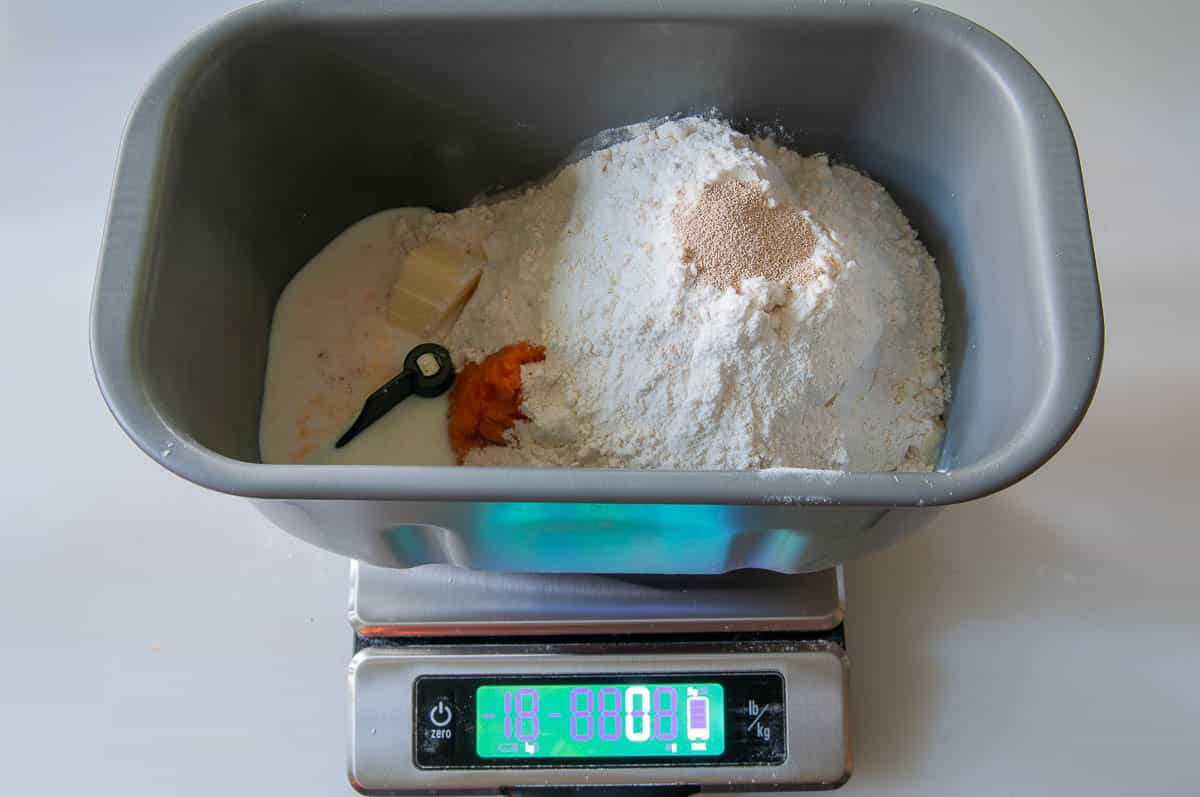
- Add ingredients to your bread machine pan in the order listed: ⅔ cup (151 g) milk , 1 large (50 g) egg, ½ cup (128 g) cooked and mashed sweet potato, 3 tablespoons (36 g) granulated sugar, 1 teaspoon salt, ¼ cup (57 g) unsalted butter, finely chopped, dash of cinnamon, 3 cups (360 g) bread flour, 2 teaspoons bread machine or instant yeast.Choose the DOUGH cycle and press "Start."
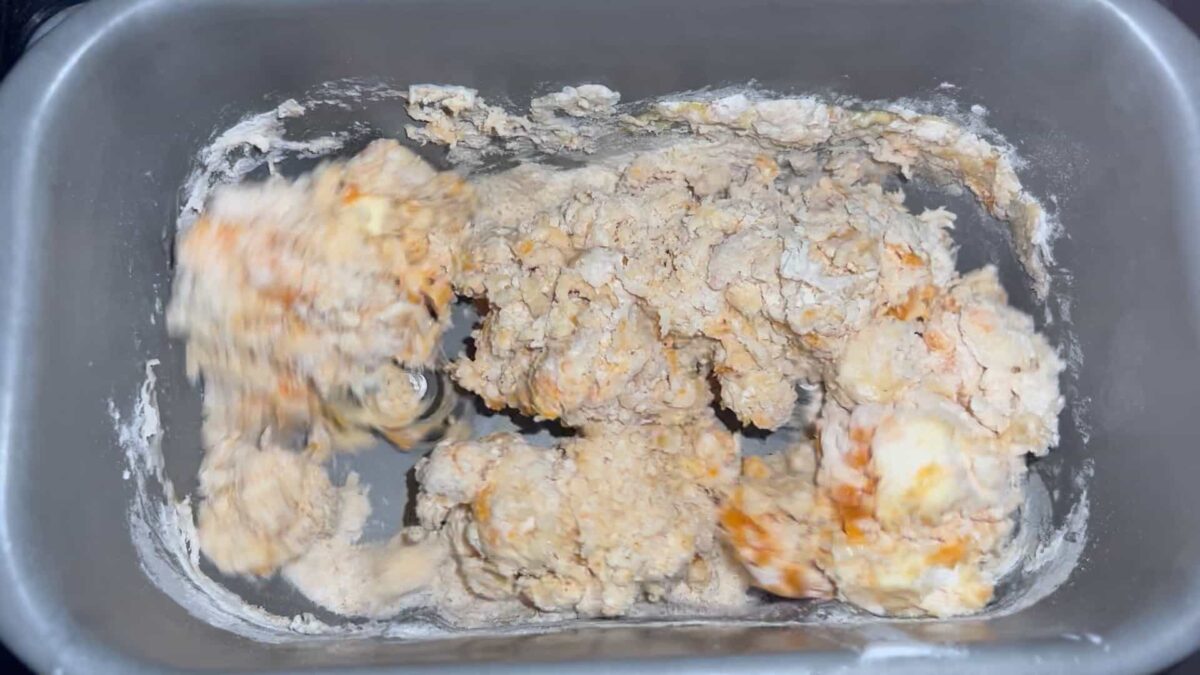
- Check the dough: After one minute, open the lid and check that the paddle(s) is engaged and the dough is starting to clump.After 15 minutes, open the lid and recheck the dough. The dough should stick to the side, then pull away cleanly. If the dough is too wet, add flour one tablespoon at a time. Wait a couple of minutes to let the dough absorb the flour before adding more. If the flour is too dry, add water one tablespoon at a time. Allow a couple of minutes for the dough to absorb the additional water before adding more.
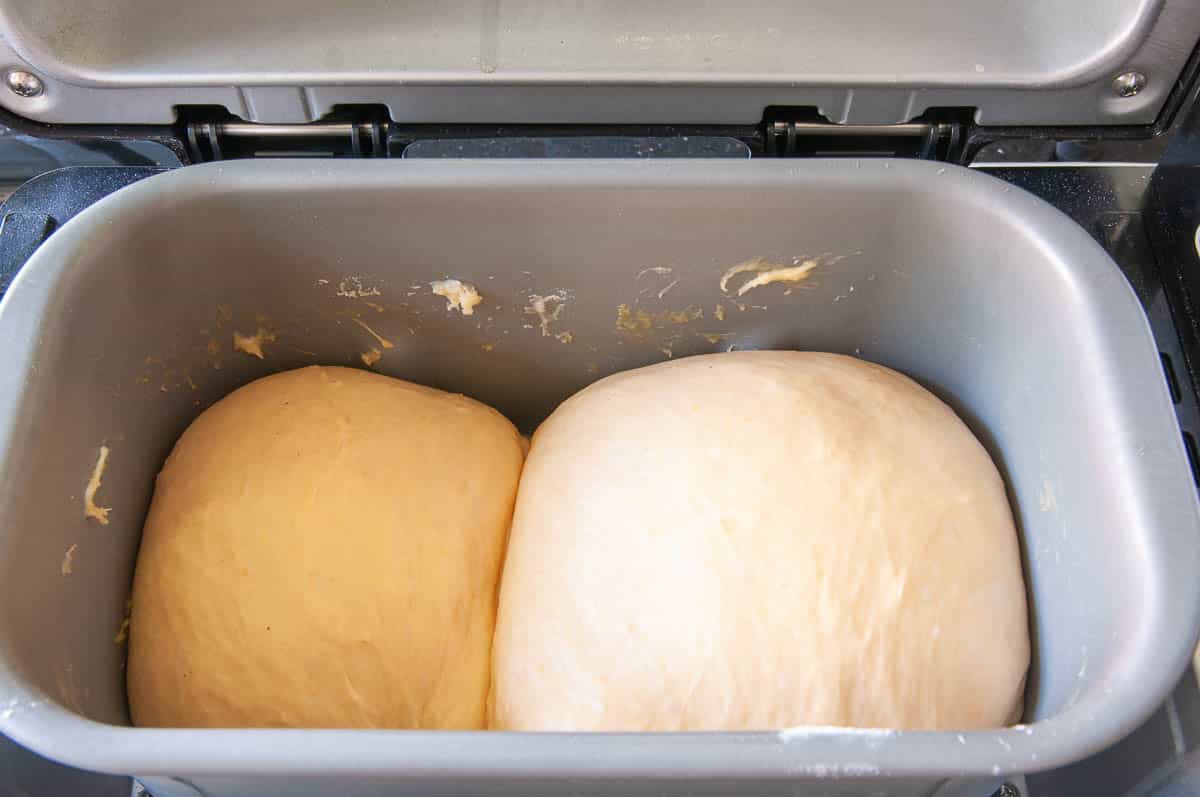
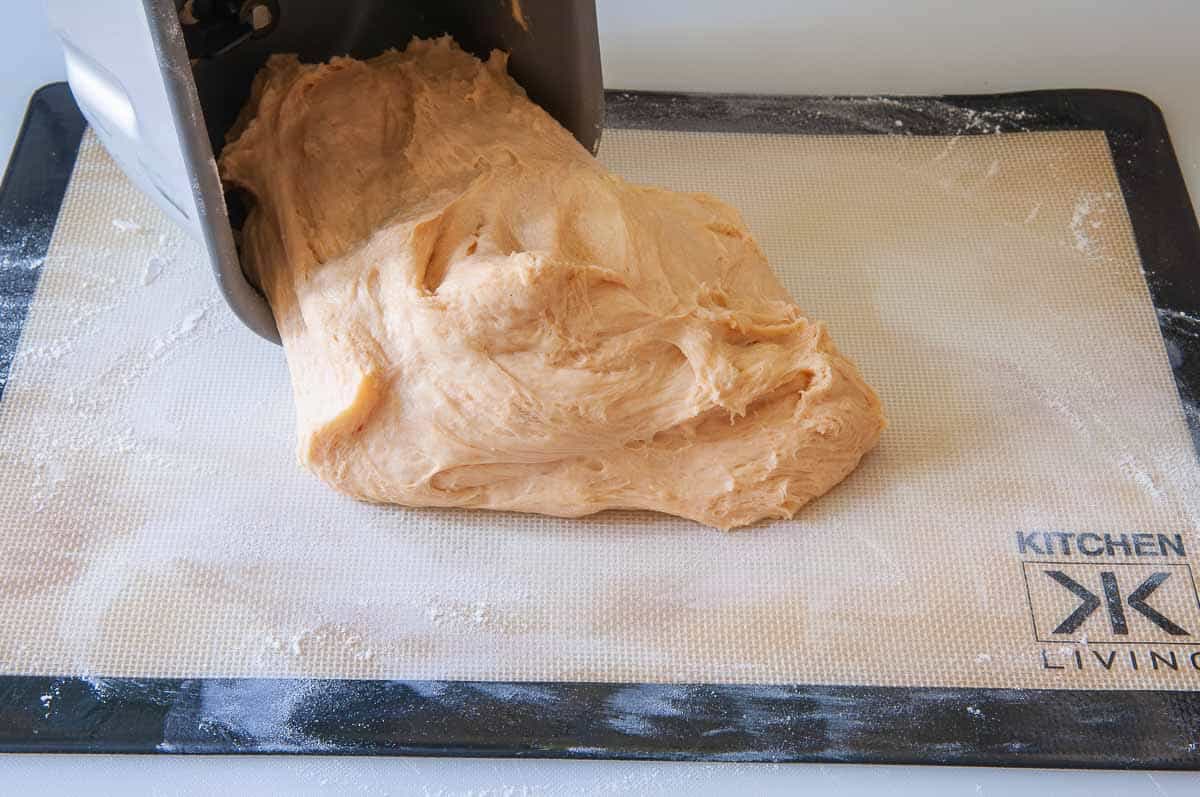
- Let the dough knead and rise in the machine. It should double in size by the end of the cycle. Remove dough from the machine and place on a lightly floured surface.
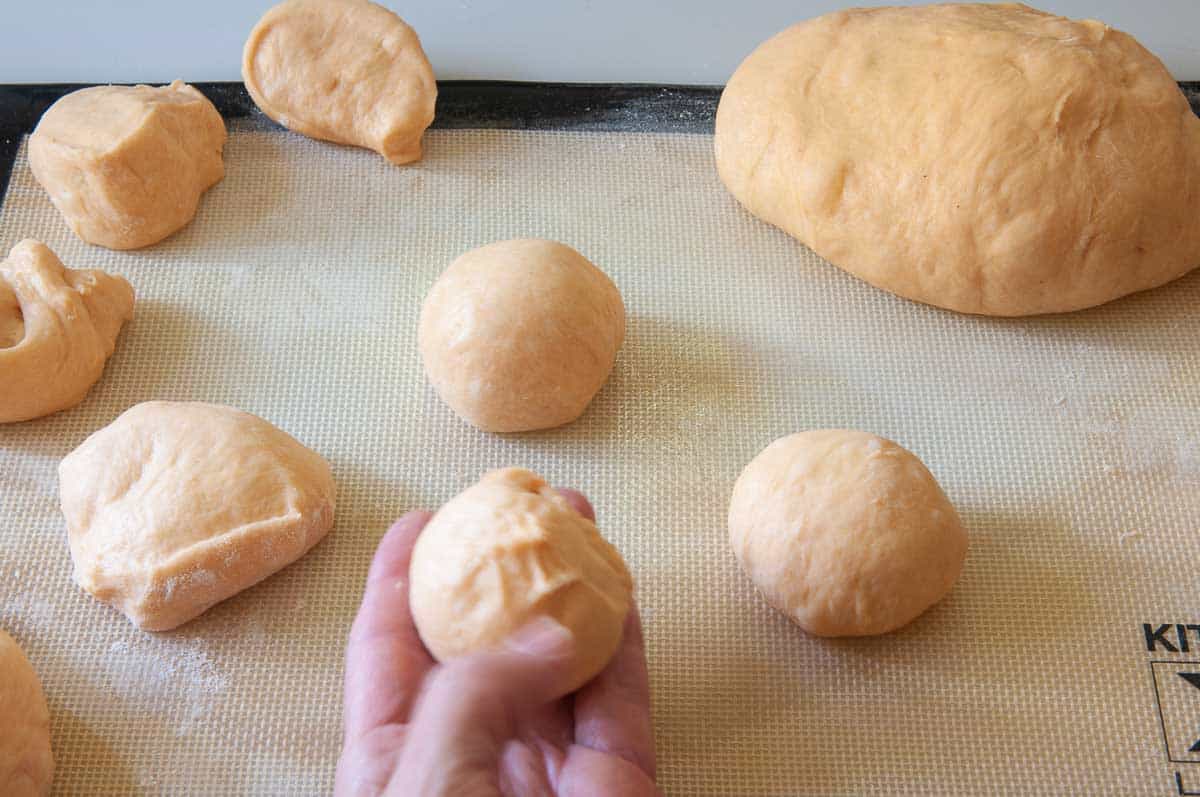
- Divide dough in half and each half into 8 equal portions (16 total rolls). See the picture gallery and videos in the post for how to make balls.
- Arrange balls into two round (or square) 8 or 9-inch greased pans. Arrange crescents on a baking sheet.
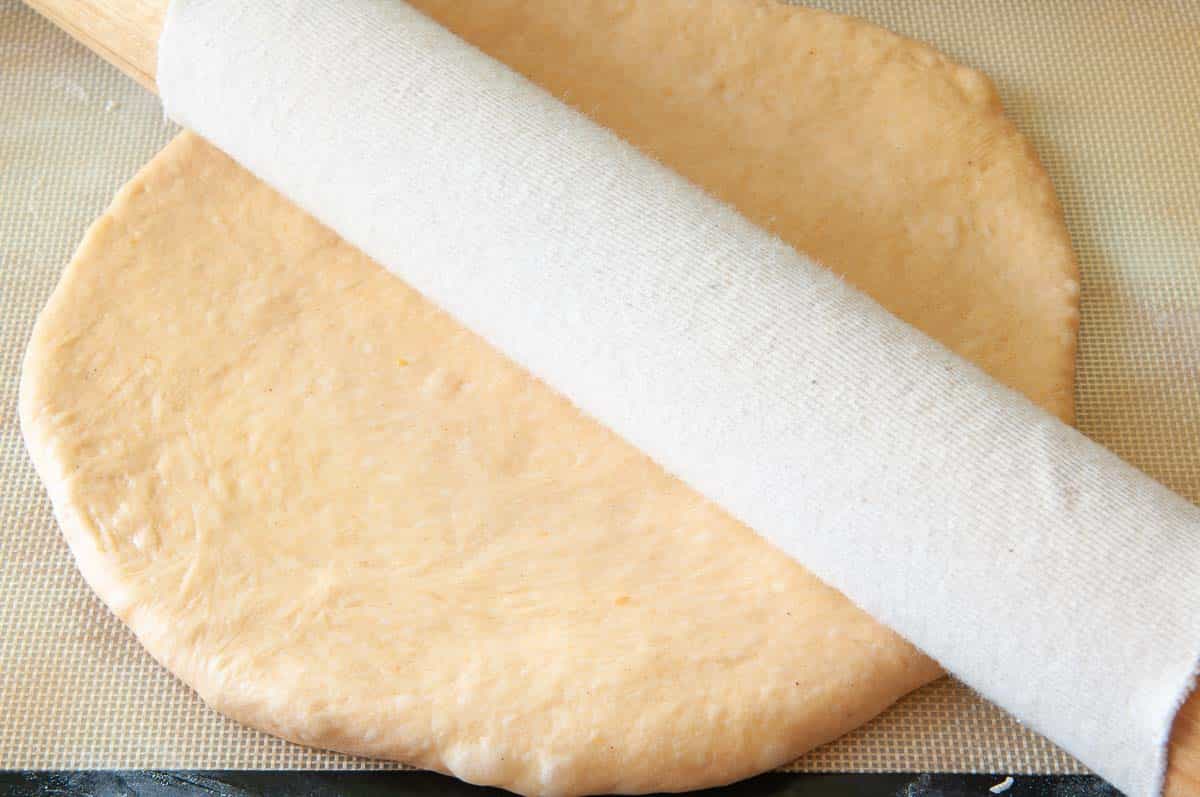
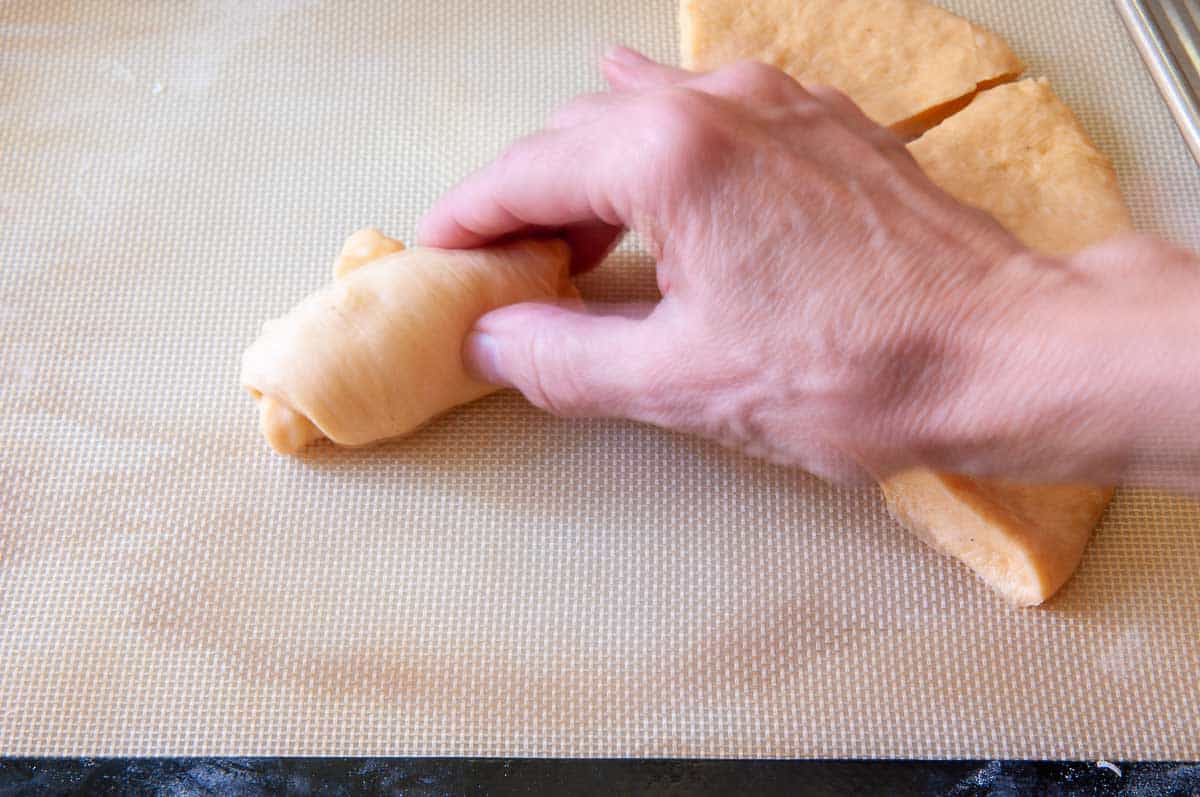
- Shaping crescents: Divide dough in half and form each half into a ball. Roll to approximately 9-10 inches in diameter. Use a knife or pizza cutter to create 8 triangles (see picture). Roll each triangle starting from the wide end and finally, tucking the small end under so it will not pop out when baked. Place on a greased cookie sheet.
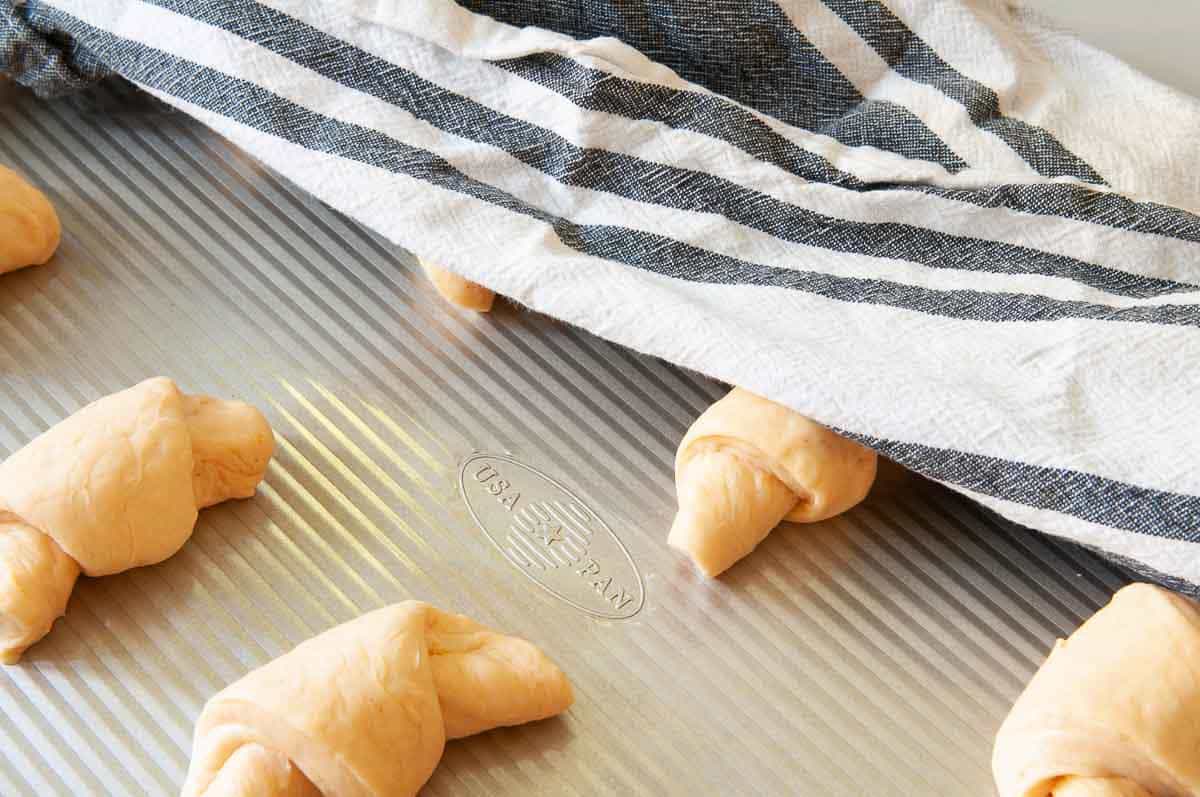
- Cover rolls loosely with a tea towel to rise.After rolls have almost doubled in size, brush with simple egg glaze, if using.
- Preheat oven to 375°F (190°C).
- Bake at 375˚F (190˚C) for 12-15 minutes or until rolls are golden brown.Remove the rolls from the pan within a few minutes and cool on a wire rack to prevent soggy bottoms.
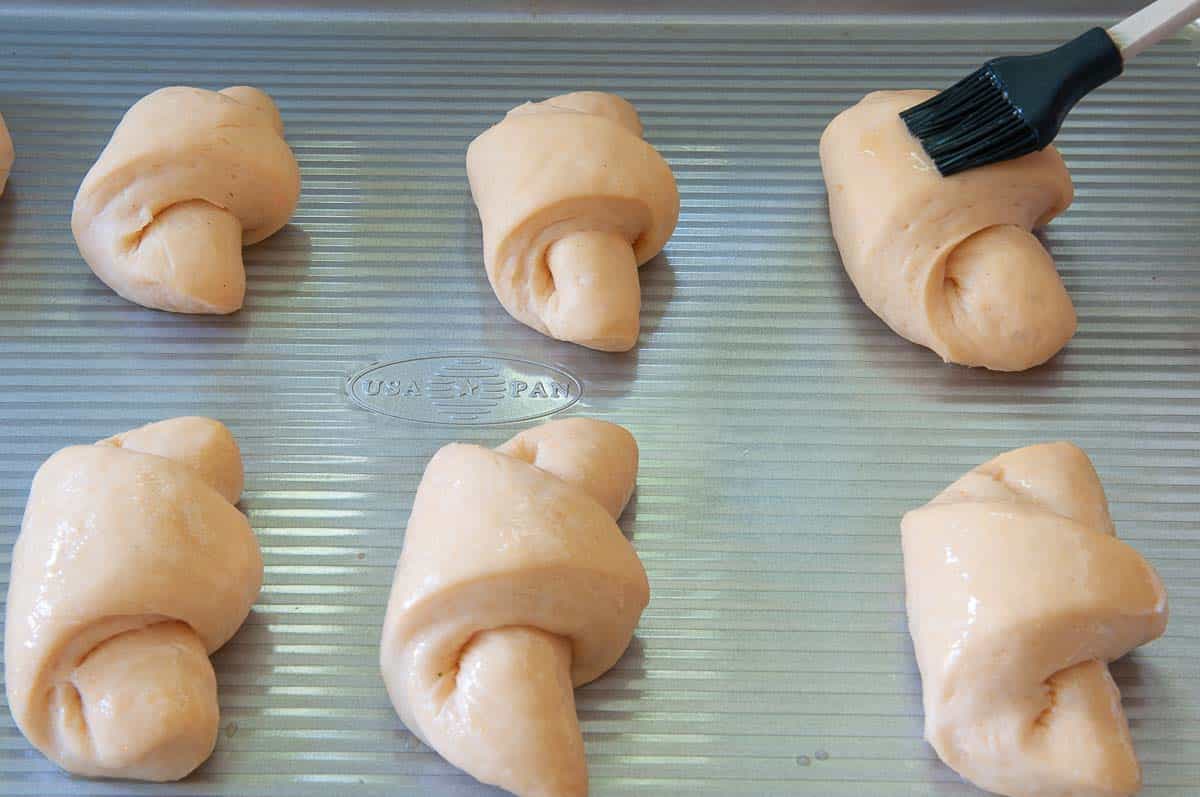
- Honey Butter Glaze: Combine all ingredients 1 (30 g) egg white, 1 tablespoon (21 g) honey, 1 tablespoon (14 g) melted butter, and 1 tablespoon granulated sugar and brush carefully over each roll immediately before popping them into a preheated oven. Try not to let the glaze touch the cookie sheet.The honey butter glaze adds shine and flavor but remains slightly sticky. If you're making rolls ahead or transporting them, consider using the simple egg glaze instead.
- Simple Egg Glaze: Whisk one egg until smooth.
Notes
- Unbaked dough: Freeze after the DOUGH cycle or after shaping (before final rise). Defrost in the fridge overnight.
- Baked bread: Double-wrap and freeze up to one month. Reheat gently.
- Stand Mixer: Mix until moistened, then knead with a dough hook (speed 2–3) until smooth and elastic (5–10 minutes). Let rise, deflate, and shape as directed.
- By Hand: Mix to a shaggy dough, knead on a floured surface until smooth and elastic (10–20 minutes). Let rise, deflate, and shape as directed.
Equipment
Nutrition
All images and text ©️ Paula Rhodes for Salad in a Jar.com
Final Thoughts
These rolls are a welcome addition to any holiday table, but they’re just as good alongside a bowl of soup or tucked around a sandwich filling. The bread machine handles the hard work while sweet potatoes add color and lasting softness. If you’re serving them for the holidays, try them with microwave pumpkin butter.
— Paula, Home Economist
Homemade Food Worth Sharing
Need help troubleshooting?
Email me: Paula at saladinajar.com — photos help!

Thank you so much for your wonderful recipe! I’ve been making these rolls for over 13 years. They always turn out well, and friends and family look forward to them at dinners and potlucks. I mash a couple of large sweet potatoes at a time and freeze them in 1/2 cup portions so I can make the rolls on short notice. And I usually make the rolls smaller, so I can typically get 24 rolls out of the recipe, and they end up being around the size of store-bought Hawaiian rolls.
Hi Nancy,
What a great story about these rolls and your family. It’s the perfect example of “food worth sharing.” I like your tip about freezing the sweet potatoes. Good idea!
I forgot to ask. Yesterday when making the sweet potato rolls, I thought I was going to run out of time with them rising and then having to bake them. I used 2 large serving spoons and scooped out the dough with 1 and pushed it into my muffin tin with another. Would it have been OK to the put the muffin tin in the refrigerator until the mass confusion in my house settled down? Then bringing them out and letting them finish rising before baking? Just wondering should this happen again. They turned out great! Even using the large serving spoons instead of rolling them into balls first. It made 13 rolls. Thanks Paula.
Hi Linda, It probably would have been OK, but the rolls are never as good after they sit in the fridge. If they are there too long, they get a stronger yeasty flavor. For just a few hours probably wouldn’t hurt too much.
Hi Paula, I have made these rolls 2x now 2 different ways. They are just delicious!!! First time in my ZO machine.
The 2nd time, I got lazy. Walmart had frozen sweet potatoes cut into small cubes. I bought a bag. Cooked in microwave and then mashed. Gave me about 3/4 of a cup. Perfect. Then, instead of using my bread machine, I used my Kitchen aid and the dough hook. For the 2nd time they turned out wonderful. I am bringing them to my neighbors for Thanksgiving. Thanks again for great recipes. HAPPY THANKSGIVING!!!
Hi Paula, I am going to try your sweet potato rolls ahead of time to be sure I get them right. Just 1 question. It says, “if you want to do the round rolls, see video” I have searched all over the sight and can’t find the video. When I click on “Jump to the Video” it goes directly to your recipe. I went to the recipe for just plain rolls and found out how to cut them. But that also said “see the video for shaping”. I think I know how to do it from the regular round roll recipe. But just was wondering where I could get the recipe. I love your bread recipes and have made many.
Hi Linda,
Thank you for writing. There are two videos on that post. The one about shaping round rolls is inside the post. The button at the top goes to the video about making the sweet potato rolls specifically and like you said, it is located inside the recipe. I’m betting you already know how to do it.
Hi Paula, these rolls are awesome! Can this recipe turn into Bread Machine Sweet Potato Loaf as well? Thank you.
I haven’t tried it, Lee. Let me know if you do.
This question may seem silly but I’m guessing that the ingredients for the honey butter glaze begin with the fork beaten egg and everything above that is for the rolls. Is that correct? The recipe says to add all ingredients and maybe it’s supposed to be obvious to stop at the yeast.
Hi Krestena,
That is not a silly question. I have already fixed it. Thank you for writing. Hope you love the rolls as much as we do.
Thank you for sharing your wonderful recipes! Hawaiian rolls are next on the list! 🙂
Thank you Paula! These rolls are wonderful! i was too lazy to cook potatoes so i used pumpkin pure instead. By the end of the day only one roll was lef. i am glad i found your site!
Elina,
I’m so glad you wrote. I have never tried pumpkin in these rolls but figured it would probably work. Good to know! Thanks for writing.
Thank you for sharing your wonderful recipes! Hawaiian rolls are next on the list! 🙂
Hi Paula. Love ur homemade bread recipes. I tried several recipes including this n really satisfied. Do u have a recipe italian herb bread? Contains rosemary, thyme n parmesan? Thank u 🙂
Hi Elly,
I do not have one like that. Will work on it. 🙂
Hi Paula,
Can I save the leftover glaze to use in 3 days? Doing a test run on these rolls today and will be making them again on Thansgiving.
Thank you!
I haven’t tried it but I would think so–as long as you keep it in a sealed container so it won’t dry out.
This looks lovely!
I found this site about yams against sweet potatoes. Is it accurate, i would not want to buy the wrong stuff?
http://easyguyevo.hubpages.com/hub/Difference-Between-Yams-And-Sweet-Potato
Hi Torn,
I’m afraid I don’t really know. I buy whatever is available in my local grocery store and it has always turned out just fine.
Made these rolls and really enjoyed them! I liked them best as a dinner roll. I made them in the morning so I skipped the glaze and warmed them up for dinner, so delicious!
Hi Stacie,
Thanks for taking the time to come back and give your opinion. This dough also makes wonderful cinnamon rolls. I just made some yesterday.
I made these in the bread machine today (they are rising right now). The dough was very, very sticky. Is that how it turns out for you, Paula? I added an extra 1/2 cup of flour, and it was still very difficult to shape the rolls.
Hi Common Sense,
Oh no. The dough should not be sticky. It should be VERY easy to handle. I wonder if you miscounted the cups of flour (I’ve done that), or….is it possible you mis-measured the liquid ingredients? Were your sweet potatoes runny? They should be the consistency of rather thick mashed potatoes. Anyway, you did the right thing by adding more flour but sounds like you should have added even more. Did you use bleached flour? If so, you must use more than if you use the bread flour called for in the recipe. This is a mystery and I’m not sure of the answer without watching you make them.
I make bread in the machine several times a week at least, so I’m pretty familiar with the process. I think the liquid measuring was good. It is possible that I miscounted the flour. As I recall, I had to open a new bag, so maybe that was the problem. I do use bread flour. Also, I baked the sweet potato in foil, and it may have had a high moisture content (it seemed fairly juicy when I peeled it). Thanks for responding…I’ll try them again.
I think your sweet potato should have been perfect. Perhaps it was the flour. Makes sense.
I just saw the comment about how to make them if you don’t have a bread machine. I just used my Kitchen aid. I had to use approx. 1 extra cup of flour because the dough was very sticky. I then took the dough out of the bowl with floured hands kneaded a little more flour into the dough so it wouldn’t stick to my fingers, formed it into a dough ball, greased my bowl put the dough back in the bowl and turned it over so it would have the oil on both sides of the dough. I covered the bowl and let it set until it had probably doubled in size. I than punched it down and divided it like the recipe said. I put in in 2 cake pans, covered them with a tea towel and let them rise again till double in size. I then baked them as your recipe suggested and they turned out wonderful. Hope this helps with those who want to know how to do this without a bread machine.
Paula, I wanted to tell you I made the Sweet Potato Rolls for Thanksgiving Dinner and they were a real hit. I didn’t put the glaze on them because I made them on Wed. Our daughter took one bite and said ” these are the best rolls I have ever eaten. I have to have this recipe.” I felt really good. I have been sick and on Chemo for 6 months and my family doesn’t ask me to help out much with things, but I wanted to try a little something so your rolls was what I chose to do. They turned out wonderful. I gave my bread machine away so I used my Kitchen aid to whip them up. Thanks for sending the recipe. Peggy
Paula, thanks for posting your experience for us. Did you follow the recipe exactly with your Kitchen Aid or did you have to add extra flour as Peggy did. Also did you sift your flour prior to measuring? Thanks and I pray that God blesses you with a speedy recovery.
Making these now! Holy smokes, I made 1/2 buns and 1/2 croissants!). They are huge and absolutely fabulous!))
I’d like to make these this weekend to have with lasagna! I’m wondering if they can be assembled ahead of time and baked just before dinner. If so, at what stage should they be refrigerated? Thanks!
Rebecca,
I would recommend chilling them after you have formed them into rolls. You’ll need to allow an extra 1-2 hours (depending on the temperature of your room) for them to double before you bake them. Hope that helps.
Thanks! I’ll let you know how it goes – I’m making them tomorrow!
Yum, Paula, I could probably eat a whole panful of these – quite delish looking! I need to come watch you up close make those round dough balls, mine don’t come out as perfect as yours!
It’s looks delicious. Thanks for the post.
These sound delicious, but I don’t have a bread machine. Can they be made without it? If so, how? Thanks!
Stefanie,
Yes, I am confident they could be made by hand or with a stand mixer but I have not actually done it myself so can’t give you specific instructions. You might google how to convert a bread machine recipe to get started.
These rolls are gorgeous, Paula! I’m not cooking for Thanksgiving, but I wouldn’t even need an occasion to make these. 🙂
Dinner Rolls