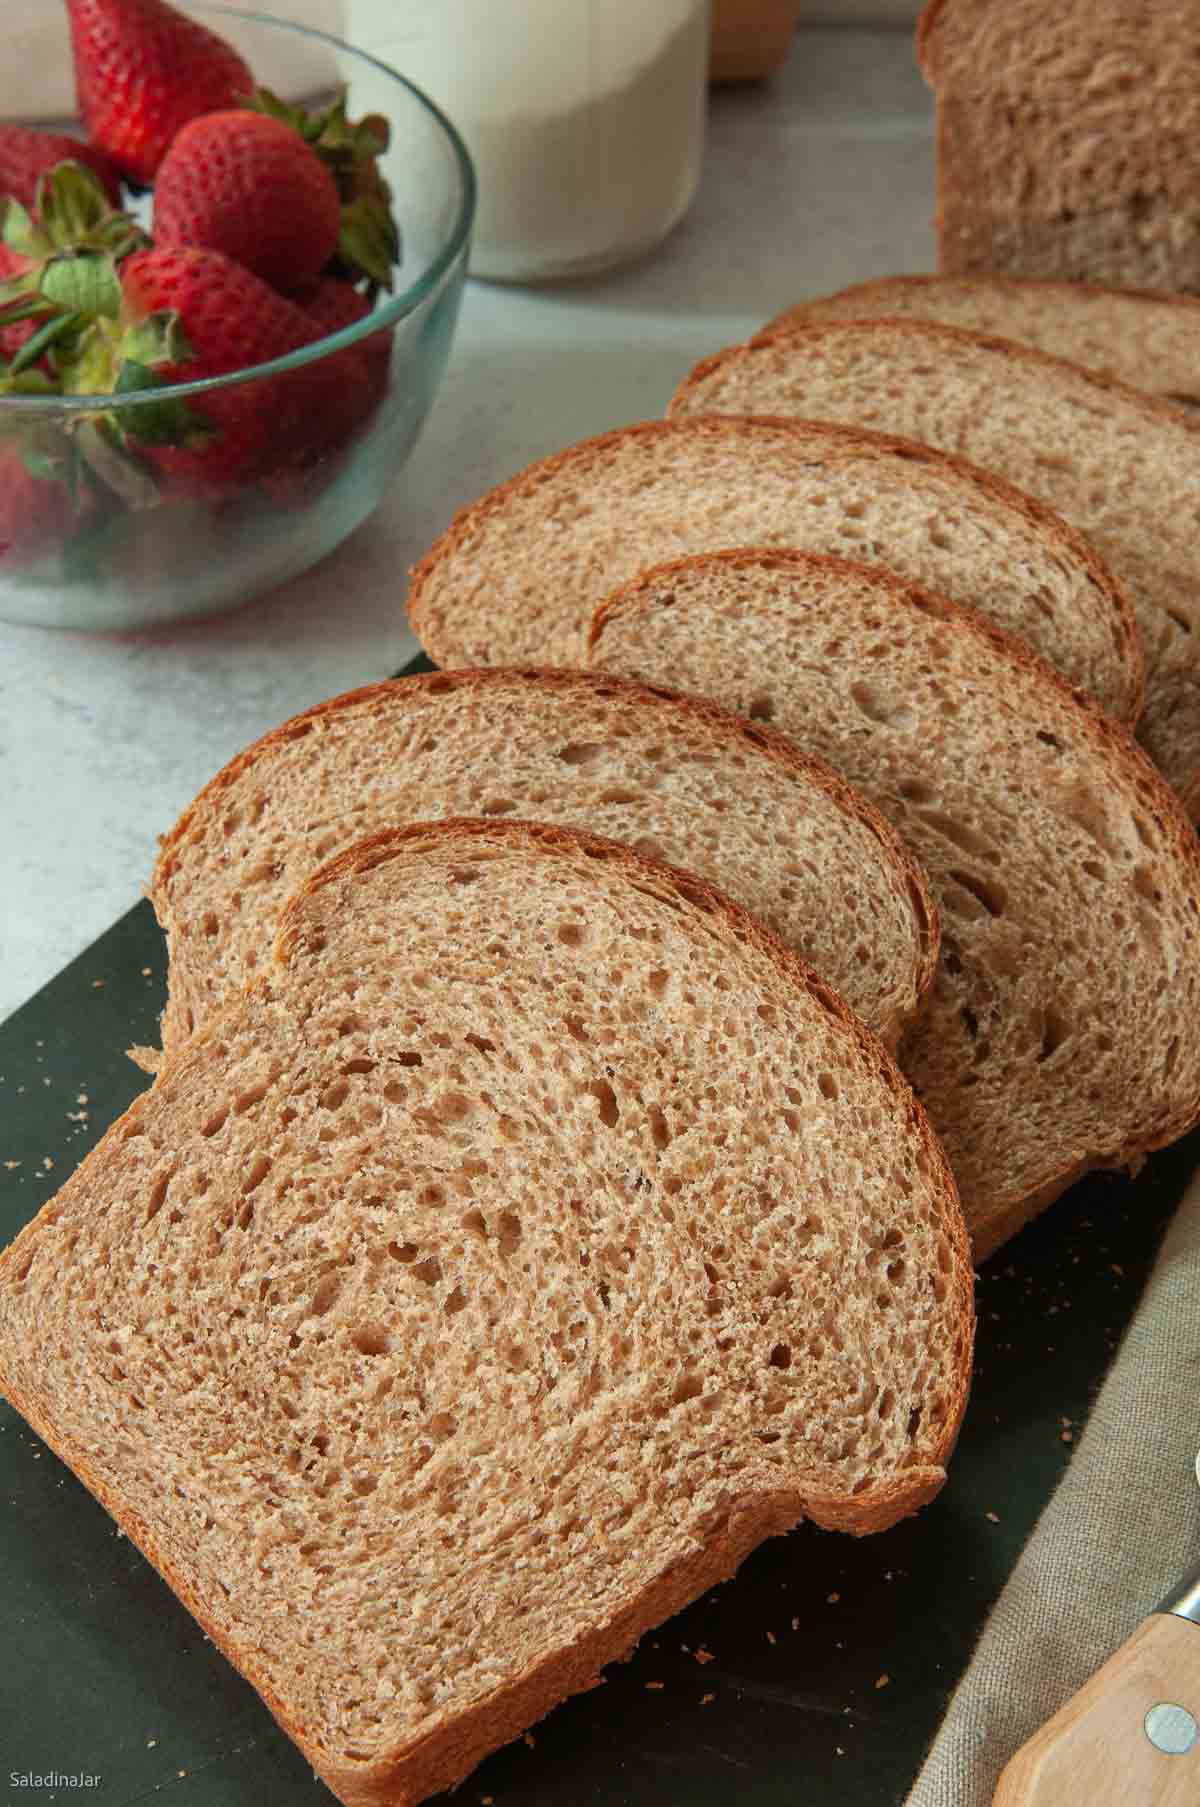
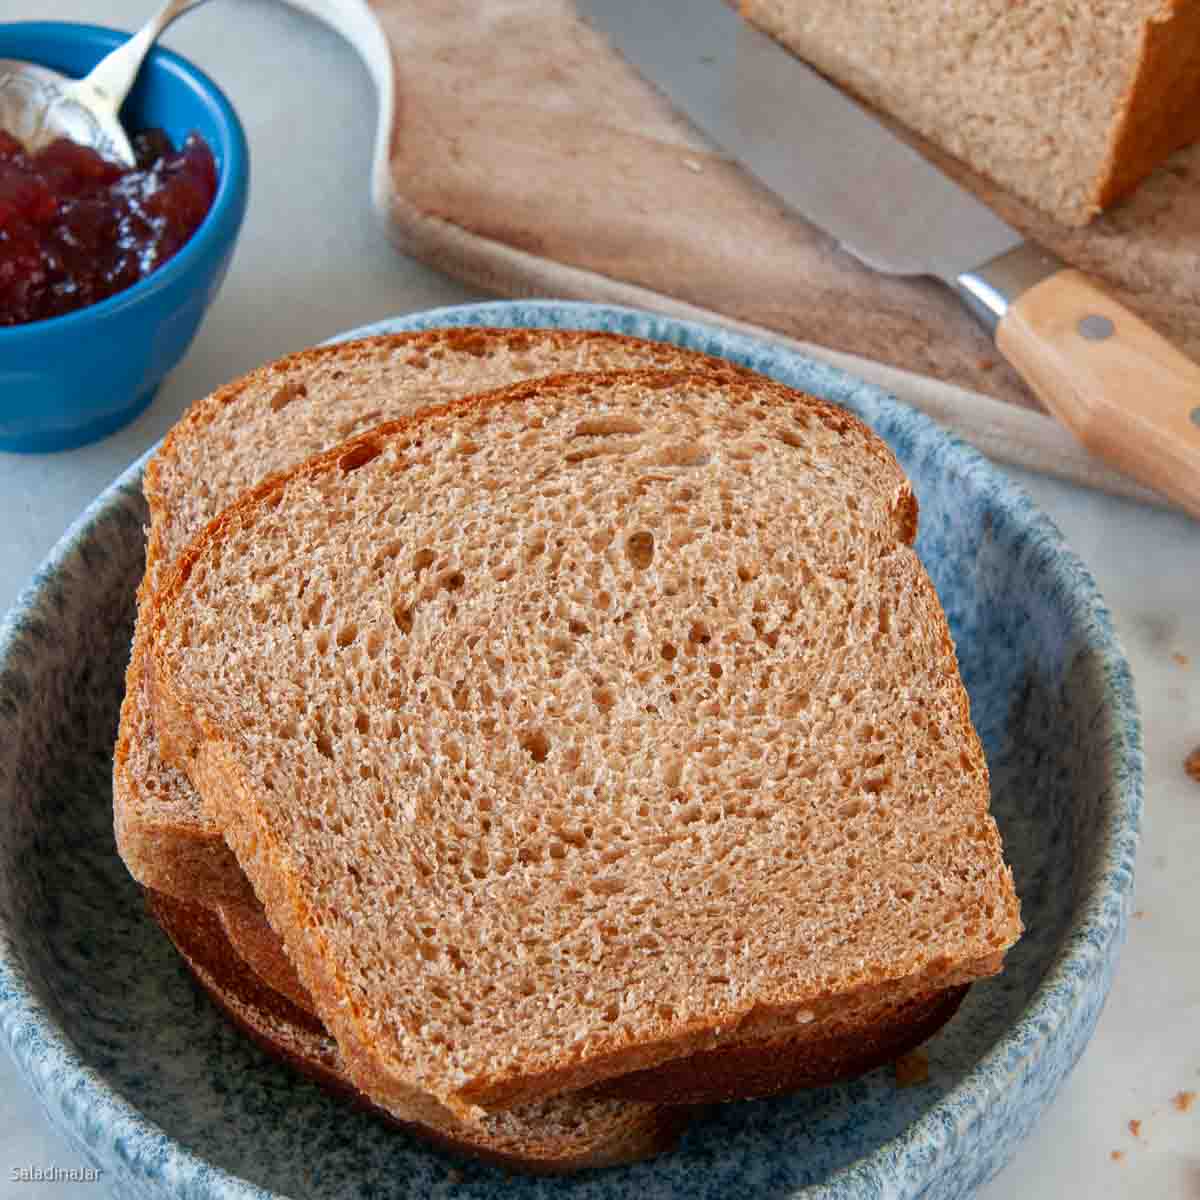
100% Whole Wheat Sandwich Bread (Bread Machine Dough, Oven-Baked)
Sneak Preview: This 100% Whole Wheat Sandwich Bread is mixed and kneaded in a bread machine, then shaped and baked in a conventional oven for a softer crumb and better structure—no white flour needed.
This post contains affiliate links. As an Amazon Associate, I earn from qualifying purchases at no extra cost to you.
Have you ever tried making 100% whole wheat bread in a bread machine and ended up with a dense, disappointing brick? You’re not alone. That’s why I developed this recipe—after lots of testing—to give you a soft, flavorful loaf that’s entirely whole grain and still a joy to slice.
My secret to success with whole grains? A short rest before kneading to hydrate the flour, plus an optional spoonful of peanut butter that subtly enhances softness without affecting taste too much. It’s reliable, beginner-friendly, and works beautifully whether you mix by hand, with a mixer, or in your bread machine using the DOUGH cycle.
How I Use a Bread Machine for Better Bread
I use my bread machine (my favorite) to mix and knead the dough using the DOUGH cycle, then shape the loaf and bake it in a conventional oven. This approach gives me better rise, structure, and crust — results I’m happy to share with family and friends.
If you prefer to bake bread entirely in your machine, you can—but results will vary depending on the recipe, humidity, and your bread machine model. My free Bread Machine Crash Course explains my approach in more detail.
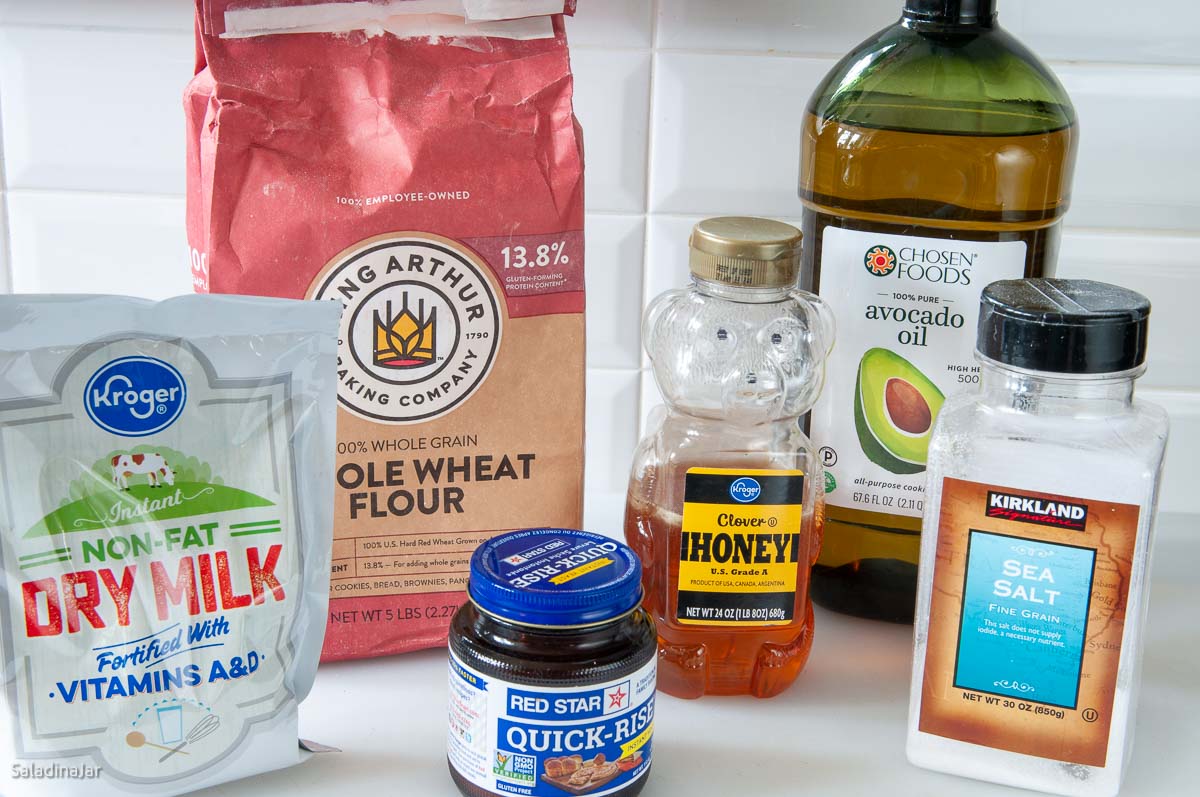
Ingredients & Substitutions
• WATER: Use room-temperature tap water; filtered is helpful if your tap water is very hard or chlorinated.
• SALT: Use sea salt or table salt; add ¼ tsp more if using freshly ground wheat or kosher salt.
• OIL: Avocado, canola, coconut, or vegetable oil all work.
• CREAMY PEANUT BUTTER (OPTIONAL): Acts as an emulsifier for softness. Sub sunflower seed butter for a milder taste, or use 1 tbsp more oil.
• HONEY: Adds flavor and moisture; sub brown sugar and adjust liquid if needed.
• NONFAT DRY MILK: Adds richness and improves texture.
• VITAL WHEAT GLUTEN (OPTIONAL): Helps the loaf rise higher and soften. If omitting, increase flour by 2 tbsp.
• WHOLE WHEAT FLOUR: Use King Arthur, store brands, or white whole wheat flour.
• YEAST: Use instant (bread machine) yeast; active dry also works—add ¼ tsp more if using.
Step-by-Step Photos for 100% Whole Wheat Bread
⬇️ Jump to the recipe below for exact amounts and detailed instructions.
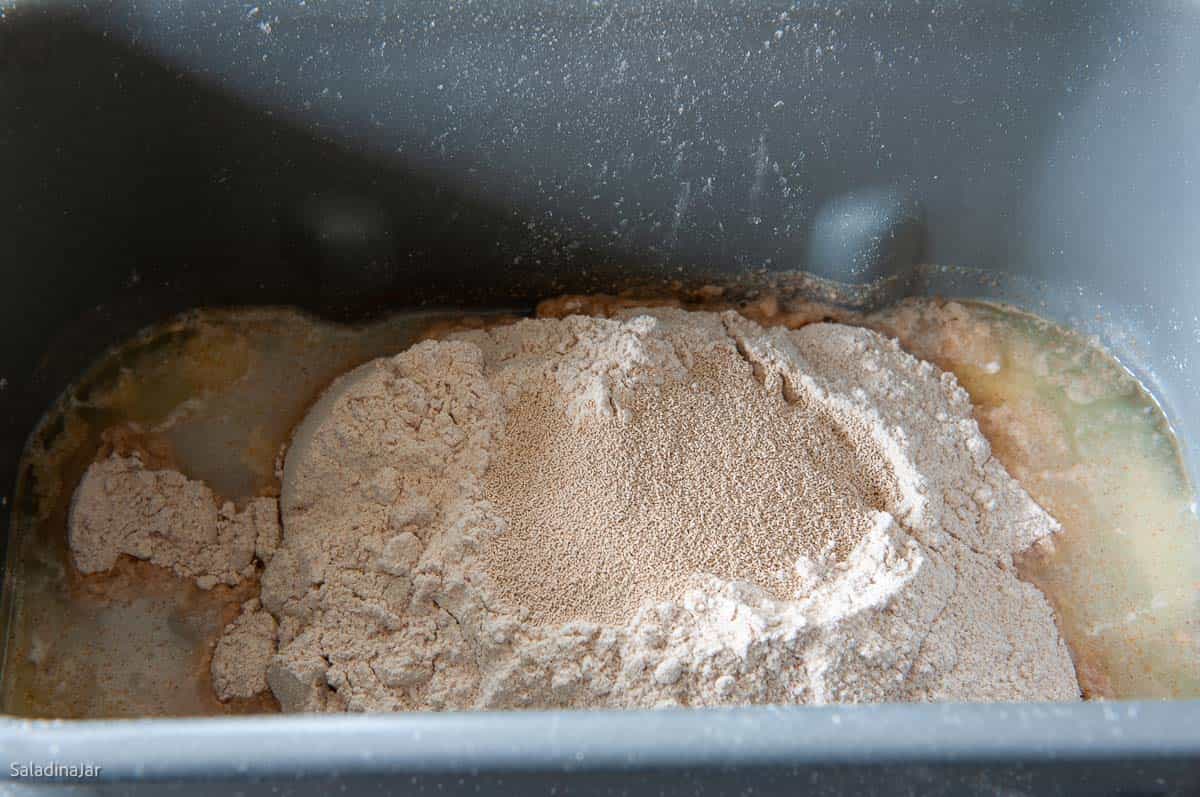
Making the Dough
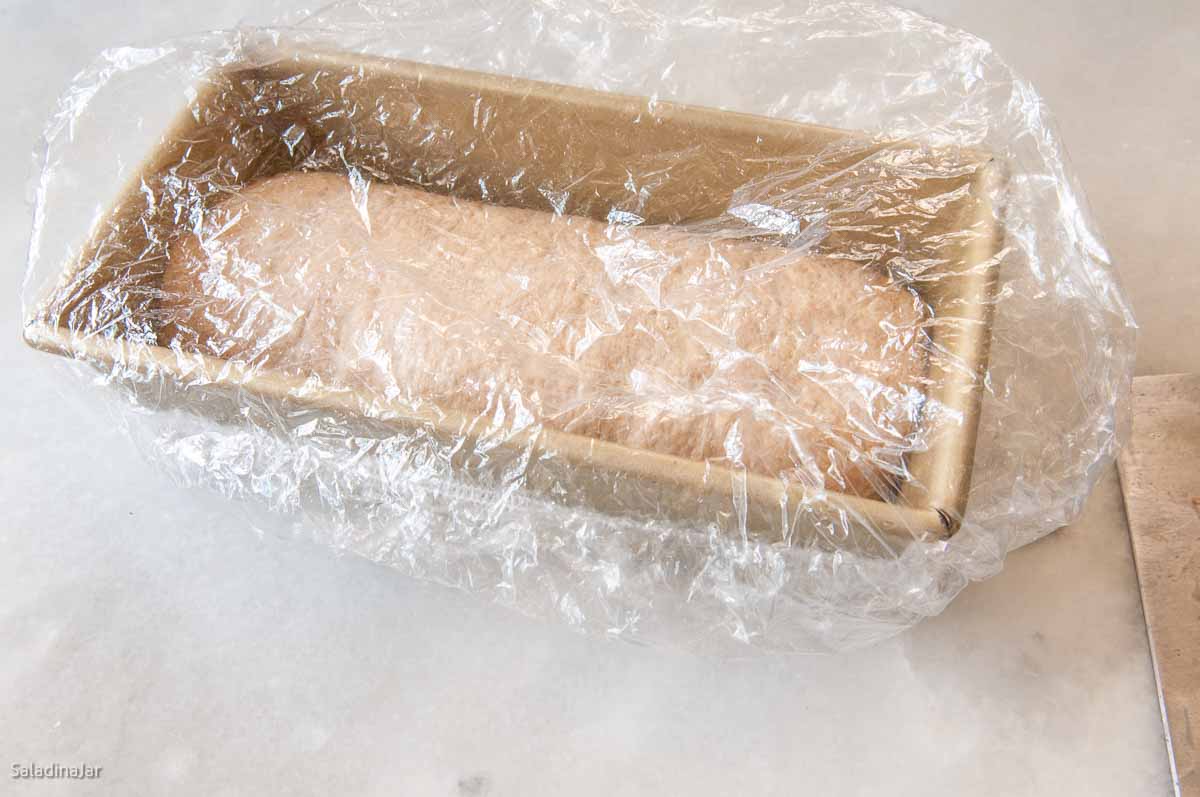
Shaping the Dough

Note: This dough always rises fast at my house (in warm Texas). If your dough overproofs even slightly, it will most likely fall in the oven. Watch it like a hawk.

100% Whole Wheat Sandwich Bread (Bread Machine Dough, Oven-Baked)
Video
Ingredients
- 1¼ cups (284 g) water
- 1¼ teaspoon salt
- 2 tablespoons (23 g) avocado, canola, or coconut oil (add one more tablespoon if not using peanut butter)
- 1 tablespoon creamy peanut butter or sunflower seed butter (optional)
- 3 tablespoons (63 g) honey
- 3 tablespoons (22 g) nonfat dry milk
- 2 tablespoons vital wheat gluten (optional)
- 2⅞ cups (345 g) whole wheat flour (if not using vital wheat gluten, add two additional tablespoons of whole wheat flour for 360 gr total)
- 2 teaspoons instant yeast
Instructions
- Make Dough: Add 1¼ cups (284 g) water, 1¼ teaspoon salt, 2 tablespoons (23 g) avocado, canola, or coconut oil, 1 tablespoon creamy peanut butter or sunflower seed butter, (optional–if not using, add another tablespoon of oil), 3 tablespoons (63 g) honey , 3 tablespoons (22 g) nonfat dry milk , 2 tablespoons vital wheat gluten (optional), 2⅞ cups (345 g) whole wheat flour, (if not using vital wheat gluten, add two additional tablespoons of whole wheat flour for 360 gr total), and 2 teaspoons instant yeast to the bread machine pan in the order listed. Select the DOUGH Cycle and press START. Let the machine run for 1 minute then STOP it.
- Rest Period: Let the dough rest for 30 minutes to hydrate the flour and kickstart gluten development. (Zojirushi users: Set the timer for 2:00. Press START, and the DOUGH cycle will begin after 30 minutes.)
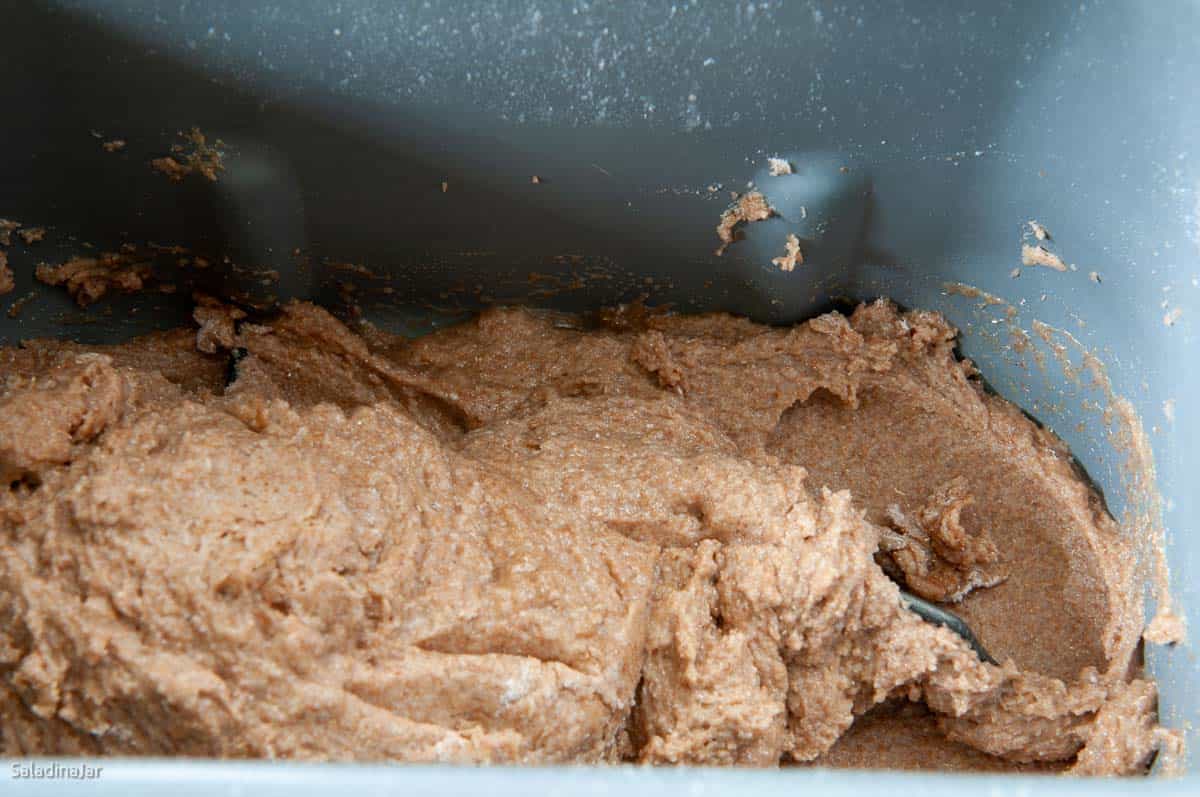
- Restart DOUGH Cycle: After the rest, restart the DOUGH cycle. Open the lid and check that the paddles are engage and dough is forming a ball.
- Check Consistency (15–17 Minutes In):Too Wet? Add flour 1 tbsp at a time until it sticks to the sides and pulls away cleanly.Too Dry? Add water 1 tbsp at a time until the dough is tacky but not sticky. Find out more about this surprising secret to success with a bread machine here.
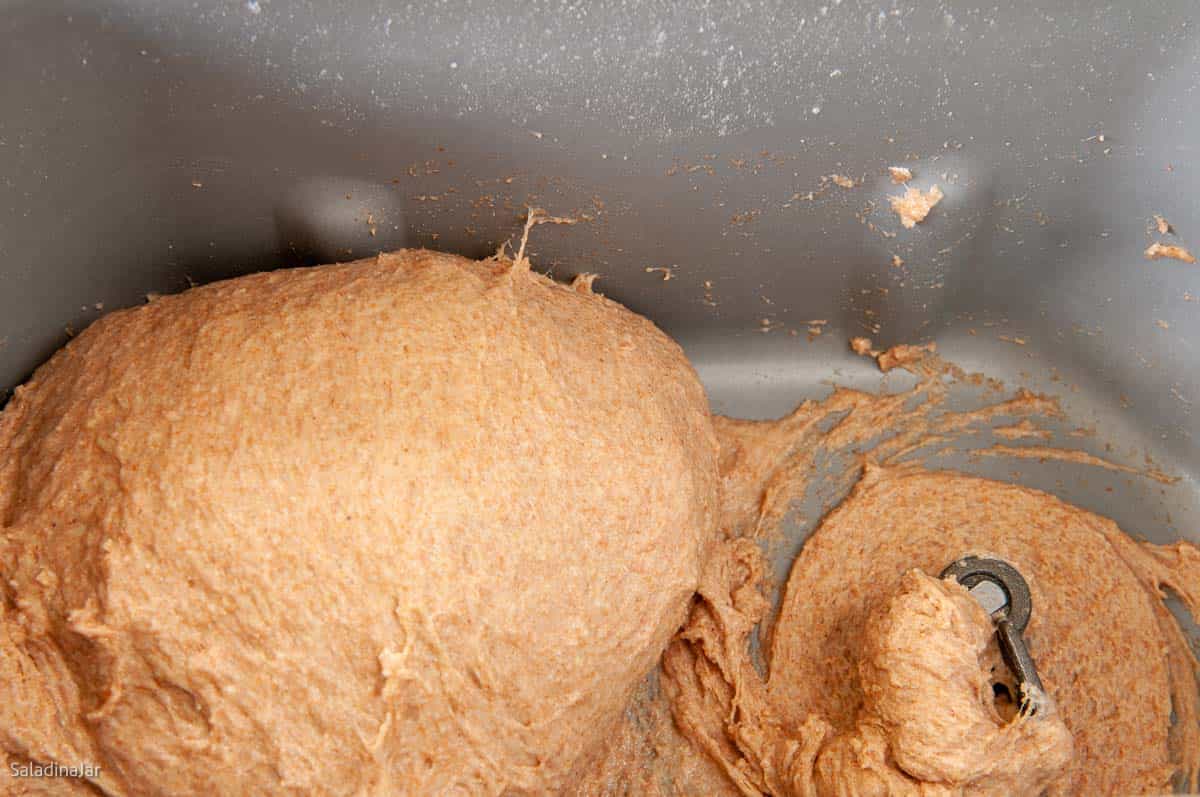
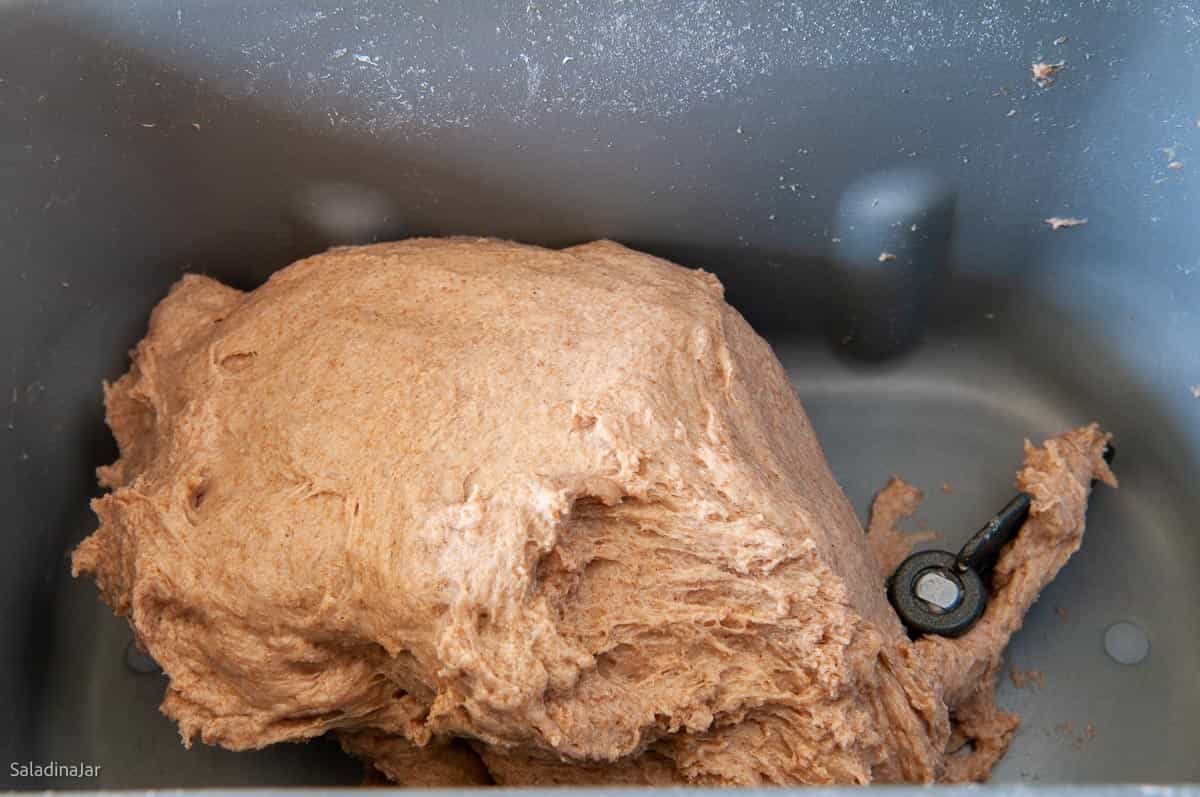
- Dough Rising: Let the dough rise during the DOUGH cycle until doubled in size. At the end of the DOUGH cycle, I like to restart the DOUGH cycle and run it for 5 seconds to compress the dough before shaping
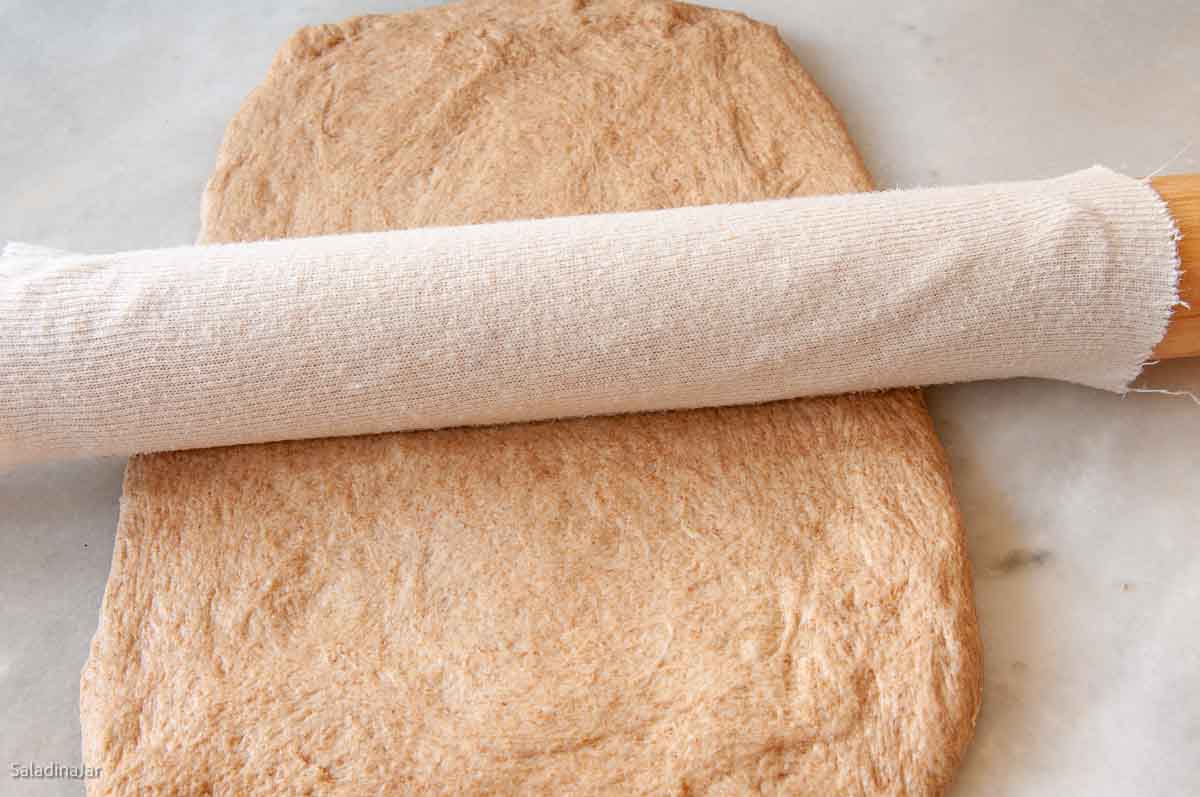
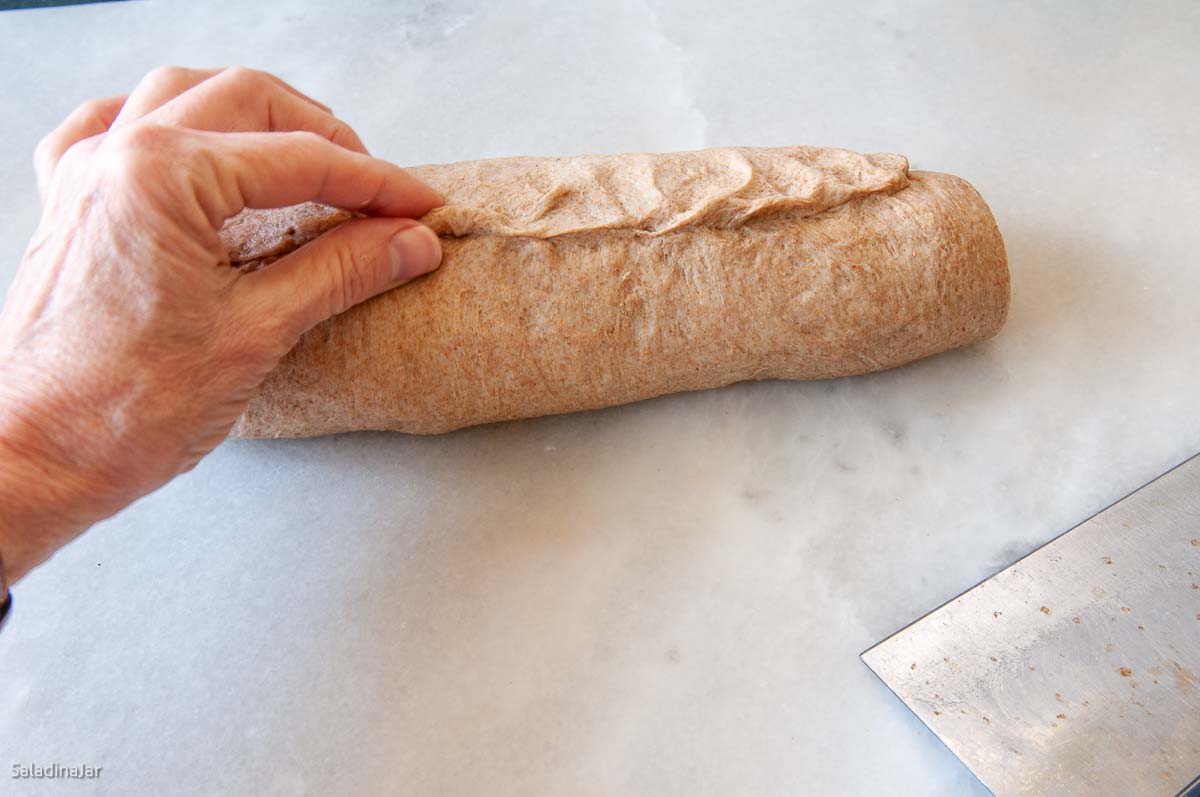
- Shape the Dough: Pull the dough out of the machine onto a lightly floured or damp surface. Press into a rectangle. Use a rolling pin to make it evenly thick and remove rogue bubbles.Roll into a cylinder, avoiding air pockets, and pinch the seams closed.
- Place in Pan: Transfer the dough, seam-side down, into a greased or parchment-lined loaf pan (4½ x 8½-inch or a Pullman pan 9x4x4-inch).
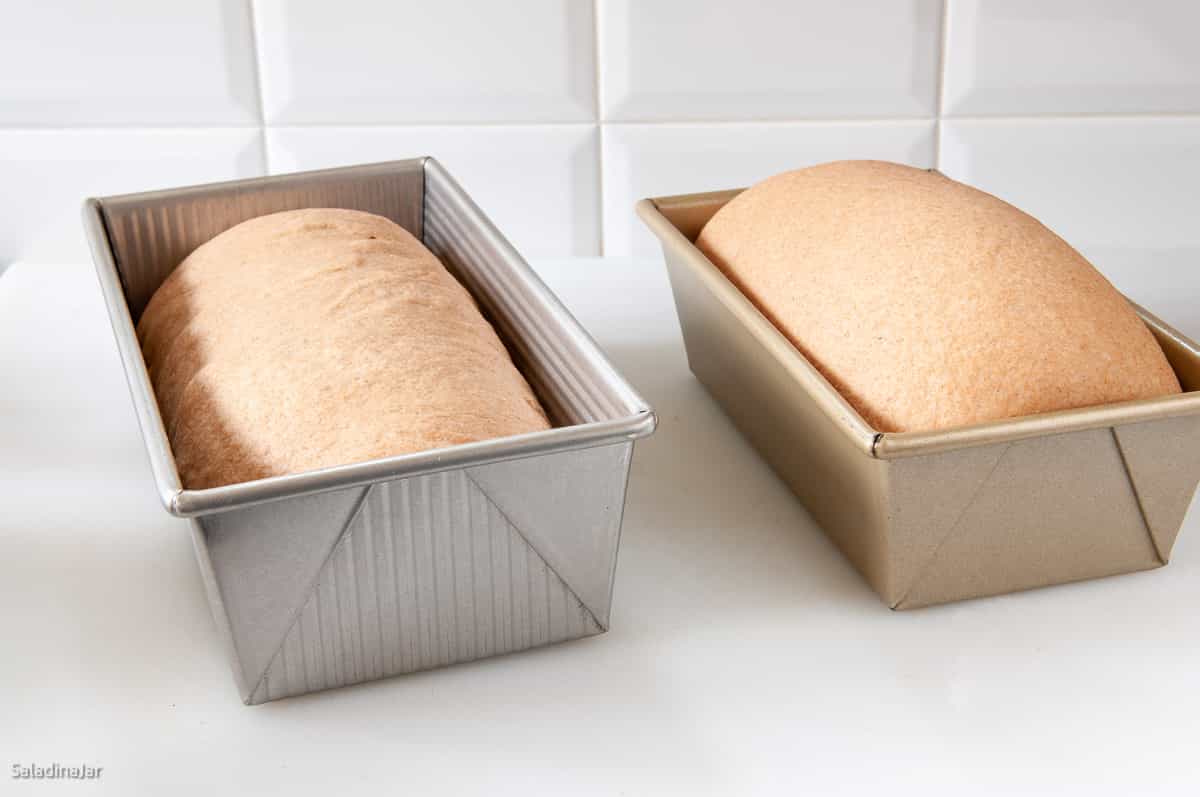
- Final Rise: Cover with a damp tea towel or shower cap. Let rise in a warm spot until even with the pan edge for the 9×4 Pullman pan (or 9×5 pan if you end up using that one). Allow the dough to rise about 1 inch above the top for an 8½ x 4½ pan.
- Preheat oven to 350˚F (180˚C).
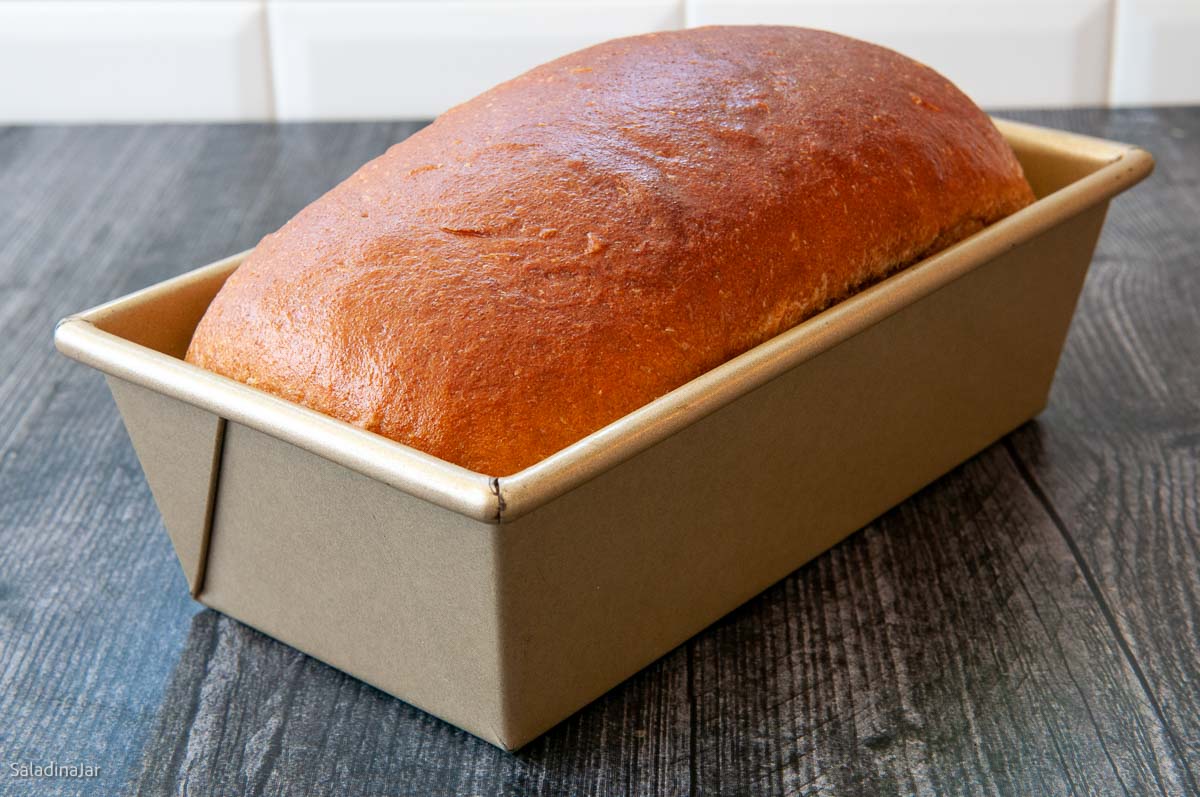
- Bake: Place the loaf onto the center rack of your hot oven for 35 minutes or until the internal temperature reads 195˚ to 200˚F. (90-92˚C).
- Cool: Let sit in the pan for 5 minutes, then transfer to a cooling rack for at least 30 minutes. If desired, brush with softened butter after cooling. Brushing it on while hot can cause wrinkling.
Notes
- Unbaked dough: Freeze after the DOUGH cycle or after shaping (before final rise). Defrost in the fridge overnight.
- Baked rolls: Double-wrap and freeze up to one month. Reheat gently. Frost after thawing.
- Stand Mixer: Mix until moistened, then knead with a dough hook (speed 2–3) until smooth and elastic (5–10 minutes). Let rise, deflate, and shape as directed.
- By Hand: Mix to a shaggy dough, knead on a floured surface until smooth and elastic (10–20 minutes). Let rise, deflate, and shape as directed.
Active dry yeast may be substituted. Use about ¼ teaspoon more than instant yeast. Dissolving first is optional.
Equipment
Nutrition
All images and text ©️ Paula Rhodes for Salad in a Jar.com
What Readers Ask Me About This Recipe
Can I bake this bread entirely in my bread machine?
Yes, but results may vary depending on your machine. Use the “whole wheat” setting, and keep an eye on the final rise to avoid over-proofing.
Why is my dough so sticky?
Whole wheat flour absorbs water slowly. Don’t skip the rest period (step #2). If the dough still feels sticky 15–18 minutes into kneading, add extra flour 1 tablespoon at a time until it sticks to the sides and then pulls away cleanly.
Can I leave out the sugar or oil?
Leaving out either one will change the flavor, texture, and shelf life. The honey adds moisture and tenderness, while the oil softens the crumb. The bread will be drier and denser without them.
Final Thoughts
If you prefer a whole wheat loaf that is lighter in texture and taste, try my Honey Whole Wheat Loaf with a mix of whole wheat flour and bread flour. Here is a recipe for Whole Wheat Dinner Rolls if that’s what you need. This recipe for Sprouted Wheat Bread Machine Recipe with Honey and Seeds is especially flavorful, and you can use your whole wheat flour as a substitute for sprouted wheat flour.
— Paula, Home Economist
Homemade Food Worth Sharing
Need help troubleshooting?
Email me: Paula at saladinajar.com — photos help!

Paula, I am very keen to try this recipe as I have had so much success with many of your other ones. I was wondering if you could tell me what difference it would make if I reduced the amount of honey. I don’t like whole wheat bread to taste sweet, which many do, but understand that would have some impact on how much the bread rises. I was thinking of cutting it back by 1 tablespoon. Should I compensate with the other ingredients in any way?
I don’t know how much protein is in whole wheat flour in the US but, in Canada, our whole wheat flour is 13% protein. Do I still need to add the vital gluten?
Thank you so much for the wonderful website. It inspires me!
Hi Hannah,
I’m so happy to hear you’ve had success with my recipes. It won’t hurt to reduce the honey in the 100% WW loaf. A teaspoon or two is all you really need if you want to reduce the sweetness. No compensation needed but always check the dough after about 15-18 minutes of kneading to see if you need to add more liquid. The protein in whole wheat flour varies widely according to how it is milled and the variety. You can definitely make this loaf without VWG. (See the picture in the post). But if you find you want a “lighter” loaf” try a different flour or try adding the VWG. It’s optional. Isn’t it fun to make your own bread and be able to customize it?
Thank you for your quick response and your helpful tips. I will definitely try the ww bread recipe with less sugar. I do like a lighter loaf and have the gluten handy so in it will go 🙂 I am sure it will be another “Salad in a Jar” winner.
Please let me know how it turns out for you.
Unsurprisingly, it was a complete success. I reduced the honey to 1 tablespoon and used the vital gluten. The taste is wonderful, just how hubbie and I like it. A wonderful recipe.
You are so right to watch the bread after placing it in the loaf pan. After only about 10 minutes, the bread had already risen more than 1 inch above the pan. It turned out great nevertheless but I appreciate your warning about rise time and not forgetting about it.
Next time, I think I will try it without vital gluten so that the rise time is longer. I suspect that the Canadian flour I use probably doesn’t really need it.
I have no first-hand experience with Canadian flour, but from what I hear, it has more protein so you may not need the VWG. Let me know how it goes.
Hi
Could I use extra virgin olive oil instead of coconut oil? also could I just add a bit of milk with the water instead of milk powder?
Hi Deborah,
I haven’t actually tried either of these but I think the olive oil swap for coconut oil (although they are a slightly different consistency), would probably work. Regarding the milk, I would substitute milk for the water. Adding more milk would probably be too much liquid. I always recommend you follow the recipe precisely as written the first time. And be sure to check the dough as it kneads to see if you need to add more liquid of flour. If that works out, then start playing around to suit your tastes and pantry. If it works, be sure to leave a comment so other readers can learn from you. Thank you for writing.
I need some troubleshooting help please. 1st, I was confused on the 3 tablespoons of dry milk. That amount was like 26 grams, not 12 so which is correct? 2nd, I had holes in the middle of my loaf. I appreciate your input, thanks!
Hi Ginger,
Thank you for writing. I agree with you about the dry milk. According to King Arthur, 3 tablespoons of nonfat dry milk should weigh 21 grams. Google says 22 grams.(There is no “standard” in the world of converting measuring spoons to metric). The “12 grams” in the recipe is a typo. Honestly, I don’t weigh it when I make this bread–I measure out 3 Tablespoons because it’s quicker. I also find that such small amounts do not measure very accurately on the digital scales most of us own. Either way, it’s not a deal breaker in this recipe. Meanwhile, I changed the number in the recipe so it won’t be confusing.
Your next question is more challenging. The most common reason for tunnels or holes is that air pockets formed in the dough as you shaped it, or you didn’t get all the air pockets out of the dough when compressing it after the DOUGH cycle ended. (See tip #3 above the recipe in the post.) It can also happen if you used flour on your hands or shaping surface instead of water. The flour can prevent the dough from sticking together properly after it’s rolled into a cylinder.
Another tip: As you shape the dough, keep your eye out for bubbles that appear on the sides and pinch them shut as you go. Hope this helps.
thank you so much! I will try those tips….off to make another loaf! : )
I love your attitude, Ginger. It’s the best way to become a fabulous bread baker.
Thanks for this great site and sharing your recipes.
The instructions for this recipe seem contradictory regarding pan size and rise:
1) “Let rise in a warm spot until 1 inch above the pan edge for the 9×4 pan or level with the top for smaller pan.”
2) “When the loaf has risen approximately 1-inch above the top edge of the 8½ x 4½-inch pan or approaches the top of the Pullman pan…”
I think these should align with the photo caption that states:
“The pan on the left is a 9 x 4 x 4-inch Pullman pan. The bread dough has risen almost even with the top. The pan on the right is 8½ x 4½ inches. The dough has risen one inch over the top.”
So, the first one should probably (if I’m not wrong) read:
“Let rise in a warm spot until almost even with the top the 9×4 pan or 1-inch above the top edge of the smaller pan.”
Hi Laura,
Thank you so much for your thoughtful feedback and kind words about my site and recipes! I really appreciate you taking the time to point out the inconsistency in the instructions for the pan sizes and rise times. You’re absolutely right, and I’ve updated the instructions for better clarity and alignment with the photo caption.
I hope this clears up any confusion and makes the process smoother for you and others! If you have any other questions or suggestions, please don’t hesitate to reach out—I love hearing from readers like you.
Hi Paula , i had an Oster bread maker which was just lying in my storage as the first time i tried , my bread was so crumbly and i dint have any motivation to proceed. Thanks to your blogs i have started using the bread machine now and your dinner rolls recipe was a huge success in my house. Now i am keen to bake this whole wheat bread and i have two questions and need your inputs please
1. Can i replace the non fat milk powder with milk? If so what would be the measurement?
2. I want to bake a very small loaf which yields like 8 slices only. I can get the measurement from your blog for 8 slices but i am unable to figure out which size loaf pan would be appropriate for the yield i choose from your blog. Please help me with this
Hi RV,
Congratulations on your successful loaves.
Answers to your questions:
1. I haven’t tested it, but you could try replacing the water with milk. You can just leave out the non-fat powdered milk if you don’t want to use it. I like using water better because this recipe includes a thirty-minute “soak” at the very beginning, and I would rather do that with water than milk. This is a very important step in this recipe. The powdered milk adds flavor and helps to make a nice crust. I strongly suggest using the powdered milk. It stores for a very long time in the fridge.
2. Pans smaller than 8½ x 4½ are not a standard size. I haven’t tried a smaller pan because the slices would be too small for most people for a sandwich or even toast. I can only suggest you experiment with any smaller pans you have. It will require a shorter cooking time. Remember this general rule: The dough should not fill the pan more than half full when you first lay it in there before it rises.
Can this recipe be used with fresh ground wheat?
Yes, I have made this loaf successfully with fresh ground white whole wheat flour. However, I never bake in my machine because I want complete control of the timing. If you are asking if this works in a machine from beginning to end, I have no idea. But it turns out beautifully when you use the DOUGH cycle, then shape by hand and bake it in your conventional oven. Whole wheat bread can be unpredictable sometimes so I don’t trust a machine. For example, whole wheat bread is quite sensitive to temperature and will rise way too fast when it’s too warm. Freshly ground wheat can be quite thirsty so you might need to correct the moisture level. These are things that are impossible to predict ahead of time.
Good luck and I hope it turns out great on the very first try.
Yes. But evaluate the moisture level closely as freshly ground wheat can be thirsty…or not. I have only tested this recipe using the DOUGH cycle.
Hi Paula, I’m hopefully going to try this over the weekend when My vital wheat gluten arrives from Amazon. Can I just ask is the whole wheat flour strong bread flour or just whole wheat flour ? Actually in the UK, we call it
Whole meal flour .
Thanks Paula.
Hi Jules,
Hmmm. I’m not an expert on flour in the UK. Far from it. Good bread flour usually has 13-14% protein. For this recipe, I use regular whole wheat flour (whole meal?) because that’s the only whole wheat flour available in most grocery stores in the States.
I hope you’ll let me know how this recipe turns out for you and what kind of flour you ended up using for your bread.
This has turned out perfectly every time I’ve made it.
I never get tired of hearing this!! Thank you for writing.
I never buy whole wheat bread as myself and my family don’t like it but this is a game changer! If you’re looking for a healthier everyday bread, this is the recipe you’ve need. Amazing flavour. I still will never whole wheat bread but I will be buying whole wheat flour to make this bread regularly. Not only does it taste great but a healthy choice for everyday. Thank you Paula again
Hi Jacqui,
I’m so happy to hear that you love it. If you can find white whole wheat flour made with hard white winter wheat (check at Target or online), your family won’t even realize it’s whole wheat but the nutrition is the same. The flavor is more mild than when using regular whole wheat flour made with hard red winter wheat berries.
Thank you for taking the time to write.
Didn’t rise very much on the first rise. Any ideas why?
Hi Kim,
My first guess is temperature. Is your kitchen rather cool or drafty? If so, move the machine to a warmer place or throw a quilt over it to keep it warm. If you have a quick-read digital thermometer, it’s easy to check the temperature of the dough. Ideally, it will be between 76 and 80˚F.
Did you measure or weigh the flour? Weighing is much more accurate. Measuring with cups often results in a dense dough that takes longer to rise.
Because this is 100% whole wheat, the dough is not going to rise as high as dough with bread flour in it. Did you let the dough sit for 30 minutes after mixing it as instructed in the recipe? This helps the rise, too.
There could be other reasons; these are just common ones. Do you think any of these are possibilities?
Hi Paula – your absolutely right about allowing the semi mixed wet dough to rest for at least 30 min. Makes all the difference with w.w. bread recipes. Also I always add 1 Tbls. lemon juice or vinegar as part of the liquid ingred. (reduce water by 1 Tbls.) Maybe that’s picking up on adding the orange juice idea. (old old trick)
Hi Dee,
Yep. That whole wheat flour needs time to soak. I haven’t tried the lemon juice with this recipe but I do love it in my basic white bread. The orange juice sounds good with whole wheat, too. Thanks so much for writing.
My breadmaker tells me to add the dry ingredients first, then the wet. But, if I want to make this recipe do I follow the order as you have described?
Hi Sheila,
I’ve owned and used several different bread machines, but none like you describe. However, I would make this bread according to my directions, first. The wheat flour needs to soak for 30 minutes before you add the remaining ingredients since it’s 100% wheat flour. That’s part of the secret to this recipe. (By the way, this recipe is somewhat advanced, so I hope you have some experience making bread.) Since you won’t be using your machine to bake the bread, I think it will work out fine. Let me know if you try it.
You say, “With a Zojirushi, set the timer for 2:00. Then press START. The DOUGH cycle will automatically start in 30 minutes.”
Since you seem to want the ingredients to be mixed a bit, wet, should I just start the Zo, let it run in DOUGH cycle for 1 minute or so, THEN set the timer? Or, will just the fact that the whole wheat flour is just sitting on the water be enough?
Thanks!
(No oven wanted right now – was 107° in Hot Humid Houston yesterday & no break in sight!)
Hi Cindi,
I hear you about the heat. We were 106 here in the DFW area yesterday. Our swimming pool has turned into a big bathtub. So I completely understand about not using your oven. My solution is to prepare the dough. After the DOUGH cycle ends, I put the dough into the fridge overnight, then shape and bake the dough as soon as I get up the next morning before the temps get too awfully high.
Back to your question: The flour does need to be sitting in the water. Do whatever it takes so that all the ingredients are mixed up, then just sit there for 30 minutes before the mixing and kneading starts. If you use the timer, you can set it and leave the kitchen until the DOUGH cycle completes. Or you can start the DOUGH cycle and let it run for 1 minute.Stop or unplug the machine. Come back to the machine in 30 minutes and restart the DOUGH cycle. It’s kind of hard to explain, so let me know if you still don’t understand and I’ll try again.
Been making bread for years but this has now become a family favorite. My question is can I add nuts and/or seeds? If so, what proportion would you suggest or how would you adjust the recipe?
Hi Dawn,
So glad you like the bread. I have not tried adding any nuts or seeds. If I did, I would start out with a maximum of 1/2 cup and see how that goes. Because 100% whole wheat bread is more fragile, it may cause the bread to be dense. Experimentation is in order. If you figure it all out, leave a note here in the comments. I’m sure other readers have had the same question.
Has anyone made this completely in their bread machine??
The title of this recipe is misleading. I assumed that it would be completely made in the bread machine and it was not. I do not have time to shape and bake traditionally. I take responsibility for not having read the whole recipe before starting.
Hi Asiya,
All of my bread machine recipes are made this way. I am super picky about the crust, shape and texture of my bread since I give a lot of it away and even sell it. My readers like to share their bread, too. Bread with holes in the bottom, cardboard crusts, crumbly texture, and ugly shapes are not good enough. Some of my readers do bake their loaves in their machines and that’s fine, too, but I make no promises about the results. Some recipes work better than others.
Hi Paula! I’m a longtime fan of your bread machine method recipes. I have made this loaf twice — the flavor is OUTSTANDING and I want to make this my everyday family bread; however, I’ve been having issues of 1) the loaf sticking to my USA Pans (despite being oiled thoroughly), and 2) hole/tunneling where the bread is pinched together. I’ve not used flour or oil when shaping, only water. My first loaf rose very, very quickly, so I reduced the amount of yeast and the second loaf was less precipitous. 🙂 Can you help me figure out what I’m doing wrong, please?
Hi Margy,
Glad to hear you are enjoying the wheat bread. I had issues with both of these things while testing this recipe.
1. The loaf sticking: This can happen if you use too much water on your hands while shaping. The best solution is to make a parchment paper sling–but that could get expensive. I didn’t have any problems with sticking when I used my USA pans, but I did with other pans. By any chance, have you washed your USA pan in the dishwasher? Just curious. You may not like aerosols, but have you tried spraying your pans with Baker’s secret? That stuff works like a dream. One other tip–use a plastic knife to release the bread from the sides of the pan so you don’t damage your pan.
2. Holes and tunnels: I think this is a common problem for bread makers because if you search around the internet for 100% whole wheat bread, you will see lots of small and large tunnels in the pictures if they show a slice. Many won’t show a cut slice (my pet peeve). Assuming you haven’t used oil or flour in the shaping, the best way to minimalize this occurrence is to be sure you gently press all the bubbles out of the dough after you have shaped it into a rectangle. I use a rolling pin and make sure I roll it firmly over the entire rectangle and don’t miss the edges. As you roll up the rectangle, be sure that the dough is snug without stretching it. Pat the seam down with your fingers to see if that will help. I’m guessing a little practice will fix the problem.
A word about the rapid rise of the dough: You did well to decrease the yeast. That never hurts as long as you have plenty of time for the dough to rise. Unless your house is extra cold, you don’t need to set the dough in a warm place to proof. Also, there is no need to warm any of the ingredients (chop the butter). The friction caused by the kneading paddles will heat everything just fine. The longer the rise, the better the flavor.
This was one of the easiest breads I’ve made so far!! Thank you for this recipe! I’ll be making it a lot!
Glad it worked for you. Your letter makes my day!
I have been experimenting with whole wheat flour for some time now. I haven’t tried this recipe yet, but some variations that I’ve tried include using orange juice as part of the liquid element (I’m not sure of the source of this idea). It does temper the sometimes bitter flavour of the whole wheat. Another recipe that I have calls for 2 tablespoons of molasses. Not sure why and it does give the bread a darker look. I don’t particularly like the final product with the molasses but thought I’d let you know. I also have a whole wheat challah (egg loaf) recipe although some of my friends tell me that challah “can only be made with white flour”. They’re purists!
I’ll try this recipe next loaf! Thanks.
Hey Stephen,
I can’t wait for you to make the recipe and let me know how it turns out for you–good and/or bad. Orange juice is a brilliant idea. Unfortunately, I don’t keep orange juice in the house. Although come to think of it, I usually have 1 or 2 oranges in the fridge. I could use one of them. I agree with your purist friends about the Challah. Whole wheat flour just doesn’t seem fittin’. On the other hand, when you are making the dough, you are the boss and can do exactly as you please. Right?? Yep!!
@Stephen, Made it this morning and the results are excellent. Great looking and great tasting. Didn’t use peanut butter and did add 1/4 cup orange juice + 1 cup water.
I’ve gotta give the orange juice a try.
In the recipe above can i use bread machine yeast and if so how much for this recipe please
Hi Cheryl,
Instant yeast and bread machine yeast are the same thing. See this post
Follow the recipe and use 2 teaspoons. Hope this loaf turns out to your liking.
I have used my bread maker many times for the dough cycle – mine is 2 hours long. My question is – can I take the dough out after the first rise when the machine knocks it back. – it’s way before the 2 hour mark?
Thank you
Hi Nancy,
Good to hear from you.
I need a few more details to give you an intelligent answer. What brand is your machine? Does your DOUGH cycle include a resting phase at the beginning of the DOUGH cycle? If so, can you shut it off? (you don’t need it). Are there rest times sporadically sprinkled throughout the kneading phase?
In general, the two rises that most bread machines incorporate into the DOUGH cycle help to improve the texture of the finished bread. In the end, do what suits you best. You are the boss of your bread machine (not the other way around.)