A Surprising Secret for Making Better Bread with a Bread Machine
Sneak Peek: This surprising secret for making better bread with a bread machine will help improve the texture of your bread, whether you bake it in the machine or a conventional oven.
As an Amazon Associate, I earn from qualifying purchases.
Did you buy a bread machine hoping it would magically make the perfect loaf of fresh yeast bread with the press of a button? You might get lucky, and it happens.
However, I can relate if your bread hasn’t turned out so great. I was ready to throw out my machine until I discovered the most important thing you should do when using one.
Three Steps To Making Better Bread with a Bread Machine
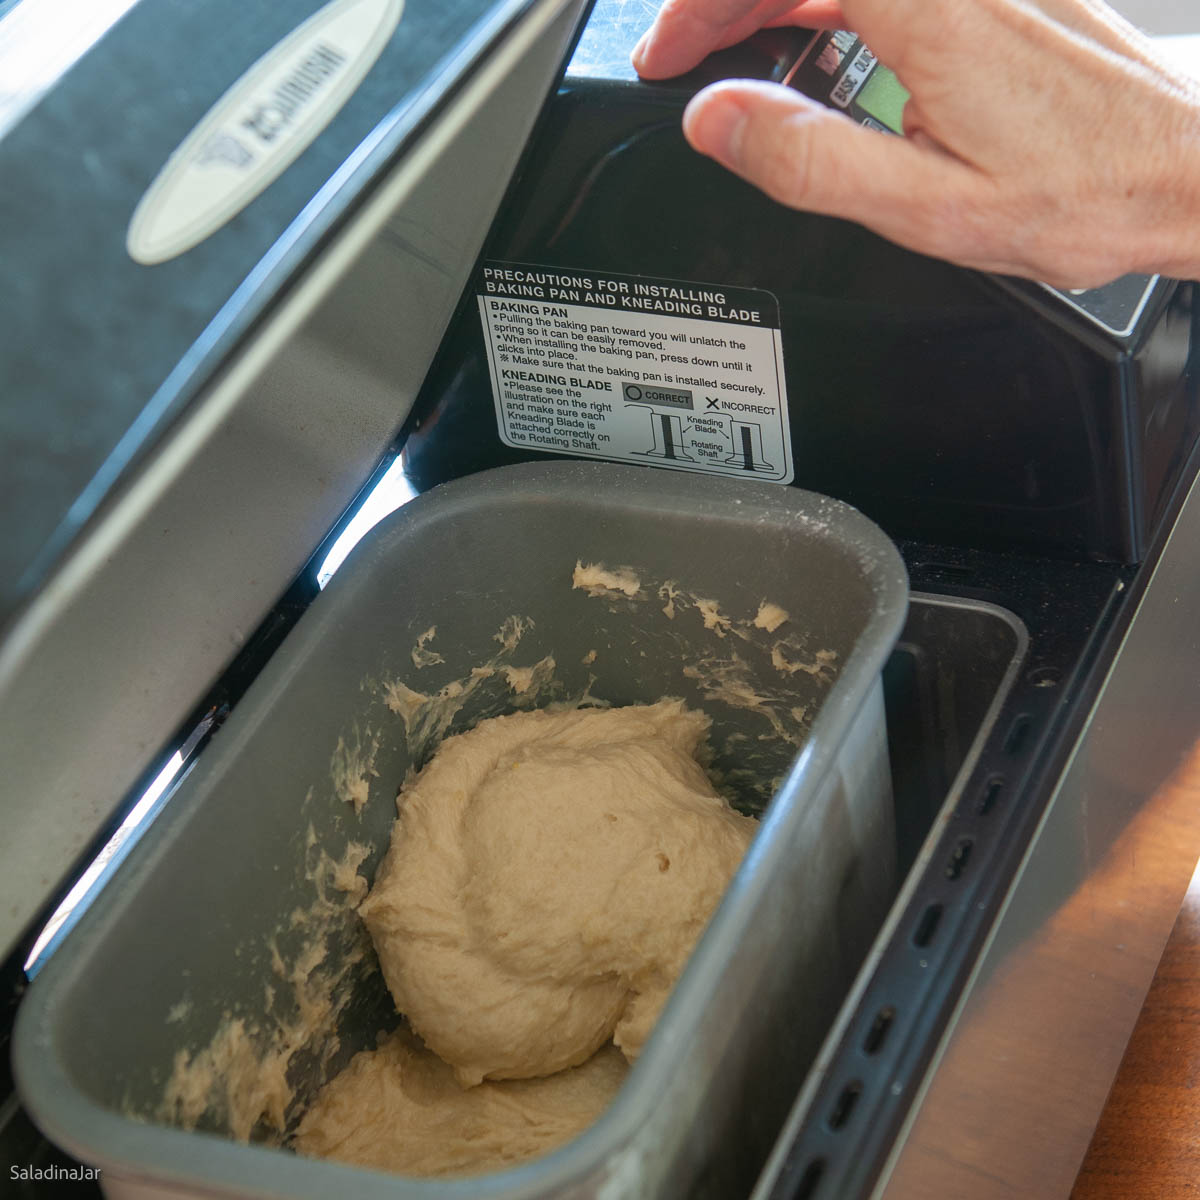
- Open the lid to observe dough consistency.
- Assess if the dough is too dry or wet as it kneads.
- If necessary, add more liquid or more flour.
Keep reading for the full scoop!
Happy Bakers Speak Up
“Awesome! I have an old model bread machine that never made a good bread and that I was thinking of throwing away. Looking at your tips, I was able to use it today for kneading and got myself a perfect loaf of bread. Can’t thank you enough.” — SANJAY
Three Reasons Why Checking the Dough is Important
If you set your machine and walk away like most people, you may be surprised when you return. Unfortunately, it may not be a delicious or edible surprise.
- Ensure the paddle is correctly inserted and engaging properly.
- Double-check that you measured correctly and left nothing out, such as the yeast.
- Your bread machine can’t compensate for a poor recipe, high altitudes, weather extremes, different flour characteristics, or reckless substitutions. However, watching the dough knead can help you save the bread.
“Your bread machine has no brain.”
📌Kitchen Tip📌
Keep a small spatula handy when you look at your dough. Use it to clean out any unmixed flour left in the corners.
When should I look? Open the lid and check the dough at least twice. Check three times if using the DOUGH cycle.
First Check
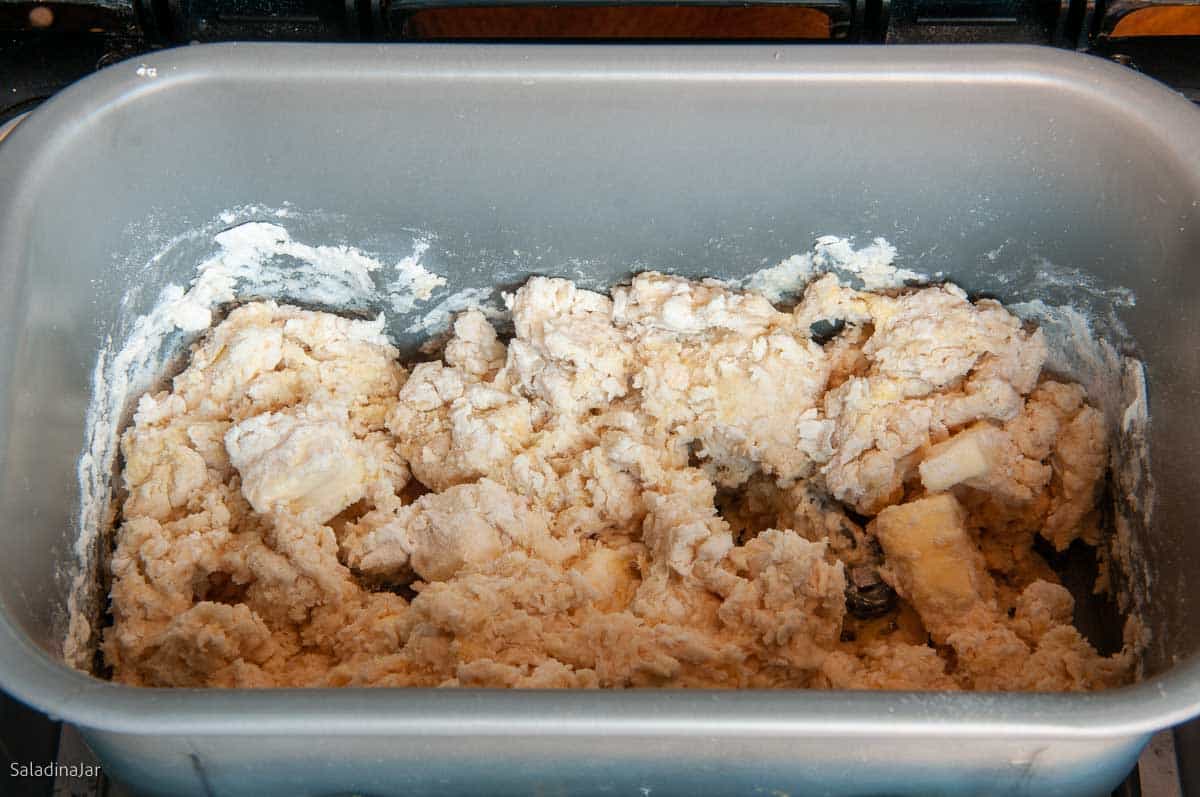
Within the first minute after the kneading phase starts, open the lid and peek at the dough. Ensure the paddle(s) are engaged and the ingredients start clumping. The dough should stick together in big and small lumps. It looks messy and raggedy, but the dough is coming together and trying to form a ball.
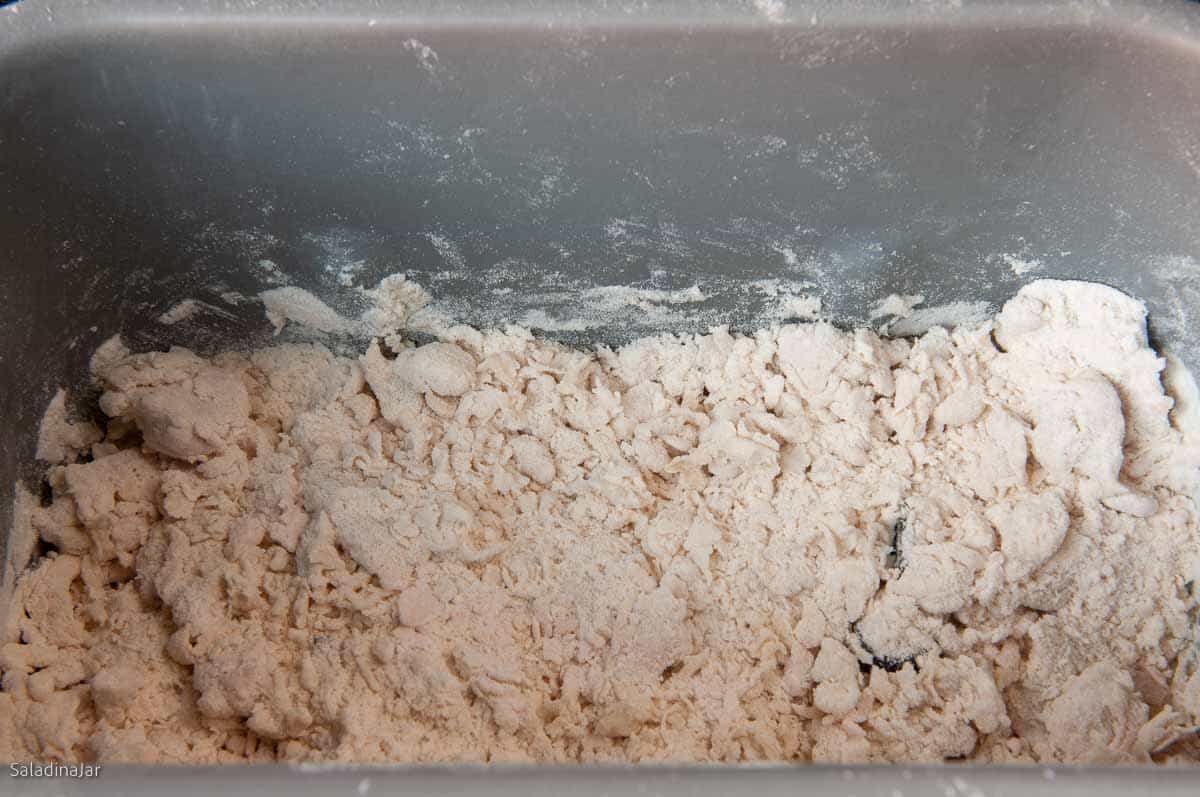
Just as bad is the opposite problem.
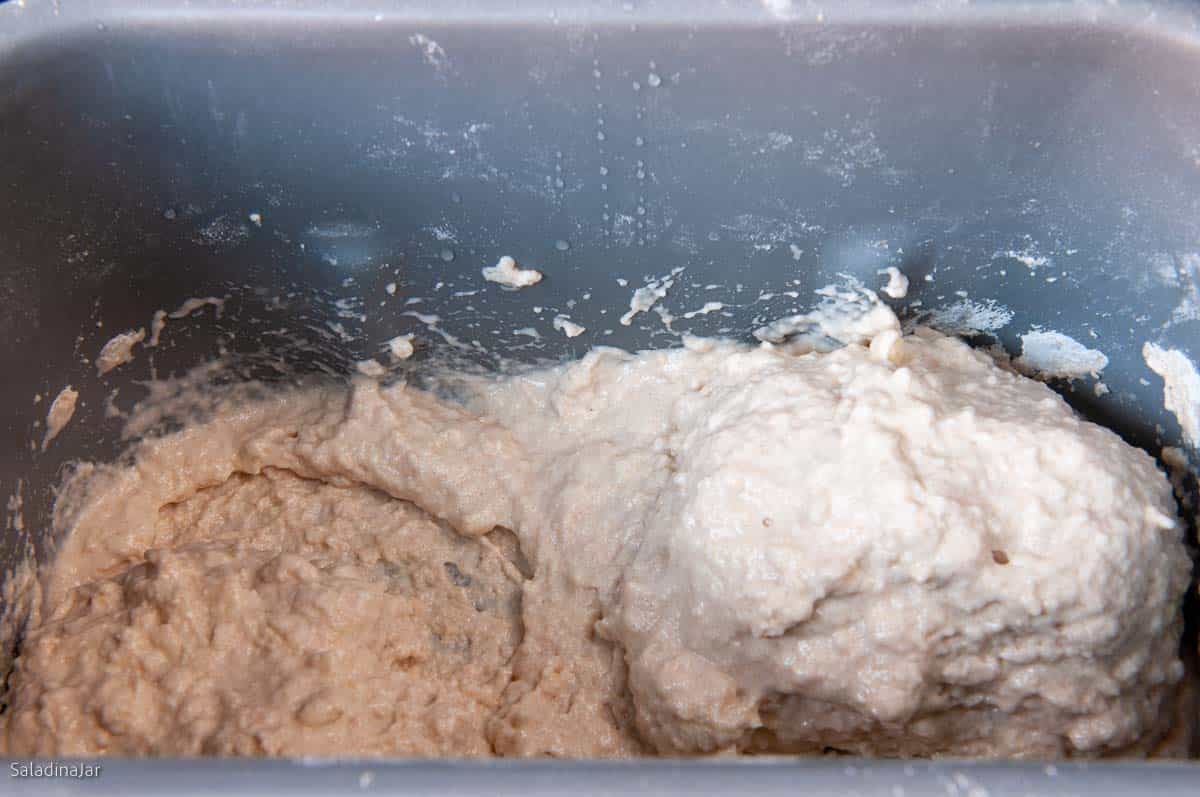
Six Reasons Why Your Dough Isn’t Clumping
Consider these possibilities before you pronounce the recipe a dud or sell your bread machine in the next garage sale.
- Did you misread the recipe? 🙋🏼♀️ (I’ve done this more than I want to admit.)
- Were you interrupted or distracted mid-recipe? Did you leave out an ingredient or miscount your cups or teaspoons? (I’ve done this one, too.)
- Did you substitute an ingredient with a different consistency or characteristic from the original? I try to give this information in my substitution list, but sometimes, readers’ imaginations regarding variations eclipse mine.
- If you weigh your ingredients, did you zero out between each ingredient? (Guilty of this one too.)
- If you measure your ingredients, were you precise and careful not to pack the flour? Consider this one if your mixture is dry. If you stick with recipes that list weights, your chances for success are much better.
- Did the author make a mistake? If it’s my recipe, send an email ASAP with details.
Three Ways To Correct the Problem To Avoid an Impending Bread Disaster
Do these things as the machine kneads.
- Add omitted ingredients immediately.
- If the dough looks like oatmeal, add more liquid, one tablespoon at a time, until the dough starts to clump.
- If the dough looks like pancake batter, add more flour, one tablespoon at a time, to encourage clumping.
Beware of the seesaw effect: Go slow when making adjustments. If you add too much liquid or flour too fast, you may have the opposite problem 10 minutes after the dough has absorbed the ingredients you added.
Knowing when-what-and-how-much with bread dough requires experience, a sixth sense, and sometimes, good luck.
Second Check
Open the lid and recheck approximately 15-18 minutes after starting the machine.
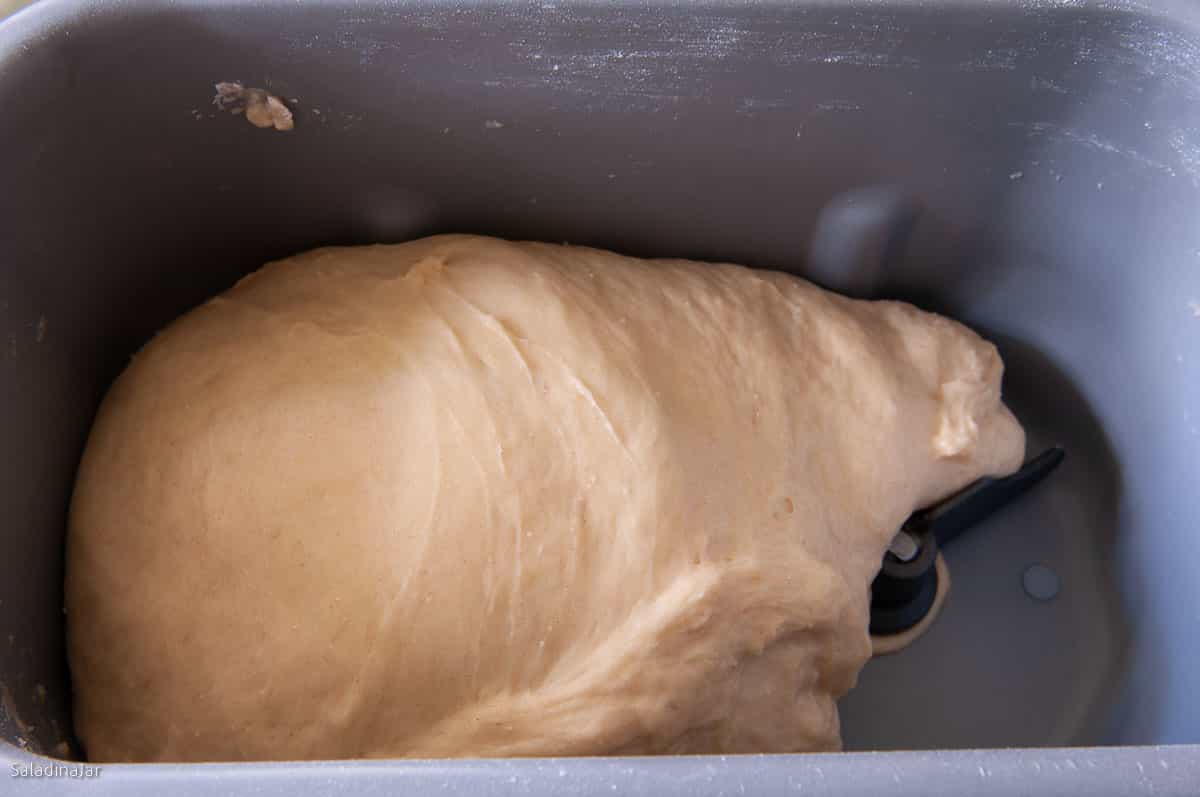
The dough should stick to the side, then pull away cleanly as it kneads.
The dough in the video below is the perfect consistency for the average loaf of yeast bread. It’s pliable, shiny, smooth, and tacky without being too sticky.
How Do I Adjust the Consistency of the Dough?
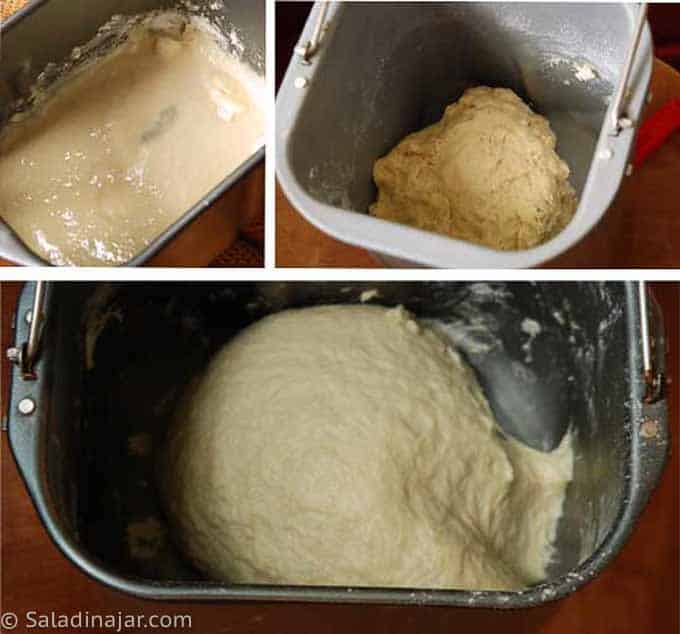
If the Dough is Too Dry
Is the dough crumbly and refuses to form a ball? Or maybe it makes a ball that slaps loudly against the side of the pan or rides around on top of the paddle like a playground spinner
Add a tablespoon of liquid (preferably the same as used in the recipe). Give it a couple of minutes to absorb. Check again. Keep doing this until the dough sticks to the side briefly, then pulls away.
If the Dough is Too Wet
Does it look gooey and sticky? Add a tablespoon of flour and watch until the dough sticks to the sides and pulls away cleanly. Allow a couple of minutes to incorporate the flour before adding any more.
Remember, some doughs will be wet, like a brioche, ciabatta, or English muffins. If you are a beginner, avoid these recipes until you have dependable success with a simple loaf like this French Bread.
Third Check (only if you are using the DOUGH cycle)
Check to see if the dough has risen enough at the end of the DOUGH cycle.
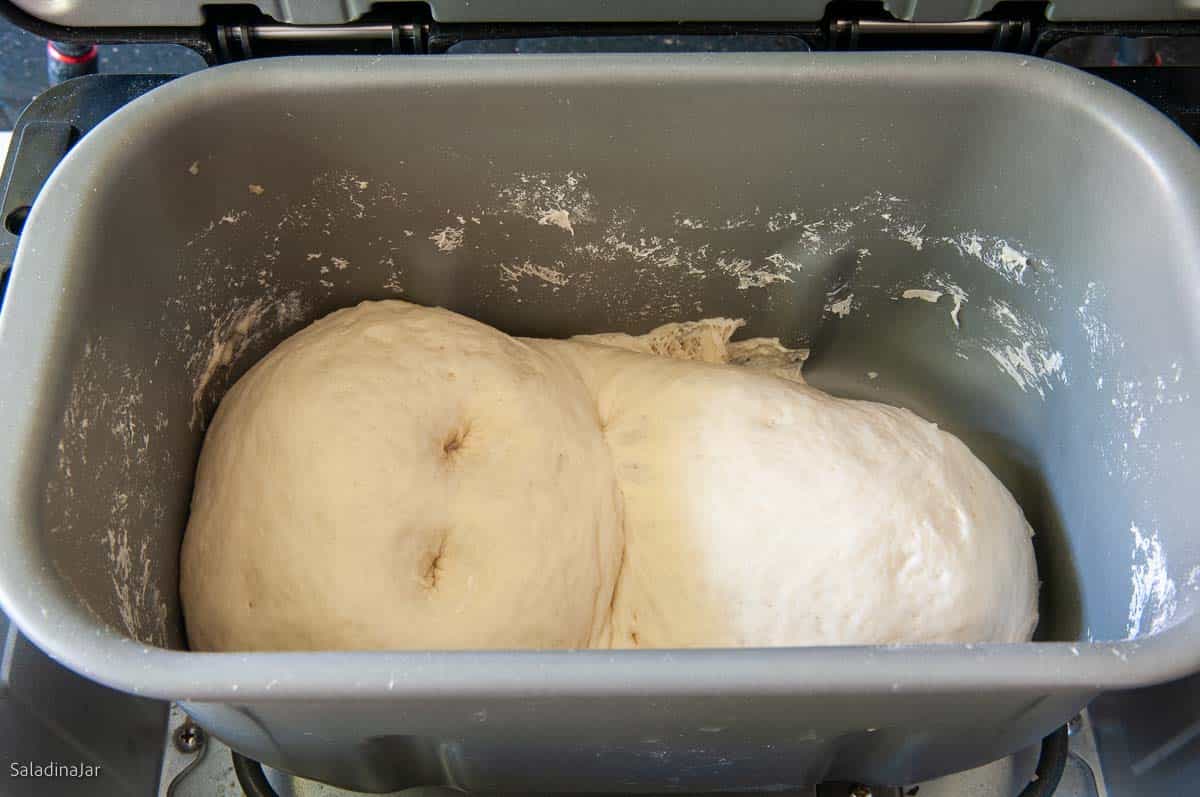
Just because the dough cycle has finished doesn’t mean your bread has risen enough to proceed to the next step.
Conversely, if the weather is warm and humid, the dough may be over-proofed if you wait until the end of the DOUGH cycle. During the summer, check your dough early to see if it has already risen enough. If so, remove it from the machine and shape it.
This is one reason why making bread in a bread machine from beginning to end can be tricky. If the dough hasn’t risen enough or has over-proofed, your machine isn’t intelligent enough to recognize it. The result? Dense bread.
1. How will I know when the dough has risen enough?
Use two floury fingers to poke into the dough. If the indentation bounces back, you will know it needs more time. On the other hand, if the holes fill back in slowly, the dough is ready to be removed from the pan and shaped.
Note: Most bread machines incorporate two proofing periods into the DOUGH cycle. Check the dough close to the end of the second rise.
2. If it hasn’t risen enough, then what?
- Leave it in the machine and let it continue to rise. Set a timer to remind yourself to check again in 15-30 minutes.
- Move the dough (either in the bread machine pan or to another bowl) to a warmer location. This might hasten the rising process.
3. What if I forget about the dough and it over-proofs or rises too much?
Remove the dough from the pan and gently compress it to remove the bubbles. Put the dough back in the bread machine pan or another bowl and allow it to rise again, but this time, watch it closely. It will rise faster because it’s already had some practice.
“Over proofing happens when the dough has proofed too long and the air bubbles have popped. You’ll know your dough is over proofed if, when poked, it never springs back. To rescue over proofed dough, press down on the dough to remove the gas, then reshape and reproof.”
—Baking 101: What Is Proofing? Learn How to Proof Breads and Other Baked Goods
FAQ About Making Better Bread with a Bread Machine
1. Is it safe to open the bread machine lid while the machine is running?
Yes. I highly recommend it. Checking the dough as it kneads helps you make corrections on the fly.
Opening the lid during the mixing cycle won’t affect your bread. It’s better than looking through the little window at the top, which won’t give you much information.
Addendum 12/21/21: Some newer bread machines will no longer keep running when you open the lid. This is an unfortunate safety feature for bakers who want to make fabulous bread. Do your best to watch the action through the window, then open the lid to add more flour or liquid.
2. Are there times when I shouldn’t open the lid?
Avoid opening the cover in the middle of the proofing period, especially if your kitchen is cold. You don’t want any heat to escape, thus slowing down the dough’s rise.
Don’t open the lid during the preheating and baking cycle if you use your machine to mix, knead, and bake. You don’t want to lose heat.
3. What can I do if my bread maker loses power in the middle of the cycle?
Whatever the reason, remove the dough from the pan (unless your machine comes back on in a few minutes). If the dough is well-kneaded (smooth, shiny, and elastic), place it in a bowl to finish rising. Shape it, let the dough rise again, and bake in your oven.
If the dough is poorly mixed or kneaded, you can knead by hand or use a stand mixer with the dough attachment. However, if the bread has already started baking, you may be out of luck.
4. Does it matter if I don’t use a digital scale?
Weighing flour will minimize the need for adjustments. In addition, a digital scale will minimize differences caused by measuring techniques and environmental variations. Checking the dough moisture, as described above, will compensate for many problems caused by inaccurate flour measurements.
Most American bread recipes don’t specify weights. Thankfully, that is changing.
Happy Bakers Speak Up
“Your bread machine tutorial saved my bread a few times already. Checking the bread machine mixing after a few minutes is genius. Once, I didn’t have the pan all the way in the machine (my Cuisinart was really stiff when it was new) and another time, I didn’t have the paddle in tightly, requiring a dump out of the pan, but I still got perfect bread. I love your recipe hints that deal with leftover ingredients. I’m tired of dumping out 3 1/2 cups of buttermilk, love the idea that I can freeze it for the next time. Hand shaping a loaf is far more easier than I’d imagined and more impressive than my former “holy” loaves with tough crusts that I baked in the machine. Your videos and visuals on how to check for adequate rise, shaping bread, etc. are wonderful. I recommend your blog to other bread bakers that I know.”—LAURIE
If you are new to the bread machine world and want to increase your chances of success, start with a bread machine mix from the grocery store. Or, try using one of my bread machine recipes designed for using a bread machine as I do, using only the DOUGH cycle. Start simple with something like pizza dough. Check out this post with over 67 of my tried and tested bread recipes you can make with a bread machine.
Parting Thoughts: Remember that making bread is an art, not an exact science. Experience is key. Start checking your dough, and I predict you’ll eventually be a master bread baker.
Do You Need More Encouragement?
- 5 Surprising Reasons I Don’t Bake Bread in My Bread Machine (But I Use It All the Time)
- How to Convert a Yeast Bread Recipe for Use in a Bread Machine
- 6 Bread Machine Secrets You Need To Know
If you have questions or suggestions, email me privately for a quick answer: Paula at saladinajar.com. Hope to see you again soon!


Paula Rhodes, owner
As a retired home economist, I created Saladinajar.com to share my belief that you don’t have to be a chef to find joy in creating homemade food worth sharing. Bread machines (used in an unconventional way), homemade yogurt, and quick microwave recipes are my specialty.