Sweetened Condensed Milk Bread (Bread Machine Dough)

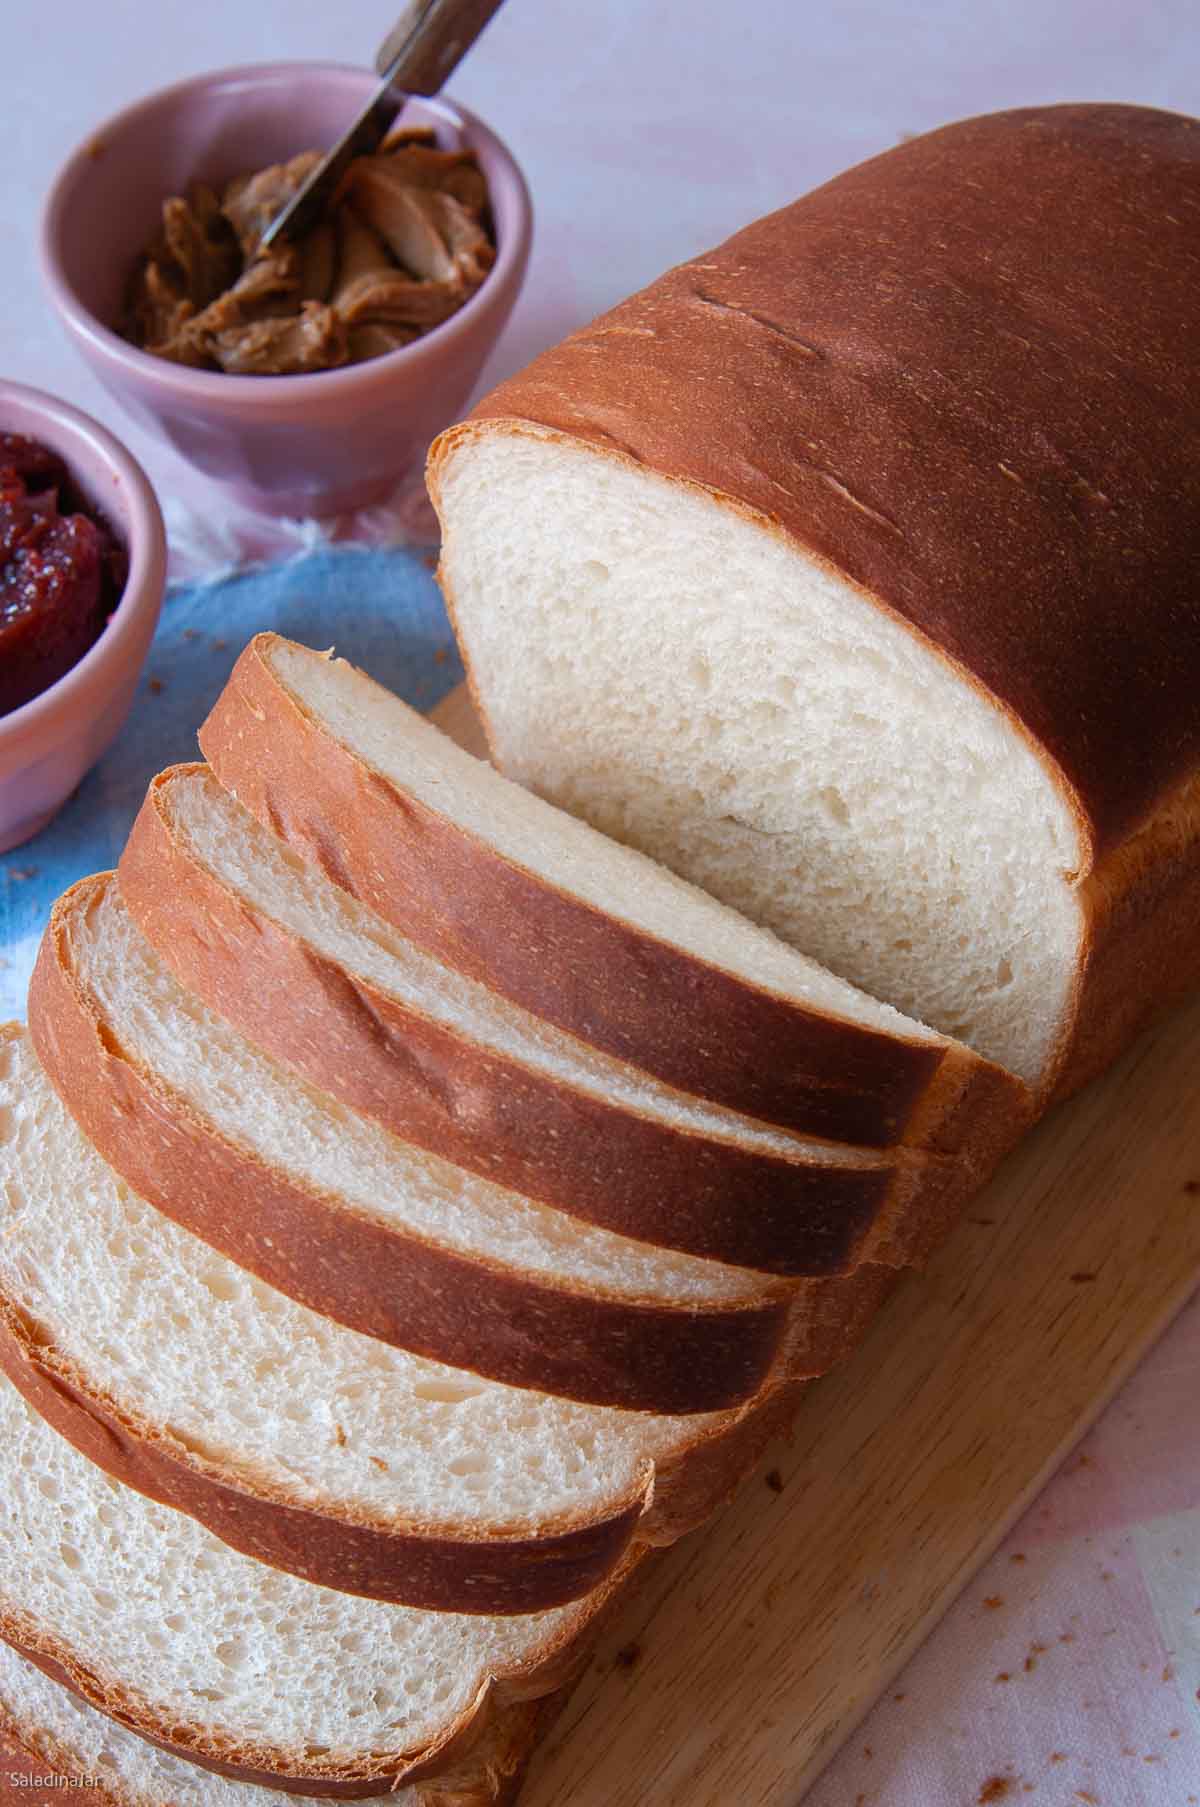
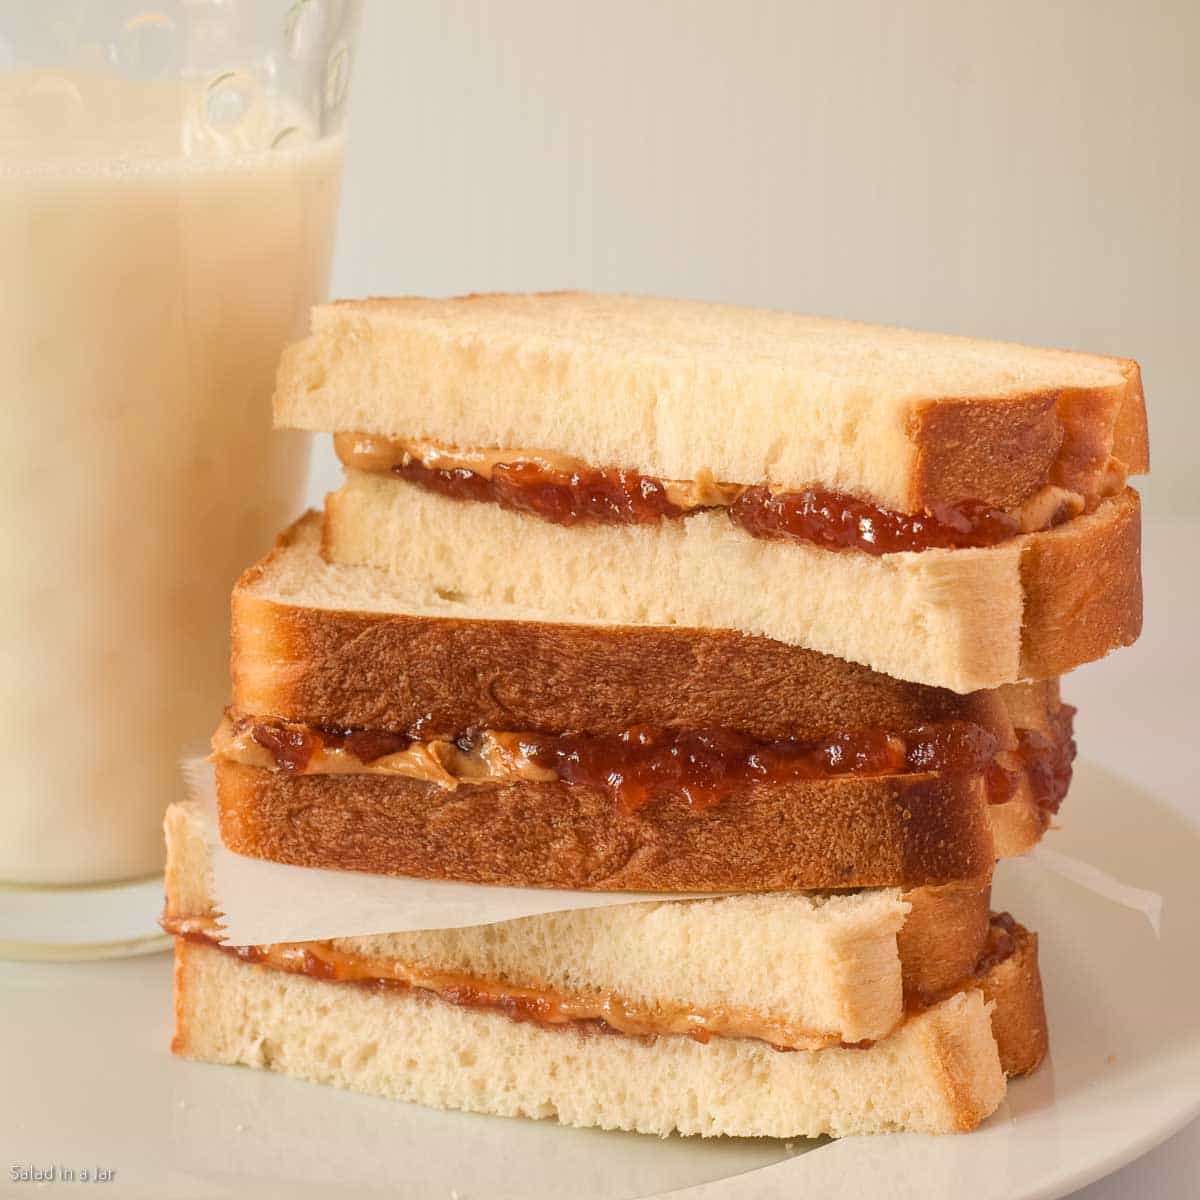
Sneak Preview: This sweetened condensed milk bread is mixed in a bread machine, shaped by hand, and baked in the oven for a soft, lightly sweet sandwich loaf. Ready in about 3½ hours and especially good for toast, PB&J, or French toast.
This post contains affiliate links. As an Amazon Associate, I earn from qualifying purchases at no extra cost to you.
If soft, tender white bread is your guilty pleasure, this loaf is worth the splurge. As a teenage exchange student in Europe, my host family teased me for wanting PB&J — but I think the real problem was the bread. Chewy baguettes and ciabatta just don’t deliver the same experience as this velvety, slightly sweet loaf made with condensed milk.
Ingredients and Substitutions
• WATER: Tap water is fine. Cool water is good when using a bread machine.
• SWEETENED CONDENSED MILK: Essential for ideal texture and sweetness. If unavailable, make your own (I typically prepare half a recipe). Cream of coconut can substitute in a pinch but will change the flavor.
• SALT: Sea salt or table salt both work well. Add an extra ¼ teaspoon if using Kosher salt.
• BUTTER: Butter provides the richest flavor, salted or unsalted. Avoid melting; chop cold butter finely instead.
• BREAD FLOUR: Gives superior rise and a pleasantly chewy texture. Substitute with all-purpose flour, but you may need to add slightly more—check dough consistency.
• YEAST: Bread machine yeast or instant yeast is ideal. Active dry yeast can be substituted, but may require additional rising time.
No bread machine? See the recipe notes for how to make this recipe with a stand mixer or by hand.
Step-by-Step Instructions
⬇️ Jump to the recipe below for exact amounts and detailed instructions.
Make the Dough
Shaping the Dough
Bake
Sweetened Condensed Milk Bread (Bread Machine Dough)
Video
Ingredients
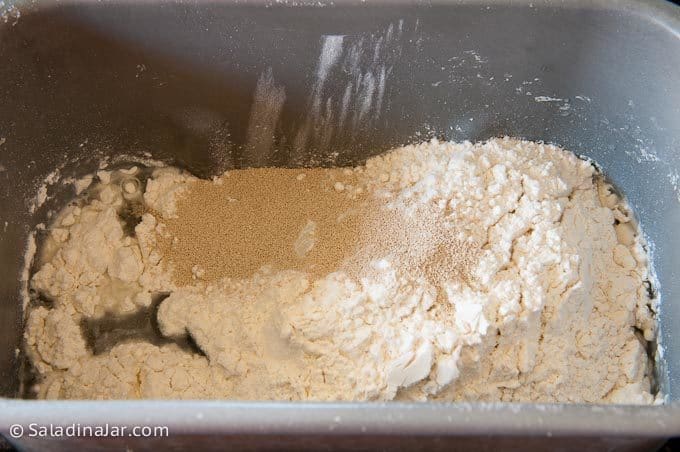
- ⅞ cup (198 g) water (cool)
- ½ cup (156 g) sweetened condensed milk
- 1¼ teaspoon salt
- 1 tablespoon unsalted butter (chopped)
- 3 cups (360 g) unbleached bread flour
- 1½ teaspoons instant or bread machine yeast
Instructions
- Load the Ingredients: ⅞ cup (198 g) water (cool) , ½ cup (156 g) sweetened condensed milk, 1¼ teaspoon salt, 1 tablespoon unsalted butter (chopped), 3 cups (360 g) unbleached bread flour), and 1½ teaspoons instant or bread machine yeast to the bread pan in the order listed.
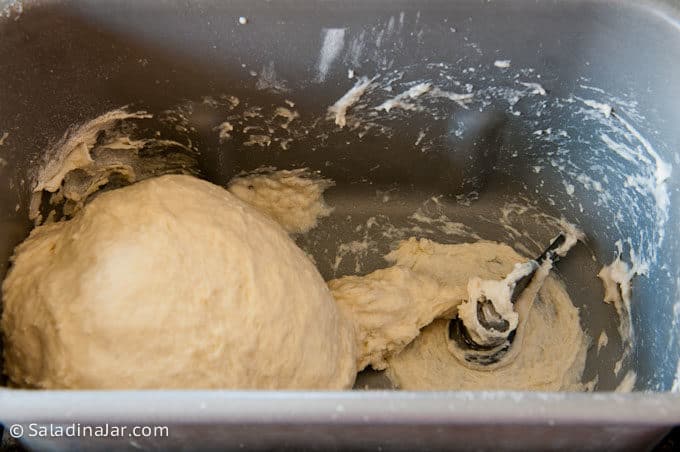
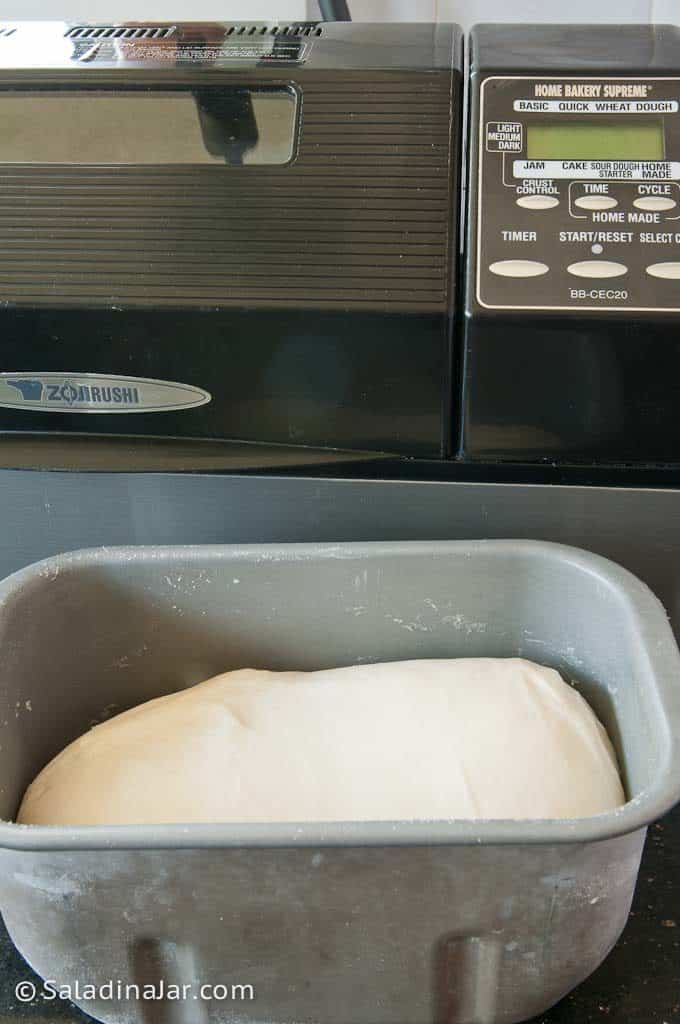
- Select the DOUGH cycle and start.First check: After a couple of minutes, check the dough to make sure it is coming together into a raggedy ball. If not, add more water 1 tablespoon at a time. If you see pancake batter instead of dough, you forgot some flour—just add it slowly until everything pulls together.Second check: Check dough again after about 15 minutes. The dough should stick to the sides of the pan, then pull away cleanly. If too wet, add flour 1 tablespoon at a time. If too dry and the dough doesn't stick at all, add more liquid. See more details–Surprising Secret for Making Better Bread with a Bread Machine.NOTE: Bread dough is influenced by flour, humidity, and even your kitchen temperature—so use this step to fine-tune the dough for your environment.
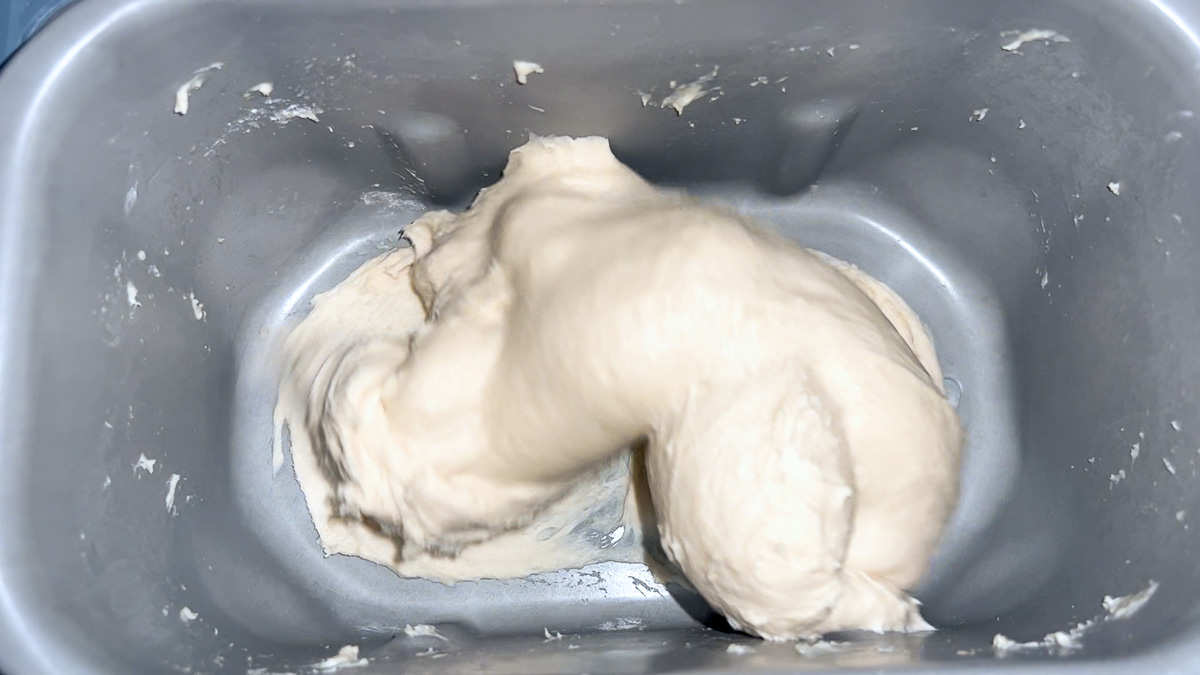
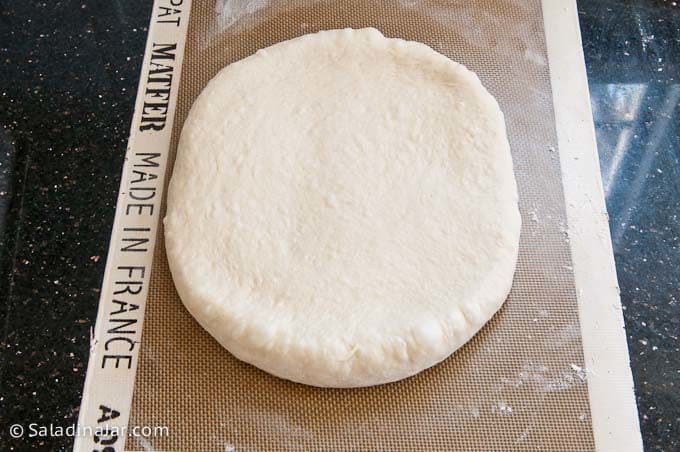
- End of DOUGH cycle: The dough should be doubled. If not, give it more rise time until it is. Restart the DOUGH cycle and knead for 5 seconds to deflate the dough. Stop the machine and turn the dough out onto a lightly floured surface, shape into a smooth ball, cover, and let rest for 10 minutes.
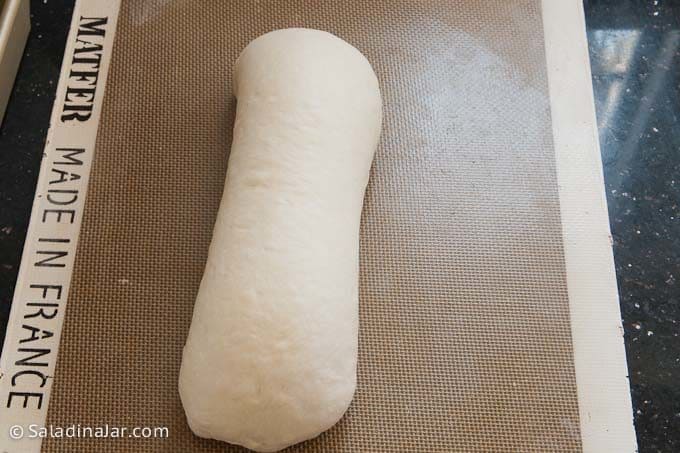
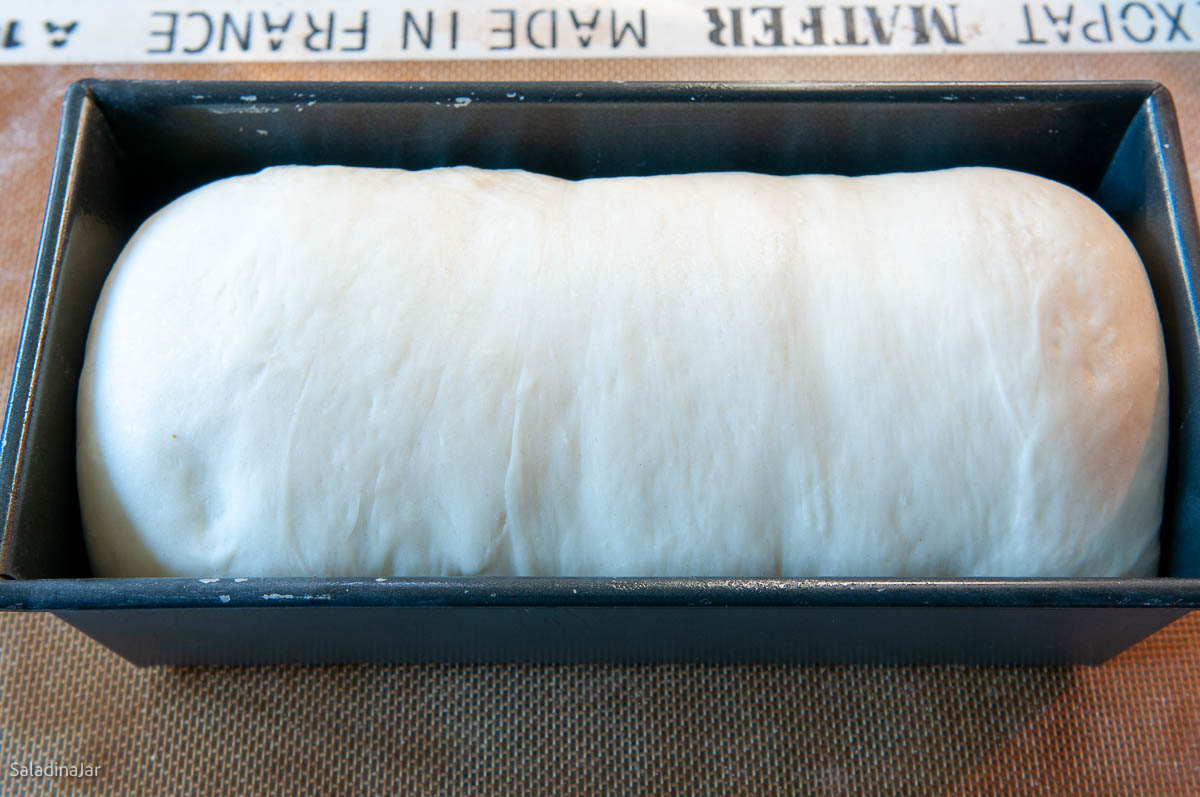
- Shape the dough: Roll dough into a rectangle (aproximately 9 x 11 inches), then roll up tightly and pinch seams and ends together.
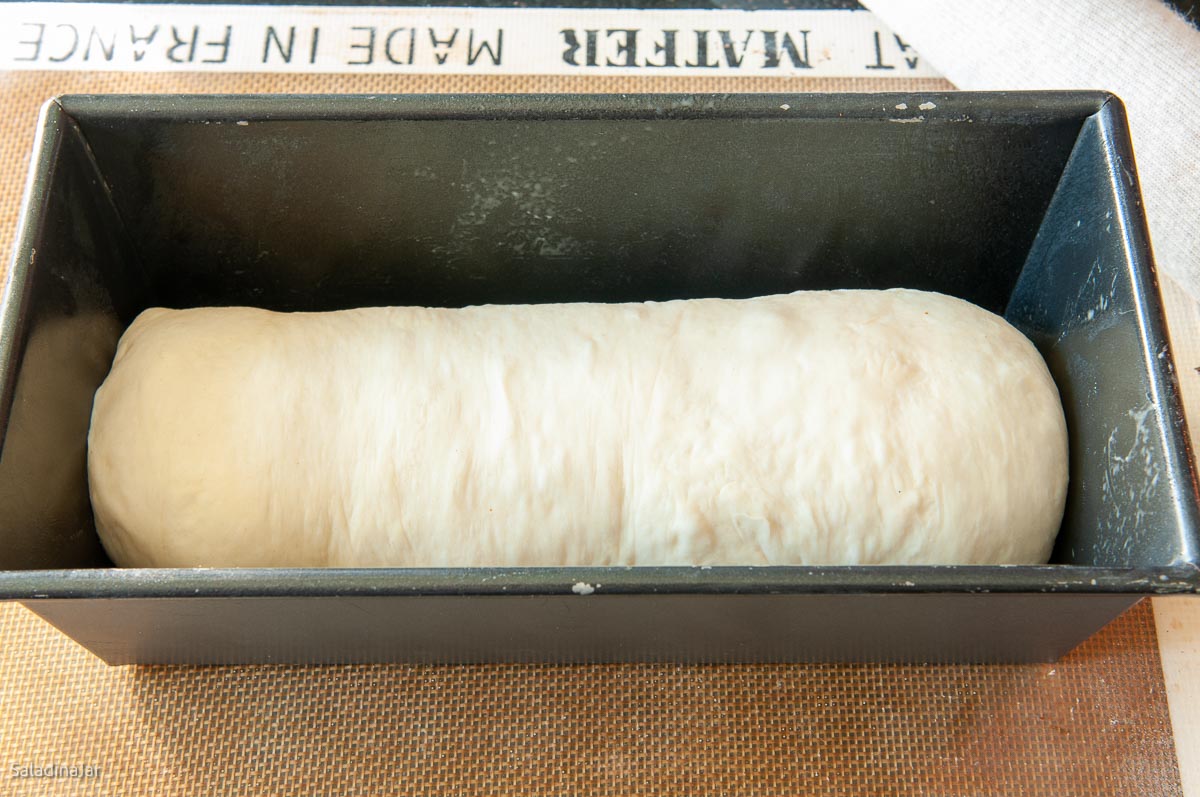
- Final Rise: Place seam-side down in a 9 x 5-inch loaf pan. Cover and let rise until the dough is just shy of doubling. Do not over-proof—this dough rises high and may collapse if left too long.Tip: If your pan is smaller, don’t use all the dough. Use extra for rolls or try a 9x4x4 Pullman pan.
- Preheat oven to 375°F (190°C).
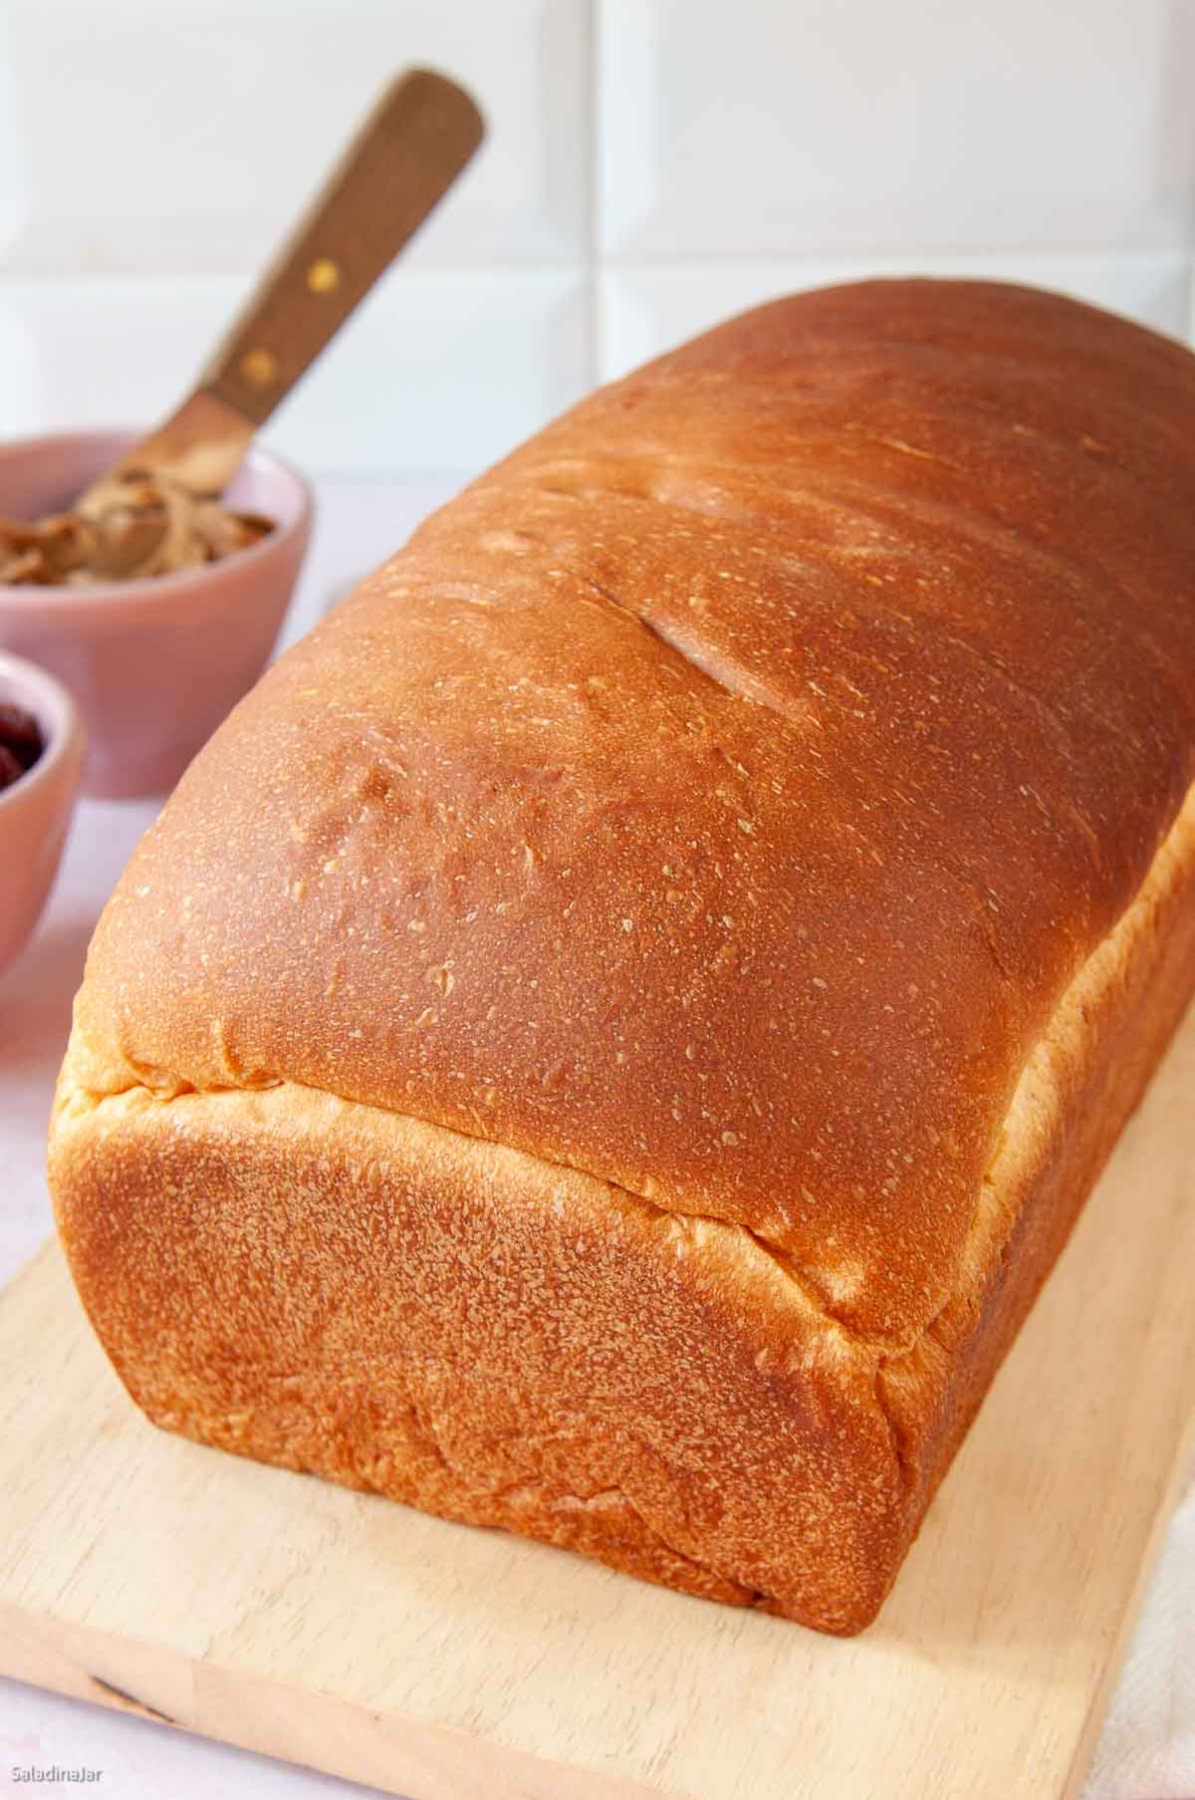
- Bake at 375˚F (190˚C) for 35-45 minutes. The interior should reach 190˚F (88˚C). If necessary, place a foil tent over the bread halfway through baking to protect it from over-browning.
- Cool for 15 minutes before removing from the pan to a cooling rack. Let rest for 2 hours before slicing to avoid squashing your loaf.
Notes
- Unbaked dough: Freeze after the DOUGH cycle or after shaping (before final rise). Defrost in the fridge overnight.
- Baked bread: Double-wrap and freeze up to one month. Reheat gently.
- Stand Mixer: Mix until moistened, then knead with a dough hook (speed 2–3) until smooth and elastic (5–10 minutes). Let rise, deflate, and shape as directed.
- By Hand: Mix to a shaggy dough, knead on a floured surface until smooth and elastic (10–20 minutes). Let rise, deflate, and shape as directed.
Equipment
Nutrition
All images and text ©️ Paula Rhodes for Salad in a Jar.com
FAQ
Yes! Freeze up to 3 months or refrigerate for up to 3 weeks.
It’s possible, but expect a thicker crust and less oven spring.
Dense bread usually means the dough was too dry or didn’t rise long enough. During kneading, the dough should stick briefly to the sides of the pan, then pull away cleanly. Adjust flour or liquid 1 tablespoon at a time as needed.
No. Sweetened condensed milk contains sugar and less water, which affects both flavor and texture. Use the recipe as written for best results.
Final Thoughts
This loaf is a good example of why I like using the bread machine for mixing and kneading but finishing the bread in the oven. You get the convenience of the machine and the texture of a traditional sandwich loaf—something that’s hard to match with a machine-baked loaf alone.
— Paula, Home Economist
Homemade Food Worth Sharing
Need help troubleshooting?
Email me: Paula at saladinajar.com — photos help!
Looking for More Tips and Recipes for Your Bread Machine?
- 6 Bread Machine Secrets You Need To Know
- Cracked Wheat Berry Bread: Making Forbidden White Bread Healthier
- My Favorite Dinner Rolls–Updated with the Tangzong Method
- How To Make Buttery Brioche with a Bread Machine
- What Does a Bread Machine Do and Why You Might Need One
This recipe is slightly adapted from The Bread Machine Magic Book of Helpful Hints by Linda Rehberg & Lois Conway.

I love this recipe! It is so easy and delicious. I made a loaf for my neighbors and their 6 year old son told his mom it was the “best and sweetest bread ever and you need to have her make this for us all the time!” Can’t get better recommendations than that! Thanks a bunch for sharing all these wonderful recipes with us!
Hi Christine,
That is a wonderful recommendation. Thank you for taking the time to share.
Paula
I am from Singapore and am so grateful for your recipe which I baked in the bread machine using 14g butter & 5g yeast as I wasn’t sure about the conversion . I had to add additional 22g flour as possibly the flour I used was different. Thank you for sharing so generously as it helps me in my strained circumstances enjoy delicious bread. Thank you so much.
Hi Sally,
The main goal is to create bread you enjoy and if you want to, share with others. I’m glad you were able to do that. You are right that it could have been the flour. That’s when it’s good to be flexible and keep practicing. I’m just an email away if you ever have a question.
I have a 12.4×4.7 inch Pullman pan and a 13×5 inch Pullman pan. I generally use your recipies in my bosch mixer and rise in an incubator. My family absolutely adores your honey wheat bread and eats 2-3 loaves a week, and there are only 3 of us. Which size would you reccomend using and would you reccomend doubling the recipie or just 1.5 times. Thank you so much for the amazing recipies!
Hi Sarah
I’m so glad your family enjoys the honey wheat bread—thank you for sharing that!
For your pans:
The 13×5-inch Pullman pan is better for larger batches and will give you more room to rise.
The 12.4×4.7-inch pan works well for standard recipes but might feel tight with extra dough.
If you’re making two loaves, scaling the recipe by 1.5x should work well for both pans. Doubling might lead to overflows or require extra adjustments. For the best results, aim for the dough to rise to just below the pan’s top edge before baking.
One rule of thumb I always share when choosing a pan: after shaping your dough, if it fills more than half the pan when first placed in it, it’s best to go up to the next size.
Thanks again for your kind words!
Really like this recipe – it has never failed me yet! Such a soft and easy to slice loaf which is great for sandwiches and toast.
I have also made it entirely in my Panasonic SD-2500 on menu 2 with success when I don’t have much time. (I live in England UK and really appreciate how your recipes do the conversions to metric for me.)
Hi Margaret,
I’m so glad this worked for baking in your bread machine. I don’t test my recipes for that method since I always bake in my conventional oven. But sometimes my readers ask so I can send them to your comment.
Have a great day.
This was the BEST!!!!! Thank you so much for the recipe. The bread stayed fresh for two days. Might have made three if we had not eat it all. lol Taste, texture, appearance where all amazing!!!!
Hi Vicki,
Glad you love this recipe. I couldn’t agree more.
My go to loaf bread recipe!! Makes great toast, sandwiches, and I use the end of the loaf for bread pudding! Great recipe, Paula!!
Hi Gwynette,
Thanks so much for your kind comment. I’m with you on this recipe.
Absolutely perfect sandwich bread! Thank you, Paula!
Hi Ellen,
Thank you for leaving a comment and a 5-star review. I’m glad your bread turned out perfect. Can’t wait to hear about future successes.
Am 100% believer in this site. Have learned so much, and, have never been disappointed. Don’t even think about baking in Bread Machine….but what a work horse in dough cycle. My question…just finished Condensed Recipe…turned out great but was so dense. Know I’ve done something wrong. I make bread all the time so not a newbee …. weigh all ingredients….did not over rise. Thanks for any help.
Hi Sandy,
I’m sorry your bread turned out dense. That is definitely not characteristic of this bread.
My first thought in the winter is the ambient temperature. Did the bread rise to double its original size during the DOUGH cycle? Did it rise to almost double in size before you baked it? Is your kitchen rather cool or, perhaps, drafty where the bread machine sits? If so, throw a quilt over it to keep things cozy for the dough. You may have to allow more time for the rise than usual in the winter.
More questions: Did you use active dry yeast instead of instant yeast? Did you happen to use evaporated milk instead of sweetened condensed milk? (I’m not saying you did, just thinking about all the possibilities) Did you check the dough as it kneaded to make sure the moisture level was correct? Even if you measure perfectly, you may need to make adjustments because of the humidity, the brand or type of flour you use, etc. If you aren’t sure what I’m talking about, you can read more about checking the dough here: A Surprising Secret for Making Better Bread with a Bread Machine.
Does any of this seem feasible? Please write back and let me know what you think. I want to help you be successful.
My first attempt at a bread recipe, accidentally forgot to add the paddle and had to shove my hand through all the ingredients to get it working. Miraculously this loaf turned out fantastic, and I’m already set on making it my go to sandwich bread. The ingredients total price is so much cheaper than store bought.
Hi Louisa,
At least you figured it out before you got too far into the process. Thank you for the 5-star rating!
There are so many ads on my screen I have trouble finding the recipes!
The recipes I have tried are excellent, thank you.
Regards,
Hi Helen,
I apologize for the ads; they enable me to share the results of my testing, research, and writing in the form of recipes at no charge to you. I love doing it, but it is a full-time job.
I’m so happy you have enjoyed the recipes. Thank you for your kind words.
p.s. You can skip many of the ads by using the “Jump to recipe” button at the top of the page.
Love it! While I have made the buttermilk variety, I find I never use up all the buttermilk and it goes to waste so I like this one because that does not happen. I have smaller meatloaf pans which are glass and have covers which are GREAT for proofing. I adjusted this recipe to accommodate two loaves. I use 1 cup of water, 10 Tablespoons of sweetened condensed milk and 2 teaspoons of instant yeast. I divided into two equal parts and put a bit of butter on the tops before proofing. Because they are smaller I bake at 350F for 25 minutes and tent with foil after 12 to 15 minutes. Comes out perfectly sized for sandwiches and is so soft and tasty! Making some today for my family and my neighbor’s birthday! Yummy! Thanks so much for sharing all these awesome recipes and tips! Loving my bread machines so much more now! (Yep, got an extra one on your recommendation and it is such a time saver!)
Hi Christine,
This is my favorite kind of email. Thanks so much for taking the time to share what you do to make this recipe more useful for your purposes. I love hearing how my readers share their bread. Your neighbor is blessed!!
p.s. Aren’t you amazed at how often two machines come in handy?
OMG Paula! This is the sandwich bread recipe I’ve been looking for! Turned out FABULOUS and was so easy to make! Thank you for all your wonderful recipes, I’ve made a ton all ready, haha!
Hi Patty,
Thank you for writing. Sounds like you enjoy this bread as much as my family does. I hope you enjoy it for years to come.
Thank you so much for another delicious recipe. This is my second time making this bread. It is a sweet, soft yet hardy bread for sandwiches. The only issue I had was the top browning really fast, as you mentioned could be an issue. I had to cover with foil after 20 minutes to protect it, but I will move that to 15 minutes because it did get a little browner than I like. I have two machines and made two batches: one I made into a loaf of bread and the other I made into 8 hamburger sized buns. I baked the hamburger buns for 20 minutes without covering with foil. Came out perfectly.
Hi Christine,
Ohhhh, I have never tried this recipe for hamburger buns. GREAT IDEA! I’m going to try it myself the next time I need some buns. Thanks for sharing.
Paula,I just made this bread and it’s come out amazing! This is the first bread I’ve made from your site, and your recipe is awesome! I had been making my breads with your advice to bake them in the oven, but using the recipes in the owners manual for my machine. Every loaf turned out dense, no matter what I did. I never saw the bubbles in the dough, and the loaves rose but not that much.
The loaf came out exactly as you said it would! It’s cooling now, and I can’t wait to taste it!!
Hi Rachel,
I hope your loaf is as tasty as it looks. Baking in your oven is a game-changer, isn’t it? Welcome to the club!
I love this recipe! I am lactose intolerant and unable to find condensed milk lactose free. I did get my hands on some lactose free evaporated milk to substitute it. Then I added 2 Tbs of granulated sugar to make up for the sweetness of the condensed milk. It was perfect and now I get request from my family to make it all the time. Thank you!!
Hi Tamara,
I’m so glad you found a way to modify this recipe so you can enjoy it. Even better, since you wrote about it here, it may help someone else in the future. Thank you so much!!
This is fabulous, we ate the loaf within three days. Definitely a keeper!
Thanks for writing, Mandy! Glad you loved it. Great to hear from you.
Hi Paula,
Just pulled this gorgeous loaf out of the oven! Of course, it’s still cooling on the counter. I have to say that I’ve never had so many air bubbles in a dough before. I thought I kneaded it like you said to do but there was still some smaller bubbles. Hope it’s okay. I’ll slice it thick because I intend to use it for my husband’s French toast in the mornings but, hey, if that doesn’t work…I like PB&J!
Thanks again for such wonderful recipes and instructions! You Rock!! Happy New Year!
@Cherie,
Hi Paula,
I’m editing…The bread is positively Wonderful! I really Love it! What air bubbles?
High Five, Girl!
Ok… I make this bread at least twice a week. My husband and I LOVE It! We don’t even buy store bought bread now. I slice it with an electric knife and place in freezer bags. We take out the slices as needed. This recipe is awesome! Thank you so much for sharing.
Mollie,
I’m so glad you liked this recipe. I couldn’t agree more. Thanks for taking the time to write.
I’m just now baking my third loaf of this winner! I think I posted before but I have since graduated to shower caps, oh what a crazy great idea, so excellent for “bread” I also love that you give the measurements since I have also graduated to my scale.
Thank you for some great bread & tips!!
Appreciate your feedback, Teresa. Thank you. I couldn’t agree more about the shower caps. So much better than a tea towel.
Such a great recipe. I’m making a second loaf two days in a row. My husband and grands requested I make it forever!!!! Thank you so much for the detailed instructions and tricks for correcting human error! You are the best!!!!
This bread is fantastic! And your explanations are wonderful! I get consistent, delicious results! Thank you for sharing your expertise with us!
*just made the pretzel rolls… Oh my! Sooo good!
Thank you, Kelly. Love hearing this.
Thanks for Sharing, I’m going to try this recipe today. Can I double the recipe? Or do I have to make them one at a time?
I don’t normally recommend doubling recipes in a bread machine because it can be hard on the machine. If you hear the machine straining, or getting hot, I would stop it immediately. Sometimes I make one batch and pull out the dough as soon I hear the kneading end. (usually after 30 minutes) Put that dough in a different bowl to rise. Start the second batch immediately resetting to the DOUGH cycle again. This time, I leave that dough in the machine to rise. Usually, by the time the first dough has doubled in size and I shape it, the second batch is ready to be shaped. Hope this helps.
Melted or softened butter?
Hi Sarah,
I modified the recipe to say “room temperature.” The general rule for most bread recipes is that all ingredients should be room temperature. That means the butter will be softened. Thanks for writing so I could make that correction.
Has anyone made this in a Pullman loaf pan? Mine is 13×4 I’m trying it today hopefully it works!
I made this bread for my family two evenings ago. I had to make another loaf today. It’s that good. My husband devoured it! He calls it my “wonder bread” for obvious reasons. Thank you for your delicious recipes!
I used the tangz Hong method with this bread; it couldn’t have been more perfect. Thanks for this recipe!
Ooooo–why didn’t I think of that? I love the Tangzhong method and use it in several of my recipes but haven’t tried it with this one. I’m so glad you wrote to tell me.
Funny you should post this today as I have Sweet Milk Bread dough rising in both of my bread machines. Going to share with visiting out of town friends later today. We love the texture of the bread.
I was raised on Wonder bread, too. Monday was wash day at our Louisiana home when I was a child and Mother would put on a pot of Lima or great northern beans early in the morning. Lunch was the bean soup with a fresh slice of Wonder bread torn in small pieces and soaking up the bean soup. I still do that on the days I cook beans and the Sweet Milk bread works great in the soup!
Thanks for another great recipe, Paula!
That is an interesting way to eat beans. I will try it the next time I make this bread. My mom used to serve baked potatoes with a pot of beans. I never thought anything of it until I left home. Thanks for taking the time to write, Gwynette.
Can I substitute the sweet condensed milk with something else? Like vanilla almond milk?
Hi Anita,
One reason this bread is so, so good is because of the fat and sugar. I have never tried it with vanilla almond milk so I can’t say for sure what will happen. You would definitely need to add some fat to get the same great crust, taste, and texture.
I don’t know if this will help. But here is a recipe one of my readers devised when they couldn’t find sweetened condensed milk. It might be a starting place for you.
2 tbsp Water
1 1/4 Cup Milk (I use whole, haven’t tried it with skim.)
2 tbsp and 2tsp sugar
1 tsp salt
1 1/2 tbsp butter (the extra butter adds some of the missing flavor from the condensed milk)
3+ cups flour
2 tsp yeast
@Paula,
Thanks! I will try this today.
Thx Paula. I am trying this tomorrow. Then I need a good cinnamon bread recipe. Got one to share?
Hey Cathy,
I don’t have a cinnamon bread recipe bread on the website, but I do have one. I’ll send it to you by email later today (if I don’t forget).
@Paula, I would love a copy of that recipe, if you have a moment. 🙂 Thank you!
Has anyone used gluten-free flour with this recipe? I’m looking for a good recipe to use all the time.
Hi Freddy,
I have not tried gluten-free flour with this recipe. But in addition to the special flour, you would need to add something like xanthum gum to hold it all together. Let me know if you try it.
I tried this bread machine bread and it is awesome!!! I never make any other white bread in my bread machine now. I like it best because the yeast goes in last so no worries about killing the yeast in the water. So glad I joined this group. Just this one recipe makes it all worth belonging.
Fantastic, Dianne!! Glad you love it. Appreciate you taking the time to leave a comment.
Tried this for the first time today…I am no newbie to bread making… my family gets a fresh homemade loaf weekly. While this was baking, I’ll have to say it has been a while since my kids and hubby commented on the aroma from the bread and wondered loudly why it was taking soooo looongggg in the oven. Let me just say, between the 4 of us, the bread was gone b/4 it even cooled down. I never leave reviews but I just had to sing this bread’s glory…. from the roof top.
I usually make a roux (1/2 cup h2o and 3 tablespoon flour from the recipe) to give my bread a softer texture. Besides that, I followed this recipe to a T. Thank you for sharing. Now back to working on a second loaf, hopefully that’ll last the entire week 🙂
Hi Paula,
Can I add the TangZhong method here? Similar to your soft roll recipe, I’ll mix 3tbsp bread flour with half the water here?
Thank you!
Wei
I would think that would work great. You should be able to reduce the flour some but would have to experiment to know how much.
I made the Sweet Milk-Soft white bread. My husband hasn’t liked any loaf I have made before this one. After I gave him a slice of this one he said that it was so bad that I should not subject the rest of the family to it. He would make the ultimate sacrifice and finish the loaf by himself. Then he asked when I would make another one. I guess I made a good loaf.
How generous of him to help out the rest of the family. Glad he liked it!
I am wondering about high altitude adjustment, do you have any recommendations for this? I am at just a little over 7000ft in New Mexico and I have used your recipe while I was in Las Vegas, NM , and I would love to try it here. Also may I get the honey wheat recipe? Thank you so much.
D
Hi Lorie,
I have never cooked in a high altitude. But here is an excellent article from King Arthur that might help. Here is the Honey Wheat Bread. Hope it works for you.
Can this not be made in the machine if hand formed and put back in the breadmachine for final rise and bake?
Hi Donna,
I’m not 100% sure I understand what you are asking. Are you saying you want to mix and knead it by hand but use the bread machine to bake it?
No, I mean to let the machine mix, knead, and di the first rise, take it out to roll out then form into a loaf. Put it back in the breadmachine pan for final rise and then bake in the machine.
Donna, I’ve heard of people doing this. You would have to catch it at just the right time in the cycle. Of course you will still have a hole in the bottom of your loaf due to the post, just not as big. I’m not sure I see any advantage to doing this but it should work if you want to try it.
Because of this recipe I now make a loaf of bread every weekend. With the weather now cold, almost all of the meals we are making are best accompanied by a toasted piece of bread with some butter. Not to mention: sandwiches taste amazing again! PB&J Sandwiches taste like a childhood memory. I can’t say enough good things about this recipe. I’m so glad I found this site. Such great recipes – check out the pizza dough recipe, too! It is also our go-to now for homemade pizza night (which we do whenever family comes to visit – which is pretty often).
Thanks so much, Jenni. This is a great time of the year to enjoy homemade bread.
Okay, his recipe is so easy and oh so close to a commercial loaf. It’s great, but I am wondering if you’ve every tried it with 1/2-2/3 cups whole wheat flour along with some vital wheat gluten? I love my Zojirushi CEC20, but hate the crust. Your comments gave me the resolve to bake my bread in the oven. Fantastic result and not that much extra work. I have all of Donna German’s Bread Machine cookbooks (ca 1990’s) and am going to start working with those instead of surfing. ☺
Hi Lois,
I am working on a Honey Whole Wheat Loaf right now that should fill the bill for you. It doesn’t even need vital wheat gluten. I have several of Donna German’s cookbooks myself. In fact, the poppy seed rolls recipe on this blog is adapted from one of her books.
Look forward to trying the Honey Whole Wheat loaf. I grind my own wheat and just ordered a fresh batch of Tupelo honey. Tried the Sweet-Milk recipe using half whole wheat flour and half bread flour and am pleased with the result but it doesn’t make a hearty loaf. The dough is really lively. It rises very fast (we’re having a heat wave in Panhandle, FL) and bakes in 30 min. (per thermometer. It’s a whole new world of possibilities for me since I gave up baking in the breadmaker.
Hi Lois, Did you get my email? I sent you the recipe for the Honey Whole Wheat loaf. I have never ground my own flour but sister does. She is very enthusiastic about it.
I thought I had answered you, but I don’t see my response. I have not received an email from you with the recipe.
Hi Lois, I just posted it. Check it out here.
With 1/2 cup of Sweetened Condensed Milk, is this bread very sweet? I don’t really like my bread sweet for sandwiches and such.
Yes, Donna. This bread is definitely on the sweet bread. You might prefer my Buttermilk Bread or Basic White Bread for sandwiches.
Wow! This turned out so good every single time. It is such a low effort recipe I couldn’t believe how fantastic the result was. We honestly have only bought one loaf of bread since I found this recipe a couple months ago.
Love hearing this, Brandy.
Awesome making my 3rd loaf for the weekend. I did need to cover it because of browning but the texture/crumb factor was great.
Thanks for coming back to say so, Donna. Glad you like it. Definitely my favorite white bread-loaf recipe.
BEST. BREAD. EVER. Enough said. Thanks so much
Thanks for the confirmation, Alisin. (I like the way your first name is spelled.)